


6.20 Initial set up procedures
Once your display has been installed and commissioned,
Raymarine recommends that you perform an initial set up
procedure.
Startup wizard
1
2
4
3
5
D
12568-1
When you power-up the display for the first time or after a
system reset a Startup Wizard is displayed. The wizard guides
you through the following initial settings:
1.
Language selection
2.
Vessel type selection
3.
Configure units
4.
Boat details (number of engines and total fuel capacity.)
5.
Finish
Note:
These settings can also be set at any time using the
menus accessible from
Homescreen > Customize
.
Additional settings
In addition to the settings covered by the Wizard, it is also
recommended that the following initial set up tasks are
completed:
• Set your date and time preferences.
• Adjust the display brightness (and set up a shared brightness
scheme if appropriate).
• Designate the data master.
• Select the GPS data source.
• Familiarize yourself with the Simulator Mode.
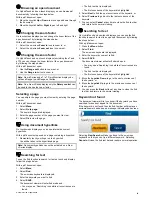
Setting time and date preferences
With the homescreen displayed:
1. Select
Customize
.
2. Select
Time and Date Set-up
.
3. Use the
Date Format
,
Time Format
, and
Local Time: UTC
menu items to set your time and date preferences.
Adjusting the display brightness — New
a Series and New e Series
1. Press the
POWER
button once.
The Shortcuts menu is displayed.
2. Adjust the brightness to the required level using the
on-screen brightness slider bar control, or
3. Touch the Sun icon to increase the brightness level or the
Moon icon to decrease the brightness level.
Note:
The brightness level can also be increased by pressing
the
Power
button multiple times.
Adjusting the display brightness
1. Press the
POWER
button once.
The Shortcuts menu is displayed.
2. Adjust the brightness to the required level using the
Rotary
control
.
Note:
The brightness level can also be increased by pressing
the
Power
button multiple times.
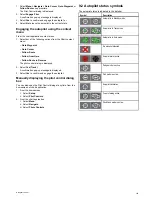
Touchscreen alignment
If the touchscreen is misaligned to your touch, you can realign it
to improve the accuracy.
Realignment involves a simple exercise to align an on-screen
object with your touch. For best results, perform this exercise
when your vessel is anchored or moored.
Note:
This only applies to touchscreen multifunction displays.
Aligning the touchscreen
With the homescreen displayed:
1. Select
Set-up
.
2. Select
Maintenance
.
3. Select
Touchscreen Alignment
.
4. Place your finger over the on-screen object momentarily,
then remove it.
5. Repeat the action a further 3 times.
6. If the operation was successful, an “Alignment Completed”
message is displayed.
7. Select
Exit
to return to the Maintenance menu.
8. If the operation was unsuccessful at any point during the
alignment exercise, an “Incorrect touch detected" message is
displayed, the alignment exercise is repeated.
9. After 2 failed alignment exercises you may be asked to
perform a precision alignment exercise.
Getting started
89
Summary of Contents for a67
Page 2: ......
Page 4: ......
Page 8: ...8 New a Series New c Series New e Series...
Page 12: ...12 New a Series New c Series New e Series...
Page 20: ...20 New a Series New c Series New e Series...
Page 36: ...36 New a Series New c Series New e Series...
Page 70: ...70 New a Series New c Series New e Series...
Page 100: ...100 New a Series New c Series New e Series...
Page 110: ...110 New a Series New c Series New e Series...
Page 116: ...116 New a Series New c Series New e Series...
Page 158: ...158 New a Series New c Series New e Series...
Page 182: ...182 New a Series New c Series New e Series...
Page 204: ...204 New a Series New c Series New e Series...
Page 214: ...214 New a Series New c Series New e Series...
Page 236: ...236 New a Series New c Series New e Series...
Page 240: ...240 New a Series New c Series New e Series...
Page 260: ...260 New a Series New c Series New e Series...
Page 290: ...290 New a Series New c Series New e Series...
Page 306: ...306 New a Series New c Series New e Series...
Page 314: ...314 New a Series New c Series New e Series...
Page 329: ......
Page 330: ...www raymarine com...