


17.5 Fishfinder introduction
Warning: Sonar operation
• NEVER operate the sonar with the vessel out of
the water.
• NEVER touch the transducer face when the
sonar is powered on.
• SWITCH OFF the sonar if divers are likely to be
within 7.6 m (25 ft) of the transducer.
Fishfinder overview
The fishfinder application provides a detailed view of the fish and
seabed under your vessel, enabling you to accurately distinguish
between different sizes of fish, bottom structure, and underwater
obstacles. The standard fishfinder image is a historical, scrolling
bottom graph with range and sonar frequency automatically
selected by the system.
The various functions and features of the fishfinder application
include:
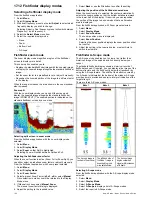
• Preset modes for easy optimal operation.
• Display modes (Zoom, A-Scope or Bottom Lock).
• Adjustable range and zoom.
• Finding bottom feeding fish with the
bottom lock
display
mode.
• Clutter and gain options to simplify the image.
• Pausing and adjusting the speed of the scrolling image.
• Using waypoints to mark a position.
• Determining depths and distances of targets.
• Fishfinder alarms (fish, depth or water temperature).
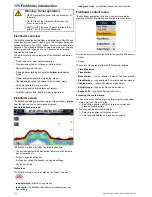
Fishfinder screen
The fishfinder displays a scrolling image of the seabed, updating
from the right as your vessel makes progress.
Example fishfinder screen
The fishfinder window includes the following aspects:
• The bottom together with any bottom structure such as reefs
and shipwrecks etc.
• Target images indicating fish.
• A status bar noting the frequency and gain settings.
• The bottom depth.
Status icon
The fishfinder status icon is located on the Status icon bar:
•
Icon animated
- fishfinder is operating.
•
Icon static
- the fishfinder transducer is connected but not
transmitting.
•
Icon greyed-out
- no fishfinder transducer is connected.
Fishfinder context menu
The fishfinder application includes a context menu which
provides fishfinder information and shortcuts to menu items.
The context menu provides the data for the position of the cursor:
• Depth
• Range
The context menu also provide the following menu items:
•
Place Waypoint
•
Place Marker
•
Move Marker
— (only available if a marker has been placed.)
•
Erase Marker
— (only available if a marker has been placed.)
•
Display mode
— (opens the display mode menu.)
•
Adjust Range
— (opens the Range mode menu.)
•
Range shift
— (opens the Range shift menu.)
Accessing the context menu
You can access the context menu by following the steps below.
1. New e Series or New c Series:
i.
Selecting a location, object or target on-screen and
pressing the
Ok
button.
2. Touchscreen multifunction displays:
i.
Selecting an object or target on-screen.
ii. Selecting and holding on a location on-screen.
186
New a Series / New c Series / New e Series
Summary of Contents for a67
Page 2: ......
Page 4: ......
Page 8: ...8 New a Series New c Series New e Series...
Page 12: ...12 New a Series New c Series New e Series...
Page 20: ...20 New a Series New c Series New e Series...
Page 36: ...36 New a Series New c Series New e Series...
Page 70: ...70 New a Series New c Series New e Series...
Page 100: ...100 New a Series New c Series New e Series...
Page 110: ...110 New a Series New c Series New e Series...
Page 116: ...116 New a Series New c Series New e Series...
Page 158: ...158 New a Series New c Series New e Series...
Page 182: ...182 New a Series New c Series New e Series...
Page 204: ...204 New a Series New c Series New e Series...
Page 214: ...214 New a Series New c Series New e Series...
Page 236: ...236 New a Series New c Series New e Series...
Page 240: ...240 New a Series New c Series New e Series...
Page 260: ...260 New a Series New c Series New e Series...
Page 290: ...290 New a Series New c Series New e Series...
Page 306: ...306 New a Series New c Series New e Series...
Page 314: ...314 New a Series New c Series New e Series...
Page 329: ......
Page 330: ...www raymarine com...