


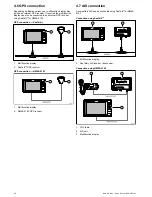


4.16 Media player connection
You can use your multifunction display to wirelessly control a
Bluetooth-compatible media player (such as a smartphone).
The media player must be compatible with the Bluetooth AVRCP
protocol (version 2.1 or higher).
D12164-2
1
3
2
1.
Multifunction display.
2.
Bluetooth connection.
3.
Bluetooth-compatible media player.
To use this feature you must first:
• Enable Bluetooth in the System Settings on the multifunction
display.
• Enable Bluetooth on the media player device.
• Pair the media player device with the multifunction display.
• Enable Audio Control in the System Settings on the
multifunction display.
• Connect an RCU-3 remote and assign the shortcut key to
Start/Stop audio playback (Only required on a New c Series
display).
Note:
If your media player does not include built-in speakers
it may be necessary to connect the media player's audio
output to an external audio system or a pair of headphones.
For more information refer to the instructions that accompany
the media player device.
Enabling Bluetooth
With the homescreen displayed:
1. Select
Set-up
.
2. Select
System Settings
.
3. Select
Wireless Connections
.
4. Select
Bluetooth > On
.
Pairing a Bluetooth media player
With the homescreen displayed and Bluetooth turned on:
1. Select
Set-up
.
2. Select
System Settings
.
3. Select
Wireless Connections
.
4. Select
New Bluetooth Connection
.
A message is displayed prompting you to put your media
player device into discovery mode.
5. Ensure Bluetooth is enabled on your external media player
device and ensure it is ready to be paired. For more
information, consult the instructions that accompany the
device.
6. On the multifunction display, select
OK
in the message
dialog.
The multifunction display will search for active Bluetooth
devices.
7. Select
Stop Discovery
when your device appears in the list.
8. Select the media player device in the list.
A pairing request message is displayed on the external
media device.
9. On the external media device, select Pair (or equivalent) to
accept the pairing request message.
The multifunction display shows a message asking you to
confirm the Pairing code.
10. If the pairing code displayed on the multifunction display
matches the code displayed on the external media device,
select
Ok
on the multifunction display. If the code does NOT
match, repeat steps 4 to 8.
11. If the pairing was successful the multifunction display will
confirm the pairing.
The external media device is now paired with the
multifunction display.
Enabling audio control
With the homescreen displayed:
1. Select
Set-up
.
2. Select
System Settings
.
3. Select
Wireless Connections
.
4. Select
Connection Manager
.
5. Select the media player device in the list.
6. Select
Audio Control > On
.
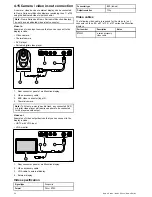
Media player controls
Touchscreen multifunction displays enable you to use the
on-screen media player controls to control the audio playing
on your external media player.
D12293-1
1
3
2
4
5
1.
Touch this icon to display the audio controls.
2.
Previous track.
3.
Play track.
4.
Pause track.
5.
Next track.
Selecting
Back
will hide the audio controls.
Media player controls using a remote
control
You can control audio wirelessly using a Raymarine RCU-3
remote control unit.
The Shortcut key on the RCU-3 must be set to Start/Stop audio
playback, refer to the
Using a Remote control
section for further
details.
1.
Press
UP
arrow for next track.
2.
Press
DOWN
arrow for previous track.
3.
Press
SHORTCUT
button to play/pause audio.
Note:
On New c Series multifunction displays, whilst the
audio controls appear on the screen you cannot interact with
them. To control audio you must use a connected RCU-3.
Unpairing a Bluetooth device
If you are experiencing problems when attempting to use
a Bluetooth device with the multifunction display it may be
necessary to unpair the device (and any other paired Bluetooth
devices) and then retry the pairing procedure.
With the homescreen displayed:
Cables and connections
57
Summary of Contents for a67
Page 2: ......
Page 4: ......
Page 8: ...8 New a Series New c Series New e Series...
Page 12: ...12 New a Series New c Series New e Series...
Page 20: ...20 New a Series New c Series New e Series...
Page 36: ...36 New a Series New c Series New e Series...
Page 70: ...70 New a Series New c Series New e Series...
Page 100: ...100 New a Series New c Series New e Series...
Page 110: ...110 New a Series New c Series New e Series...
Page 116: ...116 New a Series New c Series New e Series...
Page 158: ...158 New a Series New c Series New e Series...
Page 182: ...182 New a Series New c Series New e Series...
Page 204: ...204 New a Series New c Series New e Series...
Page 214: ...214 New a Series New c Series New e Series...
Page 236: ...236 New a Series New c Series New e Series...
Page 240: ...240 New a Series New c Series New e Series...
Page 260: ...260 New a Series New c Series New e Series...
Page 290: ...290 New a Series New c Series New e Series...
Page 306: ...306 New a Series New c Series New e Series...
Page 314: ...314 New a Series New c Series New e Series...
Page 329: ......
Page 330: ...www raymarine com...