10
1001108-01-F
These settings give you the optimum signal to noise performance and get the most from your QSC loudspeakers or amplifier. The mixer’s output
meters will reflect when you’re “running out of speaker”. Note that you will see the “Limit” light on your speakers illuminate as the mixer drives
them harder during louder portions. This is normal and is just the speaker’s internal DSP doing its job.
Select a QSC Loudspeaker Preset
The GXD amplifier and K.2 Series loudspeakers both have presets for various applications. The TouchMix mixers have the same presets . Make sure
you use only one or the other. Do not use the TouchMix presets if you have presets set up in the GXD or the K.2 loudspeakers, and vice versa.
E-Series
– QSC's GXD series amplifiers include voices for QSC E-Series loudspeakers. If you are using any other amplifier, E-Series voices may be
applied by the TouchMix. Be certain that any equalization in the amplifiers you are using is bypassed or set to flat.
K.2 Series
– The K.2 presets may also be recalled from the channel Preset screen. These settings are identical to those available from the Gain
and Preset Pop-up. These are identical to the factory presets in the K.2 loudspeakers. Simply set your K.2 speakers to the factory default setting
and leave it there. The mixer will now supply the preset.
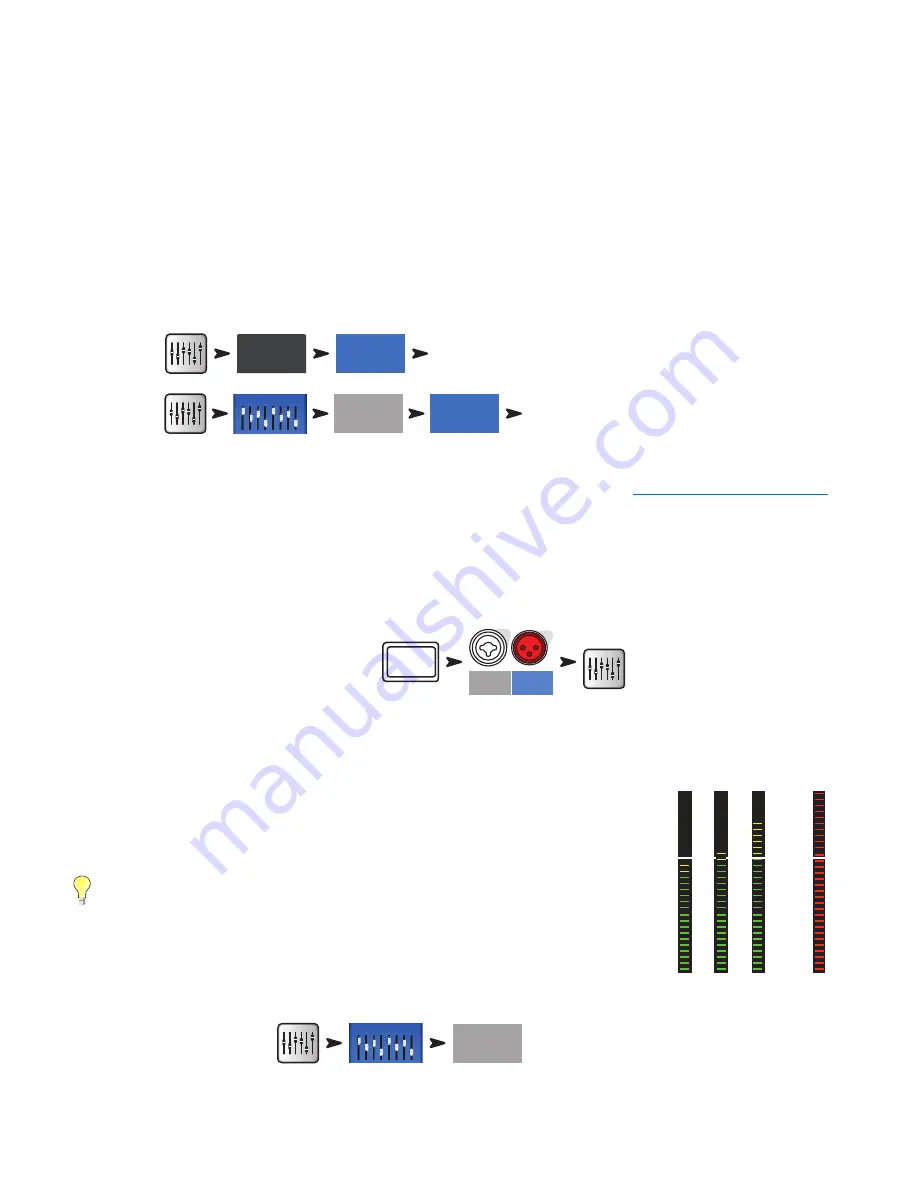
To recall a Loudspeaker Preset:
For Main L/R:
Main
Presets
Select Series > Select Model > Select Preset > Recall.
For Aux outputs:
Aux Masters
Aux 1
Presets
Select Series > Select Model > Select Preset > Recall.
QSC GXD Amplifier Settings
If you are using a QSC GXD amplifier, you can optimize the gain and sensitivity for use with your TouchMix.
See "GXD Amp Settings" on page 59
Phantom Power (+48V)
Most condenser microphones and some direct boxes require phantom power from the mixer. On TouchMix mixers, phantom power may be turned
on or off on a per channel basis. Make sure that phantom power is on for those channels that need it and off for those that don’t. It's a good
practice to keep Phantom Power turned off when making connections in order to avoid the inevitible loud pops that will occur.
To Enable or Disable Phantom Power (+48V):
Mic
48V
21
20
+48 V
In 21
In 20
To Exit
Phantom power is also accessible from the channel Setup screens.
Work on Your Inputs
Ask the performers in turn to do what they do to make their audio contribution to the performance. Without
un-muting their channels, bring the channel’s input gain Trim up while watching the channel meter on the
Home screen. What you are looking for is a meter that is bouncing around the 0 mark when the performer is
producing a normal output level.
TIP:
During sound check performers will usually not play as loudly as they do in an actual
performance so keep this in mind and allow a little extra headroom.
With the performer performing, un-mute the channel and bring the fader up until the desired performance level
is reached.
If you are using one of the internal channel presets, this channel should already be sounding good. If it’s not
what you’re looking for, try some of the other preset choices. For most instruments and musical styles, there will
be a preset that works well. If not, you'll need to dive into the channel and dial it in manually.
To Adjust Channel Parameters:
Inputs 1-8
In 1
At the top of the screen, select the tab for the channel processing element you want to work on.
0
0
0
0
Acceptable
Not
Acceptable


