background image


QIAcube Connect MDx User Manual   12/2020 

20 

2.11


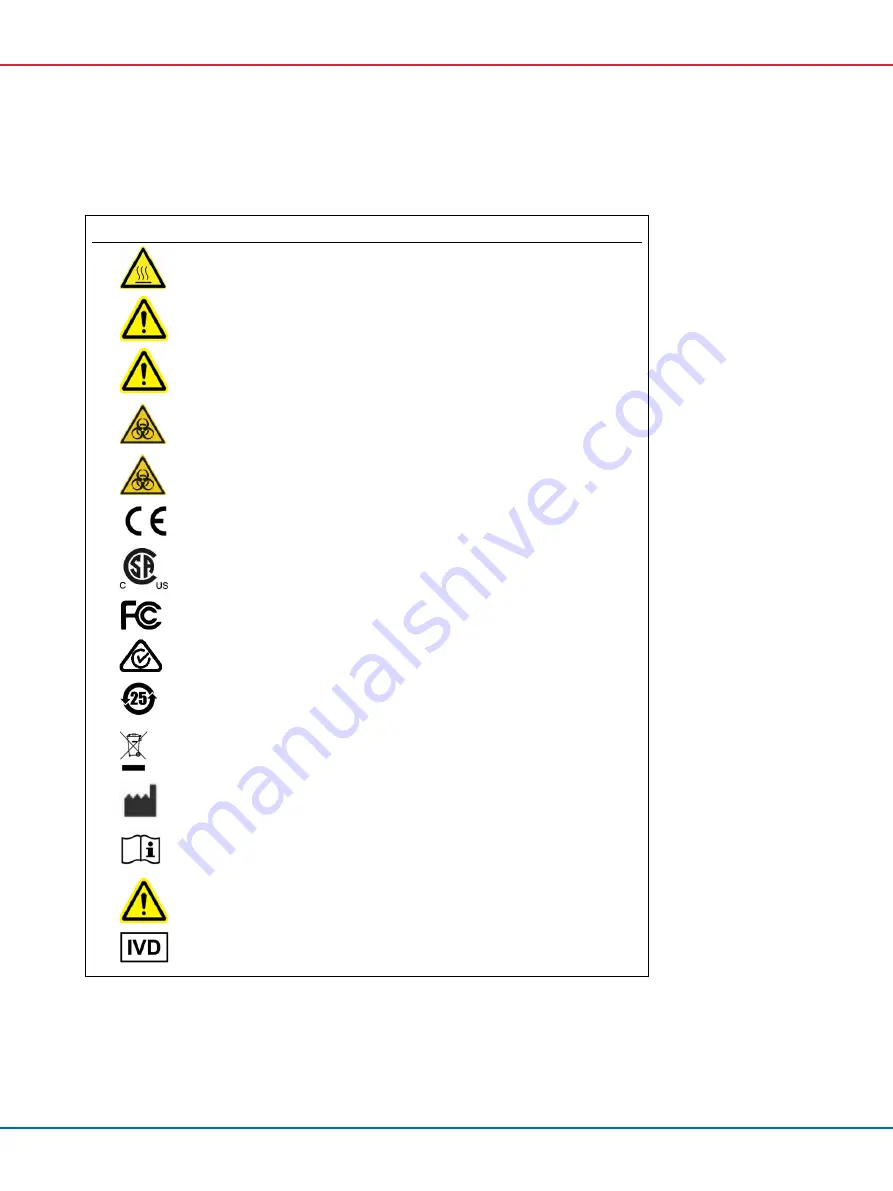
Symbols on the QIAcube Connect MDx 

  Symbol 

Location 

Description 


Next to the Shaker 

Heat hazard – the temperature of the shaker can 

reach up to 70ºC (158ºF). 


Near the centrifuge; near the robotic arm  Mechanical hazard — avoid contact with 

moving parts. 


On the instrument, near bottle rack 

Fire hazard – usage of ethanol in bottle rack. 


In front of worktable 

Biological hazard – some samples used with this 
instrument may contain infectious agents and 

must be handled with gloves. 


Inside the waste drawer 

Biohazard — the waste drawer may be 
contaminated with biohazardous material and 

must be handled with gloves. 


Type plate on the back of the instrument 

CE mark for European Conformity 


Type plate at the back of the instrument 

CSA listing mark for Canada and the USA 


Type plate on the back of the instrument 

FCC mark of the United States Federal 

Communications Commission 


Type plate on the back of the instrument 

RCM mark for Australia and New Zealand  


Type plate on the back of the instrument 

RoHS mark for China (the restriction of the use of 
certain hazardous substances in electrical and 

electronic equipment) 


Type plate on the back of the instrument 

Waste Electrical and Electronic Equipment 

(WEEE) mark for Europe 


Type plate on the back of the instrument 

Legal manufacturer 


At the back of the instrument 

Consult instructions for use 


Type plate at the back of the instrument 

See warnings and precautions 


Type plate at the back of the instrument 

In vitro diagnostic medical device 


Summary of Contents for QIAcube Connect MDx

Page 1: ...Sample to Insight__ December 2020 QIAcube Connect MDx User Manual The QIAcube Connect MDx is intended for in vitro diagnostic use 9003070 QIAGEN GmbH QIAGEN Strasse 1 D 40724 Hilden R1 1121932...

Page 2: ...ical safety 11 2 3 Environment 12 2 4 Biological safety 13 2 5 Chemicals 14 2 6 Waste disposal 15 2 7 Mechanical hazards 15 2 7 1 Centrifuge 16 2 8 Heat hazard 17 2 9 Maintenance safety 17 2 10 Radiat...

Page 3: ...igurations 46 4 4 2 Settings configuration 48 4 4 3 Network configuration 49 4 5 Packaging and transporting of the QIAcube Connect MDx 53 5 Operating Procedures 55 5 1 QIAcube Connect MDx software 58...

Page 4: ...ating a user 104 5 13 4 Changing password 105 6 Cleaning and Maintenance 107 6 1 Cleaning agents 108 6 2 Disinfection 108 6 3 Regular maintenance 111 6 4 Daily maintenance 111 6 5 Monthly maintenance...

Page 5: ...8 Glossary 140 9 Appendix A Technical data 142 9 1 Operating conditions 142 9 2 Transport conditions 142 9 3 Storage conditions 142 9 4 Mechanical data and hardware features 143 9 5 Declaration of Con...

Page 6: ...Cleaning and Maintenance 7 Troubleshooting 8 Glossary 9 Appendix A Technical data 10 Appendix B QIAcube Connect MDx Accessories 11 Version history 1 1 1 Technical assistance At QIAGEN we pride ourselv...

Page 7: ...eic acids in molecular diagnostic and or molecular biology applications The system is intended for use by professional users such as technicians and physicians trained in molecular biological techniqu...

Page 8: ...MDx User Manual 12 2020 8 1 4 Glossary For a glossary of terms used in this User Manual refer to Section 8 1 5 Accessories For information about QIAcube Connect MDx accessories refer to Appendix B of...

Page 9: ...situations that could result in personal injury to you or other persons Details about these circumstances are given in a box like this one CAUTION The term CAUTION is used to inform you about situatio...

Page 10: ...ific consumables with the QIAcube Connect MDx Damage caused by use of other types of spin columns or chemistries will void your warranty WARNING Risk of personal injury and material damage W4 Do not u...

Page 11: ...us material is spilled on or inside the QIAcube Connect MDx the user is responsible for carrying out appropriate decontamination Note Do not place items on top of the QIAcube Connect MDx hoods CAUTION...

Page 12: ...power outlet that has a protective conductor earth ground Do not adjust or replace internal parts of the instrument Do not operate the instrument with any covers or parts removed If liquid has spille...

Page 13: ...ect sunlight 2 4 Biological safety Specimens and reagents containing materials from humans should be treated as potentially infectious Use safe laboratory procedures as outlined in publications such a...

Page 14: ...zardous after completion of the protocol run Always wear safety glasses gloves and a lab coat The responsible body e g laboratory manager must take the necessary precautions to ensure that the surroun...

Page 15: ...agents W16 The waste may contain toxic material and must be disposed of properly Refer to your local safety regulations for proper disposal procedures 2 7 Mechanical hazards The hood of the QIAcube Co...

Page 16: ...ck is damaged Make sure that no loose material is inside the centrifuge during operation Make sure that the rotor is installed correctly and that all buckets are properly mounted regardless of the num...

Page 17: ...of overheating C9 To ensure proper ventilation maintain a minimum clearance of 10 cm at the sides and rear of the QIAcube Connect MDx Slits and openings that ensure the ventilation of the QIAcube Conn...

Page 18: ...rradiation hazard W26 A mechanical lock ensures that the hood must be closed for operation of the UV LED If the hood sensor or lock is not functioning correctly contact QIAGEN Technical Services WARNI...

Page 19: ...e QIAcube Connect MDx Spray bottles should be used only to clean items that have been removed from the worktables 2 10 Radiation safety WARNING Risk of personal injury W29 Do not expose your skin to U...

Page 20: ...the back of the instrument CE mark for European Conformity Type plate at the back of the instrument CSA listing mark for Canada and the USA Type plate on the back of the instrument FCC mark of the Un...

Page 21: ...r the Product Resources tab QIAcube Connect MDx is preinstalled with various protocols for processing QIAGEN spin columns for purification of RNA genomic DNA and viral nucleic acids In the Research mo...

Page 22: ...on chemistry is required as you simply continue to use trusted QIAGEN spin column kits 1 Samples are lysed in the orbital shaker which can be heated if required by the protocol 2 Each lysate is transf...

Page 23: ...QIAcube Connect MDx User Manual 12 2020 23 QIAamp DNA DSP procedure flowchart...

Page 24: ...ear view of QIAcube Connect MDx Rear view of QIAcube Connect MDx 1 Touchscreen 5 2 USB ports on the left side of the touchscreen 2 USB ports behind the touchscreen Wi Fi module plugged into 1 USB port...

Page 25: ...the QIAcube Connect MDx the hood must remain closed and should only be opened when instructed to do so by the software Therefore a hood lock has been implemented to avoid inappropriate opening WARNIN...

Page 26: ...ices to USB ports Important Do not remove the USB flash drive while downloading or transferring data or software to or from the instrument Important Always turn off the QIAcube Connect MDx in order to...

Page 27: ...lasses 2 pairs of gloves and a lab coat The responsible body e g laboratory manager must take the necessary precautions to ensure that the surrounding workplace is safe and that the instrument operato...

Page 28: ...ed Use of incorrect supply voltage may damage the electronics To check the recommended supply voltage refer to the specifications indicated in the type plate of the instrument WARNING Risk of electric...

Page 29: ...t Do not stare into the light beam when using handheld bar code scanner 3 3 Internal features of the QIAcube Connect MDx Internal view of the QIAcube Connect MDx 1 Centrifuge lid 6 Microcentrifuge tub...

Page 30: ...of personal injury and material damage W5 To prevent plastic crash load the tubes properly After a plastic crash sharp plastic particles could be inside the centrifuge Be careful when handling items...

Page 31: ...ve the samples after a run Reagent bottle rack The reagent bottle rack holds up to six 30 ml QIAcube Connect MDx specific reagent bottles and for ease of use and high process safety fits onto the QIAc...

Page 32: ...sk of explosion W7 The QIAcube Connect MDx is intended for use with reagents and substances supplied with QIAGEN kits or other than outlined in respective Information for use Use of other reagents and...

Page 33: ...bore Note Only filter tips designed for use with the QIAcube Connect MDx and supplied by QIAGEN must be used Disposal slots for tips and columns Disposable filter tips are alternately discarded throug...

Page 34: ...tomates spin column processing Pipetting system The QIAcube Connect MDx is equipped with a single channel pipetting system that moves in the X Y and Z directions The dilutor fitted with a tip adapter...

Page 35: ...ot be started To replace the beam collimator see image below push it manually into its original position If you are still having difficulties and the error message remains contact your local technical...

Page 36: ...g If required by the protocol an additional column e g QIAshredder column can be placed in the middle position of the rotor adapter For ease of use and high process safety the rotor adapters are desig...

Page 37: ...dapters can only be used once High g forces exerted in the centrifuge can cause damage to used rotor adapters WARNING Risk of personal injury and material damage W5 To prevent plastic crash load the t...

Page 38: ...Connect MDx Ensure that the workbench is dry clean vibration proof and has additional space for accessories Do not use this device in close proximity to sources of strong electromagnetic radiation e...

Page 39: ...the instrument and cause damage to plastic parts The QIAcube Connect MDx must be located out of direct sunlight 4 1 2 Power requirements The QIAcube Connect MDx operates at 100 240 V AC 50 60 Hz 650...

Page 40: ...t has no ground earth connection WARNING Electrical hazard W8 Any interruption of the protective conductor earth ground lead inside or outside the instrument or disconnection of the protective conduct...

Page 41: ...n 4 5 Packing the QIAcube Connect MDx for more details Using the original package minimizes the possibility of damage during transportation of the QIAcube Connect MDx 4 3 Installing the QIAcube Connec...

Page 42: ...tage available at the installation site 4 Plug the power cord into the instrument power cord socket 5 Plug the power cord into a grounded power outlet WARNING Damage to electronics W9 Before powering...

Page 43: ...rotor with the pin on the rotor shaft and carefully lower the rotor onto the shaft 3 Install the rotor nut on top of the rotor and tighten securely using the rotor key supplied with the QIAcube Conne...

Page 44: ...r 220 days each year For more information contact QIAGEN Technical Services 4 3 5 Installing the shaker adapter A shaker adapter must be installed before the shaker can be used Two types of shaker ada...

Page 45: ...t automatically performs the initialization tests If the centrifuge lid is closed it will open 3 Initially only one user account is available the pre installed default user Press OK on the touchscreen...

Page 46: ...een press the Setup icon 4 4 1 System configurations This section describes how to set the following system configurations Name for the QIAcube Connect MDx Current date and time System language These...

Page 47: ...e up to 24 characters letters A Z a z digits 0 9 and a hyphen The name must start with a letter and cannot end with a hyphen 4 In the Date and Time fields select the current date and enter the current...

Page 48: ...age is a two step process First the translated Graphical User Interface is uploaded via the Load button Next the translated protocols need to be uploaded by following the instructions in section 5 11...

Page 49: ...s with QIAsphere cloud The QIAsphere App helps to monitor the instrument status e g instrument is running instrument is available or the instrument requires maintenance If your QIAsphere Base is conne...

Page 50: ...etwork settings screen 5 To manually configure the network uncheck the DHCP enabled box Enter the IP address Subnet mask and Gateway in the respective fields using the IPv4 format shown in the picture...

Page 51: ...ce supplied with the QIAcube Connect MDx must be plugged into one of the USB ports behind the touchscreen Important Always turn off the QIAcube Connect MDx before you plug in or unplug the Wi Fi USB d...

Page 52: ...ion 5 Enter the wireless network password and press Connect to connect to the network The connected network is marked in the list Available networks screen with established wireless network connection...

Page 53: ...ccess to the inside of the centrifuge If the lid is not open perform steps 2 5 below If the lid is already open proceed to step 6 2 Close the instrument hood 3 On the menu bar press the Tools button 4...

Page 54: ...top of the instrument Place the box onto the instrument Important When lifting the QIAcube Connect MDx slide your fingers under both sides of the instrument and keep your back straight Important Do no...

Page 55: ...of spin columns or chemistries will void your warranty The hood of the QIAcube Connect MDx must remain closed during operation of the instrument Only open the hood when instructed to do so by the sof...

Page 56: ...areful when handling items inside the centrifuge CAUTION Damage to the instrument C4 Only use the correct volume of liquids Exceeding the recommended volume of liquids may damage the centrifuge rotor...

Page 57: ...ety glasses gloves and a lab coat The responsible body e g laboratory manager must take the necessary precautions to ensure that the surrounding workplace is safe and that the instrument operators are...

Page 58: ...de For detailed instructions on how to operate the QIAcube Connect MDx using the Research mode of the software please refer to the User Manual of the QIAcube Connect available on the QIAcube Connect p...

Page 59: ...nables to edit text or value A pop up keyboard enables these changes Row in tables Can be pressed to select the respective row Either item will be selected or row will be highlighted Press to show add...

Page 60: ...rd for editing a protocol parameter For protocol parameters the value range is displayed In the example shown in the screenshot above values from 50 100 l can be entered but only in steps of 10 l If t...

Page 61: ...reen keyboard 5 2 Switching the QIAcube Connect MDx on and off Switching on the QIAcube Connect MDx 1 Close the instrument hood 2 Switch on the instrument by pressing the power switch to the inner pos...

Page 62: ...he instrument After the initialization is complete the Login screen appears Login screen 3 Enter User ID and Password using the on screen keyboard 4 Select software mode IVD or Research Note The selec...

Page 63: ...y logged in press Cancel Note The system will log out automatically if you are inactive for a certain time The administrator can set the number of minutes before automatic logout 3 The login screen ap...

Page 64: ...r more information if required The needed sample pretreatment can be found in the respective kit handbooks 2 To start the run setup in the IVD mode scan the 2 D bar code of the QIAGEN kit Press Scan K...

Page 65: ...r Expiry date 19 to 24 6 Expiry date YYMMDD see label If not used 000000 25 to 26 2 10 Identifier Lot 27 to 4 to 10 Lot number variable length see label 1 Marker for the end of the lot number 3 240 Id...

Page 66: ...n your selections the number and order of the screens displayed on your instrument may vary Each section below contains a screenshot image Follow the instructions in that section with the correspondin...

Page 67: ...ual 12 2020 67 5 4 1 Material selection Select material screen 1 Select the sample material by touching the corresponding row Only one sample material type can be selected per run 2 Press Next to proc...

Page 68: ...Select the protocol by touching the corresponding row Only one protocol can be selected per run Important Ensure to read all essential and critical information in the right pane scroll down if necessa...

Page 69: ...defined but can be changed Follow the instructions in the information pane on the right regarding changing the values and which increments can be used Define parameters screen 1 If required press the...

Page 70: ...screen 1 To select the number of samples for the run press the corresponding number on the screen Sample numbers 1 and 11 that would lead to a misbalance during centrifugation cannot be chosen 2 Press...

Page 71: ...hown on the screen Refer to the respective kit handbook for further information and ensure that the correct buffers are used on each position see the blue shaded circle on the touchscreen When pouring...

Page 72: ...oon as a new QIAGEN kit is opened new buffer bottles should be used 3 Place each opened buffer bottle in the correct position of the reagent bottle rack as shown on the screen The buffer bottle rack p...

Page 73: ...g positions Always stand clear of the instrument while the robotic arm is moving Wait until the robotic arm has completed its movements before you start to load or unload tip racks or enzymes After yo...

Page 74: ...oid spill over during the run do not exceed this volume significantly 4 Place the opened tube in the worktable position as indicated in the table on the screen It is important that you load the tube i...

Page 75: ...h setting up the required rotor adapters and centrifuge for the run Make sure to read all essential and critical information before proceeding to the next step Depending on the selected protocol loadi...

Page 76: ...olumn adapter ring enables the robotic gripper to transfer the column during the purification procedure Break off the bottom closure of the spin column before placing into the rotor adapter Mounting a...

Page 77: ...uge tube The lid of the tube is not pushed all the way down to the bottom of the slot of the rotor adapter and could break off during centrifugation compare with part A of the above figure D Incorrect...

Page 78: ...on the sides of the of the rotor adapter Incorrectly positioned lids can break off during centrifugation WARNING Risk of personal injury and material damage W28 Be sure the lid is completely removed...

Page 79: ...een Touch the table row to highlight the particular tube position in the illustration below the table 2 Ensure that the tubes and spin columns are pushed firmly into the appropriate rotor adapter posi...

Page 80: ...to the centrifuge For workflows including the shaker unit refer to section 5 4 7 Loading the centrifuge in case samples are loaded onto shaker The procedures for loading samples into the centrifuge ar...

Page 81: ...ct lid positions Note If required and described in the table cut off the lid or screw on a spin column adapter ring and break off the bottom of the spin column 5 Repeat steps 1 4 until all rotor adapt...

Page 82: ...of shaker lid positions filled with shaker rack plugs In this step the software displays the shaker positions tubes and volume to be loaded in the table and in the schematic on the right Make sure to...

Page 83: ...the tube completely into the shaker position 4 Load the tubes into the correct position of the shaker rack The shaker rack positions are numbered for easy identification Touch the table row to highlig...

Page 84: ...roceed to starting the run or loading the centrifuge depending on your selected protocol WARNING Risk of personal injury and material damage W5 To prevent plastic crash load the tubes properly After a...

Page 85: ...n the run The screen will display the estimated run duration If required press Back to return to the previous setup screen Important Do not open the instrument hood during a run In the event the hood...

Page 86: ...rotocols further treatment of samples is described on the right side of the screen Remove the eluates samples from the instrument directly after the run finished and make sure that you follow the prop...

Page 87: ...r invalid the run status completed or aborted the software mode IVD or Research the run ID the elution volume the final eluate position Important It is recommended to perform regular maintenance as de...

Page 88: ...ils you will find the step at which the protocol stopped 5 7 Saving run reports to the USB flash drive Run reports are saved on the instrument after each run is confirmed by clicking the Done button T...

Page 89: ...reports to the USB flash drive select All run reports To save only the recent reports select Recent reports To enter the number of reports to be saved touch in the Recent reports field 5 If you would...

Page 90: ...he files confirm if they are successfully saved to the USB stick then store the files properly When the backup is confirmed you can delete the files on the QIAcube Connect MDx USB flash drive Full dis...

Page 91: ...the appropriate field to select the Frequency Temperature and Duration using the on screen keyboard 5 Load the shaker rack tubes containing samples 6 Close the hood to start run The remaining time and...

Page 92: ...Connect MDx Damage caused by use of other consumables will void your warranty We recommend replacing the centrifuge rotor and buckets after 20 000 cycles which is equivalent to 9 years of usage with t...

Page 93: ...l microcentrifuge elution tubes and or QIAGEN spin columns into the rotor adapters and place the lids into the appropriate slots in the rotor adapter 7 Ensure that the tubes and spin columns are pushe...

Page 94: ...t a centrifuge run as the lid will close automatically It is only required in case you need to prepare the QIAcube Connect MDx for shipment Loading scheme No of samples Centrifuge loading scheme No of...

Page 95: ...single protocols for removal 5 11 1 Installing new protocols This process is used to install new protocols and translated protocols from new language packages see section 4 4 1 System configurations...

Page 96: ...protocols could be copied Note If a new protocol version is uploaded the instrument will automatically use the newest version and display the protocol version in the run setup screen 7 Wait until the...

Page 97: ...Protocol_Upload folder on the USB stick 5 11 3 Saving protocols Protocols can be downloaded from the instrument to USB flash drive to transfer them to another instrument or to save them before a softw...

Page 98: ...be lost during software update see section 5 7 Saving run reports to the USB flash drive and section 7 2 Creating a support package Note A new software version might contain new version of the protoco...

Page 99: ...ports at the left of the touchscreen Important Make sure that all run reports and support packages have been backed up before proceeding to the next step See section 5 7 Saving run reports to the USB...

Page 100: ...ted by the screen remove the USB flash drive from the USB port 13 Use a computer running Microsoft Windows to delete the previously downloaded software files from the USB flash drive 5 13 User Managem...

Page 101: ...The configured users are shown in the table Each row contains the data for one user List of configured users in the user management Note With the administrator role it is required to create at least...

Page 102: ...letters or numerical characters Enter the same password into the Confirm password field Select the user role Administrator and or Operator The operator may only use the instrument while the administr...

Page 103: ...enu bar 2 Press the Users tab The configured users are shown in the table Each row contains the data for one user List of configured users in the user management 3 In the user profile row press the Ed...

Page 104: ...a risk of the system being locked in case of an error during the password entry and cannot be unlocked by any users This issue would require the intervention of a service engineer Number of login atte...

Page 105: ...ith the default user ID Admin and password Admin Login screen after failed Admin login 5 13 4 Changing password User with Administrator role is allowed to change the password for every user by editing...

Page 106: ...en keyboard 4 Enter a new password into the New password field and re enter the new password in the Confirm new password field Note The new password must be different from the last three used password...

Page 107: ...htness of the tip adapter e g after O Ring change The software provides step by step guidance under Tools Maintenance for the maintenance procedures listed above except for the regular maintenance Fol...

Page 108: ...yristyldimethylbenzylammonium chloride and 5 15 nonionic detergent per 100 g liquid Lysetol AF Gigasept Instru AF in Europe cat no 107410 or DECON QUAT 100 Veltek Associates Inc in the USA cat no DQ10...

Page 109: ...or and waste drawer DNA ExitusPlus can also be used to perform decontamination by spraying the respective worktable items use the nucleic acid decontamination agent according to the manufacturer s ins...

Page 110: ...Dx must only be performed by a QIAGEN Field Service specialist WARNING Risk of explosion W23 When cleaning the QIAcube Connect MDx with alcohol based disinfectant leave the QIAcube Connect MDx hood op...

Page 111: ...obotic arm manually Instead proceed as follows Press Move left or Move right on the Run Completed screen as needed The robotic arm will start to move The hood can remain open during this movement Ensu...

Page 112: ...ording to your local safety regulations 5 Close the buffer bottles tightly and store according to the instructions in the relevant kit handbook We recommend to reuse the buffer bottles only until the...

Page 113: ...he Next Due monthly maintenance dates Monthly maintenance screen 3 Close the hood 4 Press Start Follow the instructions on the screen Details are provided in the next steps below The robotic arm will...

Page 114: ...ansfer the run reports from the instrument to the USB flash drive and remove the run reports from the instrument For details refer to section 5 7 Saving run reports to the USB flash drive 6 6 Periodic...

Page 115: ...hood 4 Press Next to move to cleaning position 5 Remove the waste drawer and open hood 6 Open the waster drawer Moisten a soft lint free cloth with water and carefully clean the optical sensor tip ad...

Page 116: ...ure Follow the instructions on the screen Details are provided in the next steps below 3 The centrifuge lid must be open to allow access to the inside of the centrifuge The lid should be opened only a...

Page 117: ...nd the rotor head Wipe surfaces dry with a soft lint free cloth If available dry the buckets and rotor with pressurized air Brushing a bucket Brushing the rotor Important Make sure the paper towels an...

Page 118: ...ortant Make sure the gaskets remain in the proper positions 3 Clean the centrifuge lid with a soft lint free cloth moistened with cleaning agent Incubate as appropriate clean with water and wipe dry w...

Page 119: ...ft fits into a notch on the underside of the rotor directly underneath rotor position 1 Line up position 1 of the rotor with the pin on the rotor shaft and carefully lower the rotor onto the shaft 3 I...

Page 120: ...wing freely Important All centrifuge buckets must be mounted before starting a run Before starting next protocol run follow the instructions in section 6 6 3 Operating the centrifuge after cleaning 6...

Page 121: ...needed in case you need to prepare the QIAcube Connect MDx for shipment or during troubleshooting 6 7 Optional Maintenance 6 7 1 UV run The UV run is recommended to be performed daily for decontamina...

Page 122: ...ration UV run screen 2 In the Cycle field change the number of cycles The default cycle number is 1 approximately 12 minutes 3 Ensure that all disposable labware has been removed from the worktable Im...

Page 123: ...enance tab and select the Tightness subtab The screen shows the Last Executed tightness test date Tightness test screen 2 Press Start to begin with the tightness test procedure Follow the instructions...

Page 124: ...inside the QIAcube Connect MDx the user has responsibility for carrying out appropriate decontamination The QIAcube Connect MDx should also be decontaminated before shipping e g back to QIAGEN In thi...

Page 125: ...nt can be found at the right of the System tab in the configuration screen Sample input material Detailed description of the error situation This information will help you and your QIAGEN Technical Se...

Page 126: ...leaning and Maintenance Imbalance detected Make sure the rotor is symmetrically loaded according to instructions on run setup screens Remove the rotor and check the centrifuge chamber for loose plasti...

Page 127: ...tain the correct buffers and are correctly placed in the reagent bottle rack Be sure to use the right plasticware Check the volumes in the sample tubes and tubes of accessory buffer s if applicable Do...

Page 128: ...vices for repair Error when copying files to USB Power OFF the QIAcube Connect MDx wait for a few minutes and power it ON again Save the file s to the USB flash drive again Check the USB flash drive o...

Page 129: ...your responsibility to continue sample processing manually as this invalidates the whole procedure To continue sample processing 1 Note the step at which the protocol stopped This is displayed in the...

Page 130: ...ktable furthest away from the centrifuge lid 5 Remove the screw protection on top of the centrifuge lid Using the rotor key turn the screw counter clockwise Turning the screw in the centrifuge lid 6 R...

Page 131: ...g Do not exceed the maximum amount of starting material Incorrect installation of the centrifuge buckets may also cause rotor adapters to leak Check that the buckets are installed properly and can swi...

Page 132: ...ll red sign is displayed at the place where the touchscreen recognizes the contact If the point of touch and the recognized contact are at different positions a re calibration of the touchscreen can b...

Page 133: ...ss the QIAGEN logo Note If you do not press the logo the instrument will continue initialization Press the QIAGEN logo 4 Press Calibrate touchscreen Calibrate Touch Screen Button 5 An information mess...

Page 134: ...ults are saved automatically The previous screen is shown again 8 Press Start The instrument continues initialization using the new calibration settings To cancel the calibration process turn OFF the...

Page 135: ...he robotic arm procedure before you replace the O Ring 1 To start the O Ring replacement press the Tools icon on the menu bar Press the Maintenance tab and select the O Ring subtab The screen shows th...

Page 136: ...O Ring 3b Push the grey lever until you reach the black stop and insert the small end of the peg into the hole 3c Press the peg down using the back end of the tweezers until the O Ring sits in the mi...

Page 137: ...and begin loading of the O Ring tool into the QIAcube Connect MDx 5 Load the O Ring tool by opening the grey lever into tip rack position 1 nearest to user Load the O ring tool 6 Close the hood and pr...

Page 138: ...ntil you reach the black stop Open the hood Rotate the grey lever counter clockwise 7b Open the grey lever and remove the O Ring by using the tweezers from pipetting channel Note If required repeat cu...

Page 139: ...nd clean the O Ring change tool with alcohol based disinfection wipes Incubate as appropriate rinse thoroughly with distilled water and wipe dry with lint free paper towels 13 Press Done to complete t...

Page 140: ...e QIAcube Connect MDx is switched on and if required before each protocol run to check the operation of the QIAcube Connect MDx Microcentrifuge tube slots Three slots located in the labware tray that...

Page 141: ...e pipettor head During operation of the QIAcube Connect MDx the tip adapter picks up filter tips from the worktable Tip disposal slots Slots in the QIAcube Connect MDx worktable through which used fil...

Page 142: ...acceleration and can reach an approximate value of 1000 VA Fuse 2x T8A L 250V Overvoltage category II Air temperature 20 to 25 C 68 to 77 F Relative humidity 20 75 noncondensing Altitude Up to 2000 m...

Page 143: ...utes from ambient temperature to 55 C 3 C Difference in the temperature detected by the internal sensor and the temperature of the sample liquid is approximately 2 C Pipetting system Syringe size 1 ml...

Page 144: ...the Product Resources tab 9 5 Declaration of Conformity Name and address of the legal manufacturer QIAGEN GmbH QIAGEN Strasse 1 40724 Hilden Germany An up to date declaration of conformity can be req...

Page 145: ...t follow up information for scheduling collection of the electronic waste or to provide you with an individual quote 9 7 EMC Declaration The IVD medical equipment complies with the emission and immuni...

Page 146: ...radio television interference caused by unauthorized modifications of this equipment or the substitution or attachment of connection cables and equipment other than those specified by QIAGEN GmbH Germ...

Page 147: ...nual 12 2020 147 computer viruses worms trojans malware hacks or any other type of cybersecurity breaches QIAGEN assumes no liability for computer viruses worms trojans malware hacks or any other type...

Page 148: ...ng and one preventive maintenance visit One year warranty on labor travel and parts also included 9003073 QIAcube Connect MDx Device PRV 1 Instrument and service agreement package includes one inspect...

Page 149: ...y service 9245232 Accessories Filter Tips 1000 l 1024 Disposable Filter Tips racked 8 x 128 990352 Filter Tips 1000 l wide bore 1024 Disposable Filter Tips wide bore racked 8 x 128 not required for al...

Page 150: ...p tubes without skirted base 2 ml for use with the QIAcube Connect MDx 990382 USB flash drive USB flash drive for use with the QIAcube Connect MDx 9017850 O Ring Change Tool O Ring change tool for use...

Page 151: ...QIAcube Connect MDx User Manual 12 2020 151 11 Version history Document Date Description HB 2794 001 December 2020 Initial Release of QIAcube Connect MDx User Manual...

Page 152: ...ment configuration 45 Instrument operation 55 Intended use 7 Internal features of QIAcube Connect 29 LAN configuration 49 Liability Clause 146 Maintenance Cleaning the centrifuge 115 Cleaning the robo...

Page 153: ...laration of Conformity 144 FCC Declaration 145 Hardware features 143 Liability Clause 146 Mechanical data 143 Operating conditions 142 Storage conditions 142 Transport conditions 142 WEEE 144 Tip disp...

Page 154: ...RNaseZap Ambion Inc Microsoft Windows Microsoft Corporation Gigasept Lysetol Mikrozid Sch lke Mayr GmbH DECON QUAT Veltek Associates Inc Registered names trademarks etc used in this document even when...

Page 155: ...QIAcube Connect MDx User Manual 12 2020 155 1121932 12 2020 HB 2794 001 www qiagen com Technical Support www support qiagen com...

Reviews: