background image

F. CREATING SERIALIZED LABELS

PressPrint makes it easy to create serialized labels such as product serial tags,

parking stickers, and more.  PressPrint even allows you to incorporate text (.txt)

files, such as a list of names, into serialized labels for even greater customization.

To create a set of serialized labels, please refer to the following procedure.  As an

example, this procedure demonstrates how to create labels with both a serialized

number and a custom serialized name.  If you have not yet read through Parts D,

E, and F of this section, please do so before attempting to complete this procedure.

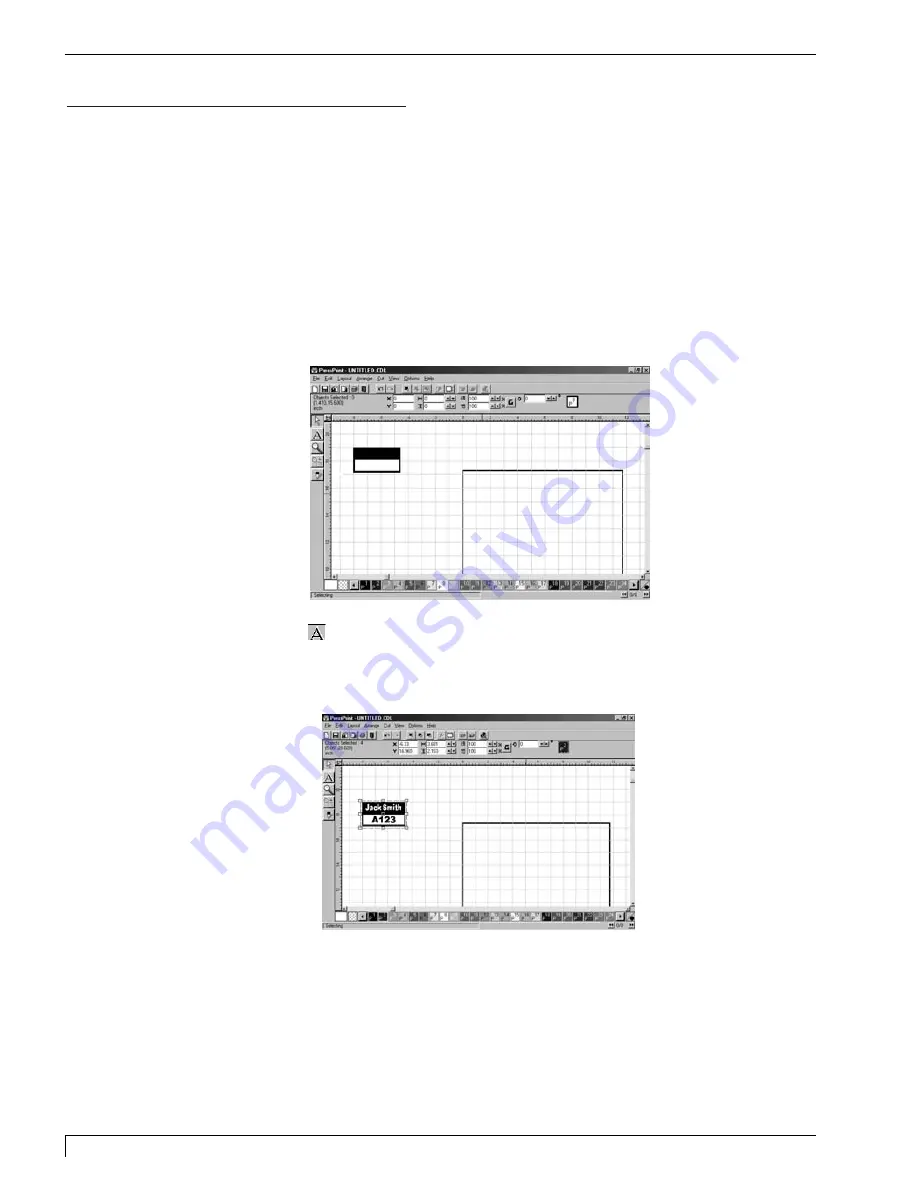
1. Import or create a label design in which you would like to place your serialized

text.

2. Use the text tool       to enter the line or lines of text exactly as you would like it

to appear in the first label. Enter a separate line of text for each text field you

would like to serialize.

3. Once you have entered the text, place a cut line around the entire label. Be sure

to select all items by clicking 

Select All

from the Edit menu.

58

Section 7:  Installing and Using the PressPrint Software for Windows

Digital Label Press 3 User’s Manual

Impressa3.qxd  10/22/01  9:30 PM  Page 58

Summary of Contents for 510212

Page 1: ...Digital label and decal press 3 Digital label and decal press 3...

Page 2: ...ed Patent Pending Trademark Acknowledgements Digital Label Press 3 and PrimaColor are trademarks and Primera is a registered trademark of Primera Technology Incorporated PANTONE is a registered tradem...

Page 3: ...lowing measures Re orient or relocate the receiving antenna Increase the separation between the equipment and receiver Connect the equipment into an outlet on a circuit different from that to which th...

Page 4: ...tput Assembly 17 I Applying Power 18 Section 4 Ribbons and Print Media A Introduction 19 B About Ribbons 19 C Loading Ribbon into the Ribbon Cartridge 20 D Placing the Ribbon Cartridge into the Printe...

Page 5: ...ing Images to Maximize Space 56 Anti Aliasing 57 Printing Multiple Pages of the Same Label 57 F Creating Serialized Labels 58 G Printing Multiple Spot Color Labels 61 Section 8 Maintenance A Supplies...

Page 6: ...ansferring color to the print media see Section 4 for more information on these ribbons and the appropriate print media for each Such ribbons are available in single spot colors or in a paneled form w...

Page 7: ...The cut line is treated just like a graphic and can be edited to match any shape The software can even trace around an image to create a perfect contour cut B SPECIAL FEATURES With its dual function...

Page 8: ...110 120 VAC 50 60 Hz if operating within the United States or Canada For printers that have been shipped outside of the United States and Canada operate the unit only on 220 240 VAC or 100 VAC in Japa...

Page 9: ...4 Section 2 Safety Precautions Digital Label Press 3 User s Manual...

Page 10: ...Section 2 Safety Precautions 5 Digital Label Press 3 User s Manual...

Page 11: ...6 Section 2 Safety Precautions Digital Label Press 3 User s Manual...

Page 12: ...Section 2 Safety Precautions 7 Digital Label Press 3 User s Manual...

Page 13: ...8 Section 2 Safety Precautions Digital Label Press 3 User s Manual...

Page 14: ...Do not place the unit in a location where the ventilation holes located on the left of the unit could become blocked Do not install unit near heat sources such as radiators or air ducts or in a place...

Page 15: ...e Media Supply Unwind Assembly Media Output Tray Ribbon Cartridge 1 Cutter Blade Holder with Blade 1 Printer Driver Software PressPrint Label Software PANTONE Software Warranty Statement and Registrat...

Page 16: ...cription POWER UP This is displayed during boot up sequence when INITIALIZING power has been applied to the unit During this sequence you will see helpful information on the firmware version for both...

Page 17: ...e that cuts ENTER WHEN READY the leading edge of the sheet and positions the paper for printing This is used when loading a new roll and is describe in detail in section 4 G PAGE COUNT 0000 This will...

Page 18: ...to accommodate the unique characteristics of each media type In most cases optimum cut pressure can be determined after just one sheet of media has been cut If cutter adjustment is required the cut p...

Page 19: ...E REMOVING THE RIBBON CARTRIDGE AND BLADE HOLDER A single Ribbon Cartridge and Blade Holder are included with Press The Ribbon Cartridge holds print ribbons in place inside the printer The Blade Holde...

Page 20: ...t it straight up and carefully remove it from the printer 4 Remove the shipping tape fastening the Blade Holder to the Ribbon Cartridge and separate the two items Remove the Blade Holder from its pack...

Page 21: ...se within the Cutter Arm If it rotates the Securing Knob needs to be further tightened Do not over tighten G INSTALLING THE MEDIA INPUT ASSEMBLY Press s Media Input Assembly houses the supply roll of...

Page 22: ...Tray consists of two separate stages The lower portion of the tray assembly protects media during the printing process The upper portion of the tray collects the finished sheets as they leave the pre...

Page 23: ...Digital Label Press 3 User s Manual I APPLYING POWER 1 Locate the power cord supplied with your press 2 With the press s power switch turned off place one end of the power cord into the power port on...

Page 24: ...print method and is distinguished by its GRAY cores This ribbon is designed to print onto special dye receptive polyester label stock and produces durable labels and decals that are color accurate whe...

Page 25: ...output while the spot color ribbons produce up to 200 sheets All resin ribbons have a maximum printable area of 11 71 x 17 3 297 x 439mm These ribbons can be used only in conjunction with the 300 Ser...

Page 26: ...THE RIBBON CARTRIDGE INTO THE PRINTER 1 Press the Cover Release Button Allow the cover to swing up and open 2 With the cover open place the Ribbon Cartridge into the printer Be certain that the suppl...

Page 27: ...s automotive decals outdoor signs and more Vinyl stock is available in both a cast and a calendered form Cast vinyl is very thin and conforms easily to curves over rivets etc Calendered vinyl is sligh...

Page 28: ...original packaging and place on a smooth flat surface when not in use Do not stack objects on top of the print media or place more than 500 sheets in a single stack Print media must not be exposed to...

Page 29: ...Press 3 User s Manual 2 Open the Media Input Assembly Cover 3 Place the media spool on the supports located on either side of the Media Input Assembly 4 Close the Media Input Assembly cover Media Inpu...

Page 30: ...lease back into the up position This will lock the media roll into place as well as engage the sensor that reads the roll s identification information 6 Open the printer s Top Cover by pressing the Co...

Page 31: ...ronically by its Sensor Connector Each of these items is marked with a yellow colored end To remove the bracket first turn the printer power OFF then disconnect the Sensor Connector by sliding it towa...

Page 32: ...cket is disconnected and unlatched gently lift it from the printer 11 Turn the Media Roll by hand to start the leading edge of the media into the printer part of your press Inside the printer portion...

Page 33: ...oller as shown Make certain the paper is centered on the platen roller 13 Remove any slack in the paper path by pulling on the leading edge of the paper Continue to feed the paper through the press un...

Page 34: ...ntered adjust the media bias lever on the back of the Media Input Assembly 14 Making certain the paper is tight and centered in the press insert the Print Pressure Bracket back into its proper positio...

Page 35: ...quence from the Control Panel Menu Press the Menu button until the display reads Next press the Enter button The press will engage it s Rotary Cutter slicing off the excess media to ensure a squared e...

Page 36: ...300 SPOT 300 Series Resin Thermal single Color Ribbon 300 3 COLOR 300 Series Rein Thermal CMY 3 Color Ribbon 200 DYESUB 200 Series CMYO Dye Sublimation Ribbon 3 color ribbon with protective overlay P...

Page 37: ...32 Section 4 Ribbon and Print Media Digital Label Press 3 User s Manual...

Page 38: ...ON and that the Top Cover and Cutter Door are shut 2 Repeatedly press the Menu button on the control panel until the LCD reads 3 Press the ENTER button on Press s Control Panel 4 Press MENU again to c...

Page 39: ...the self test image Please note that the print quality of the self test may not be optimum Don t worry this is perfectly normal The self test procedure is not intended to demonstrate print quality bu...

Page 40: ...space is recommended Note that processing speed will increase if additional RAM is added The printer is equipped with a USB to parallel adapter cable This cable provides the extremely high data trans...

Page 41: ...36 Section 5 Connecting the Press Digital Label Press 3 User s Manual 3 Select Search for the best driver for your device Recommended And click Next 4 Select CD ROM Drive and click Next...

Page 42: ...interface port located on behind the press The Control Panel LCD must display PRINTER READY CUTTER READY in order to receive data IMPORTANT In order to begin printing with this press you must first in...

Page 43: ...38 Section 5 Connecting the Press Digital Label Press 3 User s Manual...

Page 44: ...to Windows Once the driver is installed put it away in a safe place in case it ever needs to be reinstalled NOTE This section of the Operator s Manual assumes that you are already familiar with Window...

Page 45: ...a Local Printer or a Network Printer Select Local Printer and click Next to continue 6 The next window will ask you to select the type of printer you wish to install The Digital Label Press 3 is not...

Page 46: ...Disc In the Folders window double click on the Drivers folder then double click on the Windows 98 ME folder if you are installing the driver on Windows Windows 98 or Windows ME Double click on the Wi...

Page 47: ...b Refer to the following steps to change or verify your printer driver options 1 Click the Start button point to Settings and select Printers Then click on the Digital Label Press 3 icon with the righ...

Page 48: ...Blank Size is already set to Press s maximum printable area of 11 71 x 17 3 297 x 439mm For best results leave the Blank Size set to these dimensions Ribbon Type Click on the Ribbon Type down arrow Th...

Page 49: ...when printing with a resin 300 Series ribbon type Click on the Dither Mode down arrow and select the appropriate dither option Selecting Fine Dither provides a print in which the dots of color are ve...

Page 50: ...perates similar to a traditional cutter in that it is able to cut shapes and letters out of completely blank label stock Orientation Select either Portrait or Landscape Selecting Portrait causes the p...

Page 51: ...46 Section 6 Installing and Setting Up the Printer Driver for Windows Digital Label Press 3 User s Manual...

Page 52: ...ough the installation process and will also explain how to efficiently use PressPrint in its primary role of mass producing pre designed images For details on PressPrint s more general capabilities to...

Page 53: ...f Section 7 explains how to use the PressPrint features most essential to printing Refer to the following steps to learn how to import an image place a contour cut line around it and duplicate the ima...

Page 54: ...mage s outside edge Select to trace a cut line along the contour of both the outside and inside edges of your image In this case the software will essentially attempt to cut away anything it sees as w...

Page 55: ...and could overlap light colored areas A good general setting is 240 7 Select OK to begin contouring your image This process will take from just a few seconds to a few minutes depending on the size and...

Page 56: ...bels 10 Click on OK to begin duplicating your image Note that if copying multiple pages of output only one page of images will actually appear on screen This is done to conserve system resources Press...

Page 57: ...ct one of the Anti Aliasing options from the Preferences tab Anti Aliasing causes printed images to appear more smoothly around the edges In most cases the Fine Anti Aliasing option provides the best...

Page 58: ...y wish to bring the 32 Bit Spooler to the foreground in order to monitor the status of the print job If you experience an error during printing you can use the 32 Bit Print Spooler to pause the print...

Page 59: ...cintosh Files In many cases files which have been created on a Macintosh will need to be imported into PressPrint This is done in the exact same fashion as importing a Windows file and all the tips gi...

Page 60: ...y degrade in quality if significantly enlarged Show Bitmaps Outlines Show Reduced Bitmaps Since bitmap images are saved as one solid object they tend to have a file size slightly larger than that of a...

Page 61: ...ttings of the cut line and click on OK The die cut line will automatically center in relation to the selected object Selecting Objects To select an object choose the Pointer tool and click on the edge...

Page 62: ...ls Since these materials cannot produce continuous tone images like dye sublimation materials anti aliasing can actually degrade the quality of resin and wax resin images Printing Multiple Pages of th...

Page 63: ...zed name If you have not yet read through Parts D E and F of this section please do so before attempting to complete this procedure 1 Import or create a label design in which you would like to place y...

Page 64: ...es the ASCI text i e txt csv file you would like to use in your serialized labels Such a file can be created in any text editing program such as the Notepad program in the Windows Accessories folder a...

Page 65: ...r the appropriate column If not use the indicated F keys to cut and paste the data into the appropriate column 9 Click on the top gray cell of the numerical text as indicated to select all of the cell...

Page 66: ...he bottom right hand corner of its screen This allows you to easily move from page to page When your labels are finished duplicating you can then print them according to the instructions in Part E of...

Page 67: ...abel consisting of a RED square background with BLACK text centered inside Then place a cut line around the red square and array the labels down the page 2 Click on the RED color box in the color pale...

Page 68: ...ption This forces the colors in your image to be printed separately Also select the Clip Separated Colors option if you do not want the press to print in areas where the second color will be printed T...

Page 69: ...rom the file menu and enter the Print Setup This time disable the Hold Media after Print option 8 When all supplies are once again in place click on OK PressPrint will send the BLACK text to be printe...

Page 70: ...ing Kit is available from PRIMERA or your authorized reseller This optional kit includes the following Print head Cleaning Pens pre moistened with 99 99 isopropyl alcohol for cleaning your printer s P...

Page 71: ...he cloth first and then wipe down the printer D CLEANING THE INSIDE OF THE PRESS As you use your press dust and other particles will accumulate inside the printer s case These particles are attracted...

Page 72: ...the Platen Roller Use the following steps to clean this roller 1 Open the printer s Top Cover by pressing the Cover Release Button 2 Remove the Ribbon Cartridge from the printer 3 Locate the Platen Ro...

Page 73: ...wing steps 1 Open the printer s Top Cover by pressing the Cover Release Button 2 Remove the Ribbon Cartridge and if necessary the Media Tray Assembly from the printer 3 From the Printer controls press...

Page 74: ...press the Cancel button to rotate and view all areas of the rollers 5 When all print media is cleared reload the media roll as described earlier in this manual 6 Replace the Print Cartridge and close...

Page 75: ...hich holds the aluminum Blade Holder in place 3 Loosen the gold colored Securing Knob by turning it toward the rear of the printer 4 Remove the aluminum Blade Holder The cutter blade is razor sharp an...

Page 76: ...and replace the holder s screw on top 8 Place the Blade Holder back into the Cutter Arm and retighten the gold colored Securing Knob by turning it toward the front of the printer Tighten only until t...

Page 77: ...72 Section 8 Maintenance Digital Label Press 3 User s Manual...

Page 78: ...connecting to PRIMERA s World Wide Web Home Page http www primeratechnology com Control Panel LCD Display Your press s LCD Display is the best troubleshooting tool at your disposal It will identify a...

Page 79: ...Front corner of the press as shown below The error could also be due to the ribbon breaking and being pulled through the press with the media Ribbon breaks can occur if the intensity setting in the pr...

Page 80: ...ribed in section 4 C close the cover and press the Retry button to continue printing OUT OF PAPER PAPER TYPE Media rolls are programmed to run exactly 100 prints to avoid the press accidentally printi...

Page 81: ...TER PAPER JAM This error will occur if the press can not internally detect paper movement It is rare but if the media has separated from its backing inside the printer portion of the press it would ca...

Page 82: ...of the ribbon s yellow panel and the end of the preceding panel cyan on the 300 CMY resin ribbon or clear on the 200 CMYO Dye Sublimation ribbon can be seen on the take up roll There should be almost...

Page 83: ...e ribbon 5 Remove and reinstall the media according to the instructions on 4 C 6 Reinstall the ribbon 7 Close the Printer Hood and press both the Cancel and Retry buttons to reset the press 8 Resend y...

Page 84: ...ly If the paper is biased to the left move the lever one click to the right If the paper is biased to the right move the lever one click to the left The printer does not even begin to print Symptoms N...

Page 85: ...Print Push both the Cancel and Retry buttons on the press to reset the processors This resets both the press and the computer and you should then be able to print You may see communication errors if Y...

Page 86: ...look jaggy or pixelated Symptoms Prints do not look smooth or continuous but rather grainy and unclear For best photo realistic output you should always use high resolution 24 bit images If scanning a...

Page 87: ...or information on when and how to adjust the Cutting Pressure slide The X Offset and Y Offset options fine tune the position of the overall cut line If these values are slightly inaccurate the cut lin...

Page 88: ...the cut pressure accordingly See Section 3 D for instructions on properly adjusting the cutting pressure My image gets cut off at the top or bottom or on the side in Landscape mode Remember that ther...

Page 89: ...84 Section 9 Troubleshooting Digital Label Press 3 User s Manual...

Page 90: ...g Speed Dye Sublimation Approximately 6 minutes per page Resin Thermal CMY Approximately 3 minutes per page Resin Thermal Approximately 1 minute per page Paper Feed Method Friction feed Paper Loading...

Page 91: ...143cmL x 36 2cmH x 51 4cmD Weight 105 lbs 47 63 Kg Temperature Operating 5 C to 35 C Storage 20 C to 55 C 5 C to 35 C guaranteed for Ink Ribbon 5 C to 45 C for up to one month is normally acceptable b...

Page 92: ...LLEL INTERFACE The Centronics type parallel interface is the most widely used printer interface due to its simplicity speed and standardization throughout the PC industry The printer s parallel interf...

Page 93: ...88 Appendix A Digital Label Press 3 User s Manual Pin assignments are as follows TABLE A 1 Parallel Interface Pin Assignments...

Page 94: ...Blade holder 14 71 Calibrate 45 77 Cancel button 12 Canceling a job 12 Color matching 43 Contour cut 49 50 Control Panel 11 Cutter blade 15 70 Cutting pressure slide 13 Disable overlay Disable target...

Page 95: ...22 23 Print pressure bracket 26 29 30 Printer cleaning kit 65 66 67 Printer driver 39 Resin thermal transfer 1 Retry Enter button 12 Ribbon cartridge 20 21 Ribbon sensor 77 Ribbon type 43 Ribbons 19...

Page 96: ...Printed in the United States of America P N 510212...

Reviews: