26
Section 4: Ribbon and Print Media
Digital Label Press 3 User’s Manual
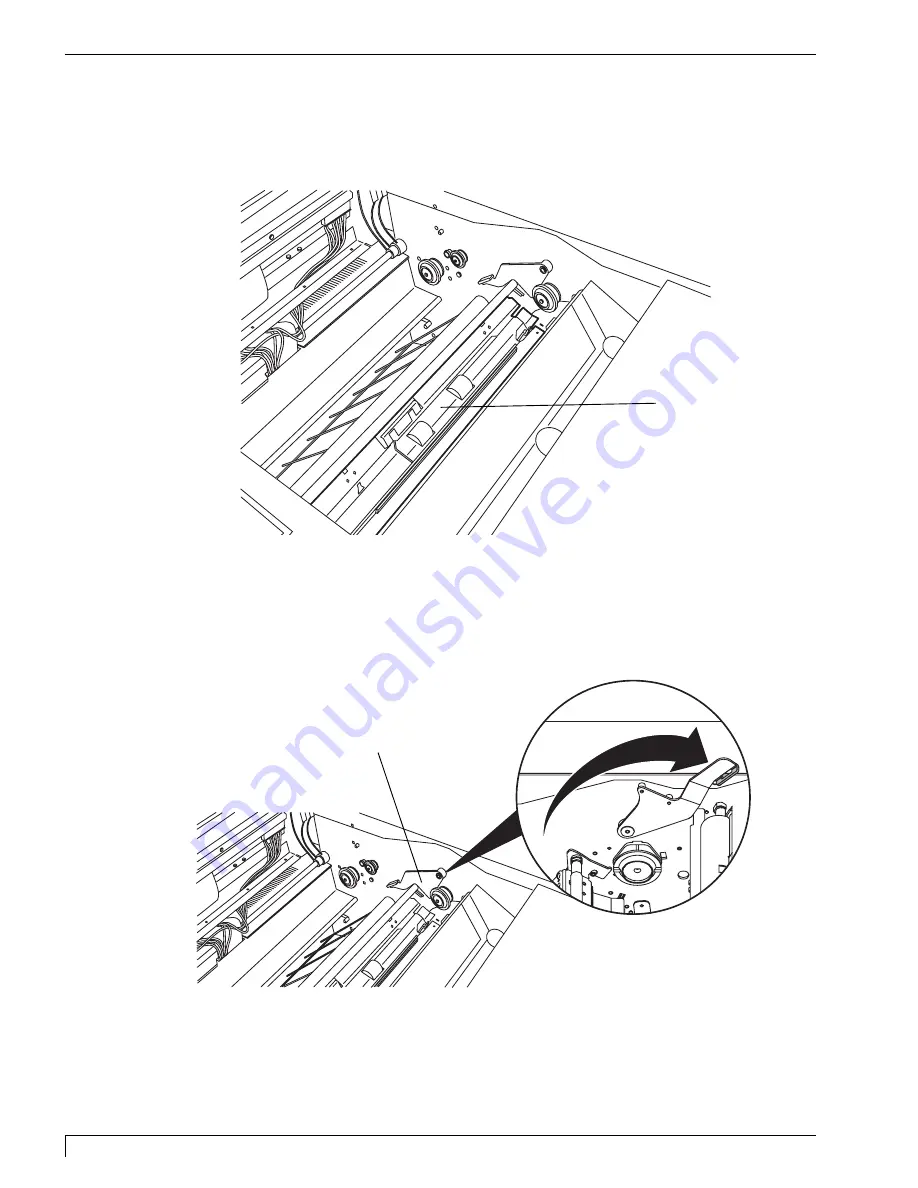
7. Locate the Print Pressure Bracket indicated in the illustration below. This
bracket runs the entire width of the printer's interior and must be removed in
order to load print media into the press.
8. The Print Pressure Bracket is held in place by two Securing Levers and is
connected to the printer electronically by its Sensor Connector. Each of these
items is marked with a yellow colored end. To remove the bracket, first turn
the printer power OFF, then disconnect the Sensor Connector by sliding it
toward the left-hand side of the printer until it stops.
9. Next, firmly pull up on each Securing Lever until each is in its fully opened
position as shown above. Some force is required to unlatch these Securing
Levers. Note that lifting both the left and right Securing Levers simultaneously
may reduce the effort required to unlatch the levers.
Print Pressure
Bracket
Securing Lever
Impressa3.qxd 10/22/01 9:29 PM Page 26
Summary of Contents for 510212
Page 1: ...Digital label and decal press 3 Digital label and decal press 3...
Page 9: ...4 Section 2 Safety Precautions Digital Label Press 3 User s Manual...
Page 10: ...Section 2 Safety Precautions 5 Digital Label Press 3 User s Manual...
Page 11: ...6 Section 2 Safety Precautions Digital Label Press 3 User s Manual...
Page 12: ...Section 2 Safety Precautions 7 Digital Label Press 3 User s Manual...
Page 13: ...8 Section 2 Safety Precautions Digital Label Press 3 User s Manual...
Page 37: ...32 Section 4 Ribbon and Print Media Digital Label Press 3 User s Manual...
Page 43: ...38 Section 5 Connecting the Press Digital Label Press 3 User s Manual...
Page 77: ...72 Section 8 Maintenance Digital Label Press 3 User s Manual...
Page 89: ...84 Section 9 Troubleshooting Digital Label Press 3 User s Manual...
Page 96: ...Printed in the United States of America P N 510212...


