


Operating manual liquid ring vacuum pumps and compressors series TRH - TRS - TRM - TRV - SA & Systems type HYDROSYS - OILSYS
38
16 - TROUBLE SHOOTING: PROBLEMS, CAUSES AND SOLUTIONS
Consult the following tab. 9 when problems are experienced, if solutions are not found in this chart or should there be
any doubts, do not hesitate to contact POMPETRAVAINI or your local representative.
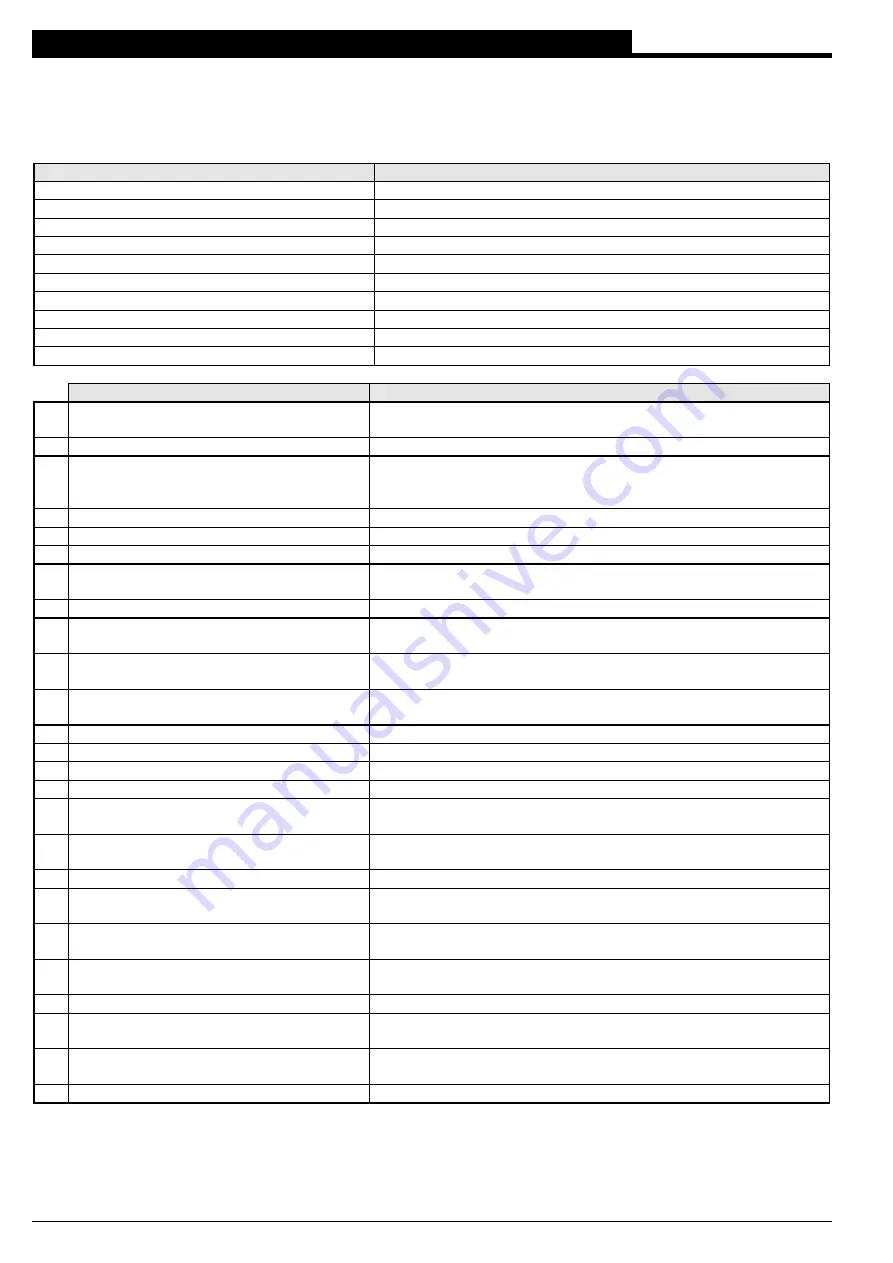
Tab. 9 -
LIST OF PROBLEMS
PROBLEM
LIST OF POSSIBLE CAUSES
Pump does not create or the vacuum is too low
1 - 2 - 3 - 4 - 9 - 11 - 18 - 19 - 22 - 23 - 24 - 25
Excessive noise
1 - 4 - 5 - 6 - 7 - 10 - 24
High power consumption
1 - 5 - 6 - 8 - 9 - 15 - 24 - 25
Vibration
5 - 6 - 7 - 8 - 10 - 12 - 13 - 24
Mechanical seal leaking
11 - 14
Pump looses liquid
11 - 19 - 23
Bearing failure
5 - 6 - 7
I
Pump does not start
1 - 6 - 20 - 21
J
Shaft partially or totally locked
6 - 10 - 15 - 16 - 21
Cavitation
3 - 4 - 8 - 9 - 17 - 24
CAUSES
SOLUTIONS
1
Defective motor or wired wrong
Check the voltage, the frequency, motor type, power
consumption, rotation, wiring connections, phase consistency
2
Leakage in suction piping
Repair piping; check valves for leakage
3
Service liquid high temperature
Lower the service liquid temperature;
check the level of the service liquid; adjust the cooling liquid flow;
adjust the radiator thermostat to lower temperature setting
4
Low service liquid flow
Increase the service liquid flow
5
Coupling misalignment
Re-align the coupling and the pump/motor assembly (see cap. 7)
6
Faulty bearing
Replace the bearing(see “Disassembly & Assembly Instructions”)
7
Cavitation
Open the anti-cavitation valve or set the relief valve to a lower
vacuum (see tab. 3)
8
High service liquid flow
Reduce the service liquid flow; adjust the by-pass valve
9
High back pressure
Check the discharge line for obstructions or high friction losses;
reduce the back-pressure to maximum 0.1 bar
10 Wrong pump/motor assembly
Verify that the base surface is level and that all pump feet are
resting on the surface, add spacers if required (see chapter 11)
11 Mechanical seal failure
Change the mechanical seal (see “Disassembly & Assembly
Instructions”)
12 Wrong pump mounting
Remount the pump (see chapter 7)
13 Piping weight resting on pump
Support the piping with hangers or other means (see chapter 11)
14 Inadequate seal lubrication
Check flushing liquid temperature, flow and pressure
15 Mineral deposits from hard water
Clean the pump
16 Foreign particles in pump
Disassemble the pump to remove the foreign objects (see
“Disassembly & Assembly Instructions”)
17 Low suction pressure
Open the vacuum regulating valve and/or the anti-cavitation
valve (see tab. 3)
18 Wrong pump rotation
Reverse the rotation (see chapter 8)
19 Bad gaskets
Replace the defective gaskets (see the “Disassembly &
Assembly Instructions”)
20 Wrong motor connections
Check the electrical connections (connectors, fuses, breakers)
and the power supply line (see chapter 8)
21 Pump seized
Disassemble and
repair the pump (see ”Disassembly &
Assembly Instructions”)
22 Pump undersized
Select a pump with higher capacity
23 Pump worn-out
Disassemble and repair the pump (see “Disassembly &
Assembly Instructions”)
24 Excessive liquid flow through suction line
Reduce the liquid flow through the pump suction; install a
centrifugal separator (cyclone) before the pump
25 Instrumentation out of calibration
Check the working characteristics, replace if required