74
4.4 Controlling Margay with RS232/RS485
Connect the RS232 In to the computer. Loop thru with RS485.
Remote control with serial commands is a good way
to control a wall while it is operating. It’s also an easy
way to control Margays in a wall during initial setup
using one of the
Planar
utility programs.
Utility programs available:
• Cube Control
• Diag
• Serial Talk
• OnOffer
• … and more
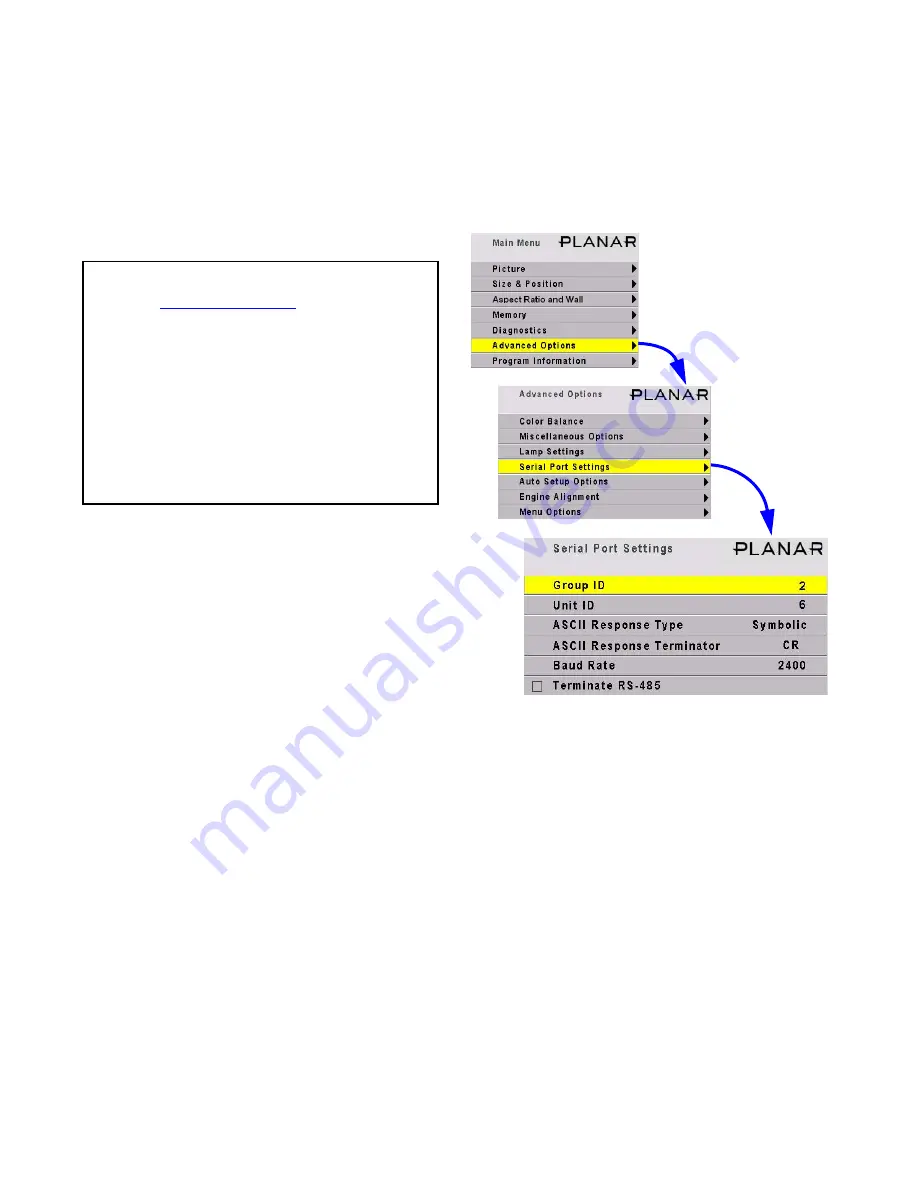
Cube IDs
When the cubes are connected in a series loop
(2.5.4 “Connections, Control: RS232 & RS485” on
page 28), each cube should have a
unique
ID. The ID
is set in the Serial Settings menu.
The
Group ID
and the
Unit ID
go together to
make the cube’s ID. Each of the two parts has a range
for characters from 0 to 9 and from A to Z (not case
sensitive).
Addressing the cubes
When you send a command, it will have an
address
. There are five forms of the address.
• To address all the cubes in this serial loop, use **
for the address.
• To address a single cube, use the specific ID of
that cube, such as A6 or 00 or 1B.
• To address all the cubes with a certain Group ID,
use an address like 3* with will address all the
cubes with the Group ID of 3, but with any Unit
ID. If you have three walls, and all the cubes in
one of the walls have Group ID 3, this type of
command would address only this wall.
• To address all the cubes with a certain Unit ID,
use an address like *0 or *3.
Baud rate
Each cube’s baud rate
must
be set to the computer
or controller ’s baud rate. The baud rate is
not
auto-
matically established, as it is in modems.
Terminating the series
If the serial string is very long, you may have to
terminate the last cube in the string for good commu-
nication. Check the Terminate RS485 box.
In most instances, this is not necessary. Terminat-
ing the string unnecessarily can cause its own com-
munication problems. The guide line is: If it works
without terminating, leave it alone.
ASCII settings
… are explained in the RS232 manual for Margay,
available or the website. Document 077-0007. All the
serial commands
are in this document, too. This and
other documents are available from
Planar
’s website.
Open
Planar
’s website in your internet
browser.
In the top banner, click on LOGIN. This
opens a new window.
Click on the lower, blue LOGIN NOW but-
ton for Consultants and Designers.
The User Name is tech.
The Password is help.
Click OK to open the window with all the
manuals, utility programs, FRUs and firmware
updates.
Summary of Contents for WN-5040-720
Page 1: ...WN 5040 720 User Guide...
Page 2: ......
Page 3: ...i WN 5040 720 Margay 50 Display Wall Unit User Guide 020 0548 00B 29 March 2007...
Page 6: ...iv...
Page 7: ......
Page 14: ...5...
Page 17: ...6...
Page 20: ...9...
Page 24: ...13...
Page 30: ...19...
Page 32: ...21 Electronics module as seen from the front The electronics module door is open...
Page 34: ...23 In Out...
Page 36: ...25...
Page 38: ...27 AC power in and out 1 4 5 3 2 6 No more than 4 115 VAC...
Page 40: ...29...
Page 51: ...40...
Page 54: ...43...
Page 56: ...45...
Page 58: ...47...
Page 66: ...55...
Page 70: ...59...
Page 72: ...61...
Page 74: ...63 ENTER ENTER...
Page 77: ...66...
Page 80: ...69...
Page 82: ...71...
Page 84: ...73...
Page 86: ...75...
Page 95: ...84...
Page 115: ...104 Diagnostics RS232 RS485 Status...
Page 116: ...105 Diagnostics Test Patterns...
Page 117: ...106 Diagnostics Setup Summary...
Page 128: ...117 Starts scanning the input con nectors for the next available source...
Page 131: ...120 7 3 Drawings All dimensions are in inches...
Page 132: ...121...
Page 133: ...122...
Page 134: ...123...
Page 140: ...129...
Page 144: ...133...


