52
3.3 Color Balancing a Wall of Margays
Color Balancing can be done before or after Input Levels.
The object of color balancing is to make the individ-
ual units show the same colors. When we see a red
car move across a video wall from one display to
another, we want it to have the same color for the
whole trip, not change from red to maroon to orange.
The displays naturally have slightly different colors
from one display to the next, because of slight varia-
tions in the lamp and DLP™ engine. This cannot be
avoided, but we can compensate for it with color bal-
ancing.
Color balancing is subjective. It may seem strange
at first, but it gets easier with practice. Fortunately,
you don't have to match all the colors; you only have
to match whites and grays.
When you make all the displays look the same
with White and Gray, all the other colors will look
the same. It is not necessary to achieve a perfect
white or a perfectly colorless gray. It is only necessary
that all the displays look alike when they display
white and gray.
CAUTION
Never try to match the colors of the display
units with the Black and White Level controls
or with the Video Controls. You will not like the
results if you do.
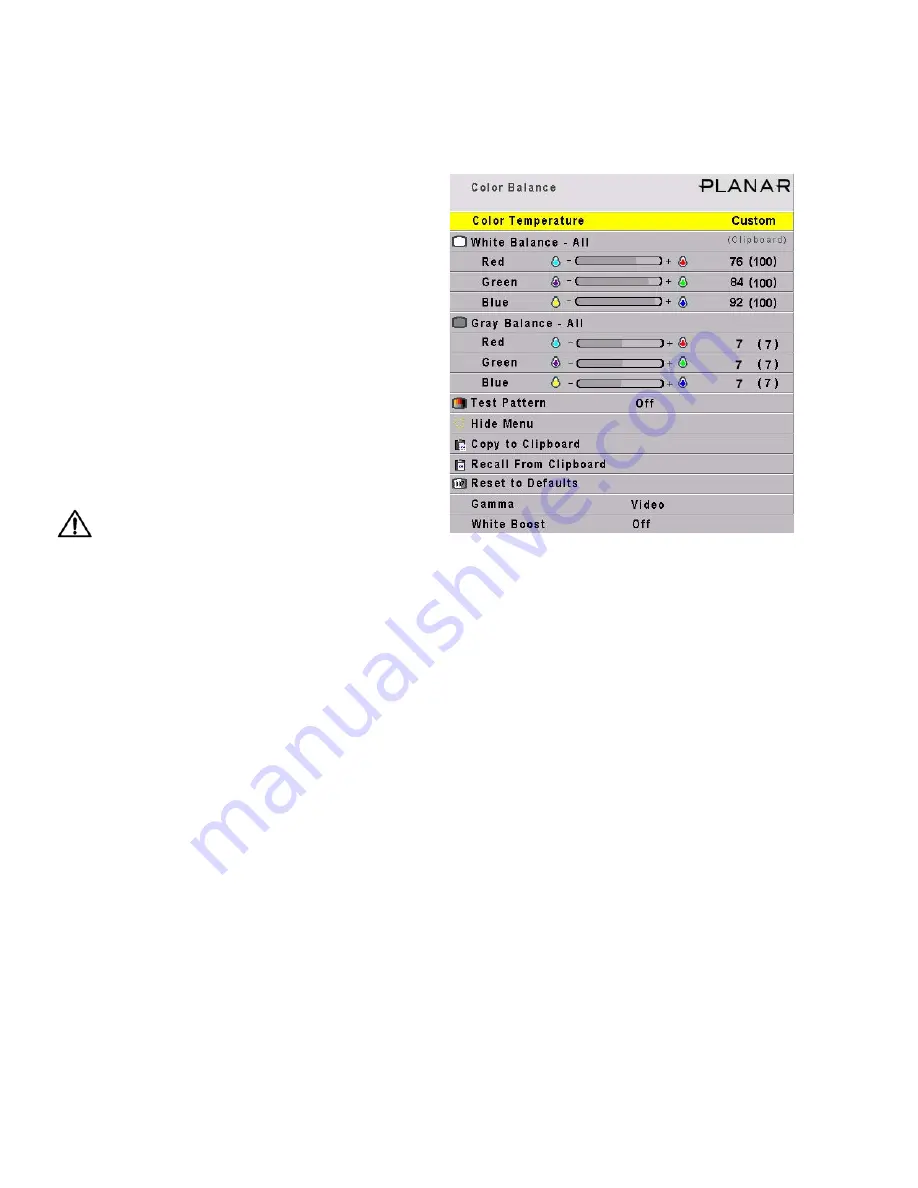
Color Balancing
1. Turn on all the units in the wall and let them
warm up for at least five minutes. The lamps
must be thoroughly warm before you color bal-
ance.
2. For each display, press
MISC
once on the remote.
3. Set
Gamma
at the bottom of the menu to either
Video or Film, but be sure this is the same for all
cubes.
4. Set
White Boost
to
Off
.
5. Set
Test Pattern
to
White
.
Always use the internal Test Patterns for color
balancing, not an external pattern.
If the wall has never been color balanced, make sure
you start with the same color temperature setting on
each cube. If you are not interested in achieving a
specific color temperature, use the default of 8500K,
which is the brightest. If the cube has been color
balance before, it will display
C
USTOM
in its color
temperature setting, because the balance values don’t
match any of the pre-set color temperatures.
6. Look at the Color Balance values on
all
displays.
All the White balance values should be 100, and
all the Gray balance values should be 7. If any val-
ues are not that way, select
Reset to Defaults
and
press
ENTER
. This is where you should
always
start color balancing.
7. Select Hide Menu and press
ENTER
on each dis-
play. This will remove all the menus so you can
see the whole screen on all displays. (To re-open
the Color Balance menu, press
ENTER
for that dis-
plays.)
8. Look at all the displays together. Stand far enough
away from the wall so you are looking almost
squarely at all of them. Pay attention to the large
central area, not the edges.
9. Find the darkest display. This is the
baseline
dis-
play.
Do not
change this one.
Summary of Contents for WN-5040-720
Page 1: ...WN 5040 720 User Guide...
Page 2: ......
Page 3: ...i WN 5040 720 Margay 50 Display Wall Unit User Guide 020 0548 00B 29 March 2007...
Page 6: ...iv...
Page 7: ......
Page 14: ...5...
Page 17: ...6...
Page 20: ...9...
Page 24: ...13...
Page 30: ...19...
Page 32: ...21 Electronics module as seen from the front The electronics module door is open...
Page 34: ...23 In Out...
Page 36: ...25...
Page 38: ...27 AC power in and out 1 4 5 3 2 6 No more than 4 115 VAC...
Page 40: ...29...
Page 51: ...40...
Page 54: ...43...
Page 56: ...45...
Page 58: ...47...
Page 66: ...55...
Page 70: ...59...
Page 72: ...61...
Page 74: ...63 ENTER ENTER...
Page 77: ...66...
Page 80: ...69...
Page 82: ...71...
Page 84: ...73...
Page 86: ...75...
Page 95: ...84...
Page 115: ...104 Diagnostics RS232 RS485 Status...
Page 116: ...105 Diagnostics Test Patterns...
Page 117: ...106 Diagnostics Setup Summary...
Page 128: ...117 Starts scanning the input con nectors for the next available source...
Page 131: ...120 7 3 Drawings All dimensions are in inches...
Page 132: ...121...
Page 133: ...122...
Page 134: ...123...
Page 140: ...129...
Page 144: ...133...


