background image

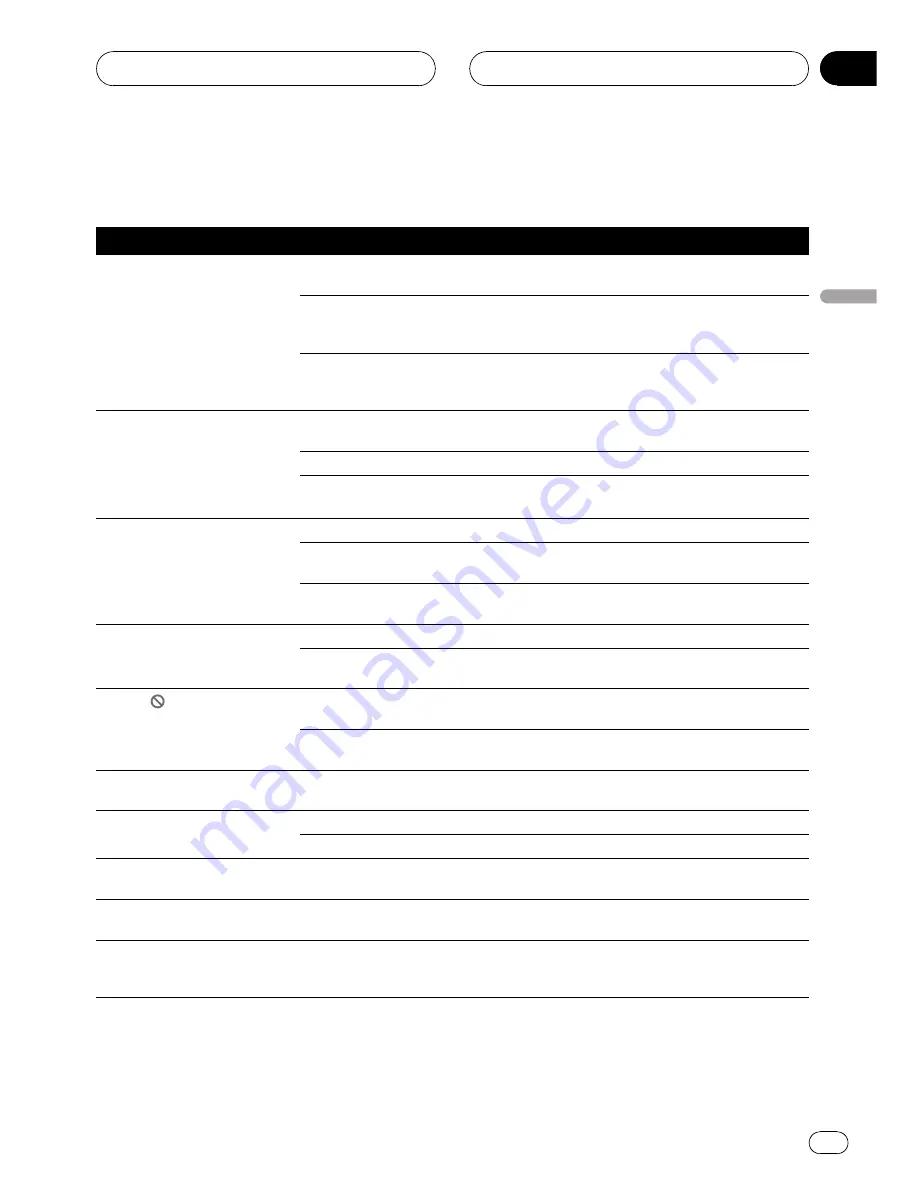
Troubleshooting

Common

Symptom

Cause

Action (See)

Power doesn

t turn on.

The unit doesn

t operate.

Leads and connectors are incor-
rectly connected.

Confirm once more that all connections are
correct.

The fuse is blown.

Rectify the reason for the fuse blowing, then
replace the fuse. Be very sure to install the
correct fuse with the same rating.

Noise and other factors are causing
the built-in microprocessor to oper-
ate incorrectly.

Turn the unit off and then on.

Operation with the remote con-
trol isn

t possible.

The unit does not operate cor-
rectly even when the appropriate
remote control buttons are
pressed.

The remote control operation mode
is incorrect.

Switch to the correct remote control mode.
(Page 13)

Battery power is low.

Load new battery. (Page 8)

Some operations are prohibited
with certain discs.

Check by using another disc.

Playback is not possible.

The disc is dirty.

Clean disc. (Page 86)

The loaded disc is a type this unit
cannot play.

Check what type the disc is.

Non compatible video system disc
is loaded.

Change to a disc compatible to your video
system.

No sounds are heard.
The volume level will not rise.

Cables are not connected correctly.

Connect the cables correctly.

The unit is performing still, slow mo-
tion or frame-by-frame playback.

There is no sound during still, slow motion or
frame-by-frame playback.

The icon

is displayed, and op-

eration is not possible.

The operation is prohibited for the
disc.

This operation is not possible.

The operation is not compatible
with the disc

s organization.

This operation is not possible.

The picture stops (pauses) and
the unit cannot be operated.

Reading of data has become impos-
sible during playback.

After stopping playback once, start playback
once more.

There is no sound.
Volume level is low.

The volume level is low.

Adjust the volume level.

The attenuator is on.

Turn the attenuator off.

There is audio and video skip-
ping.

The unit is not firmly secured.

Secure the unit firmly.

The picture is stretched, the as-
pect is incorrect.

The aspect setting is incorrect for
the display.

Select the appropriate setting for your display.
(Page 48)

When the ignition switch is
turned ON (or turned to ACC),
the motor sounds.

The unit is confirming whether a
disc is loaded or not.

This is a normal operation.

Additional Information

En

81

Appendix

Additional

Information

Summary of Contents for DVH-P5900MP

Page 1: ...Operation Manual DVD RDS RECEIVER DVH P5900MP English ...

Page 2: ...s What 10 Basic Operations 14 Tuner 15 Playing DVD video discs 19 Playing Video CDs 27 Playing DivX files 31 Playing CDs 36 Audio Adjustments 42 Setting up the DVD player 46 Initial Settings 51 Other Functions 55 Available accessories Playing songs on iPod 57 Playing songs on USB portable audio player USB memory 59 Multi CD Player 61 TV tuner 65 Bluetooth adapter 67 Introduction of DVD operation 6...

Page 3: ...o the driver In some countries or states the viewing of images on a display inside a vehicle even by persons other than the driver may be illegal Where such regulations apply they must be obeyed and this unit s DVD features should not be used NEVER install the display in a location that enables the driver to watch the DVD or Video CD while driving When you park your car in a safe place and apply t...

Page 4: ...ceania Use in other areas may result in poor reception The RDS radio data system function operates only in areas with FM stations broadcasting RDS sig nals CAUTION Do not allow this unit to come into contact with liquids Electrical shock could result Also this unit damage smoke and overheat could result from contact with liquids CLASS 1 LASER PRODUCT This product contains a laser diode of higher c...

Page 5: ...he manual before you begin using this unit It is especially important that you read and observe WARNINGs and CAU TIONs in this manual Visit our website Visit us at the following site Register your product We will keep the de tails of your purchase on file to help you refer to this information in the event of an insurance claim such as loss or theft We offer the latest information about Pioneer Cor...

Page 6: ...ing or disassembly is prohibited About WMA The Windows Media logo printed on the box indicates that this unit can play back WMA data WMA is short for Windows Media Audio and refers to an audio compression technology that is developed by Microsoft Corporation WMA data can be encoded by using Windows Media Player version 7 or later Windows Media and the Windows logo are trademarks or registered trad...

Page 7: ... and are used under license What the marks on DVDs indicate The marks below may be found on DVD disc labels and packages They indicate the type of images and audio recorded on the disc and the functions you can use Mark Meaning 2 Indicates the number of audio sys tems 2 Indicates the number of subtitle lan guages 3 Indicates the number of viewing an gles 16 9 LB Indicates the picture size aspect r...

Page 8: ... pointing in the proper di rection When using for the first time pull out the film protruding from the tray WARNING Keep the battery out of the reach of children Should the battery be swallowed immediately consult a doctor CAUTION Use only one CR2025 3 V lithium battery Remove the battery if the remote control is not used for a month or longer Danger of explosion if battery is incorrectly re place...

Page 9: ...mote control may not function prop erly in direct sunlight Important Do not store the remote control in high tem peratures or direct sunlight Do not let the remote control fall onto the floor where it may become jammed under the brake or accelerator pedal Before You Start En 9 Section 02 Before You Start ...

Page 10: ...t jack 3 5 mm stereo video jack Use to connect an auxiliary equipment 8 DETACH button Press to remove the front panel from the head unit 9 EQ button Press to select various equalizer curves a SW button Press to select the subwoofer setting menu Press and hold to select the bass boost set ting menu b 1 to 6 buttons These buttons can perform the same opera tion as NUMBER 1 to 6 buttons on the re mot...

Page 11: ... VOLUME but tons Press to increase or decrease the volume 4 AUDIO button Press to change the audio language during DVD playback SUBTITLE but ton Press to change the subtitle language during DVD playback ANGLE button Press to change the viewing angle during DVD playback 5 AUTO PLAY button Press to turn the DVD auto playback function on or off 6 RETURN button Press to display the PBC playback contro...

Page 12: ...multi CD player Press CLEAR to clear the input numbers Press to select a menu item on the Video CDs featuring PBC playback control 14 BAND button Press to select among three FM bands and to cancel the control mode of functions Press to switch between media file types Refer to Switching the media file type on page 15 15 DISPLAY but ton Press to turn the information display on or off when the video ...

Page 13: ...uttons on the head unit If you want to select a disc located at 7 to 12 by using buttons 1 to 6 press and hold the corresponding numbers such as 1 for disc 7 until the disc number ap pears in the display DVD mode operation If you switch the mode to DVD the joystick and 0 to 10 operations are changed for DVD player When you want to operate the follow ing functions switch the mode to DVD When operat...

Page 14: ...en this unit s blue white lead is connected to the car s auto antenna relay control term inal the car s antenna extends when this unit s source is turned on To retract the an tenna turn the source off When you con nected a Pioneer multi channel processor DEQ P6600 to this unit auto antenna cannot be controled Built in DVD player basic operations Playing a disc Insert a disc into the disc loading s...

Page 15: ...pes Adjusting the volume Use VOLUME to adjust the sound level With the head unit rotate VOLUME to in crease or decrease the volume With the remote control press VOLUME to in crease or decrease the volume Tuner Basic Operations When the separately sold display is connected to this unit the listed information will appear on it This unit s AF alternative frequencies search function can be turned on a...

Page 16: ...ix MW LW stations can be stored in memory When you find a frequency that you want to store in memory press one of pre set tuning buttons 1 to 6 and hold until the preset number stops flashing The number you have pressed will flash in the preset number indicator and then remain lit The selected radio station frequency has been stored in memory The next time you press the same preset tun ing button ...

Page 17: ...es When the tuner can t get good reception the unit automatically search for a different sta tion in a same network Press and hold TA repeatedly to turn AF alternative frequency search on or off Notes You can also turn the AF function on or off in the menu that appears with the pressing of FUNCTION Only RDS stations are tuned in during seek tuning or BSM when AF is on When you recall a preset stat...

Page 18: ... To turn traffic announcements standby off press TA again 3 Use VOLUME to adjust the TA volume when a traffic announcement begins The newly set volume is stored in memory and recalled for subsequent traffic announce ments 4 Press TA while a traffic announcement is being received to cancel the announce ment The tuner returns to the original source but re mains in the standby mode until TA is presse...

Page 19: ...Children s SOCIAL Social affairs RELIGION Religious affairs or services PHONE IN Phone in TOURING Travel programs not for traffic an nouncements LEISURE Hobbies and recreational activities DOCUMENT Documentaries Playing DVD video discs Watching a DVD video Read the precautions with discs and player on Handling guideline of discs and player on page 86 1 Title number indicator Shows the title curren...

Page 20: ...on on the disc is memorized enabling playback from that point when you play the disc again To resume playback press f If the remote control is set to DVH g does not operate Specifying title To perform this function set the remote con trol to DVD mode You cannot operate this function by using NUMBER when the remote control is set to DVH mode Press NUMBER corresponding to a de sired title Title numb...

Page 21: ... This lets you slow down playback speed 1 Press r and hold during playback The icon is displayed forward slow motion playback begins To return to normal playback press f 2 Press r or q to adjust playback speed during slow motion playback Each time you press r or q it changes the speed in four steps in the following order 1 16 1 8 1 4 1 2 Notes There is no sound during slow motion play back Dependi...

Page 22: ...k on a DVD s pack age indicates the number of recorded subtitle languages With some DVDs switching between subtitle languages may only be possible using a menu display You can also switch between subtitle lan guages using DVD setup menu For details refer to Setting the subtitle language on page 46 Changing the viewing angle during playback Multi angle With DVDs featuring multi angle scenes shot fr...

Page 23: ...d start playback Press AUTO PLAY to turn automatic playback on A PLAY ON is displayed To turn automatic playback off press AUTO PLAY again When the automatic playback is on you can not operate repeating play of DVD disc refer to Repeating play on the next page CM skip CM back This function skips a reproduced image for a specified time If the currently playing disc contains commercials it is possib...

Page 24: ...dicator Shows when repeat range is selected to cur rent chapter title Press FUNCTION to display the function names Press FUNCTION repeatedly to switch be tween the following functions For DVD video REPEAT repeat play LR SEL audio output PAUSE pause COMP compression For DVD VR discs REPEAT repeat play LR SEL audio output PAUSE pause item list COMP com pression PLAYLIST playlist To return to the pla...

Page 25: ...the display 2 Press a or b to scroll through the list of titles 3 Press d to select the desired title When you select the title that selection will begin to play 4 Press DISPLAY to return to the ordinary display If you do not operate the list within about 30 seconds the display is automatically returned to the ordinary display Using compression Using the COMP compression function let you adjust th...

Page 26: ...r output channel DVD VR shows the play mode audio system speaker output channel subtitle setting and repeat range 7 Title display Shows the name of the currently playing title Press DISPLAY to switch the informa tion display Press DISPLAY repeatedly to switch between the following display modes For DVD video Information display 1 Information dis play 2 Normal playback display For DVD VR discs Info...

Page 27: ...at a desired point press f Fast forward fast reverse may not be possible at certain locations on some discs If this hap pens normal playback automatically resumes 3 To skip back or forward to another track press o or p Pressing p skips to the start of the next track Pressing o once skips to the start of the current track Pressing again will skip to the previous track Track numbers are displayed fo...

Page 28: ...you temporarily stop disc playback Press f during playback The icon e is displayed and playback is paused letting you view a still image To resume playback at the same point that you turned pause on press f again Note Depending on the disc and the playback location on the disc the icon may be displayed indicat ing that still playback is not possible Frame by frame playback This lets you move ahead...

Page 29: ...ack Control playback you cannot select REPEAT To return to the playback display press BAND If you do not operate the function within about 30 seconds the display is automatically returned to the playback display Repeating play Repeat play lets you play the same track over again During playback of Video CDs featuring PBC playback control this function can not be operated 1 Press FUNCTION to select ...

Page 30: ...nformation will ap pear on it 1 Disc icon 2 Media indicator 3 Track number indicator 4 Play time indicator 5 Repeat indicator 6 Speaker output channel indicator Press DISPLAY to switch the informa tion display Press DISPLAY repeatedly to switch between the following display modes Information display Normal playback display When a Video CD featuring the PBC playback control function starts playing ...

Page 31: ...ng played This operation is can celed when the previous or next file is reached 3 To skip back or forward to another file press o or p Pressing p skips to the start of the next file Pressing o once skips to the start of the cur rent file Pressing again will skip to the pre vious file Track numbers are displayed for eight sec onds 4 To stop playback press g To resume playback press f If the remote ...

Page 32: ...ts playback of content to specific registered devices If the message is displayed after load ing a disc containing DivX VOD content press f Playback of the DivX VOD content will start To skip to the next file press p If you do not want to play the DivX VOD con tent press g Pausing playback Pause lets you temporarily stop disc playback Press f during playback The icon e is displayed and playback is...

Page 33: ...the separately sold display is connected to this unit the listed information will appear on it File name list lets you see the list of file names or folder names and select one of them to playback You can also use the function menu to dis play the list of files or folders File can also be selected by using the a b c d but tons on the head unit Refer to Selecting files from the file name list on th...

Page 34: ...t play range changes to disc repeat When FLD folder repeat is selected it is not possible to play back a subfolder of that folder Pausing playback Pause lets you temporarily stop disc playback 1 Press FUNCTION to select PAUSE 2 Press a to turn pause on Playback of the current file pauses To turn pause off press b Selecting files from the file name list When the separately sold display is connected...

Page 35: ...eparately sold display is connected to this unit the following information will ap pear on it 1 Disc icon When playing a disc containing various data format MIXED appear on it 2 Media indicator 3 Folder number indicator 4 File number indicator 5 Play time indicator 6 Audio system indecator 7 Subtitle number indicator 8 Repeat indicator 9 Title display Shows the name of the currently playing file P...

Page 36: ...ck or forward to another track press c or d You can also skip back or forward to another track by pressing o or p on the remote con trol Notes There is sometimes a delay between starting up disc playback and the sound being issued When being read FRMT READ is displayed If an error message such as ERROR02 XX is displayed refer to Error messages on page 83 When playing CD EXTRA or MIXED MODE CDs com...

Page 37: ...ascending order A B C Each press of b will display a letter in des cending order 4 Press d to move the cursor to the next character position When the letter you want is displayed press d to move the cursor to the next position and then select the next letter Press c to move backwards in the display 5 Move the cursor to the last position by pressing d after entering the title When you press d one m...

Page 38: ...one of them to play back You can also use the function menu to dis play the track name list Tracks can also be selected by using a b c d buttons on the head unit Refer to Selecting tracks from the list on page 40 1 Click the joystick to display the list of track titles 2 Move the joystick up or down to change the desired track title 3 Move the joystick right to select the de sired track title When...

Page 39: ...FUNCTION to select REPEAT 2 Press c or d to select the repeat range DSC Repeat all tracks TRK Repeat just the current track FLD Repeat the current folder If you select another folder during repeat play the repeat play range changes to disc repeat When playing CD performing track search or fast forward reverse cancels the repeat play auto matically When playing compressed audio performing track sea...

Page 40: ...s by clicking the joystick File can also be selected by using the joystick Refer to Selecting tracks from the file name list on page 38 1 Press FUNCTION to select a file name list Press FUNCTION until the names of files or folders appears in the display 2 Press a or b to scroll through the list of file names or folder names 3 Press d to select the desired file name or folder name When you select a...

Page 41: ...ay Shows the text information of currently play ing disc For CD TEXT discs D TITLE disc title D ARTIST disc artist name T TITLE track title T ARTIST track artist name For WMA MP3 AAC discs ALBUM album title TRACK track title FOLDER folder name FILE file name ARTIST artist name Press DISPLAY to switch the informa tion display Press DISPLAY repeatedly to switch between the following display modes In...

Page 42: ... you cannot switch to SLA To return to the display of each source press BAND If you do not operate the audio function within about 30 seconds the display is automatically re turned to the source display Using balance adjustment You can change the fader balance setting so that it can provide you an ideal listening envir onment in all occupied seats 1 Press AUDIO to select FADER If the balance setti...

Page 43: ...espectively 6 to 4 or 6 is displayed as the equalizer curve is increased or decreased The actual range of the adjustments are differ ent depending on which equalizer curve is se lected The equalizer curve with all frequencies set to 0 cannot be adjusted Adjusting 7 band graphic equalizer For CUSTOM 1 and CUSTOM 2 equalizer curves you can adjust the level of each band A separate CUSTOM 1 curve can ...

Page 44: ...ap pears in the display Press d to select normal phase and NOR appears in the display Adjusting subwoofer settings When the subwoofer output is on you can ad just the cut off frequency and the output level of the subwoofer 1 Press SW to select 80HZ 0 You can also select the subwoofer setting menu by pressing AUDIO on the unit When the subwoofer output is on you can se lect 80HZ 0 subwoofer setting...

Page 45: ...hose in the se lected range are outputted from the front or rear speakers Adjusting source levels SLA source level adjustment lets you adjust the volume level of each source to prevent ra dical changes in volume when switching be tween sources Settings are based on the FM volume level which remains unchanged 1 Compare the FM volume level with the level of the source you wish to adjust 2 Press AUDI...

Page 46: ... display Setting the subtitle language You can set a desired subtitle language If the selected subtitle language is recorded on the DVD subtitles are displayed in that language 1 Move the joystick up or down to select S TTL LANG 2 Click the joystick A subtitle language menu is displayed 3 Move the joystick left or right to select the desired language 4 Click the joystick A subtitle language is set...

Page 47: ...on a disc 1 Move the joystick up or down to select MENU LANG 2 Click the joystick A menu language menu is displayed 3 Move the joystick left or right to select the desired menu language 4 Click the joystick The menu language is set Notes If the selected language is not recorded on the disc the language specified on the disc is outputted Pressing RETURN takes you back to the pre vious display If yo...

Page 48: ...he shape of a letterbox with black bands at the top and bottom of the screen PANSCAN The picture is cut short at the right and left of the screen 4 Click the joystick The selected TV aspect is set Notes When playing discs that do not specify PANSCAN playback is with LETTER BOX even if you select PANSCAN setting Confirm whether the disc package bears the 16 9 LB mark See page 7 Some discs do not en...

Page 49: ...yback of those scenes will be skipped For details refer to the instruction manual that came with the discs Pressing RETURN takes you back to the pre vious display Changing the level You can change the set parental lock level 1 Move the joystick up or down to select PARENTAL 2 Click the joystick Parental lock setting menu is displayed 3 Press NUMBER buttons to input the re gistered code number 4 Mo...

Page 50: ...title is set on or off Notes Up to 42 characters can be displayed on one line If more than 42 characters are set the line breaks and the characters are displayed on the next line Up to 126 characters can be displayed on one screen If more then 126 characters are set the excess characters will not be displayed Setting for digital output Audio which is outputted from digital output of this unit can ...

Page 51: ...operate D ATT and A RESET instead of R SP Setting the clock Use these instructions to set the clock 1 Press FUNCTION to select CLOCK AJST 2 Press c or d to select the segment you wish to set Hour Minute As you select segments of the clock display the segment selected will blink 3 Press a or b to set the clock Pressing a will increase the value of the se lected segment Pressing b will decrease the ...

Page 52: ... or b to turn AUX2 on or off Setting the AV input You can connect AV components to the AV input with an RCA cable Switch the AV input setting according to the connected AV component For more details refer to the installation man ual Select TV to watch video of a TV tuner as TELEVISION source Select DVD to watch video of a connected DVD player as S DVD source Select EXT V to watch video of a connec...

Page 53: ...t can be used for full range speaker R SP FULL or subwoofer R SP S W connection If you switch the rear output setting to R SP S W you can connect a rear speaker lead directly to a subwoofer with out using an auxiliary amp 1 Press FUNCTION to select R SP 2 Press a or b to switch the rear output setting Pressing a or b will switch between R SP FULL full range speaker and R SP S W subwoofer and that ...

Page 54: ... is connected to this unit you can operate this function You can reset audio functions other than the following settings Volume setting refer to Adjusting the vo lume on page 15 Listening position setting refer to Using the position selector on page 70 Fader balance setting refer to Using bal ance adjustment on page 69 SLA source level adjustment setting refer to Adjusting source levels on page 72...

Page 55: ... can control an auxiliary equipment such as VCR or portable device sold sepa rately When connected auxiliary equipment is automatically recognized as AUX source and assigned to AUX About AUX connection method You have two methods to connect auxiliary equipments to this unit Mini pin plug cable AUX1 When connecting auxiliary equipment using a mini plug cable iPod and portable audio video player can...

Page 56: ...og or di gital However when you use AUX2 as the source make sure the AUX mode is set to analog AUX digital should not be used with this unit Using the PGM button You can operate the preprogrammed functions for each source by using BOOKMARK Press BOOKMARK to turn pause on when selecting the following sources DVD Built in DVD player S DVD DVD player multi DVD player IPOD iPod USB USB portable audio ...

Page 57: ...name This playlist plays all songs in your iPod If the characters recorded on the iPod are not compatible with this unit those charac ters will not be displayed If all characters recorded on the iPod are not compatible with this unit NO INFO will be displayed You can also perform the following opera tions by using the joystick 1 Press a or b repeatedly to switch be tween the following settings PLA...

Page 58: ...peatedly to switch between the following functions REPEAT repeat play SHFL random play PAUSE pause To return to the playback display press BAND If you do not operate the function within about 30 seconds the display is automatically returned to the playback display Repeating play For playback of the songs on the iPod there are two repeat play ranges ONE repeat one song and ALL repeat all songs in t...

Page 59: ...ou can use this unit to control a USB adapter e g CD UB100 which is sold separately For details concerning operation refer to the USB adapter s operation manual This section provides information on USB portable audio player USB memory operations with this unit which differs from that described in the USB adapter s operation manual Optimum performance of this unit may not be obtained depending on t...

Page 60: ...om play is on 3 RPT indicator Shows when repeat range is selected to TRK or FLD Press FUNCTION repeatedly to switch between the following functions REPEAT repeat play RANDOM random play SCAN scan play PAUSE pause item list To return to the playback display press BAND If you do not operate the function within about 30 seconds the display is automatically returned to the playback display Function an...

Page 61: ...ual are supported by 50 disc multi CD players This unit is not designed to operate disc title list functions with a 50 disc multi CD player About the disc title list functions please refer to Selecting discs from the disc title list on page 65 1 Disc number indicator 2 Track number indicator 3 Play time indicator 1 Press SOURCE to select the multi CD player 2 Press a or b to select a disc you want...

Page 62: ...turn to the playback display press BAND If you do not operate the function within about 30 seconds the display is automatically returned to the playback display Function mode 2 Press FUNCTION and hold repeatedly to switch between the following functions TITLE IN disc title input ITS ITS program ming To return to the playback display press BAND Function and operation REPEAT RANDOM SCAN PAUSE COMP a...

Page 63: ...ith the disc titles With multi CD players sold be fore the CDX P1250 and CDX P650 up to 24 tracks can be stored in the playlist 1 Play a CD that you want to program Press a or b to select the CD 2 Press FUNCTION and hold until TITLE IN appears in the display then press FUNCTION to select ITS If you select ITS ITS play in function mode 1 press and hold FUNCTION to enable you to select ITS directly ...

Page 64: ...t you want to delete Press a or b to select the CD 2 Press FUNCTION and hold until TITLE IN appears in the display then press FUNCTION to select ITS 3 Press b to erase all tracks on the cur rently playing CD from your ITS playlist All tracks on the currently playing CD are erased from your playlist and ITS CLEAR is dis played 4 Press BAND to return to the playback display Using disc title function...

Page 65: ...tails concerning operation refer to the TV tuner s operation manual This section pro vides information on TV operations with this unit which differs from that described in the TV tuner s operation manual 1 Band indicator Shows which band the TV tuner is tuned to 2 Preset number indicator Shows which preset has been selected 3 Channel indicator Shows which channel the TV tuner is tuned 1 Press SOUR...

Page 66: ... 12 stations six for each of two TV bands can be stored in memory You can use a and b to recall stations as signed to preset tuning numbers P CH01 to P CH12 Storing the strongest broadcast stations sequentially 1 Press FUNCTION to select BSSM 2 Press a to turn BSSM on BSSM begins to flash While BSSM is flashing the 12 strongest broadcast stations will be stored in order from the lowest channel up ...

Page 67: ...efer to the DVD player s or multi DVD player s operation manual This section provides information on DVD operations with this unit which differs from that described in the DVD player s or multi DVD player s operation manual Operation You can use the following function with this unit Reference page is in this manual Using ITS playlist and disc title functions During CD playback when using this unit...

Page 68: ...h is sold sepa rately Some functions may differ depending on the multi channel processor connected to this unit By carrying out the following settings adjust ments in the order shown you can create a fi nely tuned sound field effortlessly 1 Setting the speaker setting 2 Using the position selector 3 Auto TA and EQ auto time alignment and auto equalizing 4 Adjusting the time alignment 5 Adjusting t...

Page 69: ...en the di rect control is on except VOLUME and PLII When you select MUSIC in the PLII you can select adjusting music mode When playing other than the DVD disc you cannot switch to DRC When selecting the FM as the source you cannot switch to SLA To return to the display of each source press BAND Note If you do not operate the DSP function within about 30 seconds the display is automatically re turn...

Page 70: ... two channel sources to achieve high purity matrix surround If both the center and the rear speakers are set to OFF you cannot use this function Dolby Pro Logic II supports up to 48kHz sampling rate stereo source and has no ef fect on other types of source 1 Press AUDIO to select PLII 2 Press c or d to select the desired mode MOVIE The Movie mode suitable for movie playback MUSIC The Music mode su...

Page 71: ...eatedly to switch between the following modes MUSICAL musical DRAMA drama ACTION action JAZZ jazz HALL hall CLUB club OFF off Note If the source is a 2 channel LPCM audio or a 2 channel Dolby Digital audio and you select SFC effects that are most applicable for 5 1 channel audio i e MUSICAL DRAMA or ACTION we recommend turning Dolby Pro Logic II on On the other hand when selecting SFC effects that...

Page 72: ...t the volume level of each source to prevent ra dical changes in volume when switching be tween sources Settings are based on the FM volume level which remains unchanged 1 Compare the FM volume level with the level of the source you wish to adjust 2 Press AUDIO to select SLA 3 Press a or b to adjust the source vo lume Each press of a or b increases or decreases the source volume SLA 4 to SLA 4 is ...

Page 73: ...l AT EQ ap pears in the display If auto TA and EQ have not been carried out SET A EQ is displayed when AT EQ is selected 2 Press a to turn the auto equalizer on AT EQ ON appears in the display To turn auto equalizer off press b Auto TA and EQ auto time alignment and auto equalizing The auto time alignment is automatically ad justed for the distance between each speaker and the listening position T...

Page 74: ... of an active subwoofer should be set to the highest frequency The time alignment value calculated by auto TA and EQ may differ from the actual distance in the following circumstances However the distance has been calculated by computer to be the optimum delay to give accurate results for the circum stances so please continue to use this value When the reflected sound within a vehi cle is strong a...

Page 75: ...into the micro phone input jack on the multi channel pro cessor 8 Press a to start the auto TA and EQ 9 Get out of the car and close the door within 10 seconds when the 10 second count down starts The measurement tone noise is outputted from the speakers and auto TA and EQ be gins When all speakers are connected auto TA and EQ is completed in about nine minutes To stop auto TA and EQ press any key...

Page 76: ...ou can switch to PHASE only when the sub woofer has been set to ON 3 Press a or b to select the correct size for the selected speaker Each press of a or b selects the size in the fol lowing order SML small LRG large OFF off You cannot select OFF when FRONT front speakers have been selected You can select ON or OFF when SUB W sub woofer has been selected You can switch REV reverse phase or NOR norm...

Page 77: ...00 Hz 4 Press BAND to return to the playback display Note Selecting a cross over frequency is to set a cross over frequency of the subwoofer s L P F low pass filter and that of the SML speaker H P F high pass filter The cross over frequency setting has no effect if the subwoofer is set to OFF and other speakers are set to LRG or OFF Adjusting the speaker output levels Speaker level can be adjusted...

Page 78: ...dis played as the level is increased or decreased The test tone rotates to the next speaker after about two seconds from the last operation 4 Press c to stop the test tone output 5 Press BAND to return to the playback display Notes If needed select speakers and adjust their ab solute output levels Refer to Adjusting the speaker output levels on the previous page To adjust the speaker output levels...

Page 79: ... the equalization to match car interior acoustic characteristics as desired Recalling equalizer curves There are seven stored equalizer curves which you can easily recall at any time Here is a list of the equalizer curves Display Equalizer curve POWERFUL PWRFL Powerful NATURAL Natural VOCAL Vocal EQ FLAT Flat CUSTOM 1 Custom 1 CUSTOM 2 Custom 2 SUPER BASS S BASS Super bass CUSTOM 1 and CUSTOM 2 ar...

Page 80: ...ed Each press of a or b selects equalizer bands in the following order LOW low MID mid HI high 4 Press d and then press a or b to select the center frequency of selected band Each press of a or b selects the frequency in the following order 40 50 63 80 100 125 160 200 250 315 400 500 630 800 1k 1 25k 1 6k 2k 2 5k 3 15k 4k 5k 6 3k 8k 10k 12 5k Hz 5 Press d and then press a or b to adjust the equali...

Page 81: ... video system No sounds are heard The volume level will not rise Cables are not connected correctly Connect the cables correctly The unit is performing still slow mo tion or frame by frame playback There is no sound during still slow motion or frame by frame playback The icon is displayed and op eration is not possible The operation is prohibited for the disc This operation is not possible The ope...

Page 82: ...e disc Playback is not with the audio language and subtitle language settings selected in the DVD setup menu The DVD playing does not feature dialog or subtitles in the language selected in the DVD setup menu Switching to a selected language is not possi ble if the language selected in the DVD setup menu is not recorded on the disc Page 46 Switching the viewing angle is not possible The DVD playin...

Page 83: ...e heard over speakers other than the center one Dolby Pro Logic II is turned on Turn Dolby Pro Logic II off If the audio source is mono and Dolby Pro Logic II is turned on sound is heard over the center speaker only Page 70 Turning dynamic range control on has no effects The currently reproduced sound is not Dolby Digital coded The feature is only effective on Dolby Digital sounds Page 71 No sound...

Page 84: ... secured by digital rights manage ment DRM Replace disc Understanding auto TA and EQ error messages When correct measurement of car interior acoustic characteristics is not possible using the auto TA and EQ an error message may appear on the display If an error message appears refer to the table below to see what the problem is and the suggested method of correcting the problem After checking try ...

Page 85: ...Translation CAUTION SCREEN IMAGE MAY APPEAR REVERSED Pioneer recommends the use of a camera which outputs mirror reversed images otherwise screen image may appear re versed Additional Information En 85 Appendix Additional Information ...

Page 86: ...s which have been finalized When DVD R DVD RW discs are used playback is possible only for discs which have been recorded with the Video format video mode It is not possible to play back DVD RW discs which have been recorded with the Video Recording format VR mode It may not be possible to play back DVD R DVD RW discs which have been recorded with the Video format video mode be cause of disc chara...

Page 87: ...xt information recorded on a CD R CD RW disc may not be dis played by this unit in the case of audio data CD DA Read the precautions with CD R CD RW discs before using them Dual Discs Dual Discs are two sided discs that have a recordable CD for audio on one side and a recordable DVD for video on the other Playback of the DVD side is possible with this unit However since the CD side of Dual Discs i...

Page 88: ...atibility WMA Compatible format WMA encoded by Windows Media Player Ver 7 7 1 8 9 or 10 Bit rate 5 kbps to 320 kbps CBR VBR Sampling frequency 8 kHz to 48 kHz Windows Media Audio 9 Professional Loss less Voice No MP3 Bit rate 8 kbps to 320 kbps CBR VBR Sampling frequency 8 kHz to 48 kHz em phasis 8 kHz to 48 kHz Compatible ID3 tag version 1 0 1 1 2 2 2 3 ID3 tag Version 2 x is given priority than ...

Page 89: ...ion code on page 50 File extensions such as avi or divx must be used properly For more details about DivX visit the follow ing site http www divx com DivX compatibility Compatible format DivX video format im plemented in relation to DivX standards DivX Ultra format No DivX files without video data No Compatible audio codec MP2 MP3 Dolby Digital LPCM No Bit rate 8 kbps to 320 kbps CBR VBR Sampling ...

Page 90: ...annada kn 1114 Sesotho st 1920 Azerbaijani az 0126 Kashmiri ks 1119 Sundanese su 1921 Bashkir ba 0201 Kurdish ku 1121 Swahili sw 1923 Byelorussian be 0205 Kirghiz ky 1125 Tamil ta 2001 Bulgarian bg 0207 Latin la 1201 Telugu te 2005 Bihari bh 0208 Lingala ln 1214 Tajik tg 2007 Bislama bi 0209 Laothian lo 1215 Thai th 2008 Bengali bn 0214 Lithuanian lt 1220 Tigrinya ti 2009 Tibetan bo 0215 Latvian l...

Page 91: ...create your own using your personal content and easy to use tools from DivX com DivX Certified DivX Certified products are officially tested by the creators of DivX and guaranteed to play all versions of DivX video including DivX 6 Dolby Digital Dolby Digital provides multi channel audio from up to 5 1 independent channels This is the same as the Dolby Digital surround sound system used in theater...

Page 92: ...Generally DVDs are re corded with higher sampling frequency and bit rate than CDs Therefore DVDs can provide higher sound quality m3u Playlists created using the WINAMP soft ware have a playlist file extension m3u MP3 MP3 is short for MPEG Audio Layer 3 It is an audio compression standard set by a working group MPEG of the ISO International Stan dards Organization MP3 is able to compress audio dat...

Page 93: ...ns You can also enjoy viewing high and standard resolution still images Region number DVD players and DVD discs feature region numbers indicating the area in which they were purchased Playback of a DVD is not pos sible unless it features the same region num ber as the DVD player This unit s region number is displayed on the bottom of the unit Title DVD video discs have high data capacity en abling...

Page 94: ...ivX system Region number 2 Usable discs DVD video Video CD dtsCD CD CD R RW DVD R RW Signal format Sampling frequency 16 22 05 24 44 1 48 88 2 96 176 4 192 kHz Number of quantization bits 16 20 24 linear Frequency response 5 Hz to 44 000 Hz with DVD at sampling frequency 96 kHz Signal to noise ratio 97 dB 1 kHz IEC A net work CD 96 dB 1 kHz IEC A network Dynamic range 95 dB 1 kHz CD 94 dB 1 kHz Di...

Page 95: ...sable sensitivity 30 µV S N 20 dB Signal to noise ratio 65 dB IEC A network Note Specifications and the design are subject to pos sible modifications without notice due to im provements Additional Information En 95 Appendix Additional Information ...

Page 96: ...STRALIA PTY LTD 178 184 Boundary Road Braeside Victoria 3195 Australia TEL 03 9586 6300 PIONEER ELECTRONICS OF CANADA INC 300 Allstate Parkway Markham Ontario L3R OP2 Canada TEL 1 877 283 5901 PIONEER ELECTRONICS DE MEXICO S A de C V Blvd Manuel Avila Camacho 138 10 piso Col Lomas de Chapultepec Mexico D F 11000 TEL 55 9178 4270 先鋒股份有限公司 總公司 台北市中山北路二段44號13樓 電話 02 2521 3588 先鋒電子 香港 有限公司 香港九龍尖沙咀海港城世...

Reviews: