Philips EasySense SNS210 MC Installer/User Manual Download Page 22

22

Configuring scenes

Purpose:

Different lighting configuration settings can be stored in scenes. With any 4-button wireless switch, up to 2 scenes can be configured. You may add up to

5 switches to a group, all belonging to the same brand but only 2 scenes will be supported across all switches. 
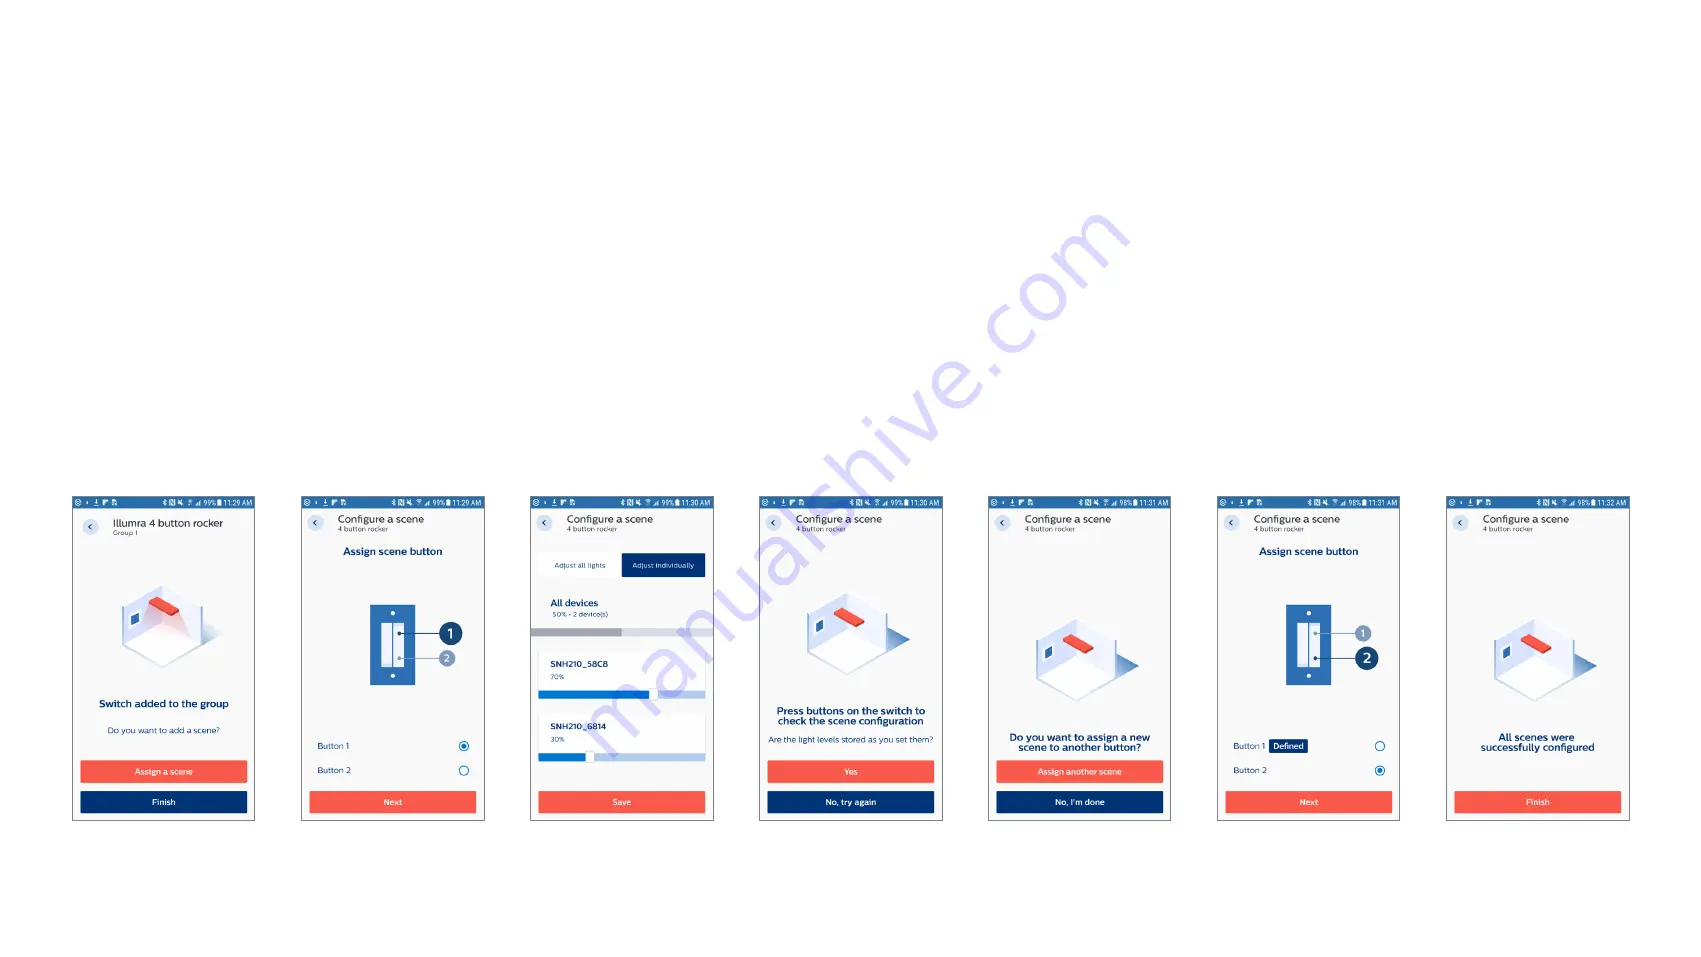
How to:

•  Choose “Assign a scene” and the button with which that scene will be switched on and off.

•   The light levels of all the luminaires in the scene can be set individually or get the same value when set together. Test the scene setting by pressing 

the selected button of the wireless switch.

•  After that eventually a second scene can be set with the second button (if available on the selected switch).

•  Once all scenes have been configured and all light levels are as expected, tap “Finish”.

•   For scene recall, it is advised to divide the group of 40 nodes in 2 zones and attach switch(s) to each zone. In case zoning is not preferred,the group size 

can go up to 30 nodes. 

Summary of Contents for EasySense SNS210 MC

Page 1: ...April 2022 Sensors EasySense SNS210 MC Installer End User Manual ...

Page 2: ... 20 Zoning 21 Adding switches 22 Configuring scenes 23 Tunable White Configuring CCT levels 24 Generating QR Code 25 Maintenance 26 Remove Reset devices from a group 27 standard method Remove Reset devices from a group 28 safe mode How to check for app version 29 Over the Air Update 30 Project Back up and Access Sharing 31 Configuration 37 List of Configuration Parameters 38 Daylight Regulation 40...

Page 3: ...Energy BLE technology and is available for free in the App Store and the Google Play Store The outline of this document is as follows a brief introduction of the stand alone system built with EasySense SNS210 MC components is made The next section describes the installation procedure using MasterConnect App Once installed the lights can be configured to adapt to project or application needs A deta...

Page 4: ...smartphones and Apple Store for iPhones Minimum Requirements Android version 6 or higher iOS version 11 or higher Bluetooth version 4 2 or higher Remark For smartphones not officially tested please note that the MasterConnect App may not work to guaranteed performance Huawei smartphones are not officially supported ...

Page 5: ...dd a node to group for example Group A When an installer proceeds to add the next device to the same group it then assigns the same network id key to the 2nd device node 2 The process of adding more SNS210 nodes can continue up to 30 devices beyond which creating another group is advised Each of the SNS210 devices when added to a group nodes 3 4 5 gets connected with other SNS210 nodes in a ZigBee...

Page 6: ...d ZigBee radio and no sensing radio only such as SNS410 MC or wireless drivers or wireless MC lam Switches Two or four button Zigbee based switches piezo powered no batteries Philips branded switches Compliant switches from external suppliers Sensors Stand alone Zigbee sensors for office and industry applications Either with occupancy sensing only or with daylight harvesting as well They can be co...

Page 7: ...7 Commissioning ...

Page 8: ... that you have a good internet connection Make sure Bluetooth is activated on the smartphone in use Allow for Location Access services to be enabled when requested by the app Regularly check for app updates as it is recommended to use the most recent version for best performance and updated features Usually auto update can be enabled in the smartphone settings When using more than one smartphone a...

Page 9: ...ct name and if desired add a location for that project This can be the name of the building for example Building ABC fill in the location optionally Creation of the first project is prompted automatically For another project select the building icon to get a list of earlier projects made under the same account and add a new one For each group of luminaires that need to work together a group is def...

Page 10: ...r Through the received signal strength RSSI also known as list based approach Remarks Bluetooth on your smartphone needs to be activated In the event Bluetooth is disabled MasterConnect app will prompt for activation which the user needs to confirm The luminaires should be powered up The term lights refers to a luminaire with built in wireless sensor or wireless driver Lights that are added in a g...

Page 11: ... been selected choose Finish adding The number of devices that are bind to that group are now displayed in the group overview Remarks Use a flashlight torchlight with a well defined light cone and point to the sensor from 3cm 5cm distance only to cause a steep light increase Typically illuminance of the sensor should increase by 5000lx suddenly A 500 Lumen flashlight is recommended It is required ...

Page 12: ...iple devices are added simultaneously a loading bar pops up Wait for it to finish and then press Finish adding Remarks To check which luminaire in the room is indicated in the app with a certain Zigbee address select the device the corresponding luminaire will blink 10 times In case not all lights are listed please re try please press the back facing arrow then select the plus sign to rescan The l...

Page 13: ...idual luminaires can be switched on and off with the app With a simple adjustment of the blue bar the dim level of the luminaires in the group can be controlled Verify that all luminaires respond properly In test mode the response of the fixtures is not immediate and might need a few seconds After testing leave the test environment by going back one screen arrow in upper left corner Remarks The de...

Page 14: ...t to let the blinking start again first press Turn off identifying by blinking and then press Turn on identifying by blinking again How to Press the Group label Press the three dots right of the node s name A screen appears in press Turn on identifying by blinking The luminaires in the Group start to blink The blinking will stop automatically after a while To interrupt the blinking press the three...

Page 15: ...application needs How to To modify configuration navigate to the group to be configured tap the icon as shown below Choose Edit configuration change the parameters according to your requirements and press Save and apply Remarks The lighting parameters related to the sensors are explained in the Configuration section starting page 37 ...

Page 16: ...es of a zone within a group to adapt to application needs How to Go to the group of which the light is part of and click on settings icon of the Zone to be configured Choose Edit configuration change the parameters according to your requirements and press Save and apply to modify configuration ...

Page 17: ...light within a group to adapt to application needs How to To modify configuration navigate to the group of which the light belongs and select the light to be configured Tap the icon in the upper right corner Choose Edit configuration change the parameters according to your requirements and press Save and apply ...

Page 18: ...he sensors are explained in the Configuration section starting page 37 If a device does not respond to a single light configuration setting it is recommended to trigger Refresh network and then send the new setting again select the group select the three dots and choose Refresh network ...

Page 19: ...s to the profiles based on associated application e g private office corridor classroom etc for easy re use at a future point Profile data is automatically saved ONLY on the smartphone initially used How to Save the parameters by selecting Save as a new profile Give it a name and optionally add a description for that profile To recall a profile select on Choose from profiles select on the one in t...

Page 20: ...tay on A large conference room may be divided into two zones with contained occupancy sharing within each zone How to Select the three dots and choose create a zone After giving it a name the luminaires for that zone can be selected Finally choose Add to a zone Repeat this procedure for all the zones needed Remarks The separation into zones can be verified via Enable Test Mode For details see page...

Page 21: ...rks Add all luminaires in a group first and then add a switch Switch binding mechanism is to each node within the Zigbee group at the time of commissioning If new nodes are added after commissioning switch binding does not take place A switch can be added either to a group or to a zone Once added to a zone another switch will need to follow the same choice i e either a group or a zone Up to 5 swit...

Page 22: ...d on and off The light levels of all the luminaires in the scene can be set individually or get the same value when set together Test the scene setting by pressing the selected button of the wireless switch After that eventually a second scene can be set with the second button if available on the selected switch Once all scenes have been configured and all light levels are as expected tap Finish F...

Page 23: ...t App In addition to the scene recalls press and hold of the Scene 1 button will gradually increase the CCT and press and hold the Scene 2 button will gradually decrease the CCT How to Configure the color temperature CCT for the automatic manual ON level in the Edit configuration screen as shown below on the picture on the left Configure the color temperature CCT for the Scene buttons in the Confi...

Page 24: ...ared and can be printed for placement at the intended application area making it accessible for scanning by an end user Remarks It is not supported to mix tunable white and single color white lights in one group For QR generation the installer needs to be in range of the lights Within one group QR codes should be generated either for the whole group or for one or more zones but not for the group a...

Page 25: ...25 Maintenance ...

Page 26: ... choose the light to be removed by selecting the three dots next to the light and choose Remove from group The intensity of the light goes to full light level Repeat this step for other individual lights in the group Remove switches In the group overview go to Switches tab Select the three dots and choose Remove all switches Remove group Same as above 2 scenarios a group is removed by clicking on ...

Page 27: ...econds reconnect device to mains Repeat above process for 4 times On the 5th cycle leave the fixtures powered ON at the end You should see a short dim down dim up signal Sensors are now in Safe Mode Scan with Device Maintenance to discover the sensors that are now In Safe Mode and Reset them see screenshots below Click on three lines in the right bottom corner Click on Settings Click on Device Mai...

Page 28: ...28 How to check for app version Purpose Verify app version How to In the project start screen select the bottom right three bars and then select settings ...

Page 29: ...ose Update Upload file navigate to the saved SNS210 gbl file on the smartphone and select it Soon after the upload process begins When the upgrade is ready after a few minutes a confirmation message is displayed The new firmware version will be now visible Remarks Don t interrupt the update process Keep the smartphone in close reach of the device being updated At this moment over the air update ca...

Page 30: ...pability allows users to access their projects even when a smartphone is lost and give project access to specific contributors Before you can use the Project backup and access sharing function an activation step in project settings of the app is required Choose Project backup in the project settings Activate Sync projects with the cloud Confirm ...

Page 31: ...time you download a project the local version will be overwritten Sync The app checks the local and the Cloud data of your projects Projects that have an updated version in the Cloud will be downloaded projects that have an updated local version will be uploaded How to When a project has been created or updated the user will be prompted to upload the project to the cloud Once a project is uploaded...

Page 32: ...butors have been removed first from the project list Syncing Sharing Always check if uploading downloading and syncing have been completed successfully If not try again Downloading of an incomplete project can result in loss of project data Project backup sometimes fails If it continues to fail after a retry please use the Report a Problem feature see page 52 to send the app data logs to the Maste...

Page 33: ...s accurate information Profiles are not part of the cloud back up process Scene parameters are stored in the devices however parameter settings from the app are not backed up in the cloud Daylight Areas are not backed up General Device Wifi must be enabled but commissioning can still take place offline Do not reset a device that is saved in the cloud It is not removed from the project but cannot b...

Page 34: ...Press UPLOAD Create a group and add devices to the group in this case two LIGHTS SNS210MC App will confirm that the project has been uploaded successfully Go to the project editor Press INVITE MORE PEOPLE Type the email address of the person to be added as contributor Press the plus sign next to the email address Press SAVE App will ask if you want to upload the Project Press UPLOAD ...

Page 35: ...an be synced After pressing Sync Project 1 will be uploaded Working in one project simultaneously You cannot work simultaneously in one project If installers want to work simultaneously in one building we suggest the following way of working User 1 creates Project Floor 1 and adds User 2 as contributor User 1 commissions Project Floor 1 User 2 creates Project Floor 2 and adds User 1 as contributor...

Page 36: ...36 Configuration ...

Page 37: ...er the entire Group Occupancy based Control When enabled occupancy detection takes place to control the lighting Unless commissioned into the group the sensor does not respond to occupancy detection Out of the box lights remain switched on in nonoccupied areas Occupancy mode This feature can be configured to maximize lighting control behavior with wireless switches The mode options are auto on off...

Page 38: ...d occupancy cycle re starts Prolong time It is a configurable timer that keeps the lights at Background Light Level for a time period set as Prolong Time before switching off Prolong Time comes into effect after the elapse of Hold Time period In case Group light behavior is set to Eco on level lights in non occupied areas continue to remain to Eco on light level They dim down to Background light l...

Page 39: ...n level is set to 80 for example the light output from the luminaire adjusts to 400 lux on desk level Any time after configuration a calibration routine can be initiated When the calibration routine is complete the light level adjusts to the full light output given by the operating current of the luminaire times the percentage value set for the Eco on level By adjusting the operating current of th...

Page 40: ...l This procedures normally takes one minute but may take up to 5 minutes The lux levels are an estimation for a typical office configuration the precise level depends on the amount of light reflecting surfaces in the field of view of the sensor If the light level is not as wanted please do the calibration and adjust the light level via the Eco on level To determine the optimum Eco on level it is r...

Page 41: ... occupancy If one light is triggered it also triggers the other lights in the group or zone How to If Group Zone occupancy sharing is enabled the light shares occupancy If Zone occupancy sharing is enabled as well occupancy is shared with the other lights in the zone only if it is disabled occupancy is shared with the whole group ...

Page 42: ... 45 46 Manual on Auto off Lights are turned on with a manual command from a wireless switch A manual on command switches on the lights to Eco on level and can be further tuned up to Task Level Lights turn off automatically once vacancy is detected and timers expire This mode is typically selected to achieve maximum energy savings For more details refer Figure 4 on page 47 Manual on Manual off Ligh...

Page 43: ... Eco on level and then dim down to Background light level with a configurable Grace Fading time period Lights remain at this dim level until Prolong Time expires after which lights switch off Light Level T1 T2 T3 T4 T5 T6 T7 Task level configurable Switch On Sequence Switch Off Sequence Eco on level configurable Background Level configurable Hold Time configurable Grace Fading configurable Prolong...

Page 44: ...e during Auto on Auto off mode Once occupancy is not detected anymore the timers Hold time and Prolong time start Once the timers expire lights switch off Light Level T1 T2 T3 T4 T5 T6 Switch On Sequence Switch Off Sequence Eco on level Background Level Hold Time Prolong Time Figure 2 ...

Page 45: ...cted anymore the timers Hold Time and Prolong Time get started In case occupancy is re detected during Hold time the existing light behavior continues and the timers are reset In case occupancy is re detected during Prolong Time or after automatic light behavior starts and the timers are reset as shown Task Level 100 Manually dimming up Hold time Prolong time Automatic behavior re starts even if p...

Page 46: ...ws how daylight dimming takes place during Manual on Auto off mode Occupancy detection starts to determine the light behavior soon after manual trigger Hold time Prolong time Grace time Eco On Level 80 Background light level 20 Figure 4 ...

Page 47: ...her SNS210 nodes in the group As long as presence is detected within the group the luminaires stay on at the Background light level Eco on level configurable up to Field task level in non occupied areas Parameter Name Default value Range Description Zone occupancy sharing Disabled Enabled Disabled If enabled occupancy sharing is over the Zone If Disabled occupancy sharing is over the Group Group Z...

Page 48: ...rs connected to EasySense SNS210 MC Following parameters are displayed Previous Reading Time stamp date and time and the total energy used by the group of lights at the time of last reading Current Reading Time stamp date and time and the total energy used by the group of lights at this reading This number is set to zero at first commissioning of the group Interval The time interval between above ...

Page 49: ...2 14 70 A0 30 58 C8 FC D8 A0 BC 44 90 Remarks Energy reporting is supported for up to 20 devices If more devices are used the reported values may be compromised as not all devices are taken into account In rare cases a report may fail to capture all the devices in the allotted time If this happens we recommend waiting for a few minutes and generating another report The current reading number will ...

Page 50: ...asterConnect devices from a project will only be visible on the MC App of the user that claimed it at first Other users will not be able to work with these already claimed devices in the MC App Remark Due to the open Zigbee interface the MC devices may join another open rogue Zigbee network if significant time elapses between installation of luminaires and commissioning with the MC App In this cas...

Page 51: ...ns may cause unpredicted behavior It is not possible to edit and delete configuration profiles To store a new configuration a new profile should be created Project backup sometimes fails If this continues to fail after a retry please use the Report a Problem feature to send the app datalogs to the MasterConnect Team for analysis ...

Page 52: ...sful Wait for additional 3 seconds after the 2nd beep before proceeding to the next light Adding a wireless switch Switch commissioning fails For non Philips switches remember to exit the linking mode on the switch by pressing any other button on the switch as given in the switch instruction sheet Test the switch by pressing ON OFF buttons Ensure ZGP switch commissioning is carried out as describe...

Page 53: ...sySense SNS210 MC and Xitanium wireless drivers can be commissioned via MC App but are also open for joining Zigbee networks of gateways from partner companies like Ubisys GmBH To commission Philips MC wireless products with partner gateways software and apps of the partners need to be used These systems can not be set up with the MasterConnect app at this moment Please refer to gateway suppliers ...

Page 54: ...54 References Website https www usa lighting philips com products lighting components easysense easysense sns210mc ...

Page 55: ...and or quality of any recommendations and other advice contained in this document whether express or implied including without limitation any warranties of satisfactory quality fitness for a particular purpose or non infringement Signify has not investigated and is under no obligation or duty to investigate whether the recommendations and other advice contained in this document are or may be in co...

Page 56: ...e liable for any consequences resulting from the use of this publication PLt 20022UM EasySense_SNS210 11 2020 www lighting philips com easysense Signify North America Corporation 10275 W Higgins Road Rosemont IL 60018 Tel 800 322 2086 Fax 888 423 1882 Customer Technical Service 800 372 3331 OEM Support 866 915 5886 Signify Canada Ltd 281 Hillmount Rd Markham ON Canada L6C 2S3 el 800 668 9008 ...

Reviews: