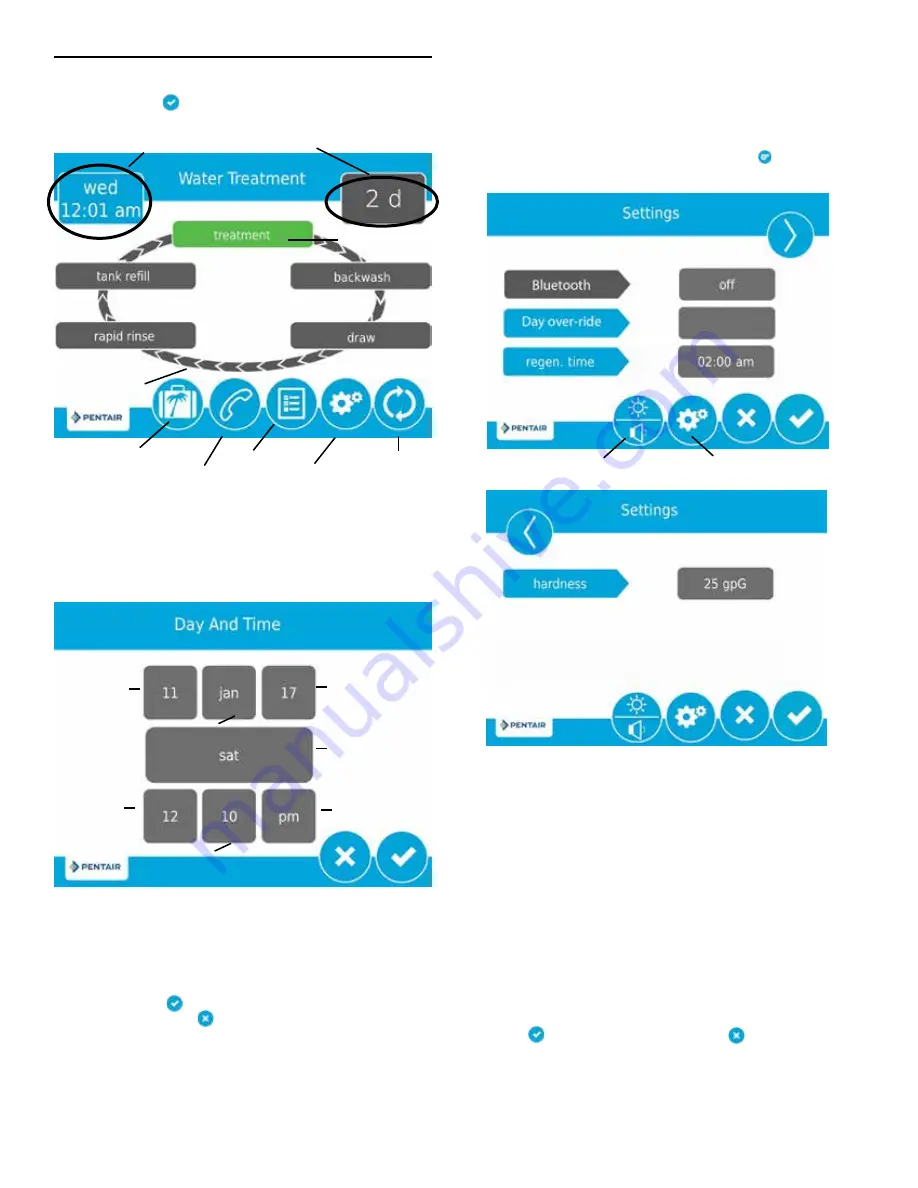
5. After pressing , the Home screen (Figure 8) appears.
Figure 8 Home Screen
The
Day and Time
button will be flashing, indicating that the
day of the week and time need to be set. If the date and time
are incorrect, press the
Day and Time
button to update to
the correct day and time. The Day and Time screen (Figure
9) appears.
Figure 9 Day and Time Screen
Press the
Day of Week
,
Hour
,
Minute
, and
AM/PM/HR
buttons to adjust the values to the correct day of week
and time. Setting the value of the
AM/PM/HR
button to
HR changes the display to a 24 hour clock. Press the
Day,
Month,
and
Year
buttons to adjust the values to the correct
date. Press the
button when finished to return to the
Home screen. Press
to return to the Home screen
without saving.
Day and Time
Regeneration
Settings
Regeneration
Cycle Wheel
Next Scheduled
Regeneration
Current Cycle
Step
Diagnostics
Assistance
Month
Day
Day of Week
Minute
Hour
AM/PM/HR
Year
TOUCHSCREEN SETUP
(continued)
Vacation
Settings
The Settings screen allows you to change basic control settings
including time of regeneration and water hardness. These
settings improve the operational efficiency of the system and
can be adjusted independently from other control settings
without needing to enter Master Settings.
From the Home screen, press the
Settings
button . The
Settings screen is displayed.
Figure 10 Settings Screen
• Bluetooth
button should be turned on to open bluetooth
signal during programming will automatically turn to off
when WiFi connected.
• Press
day override
to adjust the number of days since
last regeneration in which a new regeneration will
automatically be run whether one is scheduled or not.
• Press
regen time
to adjust the time of day that an
automatic regeneration cycle will begin.
• Press
hardness
to adjust the hardness setting. This value
should match the hardness of the incoming untreated
water supply.
NOTE: Changing the hardness setting recalculates treatment
volume and regeneration interval. This setting should
only be changed on the advice of a professional.
• Press
to save your changes or press
to return to
the Home screen.
Additional features may be accessed from the Settings screen
by pressing the buttons at the bottom of the screen.
(see Figure 14):
Brightness/Sound
Master Settings
8 •
FLECK
5800/5810/5812 XTRI Service Manual
Summary of Contents for FLECK 5800
Page 1: ...FLECK 5800 5810 5812 XTRI CONNECTED XTR2 SERVICE MANUAL pentair com...
Page 36: ...WATER CONDITIONER FLOW DIAGRAMS 5810 Upflow 36 FLECK 5800 5810 5812 XTRI Service Manual...
Page 37: ...WATER CONDITIONER FLOW DIAGRAMS 5810 Downflow FLECK 5800 5810 5812 XTRI Service Manual 37...
Page 44: ...INJECTOR FLOW DATA TR18755 REV B 44 FLECK 5800 5810 5812 XTRI Service Manual...


