background image

120-0313 Rev 04

4–13

Chapter 4 – Customization

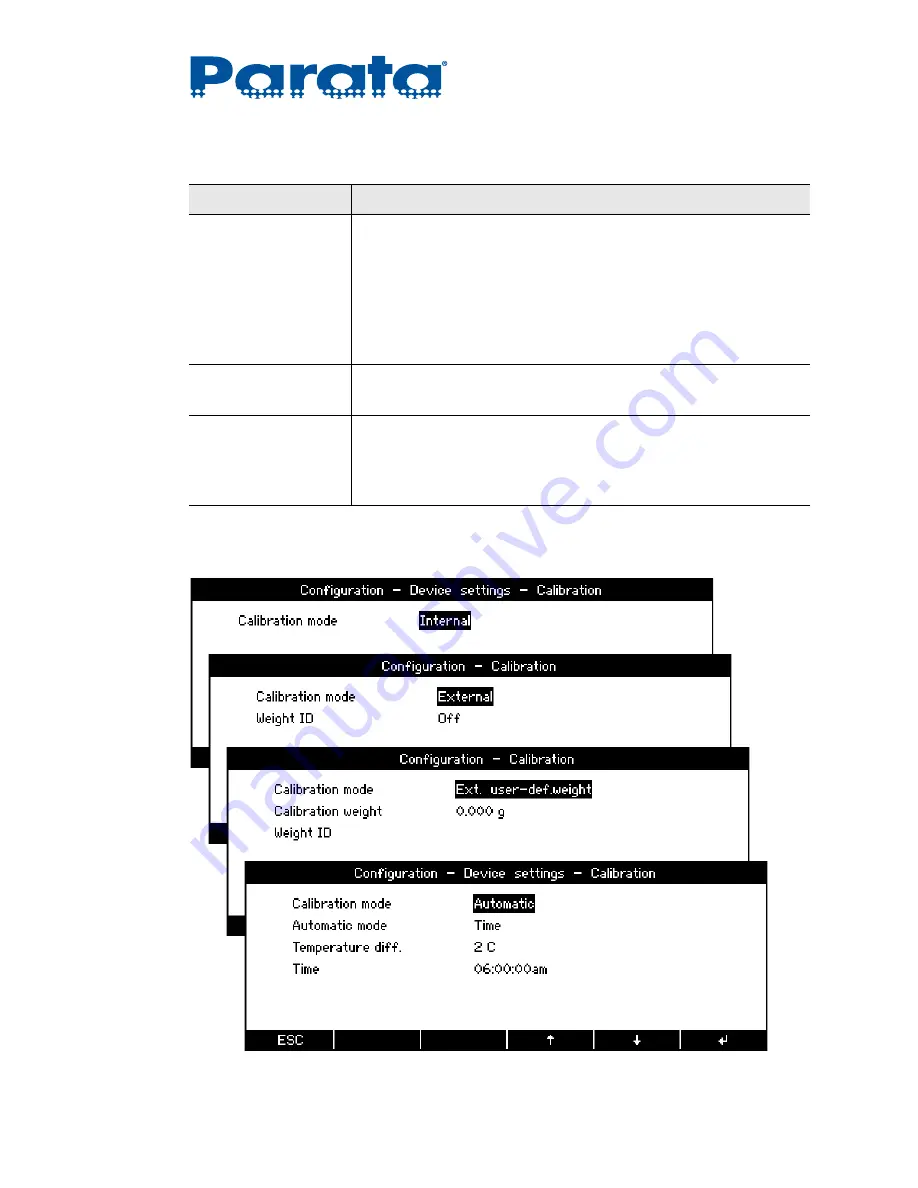
4.2.2 Calibration

Refresh rate

[ fast, 

normal

, slow, extra slow ]

The frequency that measurement is checked and displayed.
The scale location has the biggest impact on this value: an unstable 
location requires a slower refresh rate, while an ideal location may use 
the fast rate.

NOTE:

The stability control must also be set appropriately (see “Environment” 
below).

Environment

[ stable, 

normal

, unstable ]

Adjust the scale to the quality of the scale location.

Autostandby time

Off

, 30 Seconds, 1 Minute, 5 Minutes, 30 Minutes ]

Defines the period of inactivity before the scale automatically switches 
into the energy-saving mode.
To re-start the scale, press any key or put a weight on the scale.

Table 4-9:

Weighing parameters settings (cont’d)

Setting

Function

Summary of Contents for AccuCount II

Page 1: ...0 0313 Rev 04 Parata Systems LLC 2600 Meridian Parkway Durham NC 27713 www parata com The information in this document is proprietary and confidential to Parata Systems LLC Content may be changed at a...

Page 2: ...emarks or registered trademarks of McKesson Automation Systems Inc PACMED and PACVISION are trademarks of McKesson Automation Inc in the US PACMED and PACVISION are trademarks or registered trademarks...

Page 3: ...ngle on Warnings alerts you to the presence of important operating and maintenance servicing instructions in the literature that accompanies the appliance Double Insulation Unit is double insulated UL...

Page 4: ...ce from an electrical outlet WARNING Before inserting the power adapter make sure that the operating voltage stated on the power adapter agrees with the main voltage If not contact Parata Systems Cust...

Page 5: ...3 Leveling and calibration 1 8 1 3 1 Leveling 1 8 1 3 2 Calibration 1 8 Chapter 2 Overview 2 1 About the AccuCount II 2 1 2 2 About the AccuCount II drug library 2 2 2 3 Functions 2 3 2 4 Display 2 5...

Page 6: ...user submenu 4 4 4 1 2 User 1 2 3 4 5 6 7 4 6 4 1 3 Define administrator 4 8 4 1 4 Theft protection 4 9 4 2 Configuration submenu 4 11 4 2 1 Weighing parameters 4 12 4 2 2 Calibration 4 13 4 2 3 Prot...

Page 7: ...5 5 2 3 Transferring a new database to the scale 5 5 5 3 Backing up the drug database to a PC 5 8 5 4 Restoring a drug database from a PC 5 10 5 5 Updating the firmware 5 11 5 5 1 Installing the Univ...

Page 8: ...AccuCount II User Guide viii 120 0313 Rev 04...

Page 9: ...8 PARATA 1 Table 1 1 Parts included with your AccuCount II scale kit Subassembly Part Part number Scale Box AccuCount II Scale 360 9370 001 Power Adapter 601502 00 6 ft USB Type A to USB Type B Cable...

Page 10: ...st be given to the following points when unpacking the AccuCount II Unpack the scale carefully It is a precision instrument When outside temperatures are very low the scale should first be stored for...

Page 11: ...ambient conditions and prerequisites are met and maintained Place the scale on a solid firm level and preferably vibration proof base Ensure that the scale cannot be shaken or knocked over Protect th...

Page 12: ...within the black flexible tubing b Screw the gooseneck onto the threaded post at the back of the scale 3 Position the scale on a firm level vibration proof surface Ideally place the scale in its perm...

Page 13: ...ou are going to use the compounding plate set the draft shield aside or store it If you are not going to use the compounding plate place the draft shield on the scale so that it drops into the rectang...

Page 14: ...tive black bumpers on the weighing pan support 7 If you are going to use the compounding plate center it on top of the weighing pan NOTE The draft shield can not be installed while you are using the c...

Page 15: ...u can swap out keyboard scanner and printer as needed Each time that you change USB devices disconnect and reconnect the power supply to ensure that the newly connected devices are recognized 10 Conne...

Page 16: ...ences and or unevenness in the surface where the scale is placed The two feet must be adjusted as follows both of the feet are in contact with the surface the air bubble is precisely in the center of...

Page 17: ...de for which the scale is configured when it is shipped Internal calibration can be performed as needed and it should be performed when the scale is moved and every 30 to 60 to ensure accurate reading...

Page 18: ...tion that it conducts be the calibration automatic or requested by a user Each record includes the following details Calibration type see Calibration on page 4 13 Date and time Ambient temperature Use...

Page 19: ...on on page 4 13 for information about the external calibration modes To seal the scale 1 Disconnect the power adapter from the outlet and from the rear of the scale 2 Remove the weighing pan weighing...

Page 20: ...Weighing application 8 Slide the scale back onto the surface and level it see Leveling on page 1 8 9 Press and hold the Tare key until the Calibration menu appears 10 Use the and soft keys to select...

Page 21: ...00 grams on the center of the weighing pan The scale continues with external calibration 14 Wait for the external calibration to complete after which the scale flashes and displays Measuring zero beca...

Page 22: ...pt 17 Press the OK soft key 18 Disconnect the power adapter from the outlet and from the rear of the scale 19 Remove the weighing pan weighing pan support and draft shield from the scale 20 Turn the s...

Page 23: ...c Affix a wire seal to the white tab on the back of the scale to prevent access to its interior 22 Install the draft shield if it was in use before step 1 the weighing pan support and the weighing pa...

Page 24: ...AccuCount II User Guide 1 16 120 0313 Rev 04 Installation notes...

Page 25: ...ates The AccuCount II scale supports up to two of the following peripherals at a time Standard USB keyboard Datalogic Gryphon USB bar code scanner Dymo SE450 USB Label Writer printer The built in appl...

Page 26: ...e drug library is comprised of two components Standard database which is a library of drugs compiled and distributed by Parata User database which contains any drugs added by the user that are not in...

Page 27: ...ion Function s in a menu On Off key 1 Press to put the scale into Standby mode NOTE The scale continues to draw power to keep the balance zeroed You must unplug the scale to completely power it down M...

Page 28: ...to call up the next information page Continue to hold to cycle through all the pages 1 When the rotate symbol appears in the activity area press to rotate through soft key options see Alphanumeric in...

Page 29: ...e running application Displays the capacity indicator when weighing in the Rx Check and Non Rx Check applications Information Area Display a variety of weighing and or drug information details dependi...

Page 30: ...2 4 1 c below 2 4 1 a Weighing application details Figure 2 3 Details displayed while weighing in the Weighing application Area Name Description Weight The exact weight that the scale is currently re...

Page 31: ...tate key to swap the main display pieces with the secondary display weight Piece count The number of pieces that the scale has counted based on the piece weight Capacity indicator Shows the percentage...

Page 32: ...he Rotate key to swap the main display pieces with the secondary display weight Piece count The number of pieces that the scale has counted based on the piece weight Rx information Information about t...

Page 33: ...avigate to a particular page of a screen or to a particular menu item on a page with the and soft keys Press the Enter soft key to access item options or sub screens Press the Menu key to access the c...

Page 34: ...cially in text label fields Press the Rotate key to display the next set of available characters and soft key options as shown in Figure 2 6 Figure 2 6 All available soft keys used for alphanumeric en...

Page 35: ...enter the wrong character use the Backspace soft key to delete it If you want to cancel out of alphanumeric value entry press the ESC soft key NOTE You can also use a USB keyboard for alphanumeric en...

Page 36: ...B approximately 500k drugs Display 360x128 pixels monochrome backlit User Input 12 key control panel including 6 multi function soft keys keyboard and bar code scanner External Connection 1x USB Type...

Page 37: ...ch can be activated or deactivated in the Configuration menu If activated the scale automatically switches to Standby mode some time after the last weighing or key operation The delay before switching...

Page 38: ...urrently selected menu is highlighted in black To select a menu 1 Press and hold the Menu key until the Home screen appears NOTE By default pressing and holding the Menu key returns you to the Applica...

Page 39: ...application that you want to use 3 3 1 Weighing application In the Weighing application the AccuCount II acts as a basic scale It does not count items though it can perform statistical sampling and we...

Page 40: ...on the display 4 Do one of the following Weigh the items If you are preparing a compound proceed to step 5 5 Put the first ingredient of the compound on the compounding plate When the desired weight h...

Page 41: ...ired items to obtain a reference weight To use the Piece Counting application 1 Select Piece Counting from the Applications menu 2 Place the empty scoop or vial on the pan 3 Press the Tare key The sca...

Page 42: ...programmed piece weight and continues to use its value for counting until you decide to count a different item or until you press and hold the Menu key to exit the application 8 To count a new batch...

Page 43: ...match is confirmed and the individual piece weight for the drug is in the library the AccuCount II is ready to count pills While in the Rx Check application you can add new programmed piece weights c...

Page 44: ...ied drug in its library If it finds the drug skip ahead to step 14 otherwise proceed to step 5 5 The message Drug not found appears If you mis scanned the stock bottle press the Back soft key to retur...

Page 45: ...to modify then press the Enter soft key to make changes to the value 11 Repeat the previous step for each drug info value that you want to modify 12 Press the ESC soft key to save your changes The me...

Page 46: ...t keys to indicate the correct drug and then press Select 16 Add pills to the scoop on the pan The AccuCount II counts the number of pills in the scoop by piece weight WARNING Always follow the above...

Page 47: ...plication To use the Non Rx Check application 1 Select Non Rx Check from the Applications menu The scale prompts you to place the scoop on the pan and identify the drug 2 Place the empty scoop or vial...

Page 48: ...to confirm the count or press Back to return to the previous step and choose a different count 8 Pour out the pills that you used to take the sample to prevent the scale from automatically taring thei...

Page 49: ...modify the information press the Edit soft key If you want to recalculate the piece weight with a different count or even back out of the process further then press the Back soft key 13 When the drug...

Page 50: ...t or Pharmacy Technician should be alert for physical changes to pill size shape and color To ensure against a possible change in programmed piece weight that may cause a counting error the Pharmacist...

Page 51: ...5 4 Drug is in the library but the quantity is not correct NOTE If you are using the entire contents of a stock bottle the incorrect quantity might be caused by an incorrect number of pills contained...

Page 52: ...old the Menu key until the Home screen appears 2 If necessary press the soft key to select the User menu NOTE The currently active user is indicated by a dot next to the user profile icon 3 Press the...

Page 53: ...protection password Reset to the factory configuration Define basic scale settings View information about the scale and its software To select a settings submenu 1 Press and hold the Menu key until t...

Page 54: ...AccuCount II User Guide 3 18 120 0313 Rev 04 Operations notes...

Page 55: ...nto the scale as the Administrator then you can adjust any option on the scale most of the options that you customize become the default for all users When someone is logged in as a user their customi...

Page 56: ...efaults Figure 4 1 Administrator submenu screen Table 4 1 provides an overview of the Administrator submenu items and explains how to use its function Table 4 1 Administrator submenu overview Setting...

Page 57: ...e displays the Set factory settings prompt 2 Press the Yes soft key to confirm the reset or press the Cancel soft key to back out NOTE Neither the theft protection status nor the anti theft code chang...

Page 58: ...the entire user list Figure 4 2 Define user submenu screen Table 4 2 provides an overview of the Define user submenu item and explains how to use its functions Table 4 2 Define user overview and proc...

Page 59: ...ges and back out Disable all users To set all of the user profiles on the scale to Off 1 Press the Enter soft key to select Set The scale displays the Disable all users prompt 2 Press the Yes soft key...

Page 60: ...ines the alphanumeric identifier for the selected user profile Password none any text string up to 6 characters Defines the alphanumeric password that you must enter to activate the user profile from...

Page 61: ...in Applications Select Off On Enables this user profile to access the Applications menu Settings Selection Off On Enables this user profile to access the Settings menu Settings ConfMenu Protection Of...

Page 62: ...t still shows as Administrator Table 4 5 Define administrator overview settings Setting Function Name Administrator any text string up to 20 characters Defines the alphanumeric identifier for the admi...

Page 63: ...ere is still a preprogrammed code set at the factory 8 9 3 7 Table 4 6 Administrator Protection settings Setting Function Login at startup Off On Enables automatic prompting to login the administrator...

Page 64: ...e correct code Whether or not theft protection is active you must enter your anti theft code or the factory default code to access the Theft protection screen WARNING After seven consecutive incorrect...

Page 65: ...rview Setting Function Weighing parameters General settings for the weighing system See Weighing parameters on page 4 12 Calibration General settings for the calibration of the scale See Calibration o...

Page 66: ...ister during weighing See Min sample weight on page 4 28 Properties Display and print all configuration settings See Properties on page 4 29 Balance information Display and print information like mode...

Page 67: ...tion may use the fast rate NOTE The stability control must also be set appropriately see Environment below Environment stable normal unstable Adjust the scale to the quality of the scale location Auto...

Page 68: ...ust also be set see Calibration weight below Internal Calibration with the internal calibration weight only occurs when you press and hold the Tare key within an application and select Calibration Aut...

Page 69: ...mode Weight ID External Off On Enables a prompt during External calibration to enter an alphanumeric identifier for the external weight e g you have more than one 200 gram calibration weight When use...

Page 70: ...default settings are shown in bold text Table 4 11 Protocol settings Setting Function Autostart Defines the automatic start of the printout after the scale has been switched on A is displayed if Auto...

Page 71: ...If enabled starts the printout automatically when the conditions in Protocol Mode settings are met Delay 0 0 s n n s Number of seconds to delay before starting the automatic printout NOTE Only availab...

Page 72: ...e change Printout after load changes NOTE The minimum weight of load change must also be set see Min loadchange below Continuous Continuous printout after each weighing NOTE See Refresh rate on page 4...

Page 73: ...luding all possible values for the option default settings are shown in bold text Delay 1 0 s n n s Time interval at which automatic printout occurs NOTE Only available in Time interval mode Table 4 1...

Page 74: ...e hexadecimal lines in the header or footer See Protocol Header Footer Free HEX lines on page 4 21 Position Defines the positions in the header or footer See Protocol Header Footer Position on page 4...

Page 75: ...e HEX lines settings Setting Function HEX line 1 Header 1B500D any string of two digit HEX values up to 21 characters Defines the comma separated hexadecimal characters of line 1 the default 1B500D se...

Page 76: ...g Function Position 1 HEX line 1 any option as shown in Table 4 18 Defines the information to output on position1 Position 2 Header Date Time any option as shown in Table 4 18 Defines the information...

Page 77: ...t settings without prompting you to confirm Table 4 18 Protocol Header Footer Position option definitions and applicability Option Header Footer Function Off Yes Yes Position not used i e no output Ap...

Page 78: ...2 3 or 4 see Protocol Header Footer Free HEX lines on page 4 21 Underline Yes Yes Outputs a line across the printout Linefeed Yes Yes Outputs an empty line Formfeed No Yes Sends a form feed command to...

Page 79: ...II Use the ASCCI character set which is limited to the first 96 printable characters and 33 control characters Unicode Use the Unicode character set which extends to more than 110 000 characters cover...

Page 80: ...ables sounding a tone when an alert or message is displayed The AccuCount II only sounds an alert when communicating with a PC and there is some kind of delay in that case the message Data transmisson...

Page 81: ...Date format DD MM YY DD MM YYYY MM DD YY MM DD YYYY where DD Two digit leading zero date MM Two digit leading zero number of month YY Two digit leading zero year YYYY Four digit year Selects the date...

Page 82: ...in sample weight The minimal weight function is a solution which enables you to fulfill QM guidelines such as GLP GMP or USP Contact Parata Systems Customer Care if you require assistance configuring...

Page 83: ...4 22 Minimal sample weight settings Setting Function Tare range 1 2 3 Max 0 000 g nnn nnn g where nnn nnn Any decimal value between 0 000 and 620 000 in grams Sets the tare range 1 2 or 3 Tare range i...

Page 84: ...See Info screens on page 2 9 for more information about using this screen 4 2 10 Firmware history Select the Firmware history configuration item to display a date time and checksum for all scale firmw...

Page 85: ...ecking applications 1 Start the application as described in To select an application on page 3 3 2 Press the Menu key to access the application menu To access the options for the Rx Check and Non Rx C...

Page 86: ...1 Min sample weight Enables the minimum sample weight restrictions from the scale s Configuration for the Weighing application A is displayed if Min sample weight is enabled See Min sample weight on p...

Page 87: ...weighing 100 gram prepacks and the display changes to show a more useful interface for checking that weight Table 4 24 provides an explanation of each Weighing CheckWeigher option with all possible v...

Page 88: ...0 g nnn nnn where nnn nnn Decimal value between 0 000 and Nominal in grams Defines the underweight tolerance TU for use with the IN equivalence scale on the left of the CheckWeigher screen The TU perc...

Page 89: ...Customization 4 3 1 b Weighing Properties Select the Properties Weighing item to display all software settings for the Weighing application in an info screen See Info screens on page 2 9 for more info...

Page 90: ...tion menu allows you to customize and view settings within the application Many of the Piece Counting application options work the same as with the Weighing application options The two applications do...

Page 91: ...erify each time you weigh pieces of a predefined weight A is displayed if CheckWeigher is enabled See Piece Counting CheckWeigher on page 4 38 Statistics Enables statistical analysis of samples that y...

Page 92: ...ce weight before you activate CheckWeigher see Piece Counting application on page 3 5 For example you could set the scale to assume that you are always weighing 100 items and the display changes to sh...

Page 93: ...e piece count for which the scale is checking TO 105 PCS nnnnnn PCS where nnnnnn Whole number between Nominal and 999999 OR 120 000 g nnn nnn where nnn nnn Decimal value between Nominal and 620 grams...

Page 94: ...hich behave identically in the Weighing and Piece Counting applications though each application maintains its own options Screens show the Weighing application for reference and they also show the Pie...

Page 95: ...text Table 4 27 Statistics overview and settings Setting Function Statistics Off On Enables statistical analysis functions for the Weighing application Enables the STORE n soft key 6 on every soft ke...

Page 96: ...turbing it while unloading previous samples NOTE Only available when using Manual Recording or Loadchange Recording mode Time 2 0 s nnn n s where NOTE nnn n Decimal number between 0 1 and 600 0 Enable...

Page 97: ...tatistics Protocol submenus and an explanation of its option including all possible values for the option default settings are shown in bold text Table 4 28 Statistic Protocol option and overview Sett...

Page 98: ...On If enabled every single sample in the current sample set is listed in the statistics log Measured value Value Time Value Date Value Date Time Value Value Only sample the measured value Time Value...

Page 99: ...unction and option default settings are shown in bold text Table 4 30 Statistics Protocol Result settings and procedures Setting Function Position 1 Linefeed any option as shown in Table 4 31 Defines...

Page 100: ...put on position 7 Position 8 15 Off any option as shown in Table 4 31 Defines the information to output on positions 8 through 15 All positions OFF To set all of the positions in the application s Sta...

Page 101: ...set in grams or in pieces StdDev Outputs the standard deviation between the samples in the current set as a percentage Max Min Diff Outputs the maximum value sampled the minimum value sampled and the...

Page 102: ...onfiguration menu for the application Table 4 32 provides an explanation of the Min sample weight option with all possible values default setting is shown in bold text Table 4 32 Min sample weight set...

Page 103: ...he Identification submenus and an explanation of its options including all possible values for the options default settings are shown in bold text Table 4 33 Identification overview and settings Setti...

Page 104: ...latile Non Volatile Volatile The item counter data i e the count of printouts is buffered in RAM if the power adapter is disconnected from the scale the RAM buffer is cleared Non Volatile The item cou...

Page 105: ...51 Chapter 4 Customization Data type Numeric Alphanumeric Numeric The field can contain numbers only Alphanumeric The field can contain letters and numbers Table 4 34 Identification IDs settings cont...

Page 106: ...AccuCount II User Guide 4 52 120 0313 Rev 04 4 3 3 d Soft keys Figure 4 6 Soft keys common to the Weighing and Piece Counting applications...

Page 107: ...vigate through them Table 4 35 provides an explanation of each soft key function any of which may be assigned to any soft key no 1 through no 24 for either application Table 4 35 Soft keys functions S...

Page 108: ...to the soft key which allows you to clear all current samples from the Weighing application Statist Show Stat Assigns the Show Stat function to the soft key which allows you to view the Weighing Stati...

Page 109: ...he soft keys in the application to Off 1 Press the Enter soft key to select Set The scale displays the Set all Positions off prompt 2 Press the Yes soft key to confirm the reset or press the Cancel so...

Page 110: ...in Table 4 37 Assigns an information field to the upper left region of information page 1 2 3 4 5 or 6 Page 1 2 3 4 5 6 Off any option as shown in Table 4 37 Assigns an information field to the lower...

Page 111: ...Press the Enter soft key to select Set The scale displays the Clear all pages prompt 2 Press the Yes soft key to confirm the reset or press the Cancel soft key to back out Set default settings To res...

Page 112: ...tical samples Stat Mean Displays the mean value of all statistical samples in the current set Stat StdDev Displays the standard deviation between the samples in the current set in grams Stat StdDev Di...

Page 113: ...ation See Min sample weight on page 4 28 ID ID 1 2 3 4 5 6 Displays the alpha numeric value of identification 1 2 3 4 5 or 6 See ID 1 2 3 4 5 6 on page 4 50 Item counter Displays the number of printou...

Page 114: ...you select one to be in a Protocol position it won t use the Configuration Protocol s free HEX line but the application specific one Table 4 38 provides an explanation of each Protocol function and op...

Page 115: ...ly with the application Free HEX lines work the same as those described in Protocol Header Footer Free HEX lines on page 4 21 but these free HEX lines only apply to the application specific Protocol T...

Page 116: ...olerance for the CheckWeigher function CheckW TU Outputs the underweight tolerance for the CheckWeigher function Min samp weight Outputs the minimal sample weight as defined in the scale s Configurati...

Page 117: ...Check and Non R Check applications this value is compared to the difference between the drug s TmStamp and the current date If this value is less than that difference the message APW out of date Recal...

Page 118: ...nformation is output to up to 24 positions when you press the Print key Part of that information further can come from Free HEX Lines that are defined only for the application in which you define them...

Page 119: ...own in Table 4 42 Defines the information to output on position 5 Position 6 Strength any option as shown in Table 4 42 Defines the information to output on position 6 Position 7 8 Linefeed any option...

Page 120: ...tputs the drug s NDC value Strength Outputs the dosage strength of the drug PcWeight Outputs the piece weight of a single pill TmStamp Outputs the date and time that the drug was weighed counted Tare...

Page 121: ...t have been made or the value that you have specified with the Set No soft key see Set Item counter in Table 4 35 in Soft keys on page 4 52 HEX line 1 2 3 4 Outputs the contents of the free HEX line 1...

Page 122: ...AccuCount II User Guide 4 68 120 0313 Rev 04 Customization notes...

Page 123: ...nected from the electricity supply The scale must be checked by Parata Systems Customer Care before you use it again 5 1 Cleaning The scale must be treated carefully and cleaned regularly as it is a p...

Page 124: ...application called the Drug Info Download tool to update the AccuCount II drug database To install the Drug Info Download tool 1 Insert the AccuCount II Upload Download Utilities CD into the optical...

Page 125: ...intenance 6 Optional On the Select Start Menu Folder screen click Browse to select a Start Menu folder in which to create shortcuts 7 Click Next 8 Optional On the Select Additional Tasks screen check...

Page 126: ...t something click the Back button to return to the appropriate screen and make changes o 11 Wait for the installation to complete 12 Optional On the Completing the Drug Info Download Setup Wizard scre...

Page 127: ...SB cable The Type B square connector plugs into the back of the scale and the Type A wide connects to the PC 2 Power on the AccuCount II scale NOTE Ensure that the Interface RJ45 character set is set...

Page 128: ...refer your PC s Device Manager Ports or choose the highest value COM port 2nd Standard 3rd Write to Scale 3 Click the Open or select a File folder with green arrow button 4 In the Open dialog navigat...

Page 129: ...ction blue triangle button to begin loading the new database file onto the AccuCount II scale The Drug Info Download tool begins to copy the new drug database to the scale 6 When the File transfer com...

Page 130: ...AUTION Parata recommends that you make regular backups of your user database to prevent data loss To backup the existing drug database to a PC 1 If you have not done so already perform the procedure i...

Page 131: ...ice Manager Ports or choose the highest value COM port 2nd Standard 3rd Read from Scale 5 Click the Open or select a File folder with green arrow button 6 In the Save dialog navigate to the folder in...

Page 132: ...s to copy the drug database from the scale 8 When the File transfer complete message appears click OK 9 Close the Drug Info Download tool 5 4 Restoring a drug database from a PC The procedure for rest...

Page 133: ...scale 5 5 1 Installing the Universal Download tool You must use a special application called the Universal Download tool to update the AccuCount II firmware To install the Universal Download tool 1 I...

Page 134: ...the Select Destination Location screen click Browse to select the path where you want to install the program 6 Click Next 7 Optional On the Select Start Menu Folder screen click Browse to select a St...

Page 135: ...Tasks screen check Create desktop icon 10 Click Next 11 On the Ready to Install screen verify your choices and then click Install If you need to correct something click the Back button to return to th...

Page 136: ...st connect the AccuCount II scale to a PC using the USB Type A to USB Type B cable that is provided with your scale before you can update the firmware on the scale To prepare the scale for the firmwar...

Page 137: ...is connected to a PC that has the Universal Download tool you can install the new firmware on the AccuCount II To install new firmware to the scale 1 On the PC double click the Universal Download too...

Page 138: ...ect Device list 3 Click the Open Interface Settings Dialog gears button at the bottom of the Interface panel then set the following interface parameters as described below Port COM port of USB Serial...

Page 139: ...le should respond as shown in the Output field below 5 Click OK to return to the Choose Device screen then click the Switch to next Tab right arrow button to go to the next screen 6 On the Select Comp...

Page 140: ...ct a File folder with green arrow button 8 Navigate to the location of the new firmware select the file and then click Open The Update EP section displays the file name its size and its location 9 Cli...

Page 141: ...load tool initializes the download process erases the existing firmware on the scale and the transfers the new firmware to the scale The scale s display turns off during the download process CAUTION D...

Page 142: ...the scale reconnect it and then click OK on the Download Successful message 12 On the Download Finished dialog click the Go to the first tab button 13 Close the Universal Download tool NOTE Contact P...

Page 143: ...ming however you can follow the procedures in this section to reprogram it and test it To program the handheld bar code scanner 1 Connect the scanner to one of your PC s USB ports 2 Scan the following...

Page 144: ...e table below scan each bar code and verify that the text next to the bar code appears in Notepad 3 Close Notepad don t save changes 4 Once you have verified that the bar code scanner works correctly...

Page 145: ...120 0313 Rev 04 5 23 Chapter 5 Maintenance Maintenance notes...

Page 146: ...AccuCount II User Guide 5 24 120 0313 Rev 04...

Page 147: ...to or plug in the power adapter The power adapter is defective Contact Parata Systems Customer Care There is no display The scale is in Standby mode Place weight on the scale Only dashes are shown in...

Page 148: ...ft Control the temperature at the scale location Strong temperature variations in the material being weighed Control the temperature at the scale location NOTE If none of the above solutions work relo...

Page 149: ...ield while calibrating to minimize the effects of the draft The scale location is not stable enough Interrupt the calibration using the On Off button and then relocate the scale Use of an imprecise ca...

Page 150: ...AccuCount II User Guide 6 4 120 0313 Rev 04 Troubleshooting notes...

Reviews: