


92
4
■
Auto Cleaning
Auto Cleaning is for cleaning the electric-mechanical contacts of the Panasonic combination cameras. Use this function for
maintenance when the camera has been directed at the same spot or panned over the same range for a long time.
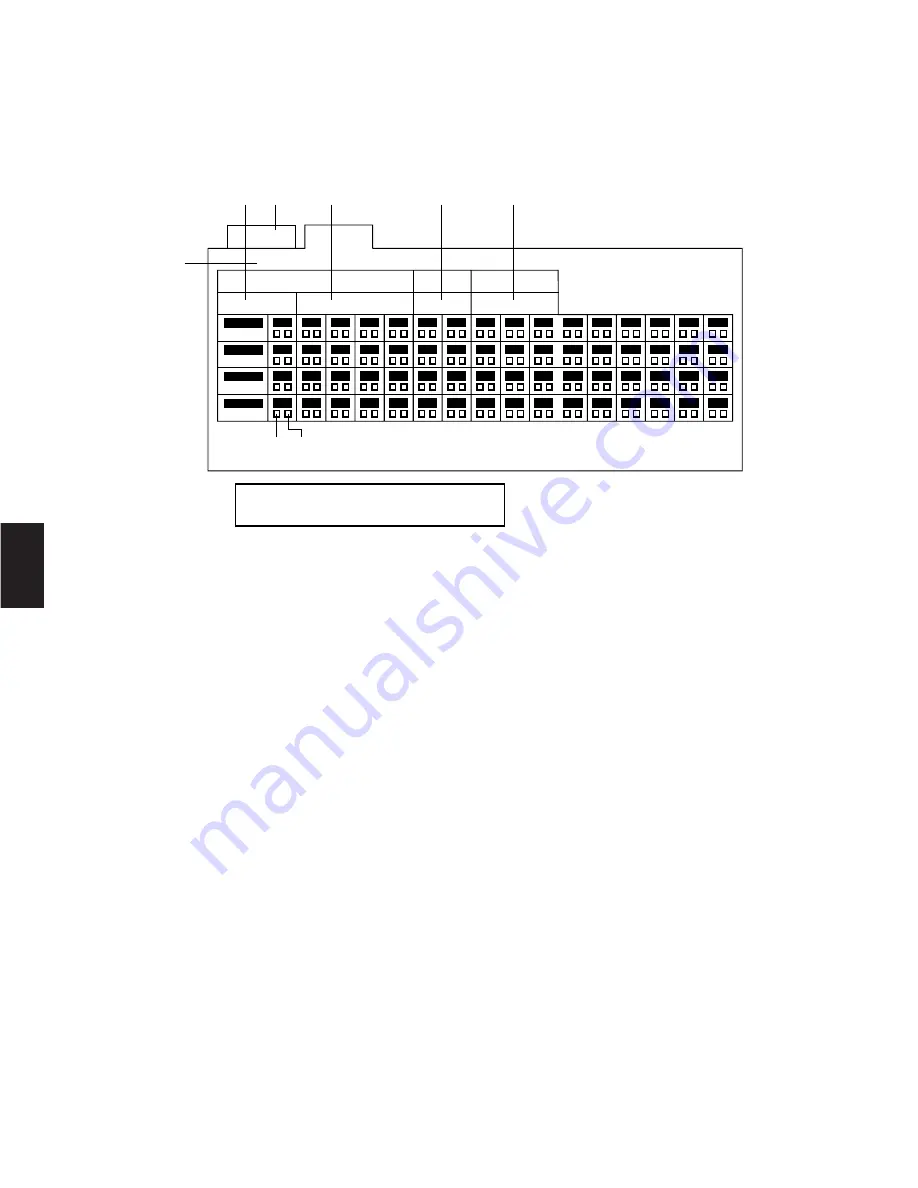
This table is used to enable and disable the auto cleaning function of the specified combination cameras at a user-specified
time or date.
To program or edit the Auto Cleaning Table, do the following:
1. Move the cursor to position 2 by moving the Joystick Controller, then press the
CAM (SET)
key.
2. Move the Cursor to position 3 by moving the Joystick Controller. Select the desired Mode by pressing the
INC +1CAM
but-
ton or
DEC –1CAM
button.
Manual:
Operator controlled Auto Cleaning
Timer:
Timer controlled Auto Cleaning
3. Move the Cursor to position 4 by moving the Joystick Controller.
Select the desired Day for timer operation by pressing the
INC +1CAM
button or
DEC –1CAM
button repeatedly.
Daily:
Daily Auto Cleaning
Sunday - Saturday:
Auto Cleaning on selected days of the week
01 - 31:
Auto Cleaning on selected days of the month
4. Move the Cursor to position 5 by moving the Joystick Controller.
Select the desired Hours by pressing the
INC +1CAM
button or
DEC –1CAM
button repeatedly.
5. Move the Cursor to position 6 by moving the Joystick Controller.
Select the desired Minutes by pressing the
INC +1CAM
button or
DEC –1CAM
button repeatedly.
6. Move the Cursor to the desired camera number (position 7) by moving the Joystick Controller.
Select
=
or
]
by pressing the
INC +1CAM
button or
DEC –1CAM
button.
=
:
Cleaning is enabled (Cleaning mode on)
]
:
Cleaning is disabled (Cleaning mode off)
7. Repeat the above procedure for other cameras on this page.
8. When satisfied with the settings, press the Function
F1
button to select the next page.
Repeat the above procedures until the settings for all cameras are completed.
9. Press the Function
F2
button to go back to the previous page.
10. When satisfied with all the camera titles, press the
MON (ESC)
key to escape from the programming mode.
The cursor returns to position 2.
S e t
U p
F 1 : N e x t P a g e
F 2 : P r e P a g e
F 3 : - -
F 4 : - -
A T C L N
A u t o C l e a n i n g P a g e
P a g e 1 o f 2
C A M
0 1
0 2
0 3
0 4
0 5
0 6
0 7
0 8
0 9
0 0
2 3
1 0
1 1
1 2
1 3
1 4
1 5
1 6
C A M
1 7
1 8
1 9
2 0
2 1
2 2
2 3
2 4
2 5
2 6
2 7
2 8
2 9
3 0
3 1
3 2
C A M
3 3
3 4
3 5
3 6
3 7
3 8
3 9
4 0
4 1
4 2
4 3
4 4
4 5
4 6
4 7
4 8
C A M
4 9
5 0
5 1
5 2
5 3
5 4
5 5
5 6
5 7
5 8
5 9
6 0
6 1
6 2
6 3
6 4
M a n u a l
N o w c l e a n i n g
T o s t o p C l e a n i n g , P r e s s E S C .
W e d n e s d a y
M o d e
H o u r
M i n u t e
e q
r
t
y
w
u i
Summary of Contents for WVCU550C - SYSTEM CONTROLLER UNIT
Page 8: ...9 1 SECTION 1 FEATURES OF THE SYSTEM 500 MATRIX SWITCHER ...
Page 19: ...21 2 SECTION 2 DETAILED PRODUCT DESCRIPTION AND SELECTION ...
Page 45: ...47 3 SECTION 3 INSTALLATION AND SYSTEM CONNECTIONS ...
Page 61: ...65 4 SECTION 4 SOFTWARE SETUP ...
Page 90: ...95 5 SECTION 5 OPERATING PROCEDURES ...
Page 122: ...127 6 SECTION 6 TROUBLESHOOTING ...
Page 126: ...131 7 SECTION 7 SPECIFICATIONS ...


