86
UF-5500 / 4500
8.1.6.
When Connecting using a USB Port (UF-5500 only)
1.Start Windows and make sure no other applications are running.
• You must be logged in as an administrator in order to install the Panasonic Document Management System.
2.Insert the supplied CD-ROM into your CD-ROM drive.
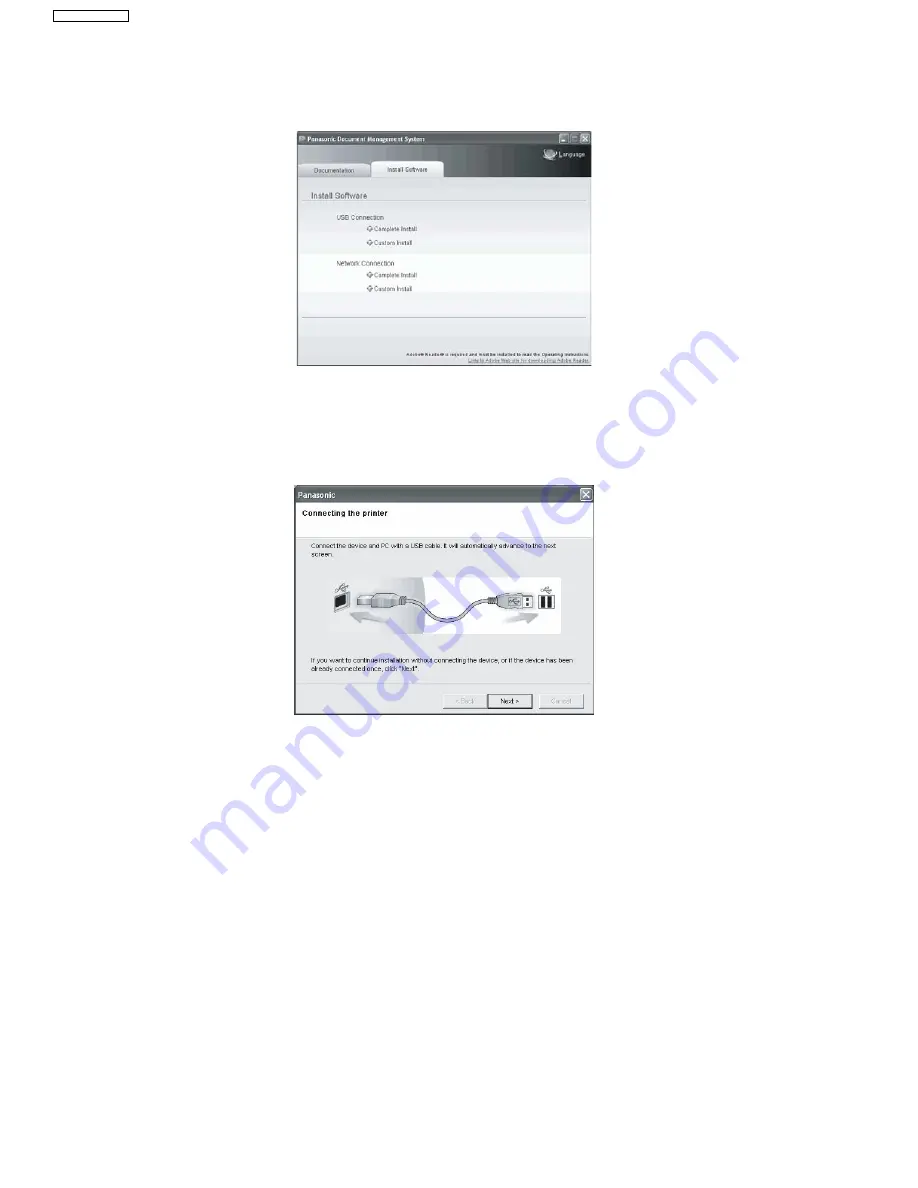
• The [Panasonic Document Management System] window appears.
3.Click [Complete Install] or [Custom Install] from [USB Connection] in the [Install Software] tab.
• For [Complete Install], go to the next step.
• For [Custom Install], select the desired software, then click [Install].
• In case of Windows Vista, Windows Server 2008 and Windows 7, the Windows Security screen is displayed after clicking [Com-
plete Install]. Click [Install this driver software anyway].
4.The [Connecting the printer] dialog box appears. Connect the machine to the computer with the USB cable.
•
Windows 2000
: go to steps 5a and 6
•
Windows XP/Windows Server 2003
: go to steps 5b and 6
•
Windows Vista/Windows Server 2008/Windows 7
: go to step 6
5a.Windows 2000
• click [Yes].
5b.Windows XP/Windows Server 2003
1. Select [No, not this time], and then click [Next].
2. Select [Install the software automatically (Recommended)], and then click [Next].
3. If you have a previous version of the Printer Driver installed, select the latest version of the [.inf] file, and then click [Next].
4. Click [Continue Anyway].
5. Click [Finish].
6.The [License Agreement] dialog box appears. Select [I accept the terms of the license agreement], and click [Next].
7.The [Select Installation Folder] dialog box appears. Confirm the destination of the installation folder, and click [Next].
• To install to a different folder, click [Browse] and select the desired folder.
8.The [Select Data Folder] dialog box appears. Confirm the destination of the data folder, and click [Next].
• To install to a different folder, click [Browse] and select the desired folder.
9.The [Select Printer Driver] dialog box appears. Select [Panasonic UF-5500], and click [Next].
10.The [Select Panafax Desktop Setup Type] dialog box appears. Select [Standalone/Server] or [Client], and click [Next].
• Consult your network administrator for proper selection.
11.The [Ready to Install] dialog box appears. Click [Install] to start the installation.
• The files will be copied to your computer.
Summary of Contents for UF-4500
Page 180: ...180 UF 5500 4500 ...
Page 248: ...248 UF 5500 4500 13 5 Test Chart 13 5 1 ITU T No 1 Test Chart ...
Page 249: ...249 UF 5500 4500 13 5 2 ITU T No 2 Test Chart ...
Page 281: ...281 UF 5500 4500 10 10 11 15 12 17 18 19 20 21 22 23 24 28 29 30 27 25 26 21 13 14 16 30 ...
Page 287: ...287 UF 5500 4500 130 131 132 133 134 135 136 137 138 139 140 141 PCB2 A UF 5500 only CN1 ...
Page 297: ...297 UF 5500 4500 ...
Page 305: ...305 UF 5500 4500 ...
Page 311: ...311 UF 5500 4500 501 502 503 504 506 507 505 508 509 511 510 514 513 512 P51 P53 P54 A51 P52 ...
Page 362: ...362 UF 5500 4500 ...


