background image

3

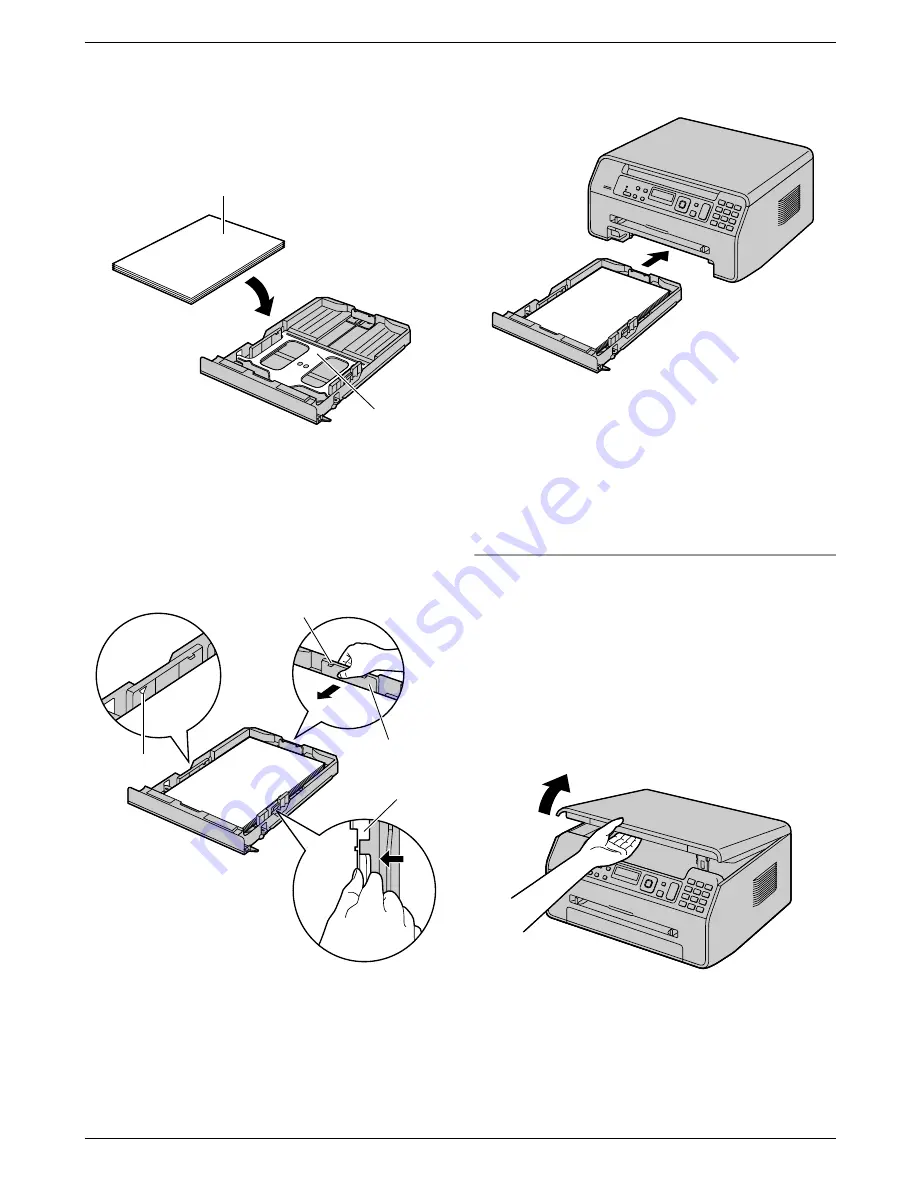
Load the paper, print-side down (

A

).

Important:

R

Push down to lock the plate (

B

) in the paper

input tray, if necessary.

A

B

4

Adjust the recording paper guides. Pinch the rear
guide (

A

), then slide it to match the paper size mark.

Pinch the right guide (

B

), then slide it to adjust the

width to the size of the recording paper.

R

Make sure that the recording paper is under the
paper limit mark (

C

), and the paper should not

be loaded over the snubbers (

D

).

A

B

D

C

5

Insert the paper input tray into the unit.

Note:

R

If the paper is not loaded correctly, re-adjust the
paper guides, or the paper may jam.

R

If the paper input tray does not close, the plate in the
paper input tray may not be in the locked position.
Push the paper down and make sure that the paper
is laying flat in the paper input tray.

To expand the paper exit

You can temporarily expand the paper exit before
printing.
– When printing on small sized paper, you can pull it

out easily.

– When printing several pages (20 to 30 pages), paper

stacking will be supported.

When using the automatic document feeder, we
recommend to replace the document cover to original
position beforehand (KX-MB1530 only).

14

1. Introduction and Installation

Summary of Contents for KX-MB1500HX

Page 1: ...o so during the setup of Multi Function Station CD ROM KX MB1520 KX MB1530 only R This unit is compatible with Caller ID Subscription to the appropriate service through your service provider telephone company is required KX MB1520EX KX MB1530EX only R Designed to be used in Czech Hungary and Slovakia according to the location setting feature The default setting is Czech To change the location sett...

Page 2: ...e model number will be omitted in these instructions R Most illustrations shown in these instructions are based on a KX MB1500 ENERGY STAR European Union only R As an ENERGY STAR Partner Panasonic has determined that this product meets the ENERGY STAR guidelines for energy efficiency ENERGY STAR is a U S registered mark Trademarks R Microsoft Windows Windows Vista Internet Explorer and PowerPoint ...

Page 3: ...o the unit Poor print quality Improper operation R Do not leave the toner cartridge out of the protective bag for a long time It will affect the printing quality R Read the instructions on page 10 before you begin installation of the toner cartridge After you have read them open the toner cartridge protective bag The toner cartridge contains a photosensitive drum Exposing it to light may damage th...

Page 4: ...When moving the unit carry it as shown Illegal copies R It is unlawful to make copies of certain documents Copying certain documents may be illegal in your country Penalties of fines and or imprisonment may be imposed on those found guilty The following are examples of items that may be illegal to copy in your country Currency Bank notes and cheques Bank and government bonds and securities Passpor...

Page 5: ... using phonebook 40 6 4 Sending an electronic document as a fax message from your computer 40 Receiving Faxes 6 5 Selecting the way to use your unit 41 6 6 Receiving a fax automatically Auto answer ON 43 6 7 Receiving a fax manually Auto answer OFF 43 6 8 Using the unit with an answering machine 45 6 9 Receive polling retrieving a fax placed on another fax machine 46 6 10 Junk fax prohibitor preve...

Page 6: ... MB1530 only 78 12 Cleaning Cleaning 12 1 Cleaning the white plates and glass 80 12 2 Cleaning the document feeder rollers KX MB1530 only 81 13 General Information Printed Reports 13 1 Reference lists and reports 82 Specifications 13 2 Specifications 82 14 Index 14 1 Index 85 6 Table of Contents ...

Page 7: ...power plug cap appropriately 1 2 Accessory information n Replacement accessory To ensure that the unit operates properly we recommend the use of Panasonic toner cartridge Toner cartridge R Model No Part No KX FAT390X R Prints about 1 500 pages at ISO IEC 19752 standard page R KX FAT390X is not available depending on country area Toner cartridge high capacity R Model No Part No KX FAT410X R Prints ...

Page 8: ...times MVN Pause KX MB1520 KX MB1530 only R To insert a pause during dialling MCopy SizeN R To select the copy size page 31 MFlashN KX MB1520 KX MB1530 only R To access special telephone services or for transferring extension calls MZoomN R To enlarge or reduce a document when copying page 32 MMuteN KX MB1520 KX MB1530 only R To mute your voice during a conversation Press again to resume the conver...

Page 9: ...g paper exit becomes full Manual input tray ADF Automatic Document Feeder cover KX MB1530 only Document entrance KX MB1530 only Document exit KX MB1530 only Document guides KX MB1530 only Document cover Document sub tray KX MB1530 only Recording paper guides Paper input tray Front cover External telephone jack KX MB1520 KX MB1530 only Telephone line jack KX MB1520 KX MB1530 only 1 4 2 Rear view A ...

Page 10: ...r in a high humidity area Do not expose the toner cartridge to direct sunlight R Do not leave the toner cartridge out of the protective bag for a long time It will affect the printing quality R Do not add toner to the toner cartridge We cannot be responsible for any damage to the unit or degradation of print quality which may occur from the use of a non Panasonic toner cartridge 1 Remove the toner...

Page 11: ...ure that the unit operates properly we recommend the use of Panasonic toner cartridge See page 7 for accessory information Waste disposal method Waste material should be disposed of under conditions which meet all national and local environmental regulations Toner save feature If you want to reduce toner consumption set the toner save setting to ON feature 482 on page 55 The toner cartridge will l...

Page 12: ... of the unit R Do not cover slots and openings on the unit They are provided for ventilation and protection against overheating R If any other device is connected to the same telephone line this unit may disturb the network condition of the device KX MB1520 KX MB1530 only R If you use the unit with a computer and your internet provider instructs you to install a filter E please connect it as follo...

Page 13: ...double sided printing with other copiers or printers This may cause paper jams Do not use paper printed from other copiers or printers for printing with this unit This may cause paper jams R To avoid curling do not open paper packs until you are ready to use the paper Store unused paper in the original packaging in a cool and dry location R For customers who live in high humidity areas Please be s...

Page 14: ...he unit Note R If the paper is not loaded correctly re adjust the paper guides or the paper may jam R If the paper input tray does not close the plate in the paper input tray may not be in the locked position Push the paper down and make sure that the paper is laying flat in the paper input tray To expand the paper exit You can temporarily expand the paper exit before printing When printing on sma...

Page 15: ...e recording paper size setting feature 381 on page 54 To use thin or thick paper change the recording paper type setting feature 384 on page 54 1 Adjust the width of the guides A to the size of the recording paper 2 Insert the paper print side up B until the unit grasps the paper and a single beep is heard A B Note R To print from the manual input tray when printing with the computer select 2 for ...

Page 16: ...Therefore if you print with the cover closed the paper may jam inside the unit 16 1 Introduction and Installation ...

Page 17: ... MB1520 KX MB1530 only You can select the desired mode by pressing the following button repeatedly KX MB1500 KX MB1520 KX MB1530 MFaxN KX MB1520 KX MB1530 only Select this mode when using the unit as a fax machine page 38 MCopyN Select this mode when using the unit as a copier page 31 MScanN Select this mode when using the unit as a scanner page 28 Note R The default operation mode is the copy mod...

Page 18: ...the document cover R Confirm that any ink paste or correction fluid has dried completely R Effective scanning area is shown by the shaded area Effective scanning area 208 mm 289 mm 4 mm 4 mm 4 mm 4 mm 2 3 2 Using the automatic document feeder KX MB1530 only 1 Open the document sub tray A by pressing its centre part B B A 2 Insert the document up to 15 pages FACE DOWN into the feeder until a single...

Page 19: ...age at a time when using the automatic document feeder or to use the scanner glass R The total height of the documents when laid flat must be less than 2 mm If the documents exceed the capacity of the automatic document feeder they may fall or cause a jam in the feeder R To set a document with a width of less than 210 mm we recommend using the scanner glass to copy the original document onto A4 or...

Page 20: ...r minute by selecting 2 digits for each Example 10 15 PM 12 hour clock format 1 M1NM0N M1NM5N 2 Press MGN repeatedly to select PM Press MGN repeatedly to select AM or PM or 24 hour time entry 4 MSetN 5 Press MMenuN to exit Note R To check the current date and time setting temporarily change the unit to the fax mode by pressing MFaxN repeatedly page 17 R Your unit s date and time will be used as th...

Page 21: ... it appears on the top of each page sent MSetN MFNMEN MMenuN MStopN 1 MMenuN A MBNM1NM0NM2N A MSetN 2 Enter your logo up to 30 characters see page 63 for character entry A MSetN 3 Press MMenuN to exit To correct a mistake Press MFN or MEN to move the cursor to the incorrect character and make the correction R To erase all characters press and hold MStopN 21 2 Preparation ...

Page 22: ... that support TWAIN scanning and WIA scanning Windows XP Windows Vista Windows 7 Storing editing or erasing items in the phonebook using your computer KX MB1520 KX MB1530 only Programming the features using your computer Sending receiving fax documents using your computer KX MB1520 KX MB1530 only To use Multi Function Station on your computer the following are required Operating System Windows 200...

Page 23: ...ect directly with a USB cable A Next R The Connect Device dialogue box will appear 6 Connect the unit to a computer with the USB cable A then click Next A R If the unit is connected to your computer the model name will be automatically detected R You can change the name of the unit if necessary 7 Click Install then follow the on screen instructions R The files will be copied to your computer Impor...

Page 24: ...me A Multi Function Station R Multi Function Station will appear The pictured model is KX MB1520 KX MB1530 Scan page 29 R To scan and display the scanned images R To scan and create an image file R To scan and send by email R To scan and convert an image into editable text data using OCR software not supplied PC FAX KX MB1520 KX MB1530 only R To send a document created on the computer as a fax mes...

Page 25: ...Email OCR Custom To change scanning settings for Multi Function scan application To select the default Email software The default Email software is used when using scan to email page 28 You can select the default Email software as follows For Windows 2000 1 Start A Settings A Control Panel A Internet Options A Programs A E mail 2 Select the desired MAPI compliant Email software such as Outlook Exp...

Page 26: ...izes and types of paper on the unit before purchasing large quantities You can change or display the settings on the following tabs Basic Paper size media type pages per sheet etc Output Number of prints collate etc Quality Quality contrast toner save feature etc Effects Watermark overlay Profile Saving the desired settings selecting the saved settings etc Support Version information Note R Select...

Page 27: ...eview the print image without test print Printer settings You can change or display the settings on the following tabs in step 5 Basic Paper size layout printing Output Number of prints paper source media type Quality Colour mode toner save Effects Header watermark footer Combining multiple documents You can display multiple pages created in various applications and handle it as a single document ...

Page 28: ...ng the automatic document feeder KX MB1530 only MStartN R When scanning to Multi Function Viewer the scanned image will be displayed in the Multi Function Viewer window after scanning However when you select PDF as a file format the software that is associated to open PDF files will start R When scanning to email the email software will automatically start and the scanned image will be attached to...

Page 29: ...in and click Scan KX MB1530 only R The scanned image will be displayed in the Multi Function Viewer window after scanning R To save the scanned image select Save As from the File menu R To cancel scanning while the documents are being scanned click Cancel Note R You can display images in applications that support TIFF JPEG PCX DCX and BMP formats R You can save images in TIFF JPEG PCX DCX BMP or P...

Page 30: ...The Select button will not be displayed when there is only one printer driver installed 30 4 Scanner ...

Page 31: ... faxes automatically even when in the copy mode KX MB1520 KX MB1530 only To select the copy size 1 Press MCopy SizeN repeatedly to select ORIGINAL SIZE 2 Press MCN or MDN repeatedly to select the size of your original document A MSetN 3 Press MCN or MDN repeatedly to select the size of recording paper size R When 2 is selected you can change the recording paper size by pressing MEN repeatedly R Th...

Page 32: ...he zoom rate that fits the size of your document and recording paper ZOOM 100 1 50 200 1 Press MCN or MDN repeatedly to change the zoom rate by 1 at a time from 25 to 400 You can also enter the desired percentage specifically by using the dial keys 3 MSetN 4 If necessary enter the number of copies up to 99 A MStartN 5 After you finish copying press MStopN to reset this feature Note R Zoom copy is ...

Page 33: ...age original document 4 3 2 1 4 3 2 1 4 4 3 3 2 2 1 1 Collated pages Uncollated pages Note R The unit will store the documents into memory while collating the copies If the memory becomes full while storing the unit will only print out the stored pages R You can hold the previous collate setting feature 469 on page 60 Proof set feature KX MB1530 only To make 1 set of a collated copy first press MC...

Page 34: ...APE or PORTRAIT A MSetN 6 If necessary enter the number of copies up to 99 7 Quick ID copy feature 1 MStartN R The unit will scan 1 page 2 Place the next document on the scanner glass and press MSetN Repeat this until all the documents are scanned R The unit will start copying R You can press MStartN anytime to start copying Image repeat feature MStartN 8 After you finish copying press MStopN to r...

Page 35: ...Set the original page 18 R To make a portrait copy set the original in portrait direction To make a landscape copy set the original in landscape direction 2 Press MPage LayoutN repeatedly to select PAGE LAYOUT 3 Press MCN or MDN repeatedly to select N in 1 A MSetN 4 Press MCN or MDN repeatedly to select the number of original documents from 2 in 1 4 in 1 or 8 in 1 A MSetN 5 Press MCN or MDN repeat...

Page 36: ...sing the dial keypad A MSetN 6 Press MCN or MDN repeatedly to select SHORT EDGE A MSetN 7 Enter the desired edge width of short edge using the dial keypad A MSetN 8 If necessary enter the number of documents up to 99 A MStartN 9 After you finish copying press MStopN to reset this feature Note R You can hold the previous edge setting feature 473 on page 60 5 2 7 Margin feature You can set the unit ...

Page 37: ...NG KX MB1520 KX MB1530 only is displayed switch to copy mode by pressing MCopyN repeatedly page 17 then press MStartN 3 Make necessary settings such as number of copies resolution zoom features and page layout features A MStartN R COPY RESERVED will be displayed The unit will start copying after the current printing job 37 5 Copier ...

Page 38: ...ityN repeatedly to display CONTRAST 2 Press MCN or MDN to change the contrast 3 MSetN Note R You can save the previous contrast setting feature 462 on page 54 To select the resolution 1 Press MQualityN repeatedly to display RESOLUTION 2 Press MCN or MDN to change the resolution STANDARD For normal sized characters FINE For small sized characters SUPER FINE For very small sized characters PHOTO For...

Page 39: ...he automatic document feeder Pre dialling a fax number 1 Enter the fax number 2 Set the original page 18 A MStartN Sending from memory Quick scan feature Important R Make sure the quick scan feature is activated beforehand feature 419 on page 57 1 Set the original page 18 2 Enter the fax number A MStartN 6 2 Storing items for the phonebook The unit provides the phonebook 100 items R Make sure that...

Page 40: ... Set the original page 18 2 If necessary change the contrast page 38 and the resolution page 38 3 Press MEN then press MCN or MDN repeatedly to display the desired item 4 MStartN 6 4 Sending an electronic document as a fax message from your computer You can access the fax function from a Windows application using Multi Function Station For example to send a document created from WordPad proceed as...

Page 41: ...Use with answering machine 6 5 1 Use only as a fax FAX ONLY mode Your situation You have a separate telephone line just for faxes or you want to use the unit only for receiving faxes Setup Set the unit to FAX ONLY mode page 43 by pressing MFax Auto AnswerN repeatedly R The MFax Auto AnswerN light turns ON Fax Auto Answer MStartN The pictured model is KX MB1520 How faxes are received All incoming c...

Page 42: ...rns OFF Fax Auto Answer Note R Make sure feature 404 is set to TEL FAX beforehand page 56 How phone calls and faxes are received If the call is a phone call the unit will ring If a fax calling tone is detected the unit will receive the fax automatically without ringing 6 5 4 Use with answering machine Your situation You want to use the unit with an answering machine Setup Connect an extension tele...

Page 43: ...e sure feature 404 is set to TEL beforehand page 56 2 Press MFax Auto AnswerN repeatedly to display TEL MODE R The MFax Auto AnswerN light turns OFF MStartN MSP PhoneN Fax Auto Answer The pictured model is KX MB1520 Note R If you do not answer the call within 10 rings the unit will temporarily switch to fax reception The other party can then send a fax How to receive phone calls and faxes 1 Press ...

Page 44: ...re answering the call R The number of rings is determined by the TEL FAX delayed ring count feature 212 on page 56 R During this time an extension telephone will ring 3 The unit will answer the call and try to detect a fax calling tone When a fax calling tone is detected The unit receives the fax automatically without ringing When a fax calling tone is not detected A The unit will ring 3 times You...

Page 45: ...lied The illustration is just an example R Remove the stopper B if attached A B The pictured model is KX MB1520 2 Set the number of rings on the answering machine to 4 rings or less R This will allow the answering machine to answer the call first 3 Record a greeting message on the answering machine R We recommend you record a message up to 10 seconds long and not to pause for more than 4 seconds d...

Page 46: ...fed into your unit s automatic document feeder KX MB1530 only 1 Press MMenuN repeatedly to display POLLING A MSetN 2 Dial the fax number A MStartN 6 10 Junk fax prohibitor preventing fax reception from undesired callers If you subscribe to Caller ID service page 48 this feature prevents fax reception from calls that do not show caller information Additionally the unit will not accept faxes origina...

Page 47: ...rough the unit Note R You can view print or transfer the received document using your computer R Messages transferred to your computer will be deleted from the unit Viewing a received document 1 Select PC FAX from Multi Function Station 2 Select Received Log in Communication Log 3 Click the item you want to view 4 Click File in the menu bar then select View or click the View icon in the toolbar R ...

Page 48: ... will be displayed OUT OF AREA The caller dialled from an area which does not provide Caller ID service PRIVATE CALLER The caller requested not to send caller information LONG DISTANCE The caller made a long distance call To confirm caller information by printing the Caller ID list To print manually see page 82 To print automatically after every 30 new calls activate feature 216 page 53 7 2 Viewin...

Page 49: ...etN R CALL LIST ERASE will be displayed 2 MSetN R To cancel erasing press MStopN then MMenuN 3 MSetN A MStopN 7 4 2 Erasing specific caller information R Make sure that the MFaxN light is ON 1 MCaller IDN 2 Press MCN or MDN repeatedly to display the desired item A MFN A MSetN A MStopN 7 5 Storing caller information into the phonebook R Make sure that the MFaxN light is ON 1 MCaller IDN 2 Press MCN...

Page 50: ...ress MBN and the 3 digit code page 51 to page 62 3 Press the appropriate selection to display the desired setting R This step will vary depending on the feature 4 MSetN 5 Press MMenuN to exit 50 8 Programmable Features 8 Programmable Features ...

Page 51: ...o select the desired language A MSetN A MMenuN Note R The default may vary depending on the model Selecting the location where you use MBNM1NM1NM4N KX MB1520EX KX MB1530EX only This setting must match your location R The language setting is also available feature 110 on page 51 M1N CZECH default To use in Czech M2N SLOVAKIA To use in Slovakia M3N HUNGARY To use in Hungary Setting the dialling mode...

Page 52: ...Because this is to prevent the toner from solidifying the noise that the unit makes during maintenance cannot be stopped However if the unit s noise bothers you you can change the start time 1 MMenuN A MBNM1NM5NM8N A MSetN 2 Enter the maintenance start time R The default time is 12 00 R If you selected 12 hour time entry page 20 press MHN repeatedly to select AM or PM R If you selected 24 hour tim...

Page 53: ...etting is valid for PC printing printing received faxes and printing reports lists automatically R When a printing error occurs the unit will beep the error beep instead of this beep even if this feature is set to ON Changing the ring count in FAX ONLY mode MBNM2NM1NM0N KX MB1520 KX MB1530 only KX MB1520EX KX MB1530EX M2N 2 default M3N 3 M4N 4 M5N 5 KX MB1520FX KX MB1530FX M1N 1 M2N 2 default M3N ...

Page 54: ... g m to 90 g m paper M2N THIN PAPER 64 g m to 75 g m paper M3N THICK PAPER 90 g m to 165 g m paper Note R This setting will be deactivated when printing from a computer To set the recording paper type for printing see page 26 Setting the waiting time for the power save mode MBNM4NM0NM3N To set the length of time before the unit enters power save mode M1N 5min default 5 minutes M2N 15min 15 minutes...

Page 55: ...g is valid for copying and when the unit prints reports lists R This setting is invalid for printing received faxes KX MB1520 KX MB1530 only Setting the reordering feature MBNM4NM9NM6N KX MB1530 only M0N OFF default Deactivates this feature M1N ON After passing multiple page documents through the automatic document feeder REORDER DOC is displayed To return the documents to their original order 1 W...

Page 56: ...ill be printed only when fax transmission fails Setting the journal report to print automatically MBNM4NM0NM2N M0N OFF The unit will not print a journal report but will keep a record of the last 30 fax transmissions and receptions M1N ON default The unit will print a journal report automatically after every 30 new fax transmissions and receptions page 39 Changing the receiving mode in the manual a...

Page 57: ... for another fax transmission until the former sending is completed Note R To cancel this setting after programming press MStopN while the unit is idle and then press MSetN Setting the Error Correction Mode ECM MBNM4NM1NM3N This feature is available when the sending receiving fax machines are ECM compatible M0N OFF Deactivates this feature M1N ON default Fax transmission reception will be carried ...

Page 58: ... fax document that is longer than your recording paper M0N OFF Deactivates this feature M1N ON default The unit will fit received documents onto your recording paper Changing the fax activation code MBNM4NM3NM4N If you wish to use an extension telephone to receive faxes activate this feature and program the activation code Important R The fax activation code must be different from the code that yo...

Page 59: ...0N OFF Deactivates this feature M1N ALWAYS If the unit recognizes the connection to the computer it will transfer received documents to the computer If the unit cannot recognize the connection it will store received documents into memory and then transfer the data after recognition of the computer connection M2N CONNECTED default If the unit recognizes the connection to the computer it will transf...

Page 60: ...s this feature M1N ENABLED The unit will hold the previous setting Holding the previous zoom setting MBNM4NM6NM8N M0N DISABLED default Deactivates this feature M1N ENABLED The unit will hold the previous setting Holding the previous collate setting MBNM4NM6NM9N M0N DISABLED default Deactivates this feature M1N ENABLED The unit will hold the previous setting Holding the previous edge setting MBNM4N...

Page 61: ...4N A MSetN 2 Enter the desired data timeout setting from 005 seconds to 600 seconds using the dial keypad R The default setting is 060 seconds 3 MSetN A MMenuN Setting mutual A4 letter print MBNM7NM7NM6N This feature allows printing in A4 size even if letter size recording paper is loaded in the paper input tray and vice versa M0N OFF Deactivates this feature M1N ON default Printing is possible be...

Page 62: ...anned image will be saved for email attachment M4N OCR The scanned image will be displayed in the OCR window Note R The OCR software is not supplied To use OCR software you need to specify the path of the OCR software page 28 Holding the previous scanning parameter for Push Scan MBNM4NM9NM4N M0N DISABLED default Deactivates this feature M1N ENABLED The unit will hold the previous scan settings for...

Page 63: ...4N G H I 4 g h i 4 M5N J K L 5 j k l 5 M6N M N O 6 m n o 6 M7N P Q R S 7 p q r s 7 M8N T U V 8 t u v 8 M9N W X Y Z 9 w x y z 9 M0N 0 H A MGN To switch between uppercase or lowercase letters MFlashN Hyphen MMuteN To insert a space MStopN To delete a character To select characters using MCN or MDN Instead of pressing the dial keys you can select characters using MCN or MDN 1 Press MCN repeatedly to ...

Page 64: ...tion without closing the window 5 Enter the password feature 155 on page 52 A OK R The new data will be transferred to the unit and the window will close Note R Some of the features cannot be programmed from your computer R When another person is adjusting stored data in the unit it may be overwritten Make sure the unit is not currently being used for the same function 9 2 2 Using Device Monitor Y...

Page 65: ...KX MB1530 only Press MStopN repeatedly to display STOP FAX To cancel fax redialling KX MB1520 KX MB1530 only Press MStopN repeatedly to display SEND CANCELLED 3 MSetN 9 4 Reordering the document KX MB1530 only The order of multiple page documents will be reversed after being fed into the automatic document feeder You can return the documents to their original order by passing the documents through...

Page 66: ...fax prohibitor feature of this unit rejected fax reception MEMORY FULL R The memory is full of received documents due to a lack of recording paper or a recording paper jam Load paper page 13 or remove the jammed paper page 75 R If the PC fax setting feature 442 on page 59 is set to ALWAYS check the connection between the computer and the unit NO DOCUMENT FAILED PICKUP R The document was not fed in...

Page 67: ... faxes have been stored into memory Change the recording paper size setting and load the appropriate recording paper Note R 1 Check the paper input tray The displayed paper size depends on the recording paper size setting feature 380 on page 54 R 2 Check the manual input tray The displayed paper size depends on the recording paper size setting feature 381 on page 54 CHECK PICK UP INPUT TRAY 2 R Re...

Page 68: ...FULL R There is no space to store new items in the phonebook Erase unnecessary items page 39 PLEASE WAIT R The unit is warming up Wait for a while POLLING ERROR R The other party s fax machine does not offer the polling function Check with the other party REDIAL TIME OUT R The other party s fax machine is busy or has run out of recording paper Try again REMOVE DOCUMENT R The document is jammed Rem...

Page 69: ... R Make sure you have installed the latest Service Pack available for the version of Windows installed on your computer See the Microsoft web site for details R Check that your computer has enough memory and hard disk space If your computer warns that there is insufficient memory close other applications If there is not enough space on the hard disk delete unnecessary files R Uninstall Multi Funct...

Page 70: ...nting quality is poor e g has smudges blurred points or lines ABC R Some paper has instructions recommending which side to print on Try turning the recording paper over R You may have used paper with a cotton and or fibre content that is over 20 such as letterhead or resume paper R The recording paper is too damp Use new paper R When you print several pages the stacked paper may have smudges on th...

Page 71: ...uter and the unit page 11 23 R Restart the computer and try again R You attempted to scan a document longer than the paper size which you set Change the setting or divide the document into the appropriate paper size and try again The document is not fed into the unit when using the unit as a scanner KX MB1530 only R Remove the document in the automatic document feeder and re insert it page 18 Even...

Page 72: ... the document using TEXT resolution page 31 and try again I cannot receive documents R The telephone line cord is connected to the EXT jack on the unit Connect to the LINE jack page 11 R The PC fax setting feature 442 on page 59 is activated and the received fax documents are automatically transferred to the computer View the received documents using the computer page 47 R Set the maximum fax spee...

Page 73: ...computer modem connect the unit directly to a telephone line jack I cannot make calls R The dialling mode setting may be wrong Change the setting feature 120 on page 17 The unit does not ring R The ringer volume is turned OFF Adjust it page 20 The other party complains they only hear a fax tone and cannot talk R FAX ONLY mode is set page 43 Tell the other party the number is only used for faxes R ...

Page 74: ...wn report will be printed out stating which fax items in the memory have been erased 10 3 8 Notice for KX MB200 KX MB700 KX FLB880 series users If you have already installed KX MB200 KX MB700 KX FLB880 series Multi Function Station on your computer use the following instructions to modify or add the printer driver which changes after installing the KX MB1500 series Multi Function Station You can m...

Page 75: ...e front and rear covers as the jammed paper may be pulled and the jam may get worse Case 1 When the recording paper has jammed inside the rear cover 1 Open the rear cover A A 2 Push down both green levers A until they stop A 3 Remove the jammed paper A carefully by pulling it toward you A C B Caution R The fuser unit B gets hot Do not touch it Note R The area near the rear cover C may also get war...

Page 76: ...When the recording paper has jammed inside the front cover 1 Open the front cover A A 2 Remove the jammed paper A carefully by pulling it toward you A R If the recording paper has jammed behind the toner cartridge remove the toner cartridge A first and remove the jammed paper B Then reinsert the toner cartridge into the unit A B 76 11 Paper Jams ...

Page 77: ...ge is still displayed check the recording paper specifications and load the recording paper again See page 13 for details 11 1 3 When the recording paper in the manual input tray is not fed into the unit properly The display will show the following CHECK PICK UP INPUT TRAY 2 1 Remove the recording paper 2 Re insert the recording paper Note R If the message is still displayed check the recording pa...

Page 78: ...play will show the following REMOVE DOCUMENT Caution R Do not pull out the jammed document forcibly before lifting the ADF cover R Be careful not to damage the transparent plastic sheets A A 1 Open the ADF cover A while holding the document cover B A B 78 11 Paper Jams ...

Page 79: ...e document entrance A When the document has jammed near the document exit A R If you cannot remove the jammed document A open the document cover remove the document then close the document cover A 3 Close the ADF cover MStopN R Press MStopN to clear the message 79 11 Paper Jams ...

Page 80: ...other party KX MB1520 KX MB1530 only Caution R Do not use paper products such as paper towels or tissues for cleaning R Be careful not to damage the transparent plastic sheets A KX MB1530 only A The pictured model is KX MB1530 1 Open the document cover A A 2 Hold the document cover while cleaning the white plates A and the scanner glass B KX MB1500 KX MB1520 A B KX MB1530 A B 3 Close the document ...

Page 81: ...n documents Caution R Do not use paper products such as paper towels or tissues for cleaning 1 Turn the power switch OFF 2 Open the ADF cover A while holding the document cover B A B 3 Clean the document feeder rollers A with a cloth moistened with water and let all parts dry thoroughly A 4 Close the ADF cover 5 Turn the power switch ON 81 12 Cleaning ...

Page 82: ...canning density Scanning resolution Up to 600 1 200 dpi Optical Up to 19 200 19 200 dpi Interpolated Copy resolution Up to 600 600 dpi Fax resolution 1 Horizontal 8 pels mm Vertical 3 85 lines mm in standard resolution 7 7 lines mm in fine photo resolution 15 4 lines mm in super fine resolution n Photo resolution 64 level n Scanner type Colour Contact Image Sensor n Printer type Laser Printer n Da...

Page 83: ...speed depends on the contents of the pages resolution telephone line conditions and capability of the other party s machine 3 Transmission speed is based on the ITU T No 1 Test Chart with original mode If the capability of the other party s machine is inferior to your unit the transmission time may be longer ITU T No 1 Test Chart Note R Design and specifications are subject to change without notic...

Page 84: ... Introduction and Installation Accessories 1 1 Included accessories 1 2 Accessory information Finding the Controls 1 3 Description of buttons 1 4 Overview Installation 1 5 Toner cartridge and drum unit 1 6 Document tray 1 7 Output tray 1 8 Recording paper 2 Preparation 2 1 Connections 2 2 Turning the power switch ON Help Button 2 3 Help function Volume 2 4 Adjusting volume Initial Programming 2 5 ...

Page 85: ...otify 59 458 All received fax erase 59 459 Set fax features to default 59 460 Input tray setting for copy 60 461 Default copy resolution 60 462 Contrast hold 54 463 Default operation mode 54 464 Mode timer 55 467 Page layout hold 60 468 Zoom hold 60 469 Collate hold 60 473 Edge hold 60 474 Frame margin 60 475 Margin hold 60 482 Toner save 11 55 493 Scan mode 62 494 Scan parameter hold 62 496 Reord...

Page 86: ...OCR software 28 Off hook alert Feature 171 53 Overseas mode Feature 411 56 P Page layout hold Feature 467 60 Paper input tray 13 Paper size Manual input tray Feature 381 54 Paper input tray Feature 380 54 Paper type Manual input tray Feature 384 54 Paper input tray Feature 383 54 Password Feature 155 52 PC fax setting Feature 442 59 PC print features 61 Phonebook All erase Feature 289 56 Sending f...

Page 87: ... 39 Manually 38 Multiple pages using the scanner glass 38 Phonebook 40 Sending report Feature 401 39 56 Set fax default Feature 459 59 Setup list 82 Storing Phonebook 39 T TEL mode 43 TEL FAX mode 42 44 Telephone number list 82 Time adjustment Feature 226 53 Toner cartridge 10 Toner cartridge life 84 Toner save Feature 482 11 55 V Volume 20 Z Zoom hold Feature 468 60 87 14 Index ...

Page 88: ...PNQX3909YA C0611KN1012 ...

Reviews: