107
4.11.1.6 Email
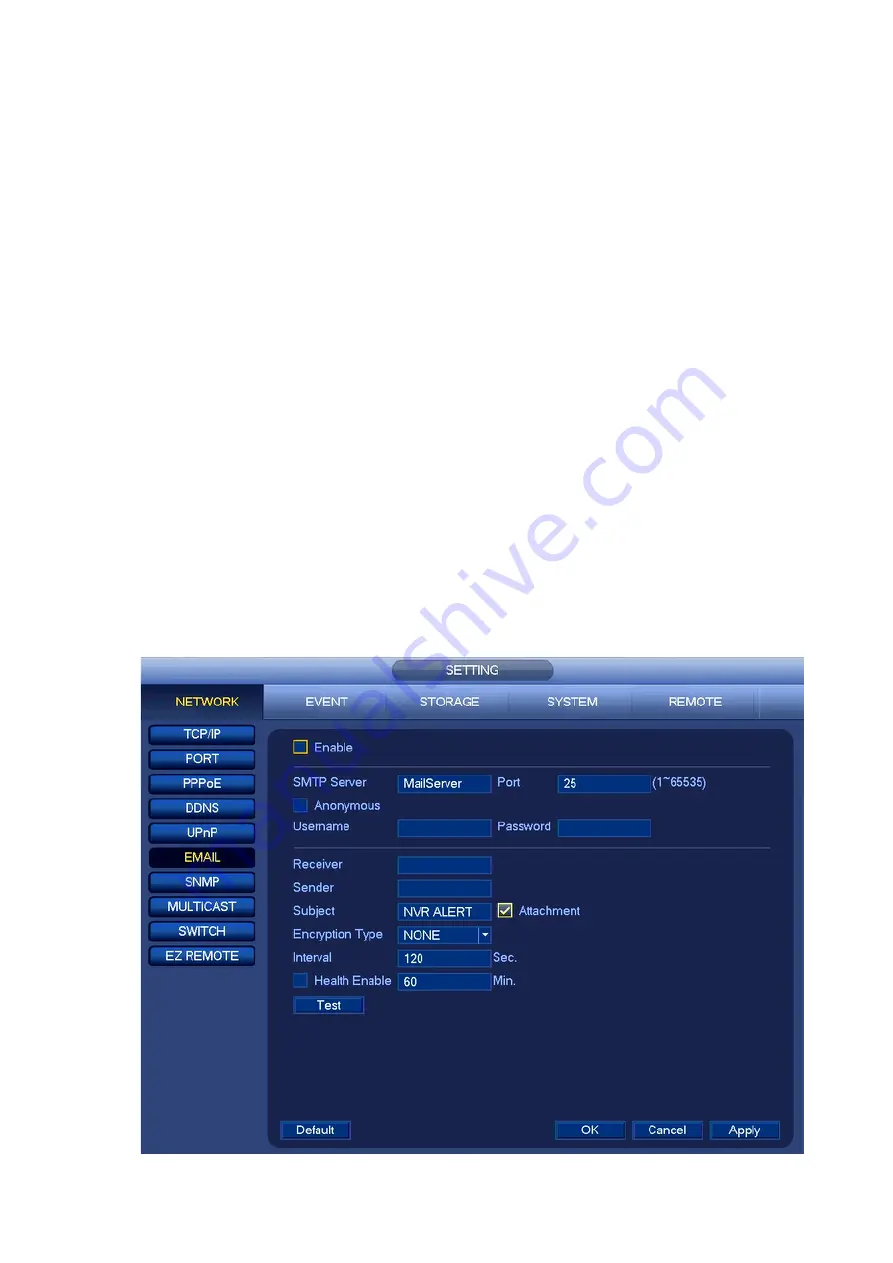
The email interface is shown as below. See Figure 4-106.
SMTP server: Please input your email SMTP server IP here.
Anonymous: Send anonymous email
Port: Please input corresponding port value here.
User name: Please input the user name to login the sender email box.
Password: Please input the corresponding password here.
Sender: Please input sender email box here.
Subject: Please input email subject here. System support English character and Arabic number. Max
32-digit.
Receiver: Please input receiver email address here. System max supports 3 email boxes. System
automatically filters same addresses if you input one receiver repeatedly.
Interval: The send interval ranges from 0 to 3600 seconds. 0 means there is no interval.
Health Enable: Please check the box here to enable this function. This function allows the system to
send out the test email to check the connection is OK or not.
Interval: Please check the above box to enable this function and then set the corresponding interval.
System can send out the email regularly as you set here. Click the Test button, you can see the
corresponding dialogue box to see the email connection is OK or not.
Please note system will not send out the email immediately when the alarm occurs. When the alarm,
motion detection or the abnormality event activates the email, system sends out the email according to
the interval you specified here. This function is very useful when there are too many emails activated by
the abnormality events, which may result in heavy load for the email server.
Summary of Contents for K-NL404K/G
Page 1: ...Network Disk Recorder User s Manual Model No K NL404K G K NL408K G K NL416K G Version 1 0 1 ...
Page 25: ...19 3 4 Connection Sample Please refer to Figure 3 1 for connection sample Figure 3 1 ...
Page 69: ...63 Figure 4 61 Figure 4 62 ...
Page 90: ...84 Figure 4 78 Figure 4 79 ...
Page 91: ...85 Figure 4 80 Figure 4 81 ...
Page 99: ...93 Figure 4 87 Figure 4 88 ...
Page 100: ...94 Figure 4 89 Figure 4 90 ...
Page 101: ...95 Figure 4 91 Figure 4 92 ...
Page 104: ...98 Figure 4 94 Figure 4 95 ...
Page 112: ...106 Figure 4 104 Figure 4 105 ...
Page 121: ...115 Figure 4 115 ...
Page 127: ...121 Figure 4 120 Figure 4 121 ...
Page 132: ...126 Figure 4 125 Figure 4 126 ...
Page 139: ...133 Figure 4 133 Figure 4 134 ...
Page 141: ...135 Figure 4 136 ...
Page 143: ...137 ...
Page 146: ...140 Figure 4 140 Step 2 Click Add user button Enter Add user interface See Figure 2 141 ...
Page 151: ...145 Figure 4 144 1 ...
Page 157: ...151 ...
Page 158: ...152 Please input your username and password Figure 5 3 ...
Page 191: ...185 Figure 5 41 ...
Page 192: ...186 Figure 5 42 ...
Page 193: ...187 Figure 5 43 Figure 5 44 Figure 5 45 ...
Page 198: ...192 ...
Page 199: ...193 Figure 5 49 ...
Page 205: ...199 Figure 5 55 Figure 5 56 ...
Page 208: ...202 Figure 5 60 Figure 5 61 Figure 5 62 ...
Page 239: ...233 ...


