97
4.10.5 Abnormality
There are three types: HDD/Network/User.
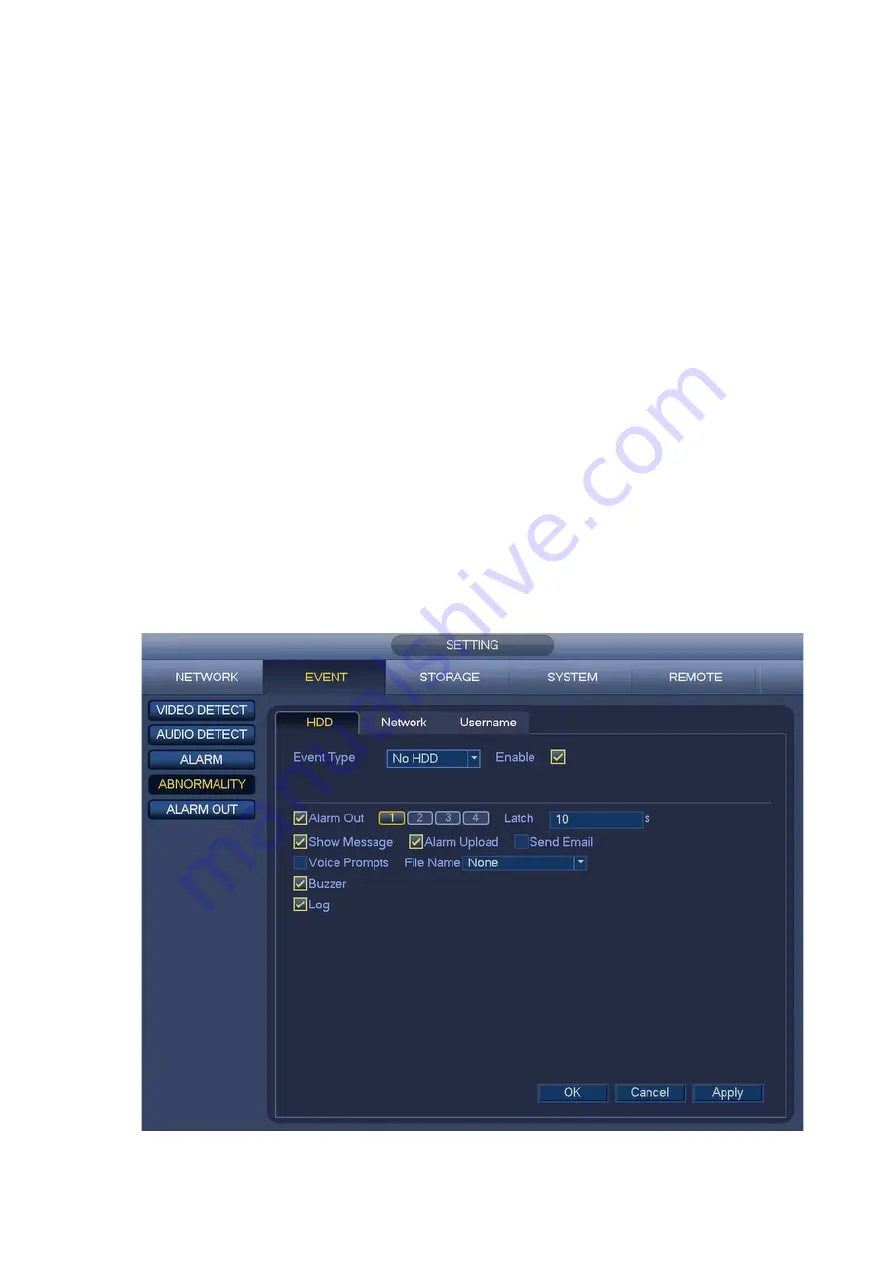
HDD: HDD error, no HDD, no space. See Figure 4-93 and Figure 4-94.
Network: Disconnection, IP conflict, MAC conflict. See Figure 4-95.
User: Illegal login. Figure 4-96.
Alarm Out: Please select alarm activation output port (multiple choices).
Less than: System can alarm you when the HDD space is less than the threshold you set here
(For HDD no space type only).
Attempts: In user interface, select illegal login from the dropdown list. Here you can set login
attempts. The value ranges from 1 to 10.
Lock time: In user interface, select illegal login from the dropdown list. Here you can set account
lock time. The value ranges from 1 to 30 minutes.
Latch: Here you can set corresponding delaying time. The value ranges from 1s-300s. System
automatically delays specified seconds in turning off alarm and activated output after external alarm
canceled.
Show Message: system can pop up the message in the local screen to alert you when alarm
occurs.
Alarm Upload: System can upload the alarm signal to the network (including alarm centre) if you
enabled current function. For disconnection event, IP conflict event and MAC conflict event, this
function is null.
Send Email: System can send out email to alert you when alarm occurs.
Buzzer: Highlight the icon to enable this function. The buzzer beeps when an alarm occurs.
Figure 4-93
Summary of Contents for K-NL404K/G
Page 1: ...Network Disk Recorder User s Manual Model No K NL404K G K NL408K G K NL416K G Version 1 0 1 ...
Page 25: ...19 3 4 Connection Sample Please refer to Figure 3 1 for connection sample Figure 3 1 ...
Page 69: ...63 Figure 4 61 Figure 4 62 ...
Page 90: ...84 Figure 4 78 Figure 4 79 ...
Page 91: ...85 Figure 4 80 Figure 4 81 ...
Page 99: ...93 Figure 4 87 Figure 4 88 ...
Page 100: ...94 Figure 4 89 Figure 4 90 ...
Page 101: ...95 Figure 4 91 Figure 4 92 ...
Page 104: ...98 Figure 4 94 Figure 4 95 ...
Page 112: ...106 Figure 4 104 Figure 4 105 ...
Page 121: ...115 Figure 4 115 ...
Page 127: ...121 Figure 4 120 Figure 4 121 ...
Page 132: ...126 Figure 4 125 Figure 4 126 ...
Page 139: ...133 Figure 4 133 Figure 4 134 ...
Page 141: ...135 Figure 4 136 ...
Page 143: ...137 ...
Page 146: ...140 Figure 4 140 Step 2 Click Add user button Enter Add user interface See Figure 2 141 ...
Page 151: ...145 Figure 4 144 1 ...
Page 157: ...151 ...
Page 158: ...152 Please input your username and password Figure 5 3 ...
Page 191: ...185 Figure 5 41 ...
Page 192: ...186 Figure 5 42 ...
Page 193: ...187 Figure 5 43 Figure 5 44 Figure 5 45 ...
Page 198: ...192 ...
Page 199: ...193 Figure 5 49 ...
Page 205: ...199 Figure 5 55 Figure 5 56 ...
Page 208: ...202 Figure 5 60 Figure 5 61 Figure 5 62 ...
Page 239: ...233 ...


