background image

- 97 -

About the PC display

When the unit is connected to a PC, it is recognised as an external drive.

Removable disk (Example: 

) is displayed in [Computer].

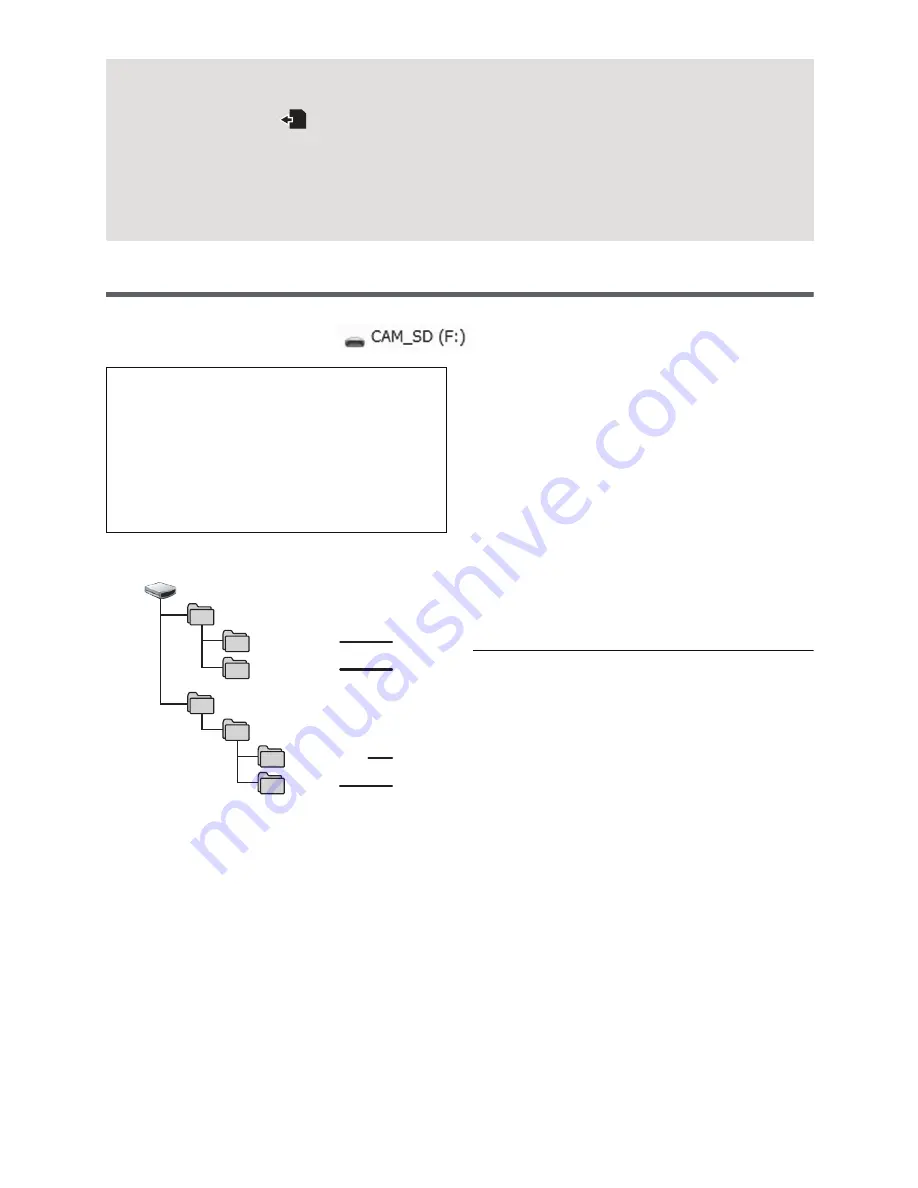
Example folder structure of an SD card:

The following data will be recorded.

1

MPO system/JPEG system still 
pictures (up to 999 still pictures can 
be recorded. ([11000001.MPO], 
[11000001.JPG], etc.))

2

MPO system/JPEG system still 
pictures created from motion 
pictures

3

The motion picture thumbnails

4

AVCHD format motion picture files 
([00000.MTS] etc.)

Copying your still pictures to 
your PC

Card reader function (mass storage)

Still pictures recorded with this unit can be 
copied to the PC with Explorer or other 
programmes.

1

Double click the folder that contains 
the still pictures. ([DCIM] 

#


[100CDPFQ] etc.)

2

Drag and drop the still pictures onto 
the destination folder (on the PC’s 
HDD).

Do not delete the SD card’s folders. Doing 
so may make the SD card unusable in this 
unit.

When data not supported by this unit has 
been recorded on a PC, it will not be 
recognised by this unit.

Always use this unit to format SD cards.

About the screen indication of the unit

Do not disconnect the USB cable, battery, or AC adaptor while the access lamp is on or 
card access icon (

) appears on the unit screen.

If the screen does not change when the unit is operated while connected to a PC, 
disconnect the battery and/or AC adaptor, wait approximately 1 minute, reconnect the 
battery and/or AC adaptor, wait approximately 1 minute again, and then turn the unit 
back on. (Data may be destroyed when above operation is performed while accessing 
the SD card.) 

We recommend using HD Writer XE 1.0 
to copy motion picture data.
Using Windows Explorer or other 
programmes on the PC to copy, move or 
rename files and folders recorded with 
this unit will result in them being unusable 
with HD Writer XE 1.0.

DCIM

CAM_SD

100CDPFQ

101CDPFS


AVCHDTN

BDMV

AVCHD

PRIVATE


Summary of Contents for HDC-Z10000

Page 1: ...Operating Instructions High Definition Video Camera Model No HDC Z10000 Before use please read these instructions completely VQT3V06 ...

Page 2: ...80 24p please use a separate SD card The scenes recorded in 1080 24p cannot be played back by the PAL system equipment Indemnity about recorded content Panasonic does not accept any responsibility for damages directly or indirectly due to any type of problems that result in loss of recording or edited content and does not guarantee any content if recording or editing does not work properly Likewis...

Page 3: ...ilizer Function 43 Focus 44 White Balance 45 Iris adjustment 47 Manual shutter speed 49 Audio Input 50 Microphone setup 50 Audio recording 51 Switching Audio Input 51 Adjusting the audio input level 54 Counter display 56 Setting the Time Code 57 Setting the User Information 58 Setting the Recording Counter 59 USER button 60 Setting the USER button 60 Using the USER button 61 Functions of the USER ...

Page 4: ...ations 98 If using Mac 99 Dubbing 100 Dubbing with a Blu ray disc recorder video device etc 100 Menu Using the Menu 104 Camera Setup 104 Recording Setup 109 Switch and display setting 116 Other Functions 121 Video Setup 125 Photo Setup 125 Display Indications 126 Messages 128 Others Troubleshooting 129 About recovery 133 Cautions for use 134 About copyright 140 Recording modes approximate recordab...

Page 5: ...ssible to adjust the covergence point connecting with the remote control optional Operations on the remote control optional will be given priority CAM REMOTE 3 5 mm mini jack It is possible to adjust the focus or iris connecting with the remote control optional It is not possible to use the remote control optional in the Intelligent Auto Mode ZOOM S S 2 5 mm super mini jack It is possible to opera...

Page 6: ...l 44 30 Zoom ring l 41 31 Iris ring l 47 32 Convergence dial CONV l 33 33 3D guide button 3D GUIDE l 34 34 Iris auto Manual button IRIS A M l 47 35 Focus auto Manual button FOCUS A M l 44 36 Optical image stabilizer button O I S l 43 37 White balance button W B l 45 38 Zebra button ZEBRA l 69 39 Colour Bar Screen button BARS l 69 40 Menu button MENU l 23 41 Display Mode check button DISP MODE CHK ...

Page 7: ...8 Card slot 1 left Card slot 2 right l 16 59 Access lamp card 2 l 16 60 HDMI connector HDMI l 81 61 AV multi connector AV MULTI l 81 103 Use the AV multi cable only the supplied cable 62 USB terminal USB 2 0 l 96 101 47 48 49 50 51 52 53 45 44 46 54 55 56 58 59 57 60 61 62 Due to limitations in LCD production technology there may be some tiny bright or dark spots on the LCD monitor screen However ...

Page 8: ...e optional to the microphone holder attchment part use the supplied microphone holder and microphone holder adaptor The microphone holder is set up so that a 21 mm external microphone can be attached Check in advance whether the microphone you wish to use can be attached 1 2 Flip the belt cover and the belt 3 Adjust the length 4 5 Replace the belt A Notch B Protrusion C Microphone holder adaptor D...

Page 9: ...16UNC screws Use the size that matches the diameter of the tripod s fixing screw If you attach a tripod which has 5 5 mm screw or larger it may damage this unit Attaching the lens cap Protect the lens surface with the lens cap while the unit is not used Attaching the INPUT terminal cap Attach the INPUT terminal cap while the audio input terminals 1 2 XLR 3 pin is not used A Tripod receptacle Attac...

Page 10: ...n some markets Some of these battery packs are not adequately protected with internal protection to meet the requirements of appropriate safety standards There is a possibility that these battery packs may lead to fire or explosion Please be advised that we are not liable for any accident or failure occurring as a result of use of a counterfeit battery pack To ensure that safe products are used we...

Page 11: ...attery charger by aligning the arrows We recommend using Panasonic batteries l 13 If you use other batteries we cannot guarantee the quality of this product Do not heat or expose to flame Do not leave the battery ies in an automobile exposed to direct sunlight for a long period of time with doors and windows closed When this unit is purchased the battery is not charged Charge the battery fully bef...

Page 12: ...on shown in the figure Removing the battery Make sure that the power switch is set to OFF and the status indicator is turned off and then remove by holding onto it taking care not to drop l 17 While pushing the PUSH button remove the battery Insert the battery until it clicks and locks ...

Page 13: ...se or charging This is not a malfunction Battery model number Voltage Capacity minimum Charging time 3D 2D Recording Mode Recording format Maximum continuously recordable time Actual recordable time Supplied battery CGA D54s optional 7 2 V 5400 mAh 5 h 30 min 3D Recording Mode 1080 50i 4 h 45 min 4 h 20 min 2 h 55 min 2 h 40 min 1080 25p 4 h 50 min 4 h 20 min 3 h 2 h 40 min 1080 24p 4 h 50 min 4 h...

Page 14: ...r of another device Do not use the AC cable with any other equipment as it is designed only for this unit Also do not use the AC cable from other equipment with this unit Insert the plugs as far as they will go 1 Connect the AC cable to the AC adaptor and the AC outlet 2 Connect the AC adaptor to the DC input terminal DC IN Removing the AC adaptor Make sure to set the power switch to OFF and the s...

Page 15: ...D Memory Card 32 MB or less cannot be used for the motion picture recording 4 GB or more Memory Cards that do not have the SDHC logo or 48 GB or more Memory Cards that do not have the SDXC logo are not based on SD Memory Card Specifications When the write protect switch A on SD card is locked no recording deletion or editing will be possible on the card Keep the Memory Card out of reach of childre...

Page 16: ...SD card jTurn the unit off jInsert and remove the USB cable jExpose the unit to vibrations or shock Performing the above while the lamp is on may result in damage to data SD card or this unit Do not expose the terminals of the SD card to water dirt or dust Do not place SD cards in the following areas jIn direct sunlight jIn very dusty or humid areas jNear a heater jLocations susceptible to signifi...

Page 17: ...ivated set the power switch to OFF once and then to ON again l 122 Change the mode to recording or playback Operate the mode switch to change the mode to or Preparation Turning the unit on off Preparation Selecting a mode Recording Mode l 29 38 Playback Mode l 72 To turn off the unit Set the power switch to OFF while pressing the lock release button The status indicator goes off C Mode switch ...

Page 18: ...irection as indicated in the figure Hold the LCD monitor extract part A when pulling out 2 Rotate to the position that is easy to view To retract the LCD monitor Retract as shown in the figure with the LCD facing downward Range of rotation of the LCD monitor It can rotate up to 270o B towards the lens Preparation Using the LCD monitor Viewfinder There are differences in the way that different peop...

Page 19: ...n About the operation icons These icons are used to switch the menu and thumbnail display page for item selection and setting etc Touch to return to the previous screen such as when setting menus Do not touch the LCD monitor with hard pointed tips such as ball point pens Perform the touch screen calibration when the touch is not recognised or wrong location is recognised Perform the touch screen c...

Page 20: ...N automatically Recordable time with the battery is shortened when the LCD is made brighter It adjusts brightness and colour density on the LCD monitor 1 Select the menu l 23 2 Touch the desired setting item 3 Touch to adjust settings 4 Touch ENTER Touch EXIT to exit the menu screen POWER LCD SW DISP SETUP POWER LCD ON LCD SET SW DISP SETUP LCD SET YES COLOUR Colour level of the LCD monitor BRIGHT...

Page 21: ...an be switched Select the menu l 23 The recording images or playback images on the viewfinder can be selected between colour black and white Select the menu l 23 Recording yourself Change the mode to Rotate the LCD monitor towards the lens side Displaying during the recording yourself can be switched by setting SELF SHOOT l 120 Only some indications will appear on the screen when the SELF SHOOT is...

Page 22: ...f the time display becomes the built in lithium battery needs to be charged To recharge the built in lithium battery connect the AC adaptor or attach a charged battery to this unit Leave the unit as it is for approx 24 hours and the battery will maintain the date and time for approx 6 months The battery is still being recharged even if the unit is off Display method of clock can be changed by sett...

Page 23: ...tton 2 Touch the top menu A 3 Touch the submenu B Next Previous page can be displayed by touching 4 Touch the desired item to enter the setting 5 Touch EXIT to exit the menu setting Preparation Using the menu screen MENU MENU ...

Page 24: ...thumbnail display switch buttons T W VOL 8 Recording start stop button START STOP 9 Date time button DATE TIME l 118 10 Menu button MENU 11 OK button OK l 25 means that these buttons function in the same manner as the corresponding buttons on the unit Preparation Using with the wireless remote control OTHER FUNCTION REMOTE CONTROL ON MENU SEARCH STILL ADV STILL ADV SEARCH VOL DATE TIME START STOP ...
Page 25: ...ration of direction buttons OK button 1 Press a direction button Selected item will become yellow 2 Select the item with the direction button 3 Confirm the selection by pressing the OK button Selection confirmation of operation icons thumbnail display etc can be operated Wherever you can touch with your finger can be operated by the wireless remote control Excluding some functions 15 15 15 15 15 1...

Page 26: ...ut your hand through the grip belt and hold the unit with both hands Recording from a high position Low angle recording For easier low angle recording the sub recording start stop button and the sub zoom lever can be used Recording Before recording ...

Page 27: ...cooling fan inlet with your hand etc Formatting cards If you use the SD cards for the first time for recording with this unit format the cards Please be aware that if a medium is formatted then all the data recorded on the medium will be erased and cannot be restored Back up important data on a PC disc etc l 87 When using two SD cards format both SD cards 1 Select the menu 2 Touch SD CARD 1 or SD ...

Page 28: ...till pictures 1 Select the menu 2 Touch the media to record motion pictures or still pictures The media is selected separately for motion pictures or still pictures and is then highlighted in yellow 3 Touch ENTER Recording Selecting a media to record SW DISP SETUP MEDIA SELECT YES MENU ...

Page 29: ...he video can be viewed in 3D using the LCD monitor 1 Change the mode to Extract the LCD monitor 2 Select the menu appears when 3D 2D REC MODE is set to 3D 3 Press the recording start stop button C to start recording Recording will stop when you press the recording start stop button again Recording Recording motion pictures RECORD SETUP 3D 2D REC MODE desired setting 3D You can record with 3D Recor...

Page 30: ... less than above in following cases jIf you change 3D 2D REC MODE or REC FORMAT jDuring the interval recording jIf you change MIC SETUP or AUDIO REC l 50 51 Please refer to page 141 about approximate recordable time When in 3D Recording Mode When in 2D Recording Mode TC 00 00 00 00 Counter display l 56 White Media where the motion picture is recorded l 28 R 1h20m Approximate remaining recordable t...

Page 31: ...It is not always possible to play back motion pictures recorded with the recording format set to AVCHD 3D on AVCHD 3D compatible equipment on AVCHD compatible equipment In such a case play back on this unit instead When motion picture is recorded in AVCHD Progressive format Only motion pictures recorded with the recording format set to AVCHD Progressive are supported by AVCHD Progressive compatibl...

Page 32: ...image that is effective as 3D video It is also recommended to adjust the convergence point again when the distance between this unit and the subject is changed significantly 1 Display the convergence To ensure that the 3D image can be safely viewed pay attention to the following points when adjusting the convergence point The image may cause tiredness or discomfort when adjustment of the convergen...

Page 33: ... if you wish to record subjects which are far away without worrying about convergence l 66 Optimal distance range for subject at Convergence Reset This is the target when the 3D GUIDE is set to MODE1 l 34 To adjust the convergence point with MIX display Images from the left and right lenses are displayed overlapping when the 3D display is set to MIX display Adjust the convergence point so the outl...

Page 34: ...dance with the screen size assumed for playback when the 3D GUIDE is set Set 3D 2D REC MODE to 3D l 29 1 Select the menu Colour of the 3D in the 3D guide display will be as following j MODE1 3D White j MODE2 3D Green 2 Touch EXIT to complete the setting SW DISP SETUP 3D GUIDE desired setting MODE1 When playing back on 196 cm 77q diagonal or smaller screen MODE2 When the screen size for playback is...

Page 35: ... out of the range of the 3D guide display the 3D guide display is displayed in red Move the unit and change the position and angle of view with respect to the subject adjust the convergence dial so as to keep within the range of the 3D guide display The 3D guide display may be displayed in red more when the 3D GUIDE is set to MODE2 It may display duplicated display strangely or may not produce 3D ...

Page 36: ...a zoom operation after adjustment readjust the viewing angle It will return to default setting in following cases jIf you turn the unit off jIf you change 3D 2D REC MODE or REC FORMAT Vertical position adjustment 1 Touch to adjust settings It will return to default setting when Reset is touched 2 Touch ENTER OTHER FUNCTION 3D FINE YES VERTICAL ALIGN The images from the left and right lenses are di...

Page 37: ... use following functions of the USER button when 3D recording or adjusting the convergence point Please refer to page 60 for details about setting the USER buttons r To focus on a close subject s To focus on a faraway subject r Brighten the image s Darken the image USER button function Effect R image l 65 Image displayed on the screen is switched to the image from the right lens when the 3D displa...

Page 38: ...ultaneous recording It is recommended to use a tripod when recording under low light conditions because the shutter speed becomes slow If simultaneous recording is used while recording a motion picture the remaining recordable time will shorten If the unit is turned off or the mode switch operated the remaining recordable time may lengthen The 16 9 still pictures recorded using this unit may be cr...

Page 39: ...nding on the recording conditions such as when faces are of certain sizes or at certain tilts or when digital zoom is used Recording Intelligent Auto Mode Manual Mode Mode Effect Portrait Faces are detected and focused automatically and the brightness is adjusted so it is recorded clearly Scenery The whole landscape will be recorded vividly without whiting out the background sky which may be very ...

Page 40: ...fective range of Automatic White Balance adjustment on this unit 2 Blue sky 3 Cloudy sky rain 4 Sunlight 5 White fluorescent lamp 6 Halogen light bulb 7 Incandescent light bulb 8 Sunrise or sunset 9 Candlelight If the Automatic White Balance is not functioning normally adjust the White Balance manually l 45 Auto Focus The unit focuses automatically Auto Focus does not work correctly in the followi...

Page 41: ...f Z00 to Z99 The value gets larger when zoomed in and the value gets smaller when zoomed out 99 is displayed during the i Zoom Ring zoom Zoom operation can be done using the zoom ring Recording Using the zoom Zoom ring A Zoom by rotating the ring A side Wide angle recording zoom out B side Close up recording zoom in Zoom lever Sub zoom lever T side Close up recording zoom in W side Wide angle reco...

Page 42: ...used approximately 1 2 m or further when the zoom magnification is at its maximum It can be focused approximately 30 cm or further in 3D Recording Mode and approximately 3 5 cm or further in 2D Recording Mode when the zoom magnification is set to 1k The image may wiggle horizontally when zoomed during the 3D Recording Mode This is because the convergence point is controlled in combination with the...

Page 43: ...ording while walking or holding the unit and recording a distant subject with zoom This function s default setting is ON This cannot be set when Optical Image Stabilizer is set to setting cancelled Stabilization may not be possible under strong shaking conditions When using a tripod we recommend that you set the image stabilizer to setting cancelled Recording Image Stabilizer Function RECORD SETUP...

Page 44: ...he iA MANU switch When the distance to the subject approaches within 1 m approx the unit switches to the macro range and or The unit may switch to the macro range even when the distance to the subject is 1 m or more depending on the subject Depending on the zoom magnification this unit may fail to switch to the macro range or go to a non displayed focus value When you perform a zoom operation in t...

Page 45: ... auto setting either set to ATW or set to Intelligent Auto Mode by switching the iA MANU switch ATW and ATW Lock can also be set to the USER button l 60 It is set to ATW when 3D 2D REC MODE is set to 3D Recording White Balance Icon Mode Settings ATW It will automatically adjust in accordance with the recording condition ATW Lock It will lock the setting for ATW P3 2k Preset value for studio indoor...

Page 46: ...erformed by pressing and holding the W B button Setting is completed when the screen goes black momentarily and BB SET OK is displayed When the White Balance Black Balance cannot be performed an error message WB SET NG or BB SET NG is displayed on the screen In such case use other mode The contents previously set are maintained in the Ach Bch Perform the setting again when the recording condition ...

Page 47: ...ge Value closer to 30dB brighten the image When the iris value is adjusted to brighter than OPEN it changes to the gain value To return to Auto Iris Mode press the IRIS A M button If the gain value is increased the noise on the screen increases Depending on the zoom magnification there are iris values that are not displayed When the 3D 2D REC MODE setting is changed this unit goes into standard Au...

Page 48: ...al Iris Please refer to page 60 for details about setting the USER button CAMERA SETUP AUTO IRIS LEVEL USER button function Effect Backlight Compensation l 62 Switches to automatic iris control to compensate the backlight This will brighten the image on the screen to prevent getting dark when a backlight is hitting the subject from the back Spotlight l 63 Switches to automatic iris control for spo...

Page 49: ...ning very bright or highly reflective During normal playback image movement may not look smooth If you record an extremely bright object or record under indoor lighting colour and screen brightness may change or a horizontal line may appear on the screen Perform following operation in such case jRecord in the Intelligent Auto Mode j When 24p SELECT is set to OFF Adjust the shutter speed to 1 100 i...

Page 50: ...ng other than 0dB it becomes impossible to select FOCUS MIC l 115 Display of the audio level meter will change depending on the settings l 127 Recording Audio Input RECORD SETUP MIC SETUP desired setting SURROUND Sound is recorded with 5 1 ch surround microphone ZOOM MIC Sound is recorded with 5 1 ch surround microphone changing the directionality in conjunction with the zoom operation Sounds near...

Page 51: ...ed with the built in microphone 5 1 ch when the MIC SETUP is set to anything other than 2ch When MIC SETUP is set to 2ch audio is recorded with the built in microphone 2 ch when the CH1 switch is set to INT L and the CH2 switch is set to INT R RECORD SETUP AUDIO REC desired setting Records in Dolby Digital LPCM Records in uncompressed LPCM MENU INPUT1 MIC LINE OFF ON 48V INPUT2 MIC LINE OFF ON 48V...

Page 52: ...audio input terminals 1 2 XLR 3 pin OFF No power supply for audio input terminals 1 2 XLR 3 pin 4 Use the CH1 switch to select the input signal to be recorded to audio channel 1 INT L Audio from the built in microphone L left ch is recorded to audio channel 1 INPUT1 Audio from a device connected to audio input terminal 1 XLR 3 pin is recorded to channel 1 INPUT2 Audio from a device connected to au...

Page 53: ...on picture is recorded without switching Set INPUT1 2 48V switches to OFF if you connect equipment not compatible with 48 V You can damage this unit or such equipment if you leave the setting at ON This unit is turned off when a problem occurs with the 48 V power supply The battery will discharge faster if you use a phantom microphone When inputting the external microphone signal to audio channels...

Page 54: ... level so that the last 2 bars of the gain value are not red Otherwise the sound is distorted Select a lower setting for microphone input level 3 Touch ENTER to set the microphone input level and then touch EXIT is displayed on the recording screen when the ALC is turned on When MIC SETUP is ZOOM MIC the volume will be different depending on the zoom rate You cannot record with the audio completel...

Page 55: ...he operation icons and touch l 71 2 Touch to adjust settings 3 Touch to complete the setting Adjusting the input level of the built in microphone 2 ch external microphone or audio device Set MIC SETUP to 2ch l 50 Adjust the input level operating the Audio control knobs CH1 CH2 Adjust confirming the audio level meter CH2 CH1 A Audio control knobs CH1 CH2 B Audio level meter C 12 dB D 0 dB ...

Page 56: ...UB 00 00 00 00 Recording Counter l 59 In Recording Mode 00 00 00 or SCN 00 00 00 In Playback Mode SCN 00 00 00 In Recording Mode display will change depending on the setting of the REC COUNTER l 59 In Playback Mode display will return to SCN 00 00 00 for each scene COUNTER COUNTER button Each time you press the button the counter display changes Time Code User Information Recording Counter Setting...

Page 57: ... time code will move An error may occur when the playback mode is switched when the 24p SELECT is set to ON It is automatically set to FREE RUN when it is set to PRE REC The time code will reset when the built in lithium battery is exhausted when it is set to FREE RUN Recording format Frame 1080 50p 1080 50i 1080 25p PH HA HE 0 to 24 1080 24p 0 to 23 TCG RECORD SETUP TCG desired setting FREE RUN I...

Page 58: ...LECT is set to ON Set the frame to 00 or value that is multiple of 4 when the 24p SELECT is set to ON The time code that is recorded will shift when other values are set Setting the User Information Eight digit hexadecimal alphanumeric can be entered and displayed as a memo information such as dates control numbers etc into the User Information UB 00 00 00 00 You can set the User Information 1 Sel...

Page 59: ...counting method during the recording To reset the Recording Counter for the Recording Mode The Recording Counter will be set to 00 00 00 when the RESET button is pressed while displaying the counter REC COUNTER SW DISP SETUP REC COUNTER desired setting TOTAL The count continues to increase until the Recording Counter is resetted SCENE Resets the Recording Counter at start of recording Counts the t...

Page 60: ...ssigned to USER1 button 3 Touch the item to register For the functions of the USER button that can be registered refer to page 62 Touch INH Inhibit if not registering Next Previous page can be displayed by touching To continuously set other USER buttons repeat steps 2 3 4 Touch EXIT to complete the setting There are some functions that cannot be used depending on the position of the mode switch l ...

Page 61: ... jPlayback parallax adjustment l 64 j3D Display l 65 jRecording Check l 66 jLast Scene Delete l 67 j3D video output selection l 67 Switch display not display of the USER buttons Display not display of the USER button icons in the LCD monitor can be switched Check the setting of the USER buttons To check the settings of the USER buttons USER1 to USER3 in the recording screen press and hold on the D...

Page 62: ...ge brighter to prevent darkening of a backlit subject appears when it is set It will return to standard Auto Iris Mode when it is cancelled l 47 Icon Item Function P AF 1 PUSH AF Push AF B Light 1 BACKLIGHT Backlight Compensation S Light 1 SPOTLIGHT Spotlight B FD 1 BLACK FADE Black Fade W FD 1 WHITE FADE White Fade ATW 1 ATW ATW ATW L 1 ATW LOCK ATW Lock FA 1 FA Focus Assist D ZM 1 D ZOOM Digital...

Page 63: ...hen 3D display is set to MIX display l 65 The thumbnails of scenes recorded using fade in become black Fade in fade out effect white can be added to the video and audio that is being recorded Press USER button or touch USER button icon in the recording screen Fade out will start and fade in will start after completing the fade out It will fade out when the button is pressed and held and fade in wi...

Page 64: ...sible when the 24p SELECT is ON Digital zoom is cancelled in following cases jIf you turn the unit off jIf you use the Quick Start Mode l 68 jIf you change the mode It is possible to adjust the parallax of the scene recorded in 3D during the Playback Mode Change the mode to and touch the play mode select icon Then set VIDEO PICTURE to 3D l 72 1 Pause during the playback of the scene recorded in 3D...

Page 65: ...2 1 Play back the scene or still picture recorded in 3D It is convenient to use Pause 2 Press USER button or touch USER button icon It will switch every time the button is pressed or the button icon is touched 3D Display 3D Display off This cannot be set when 3D OUTPUT is set to HDMI l 67 86 Image displayed on the screen is switched to the image from the right lens when the 3D display is turned of...

Page 66: ...lease use this setting you wish to record faraway subjects without worrying about convergence The setting is cancelled in following cases jIf you adjust the CONV dial l 33 jIf you use the 3D Macro Approximately 2 seconds at the end of the video recorded last can be played back It will return to recording screen once the playback is completed Playback operation is not possible during the Recording ...

Page 67: ... switch every time the button is pressed or the button icon is touched Black screen is displayed for few seconds LCD HDMI To change the 3D video output selection when in the Playback Mode Change the mode to and touch the play mode select icon Then set VIDEO PICTURE to 3D l 72 With the playback paused press USER button or touch USER button icon It is also possible to set with the menu l 86 This can...

Page 68: ...cording pause mode is being consumed so the recording time will be reduced This unit is turned off after approximately 30 minutes elapse in Quick Start Standby Mode Quick Start Standby Mode is cleared when the mode switch is set to Depending on the recording conditions and menu settings time for Quick Start may be longer than 0 6 seconds It may take some time for Automatic White Balance to adjust ...

Page 69: ...images actually recorded It is also possible to adjust the level of the zebra pattern to be displayed l 116 Colour Bar Screen To cancell press the BARS button again It will be cancelled when the unit is turned off While the colour bar is displayed a test tone will be output from the headphone terminal HDMI terminal and AV multi terminal The test tone that is output will be 997 Hz when 24p SELECT i...

Page 70: ...3 and settings of the SUB REC BUTTON and SUB ZOOM are displayed by pressing and holding the DISP MODE CHK button They are displayed only while the DISP MODE CHK button is held It is disappeared when the button is released DISP MODE CHK button All the screen display other than the Counter display Recording start stop Zebra display Marker and Safety Zone will disappear when this button is pressed l ...

Page 71: ... screen while an operation icon is being displayed or do not touch the icon for a certain period it will disappear To display again touch the screen Headphone Volume Adjustment Adjust the volume of the headphone while recording 1 Display the operation icons and touch 2 Touch to adjust the volume Actual volume to be recorded does not change 3 Touch to exit the setting Recording Using of Operation I...

Page 72: ...ure in the thumbnail display of the still pictures Next Previous page can be displayed by touching 5 Select the playback operation by touching the operation icon Playback Motion picture Still picture playback B Operation icon If you touch the screen while an operation icon is being displayed or do not touch the icon for a certain period it will disappear To display again touch the screen 1 1 1 2 2...

Page 73: ... the volume Towards s Decreases the volume To play back the scenes or still pictures recorded in 3D as 2D set the 3D Display to off l 65 Sound will be heard only during normal playback If pause play is continued for 5 minutes the screen returns to the thumbnails At playback of scenes recorded in 2D the screen goes dark momentarily when switching between scenes recorded using 1080 50p and other sce...

Page 74: ...unit may degrade or not play back motion pictures recorded or created on other products and other products may degrade or not play back motion pictures recorded on this unit even if the products support AVCHD Progressive AVCHD video Video signals for the AVCHD that can be played back with this unit are 1920k1080 50i and 1920k1080 24p This unit may degrade or not play back motion pictures recorded ...

Page 75: ...ntrol only Slow motion Playback During Pause With the playback paused continue touching is for slow rewind playback Playback is slow while touching Normal playback is restored when you touch When Slow motion pictures are played back in reverse they will be shown continuously at approximately 2 3rd the speed of normal playback intervals of 0 5 seconds Frame by frame playback The motion picture is a...

Page 76: ...ile touching The playback pauses temporarily and skips to the position touched or slid to while touching Playback will start by releasing your touching or sliding finger Touch 2 to display the operation icon Direct playback bar cannot be operated with the wireless remote control Playback operation Playback display Operating steps ...

Page 77: ...t from the normal still picture Repeat Playback Playback of the first scene starts after playback of the last scene finishes The indication appears on the full screen views All the scenes displayed in the thumbnail will be repeatedly played back Repeat Playback cannot be used for the slide show playback of the still pictures l 73 Resuming the previous playback If playback of a scene was stopped ha...

Page 78: ...Playing back still pictures by date The still pictures recorded on the same day can be played back in succession Change the mode to and touch the play mode select icon Then set VIDEO PICTURE to PICTURE l 72 1 Touch the date select icon 2 Touch the playback date The still pictures recorded on the date selected are displayed as thumbnails 3 Touch the still picture to be played back It will return to...

Page 79: ...ill pictures repeat Steps 2 3 When you stop deleting halfway Touch CANCEL or press MENU button while deleting The scenes or still pictures that have already been deleted when the deletion is cancelled cannot be restored To complete editing Touch Return or press MENU button Playback Deleting scenes still pictures Deleted scenes still pictures cannot be restored so perform appropriate confirmation o...

Page 80: ...e control while playing back or displaying the thumbnail one scene Screen to select ALL SCENES MULTI or SINGLE is displayed when the button on the wireless remote control is pressed while displaying the thumbnail 20 scenes or 9 scenes The scene or the still picture can be deleted by selecting the item and performing steps 2 to 3 Protecting scenes still pictures Scenes still pictures can be protect...

Page 81: ...nfirm the terminals on your TV and use a cable compatible with the terminals Image quality may vary with the connected terminals A High quality 1 HDMI terminal 2 Component terminal 3 Video terminal A HDMI cable optional Be sure to connect to the HDMI terminal B AV multi cable supplied Picture quality 1 High definition images when connecting to HDMI terminal 2 High definition images when connecting...

Page 82: ...s for the TV 3 Change the mode to to play back If the HDMI cable and AV multi cable are connected at the same time output will be prioritised in order of the HDMI cable AV multi cable This unit is not compatible with the VIERA Link To display the on screen information on the TV When the menu setting is changed the information displayed on the screen operation icon and Counter display etc can be di...

Page 83: ...rding Mode jWhen the play mode selection is set to 3D during the Playback Mode jWhen the play mode selection is set to 2D and scene in 1080 50p is switched to scene other than 1080 50p or vice versa during the Playback Mode jWhen the play mode selection is set to PICTURE and a 3D still picture is switched to 2D still picture or vice versa during the Playback Mode Listening in 5 1 channel sound The...

Page 84: ...UT desired setting 576i 480i When 24p SELECT is set to OFF When connecting to the component terminal on the TV compatible with 576i Playback is in standard quality When 24p SELECT is set to ON When connecting to the component terminal on the TV compatible with 480i Playback is in standard quality 576i is displayed when 24p SELECT is OFF and 480i when it is ON 1080i When connecting to the component...

Page 85: ...ble television using a HDMI cable optional or an AV multi cable supplied When connecting with an AV multi cable set COMPONENT OUT to 1080i and connect the component terminal plug to the component terminal on the TV l 84 3 Play back scenes or pictures recorded in 3D l 81 For the still pictures recorded in 3D will appear on the thumbnail display at playback If your television does not switch to a 3D...

Page 86: ...n that is compatible with the frame sequential format using a HDMI cable optional Change the mode to and touch the play mode select icon Then set VIDEO PICTURE to 3D l 72 These can also be set when in 3D Recording Mode When the used TV is not compatible with the frame sequential format it will not be picture quality of full high definition video even if it is set to HDMI Playing back scenes record...

Page 87: ...u can copy to disc in high definition picture quality or conventional standard picture quality MPEG2 format Select the function you wish to use and follow the on screen instructions for easy copying Editing With a PC What can be done with the HD Writer XE 1 0 Data type Copying data to a PC Scenes recorded in 3D will be copied unaltered as 3D video Still pictures recorded in 3D will be copied unalt...

Page 88: ...ng motion still picture data copied on an HDD of a PC Scenes recorded in 3D Delete partially Dividing Trimming BGM Scenes recorded in 2D Dividing Trimming Still picture Title Effect Transition BGM Delete partially Converting the motion picture data to MPEG2 Motion picture Playing back on a PC Play back the motion picture data in high definition picture quality on a PC Motion picture and still pict...

Page 89: ... or Disassembly Licensee may not reverse engineer decompile or disassemble the Software except to the extent either of them is permitted under law or regulation of the country where Licensee resides Panasonic or its distributors will not be responsible for any defects in the Software or damage to Licensee caused by Licensee s reverse engineering decompiling or disassembly of the Software Article 6...

Page 90: ...cal limitations in the MICROSOFT SQL SERVER COMPACT 3 5 2 Licensee shall not use copy distribute regrant for use or otherwise handle the Software in any way beyond the range of use granted under Article 9 1 and shall not conduct operations such as reverse engineering decompilation disassembling etc of the MICROSOFT SQL SERVER COMPACT 3 5 3 All rights including copyright patent rights etc relating ...

Page 91: ... Business Ultimate SP2 Windows XP 32 bit SP3 CPU Intel Core 2 Duo 2 16 GHz or higher including compatible CPU Intel Core i7 2 8 GHz or higher is recommended when playing back or using the editing function for AVCHD 3D or 1080 50p RAM Windows 7 1 GB or more 32 bit 2 GB or more 64 bit Windows Vista 1 GB or more Windows XP 512 MB or more 1 GB or more recommended Display High Colour 16 bit or more 32 ...

Page 92: ...tware If using Windows Vista Windows 7 administrative account and standard account users only can use this software An administrative account user should install and uninstall this software To use the HD Writer XE 1 0 You will need a high performance PC depending on the functions to be used It may not playback or operate properly depending on the environment of the PC used Refer to the operating e...

Page 93: ...s 7 Windows Vista 1 GHz or higher 32 bit k86 or 64 bit k64 processor including compatible CPU Windows XP Intel Pentium III 450 MHz or higher or Intel Celeron 400 MHz or higher RAM Windows 7 1 GB or more 32 bit 2 GB or more 64 bit Windows Vista Home Basic 512 MB or more Windows Vista Home Premium Business Ultimate Enterprise 1 GB or more Windows XP 512 MB or more 1 GB or more recommended Interface ...

Page 94: ...in use or the following screen is not displayed automatically select Start Computer or double click on Computer on the desktop and then double click Panasonic 2 Click Yes 3 Click Next 4 Read the End User License Agreement then place a check beside I accept the terms of the license agreement if you agree to them and click Next 5 Select the country or region where you live then click Next If the cou...

Page 95: ...D Writer XE 1 0 Follow the steps below to uninstall any software applications that you no longer require 1 Select Start Control Panel Uninstall a program 2 Select HD Writer XE 1 0 then click Uninstall Proceed with the uninstallation by following the on screen instructions After uninstalling the software be sure to reboot the PC The PC must be rebooted for the application to work ...

Page 96: ...ally recognised as an external drive of the PC l 97 When you select an option other than PC reconnect the USB cable When using the battery the LCD monitor turns off after about 5 seconds Touch the screen to turn the LCD monitor on Do not use any other USB cables except the supplied one Operation is not guaranteed with any other USB cables When performing reading writing between a PC and an SD card...

Page 97: ...te the SD card s folders Doing so may make the SD card unusable in this unit When data not supported by this unit has been recorded on a PC it will not be recognised by this unit Always use this unit to format SD cards About the screen indication of the unit Do not disconnect the USB cable battery or AC adaptor while the access lamp is on or card access icon appears on the unit screen If the scree...

Page 98: ...PC Select Start All Programs Panasonic HD Writer XE 1 0 HD Writer XE For details on how to use the software applications read the PDF operating instructions of the software Reading the operating instructions of the software applications You will need Adobe Acrobat Reader 5 0 or later or Adobe Reader 7 0 or later to read the PDF operating instructions Select Start All Programs Panasonic HD Writer X...

Page 99: ...ly recognised as an external drive of Mac When you select an option other than PC reconnect the USB cable When using the battery the LCD monitor turns off after about 5 seconds Touch the screen to turn the LCD monitor on 3 Double click CAM_SD displayed on the desktop Files are stored in 100CDPFQ folder etc in the DCIM folder 4 Using a drag and drop operation move the pictures you want to acquire o...

Page 100: ...i cable refer to the operating instructions of the equipment used Editing Dubbing Equipment used for dubbing Dubbing picture quality To dub Equipment with SD card slot High definition picture quality Insert the SD card directly l 101 Equipment with USB terminal High definition picture quality Connect with supplied USB cable l 101 Equipment without SD card slot or USB terminal Standard picture qual...

Page 101: ...HD picture quality For further details see the operating instructions of your recorder Note that the equipment described may not be available in certain countries and regions About dubbing the scenes recorded in 3D or recorded in PH 1080 50p 1080 25p or 1080 24p recording format The scenes recorded in 3D can be dubbed to a Blu ray disc as 3D video only using the AVCHD 3D compatible devices The sce...

Page 102: ...s For details on dubbing and playback methods read the operating instructions of the Blu ray disc recorder or DVD recorder If the dubbed 3D video does not display in 3D make the necessary settings on the TV For further details refer to the operating instructions of your TV When you connect the unit to a Blu ray disc recorder a dubbing operations screen may appear on the television connected to the...

Page 103: ...ate and time display and function indication are not wanted cancell them before dubbing l 82 118 Dubbing in standard picture quality Change the video input on the video device and TV that this unit is connected to The channel set will differ depending on the terminal to which the unit is connected See the operating instructions of the video device for details Insert the plugs as far as they will g...

Page 104: ...ttings of the camera setting menu are saved in the scene file Default setting of the scene file This function s default setting is SCENE1 It is possible to switch the scene file by touching to while displaying the operation icons l 71 It will return to the default settings when SCENE is selected in INITIAL SET l 124 Menu Using the Menu CAMERA SETUP desired setting CUSTOMISE SCENE SCENE1 SCENE2 SCE...

Page 105: ...rection gives crisp images but allows a slight increase in noise Setting in the r direction reduces noise 3 Touch EXIT to exit the menu screen Adjusts colour density 1 Touch CHROMA LEVEL 2 Touch to adjust settings 3 Touch EXIT to exit the menu screen Adjusts colour balance 1 Touch CHROMA PHASE 2 Touch to adjust settings 3 Touch EXIT to exit the menu screen Finely adjusts colour temperature after A...

Page 106: ...ynamic range by compressing the video signal level of the highly illuminated area that gets washed out with standard recording 1 Touch DRS 2 Touch the desired setting item Higher the value greater the compression level of the highly illuminated area Higher the value greater the noise of the dark area 3 Touch EXIT to exit the menu screen If there are extremely dark or bright parts or the brightness...

Page 107: ...KE V GAMMA HD NORM This gamma setting is suitable for high defenition picture quality recording LOW This is a gamma setting with gradual slope at the low illuminated area It will produce tranquil image with sharper contrast SD NORM This is the standard picture quality images setting HIGH This is a gamma setting with sharp slope at the low illuminated area It will produce brighter image with wider ...

Page 108: ...or anything else in the scene has colours similar to the skin colour they will also be smoothed If the brightness is insufficient the effect may not be clear If you record a person in the distance the face may not be recorded clearly In this case set SKIN TONE DTL to OFF or zoom in on the face close up to record MATRIX NORM1 Suitable for recording in the open air or under a halogen lamp NORM2 Suit...

Page 109: ...t for the 2D Recording Mode progressive is selected For dubbing of the scenes recorded in 3D or scenes recorded in the recording formats PH 1080 50p 1080 25p or 1080 24p refer to page 101 Smoother motion picture can be recorded with the higher value for the frame rate i and p of the frame rate means interlace and progressive respectively Interlace interlacing scanning Video signal that divides the...

Page 110: ... continuously record on the SD card in the other card slot even when the available capacity of the SD card runs out during the recording is displayed on the media to record the video will disappear when the recording media is switched and the relay recording is started Relay recording can only be performed once Backup recording Same motion picture can be recorded on two SD cards is displayed on th...

Page 111: ...picture recording cannot be used When the interval recording is set recording format is set to HA and the setting cannot be changed TCG is set to REC RUN l 57 TIME LAPSE REC is cancelled in the following cases jIf you turn the unit off jIf you change the mode The shortest motion picture recording time is 1 second Colour balance and focus may not be adjusted automatically depending on light sources...

Page 112: ...ollowing cases jIf you turn the unit off jIf you change the mode jAfter 3 hours have passed jPress the MENU button Video from 3 seconds prior cannot be recorded when the recording is started within approximately 3 seconds after setting the PRE REC and switching to recording screen Images displayed on the thumbnail in Playback Mode will differ from the motion pictures displayed at the start of play...

Page 113: ...echnology Switch to manual mode l 39 For more realistic colours use an HDMI cable optional with a TV that supports the x v Colour When motion pictures recorded while this function is turned ON are played back with a TV not compatible with x v Colour colours may not be reproduced properly When these images are played back with devices other than ones compatible with x v Colour it is recommended to ...

Page 114: ...the full effect depending on the recording conditions Switches the sound quality for the audio recording l 51 Recording setting of the built in microphone can be adjusted l 50 When recording the input level from the built in microphones can be adjusted l 54 WIND NOISE CANCELLER ON OFF AUDIO REC LPCM MIC SETUP SURROUND ZOOM MIC FOCUS MIC 2ch 5 1ch MIC LEVEL AUTO SET SETr ...

Page 115: ...ne 2 ch or external microphone is used by setting to ON is displayed on the recording screen It will record with natural sound when set to OFF Adjust the audio control knobs CH1 CH2 to adjust the audio input level Sets the input level of the external microphone connected to the audio input terminal 1 XLR 3 pin Sets the input level of the external microphone connected to the audio input terminal 2 ...

Page 116: ...unction to assign to the USER buttons l 60 Switches the display of the set USER button icons l 61 Selects the brightness level of the left leaning zebra patterns on the screen 1 Touch ZEBRA DETECT 1 Touch YES 2 Touch to adjust settings 3 Touch ENTER Touch EXIT to exit the menu screen SW DISP SETUP desired setting MEDIA SELECT IRIS RING DOWN OPEN Iris will open when it is turned toward B UP OPEN Ir...

Page 117: ...ed for playback l 34 You can check if the image is level while recording motion pictures and still pictures The function can also be used to estimate the balance of the composition The guidelines do not appear on the images actually recorded When Focus Assist is set to on the following occurs jThe guidelines are not displayed these are displayed on the TV when this unit is connected to TV jThe set...

Page 118: ... on the wireless remote control It is possible to change the date format In Playback Mode Change the mode to and touch the play mode select icon Then set VIDEO PICTURE to 3D or 2D l 72 Select to display the audio level meter It is possible to display not display the convergence point and 3D guide display The 3D guide display can be displayed by pressing the 3D GUIDE button even if this is set to O...

Page 119: ... preference over others Prioritised face framing Prioritised face framing is displayed as orange frames Focus and adjustment of brightness will be performed against the prioritised face framing Prioritised face framing is only displayed with Portrait Mode in the Intelligent Auto Mode The white frame is for face detection only It cannot be set while in the Interval Recording is used In 3D Recording...

Page 120: ...nder can be selected between colour black and white l 21 Enable disable of the sub recording start stop button on the handle can be switched Enable disable of the sub zoom lever on the handle can be switched Zoom speed will be different depending on the setting POWER LCD ON OFF LCD SET EVF SET BRIGHT NORMAL DARK SELF SHOOT MIRROR NORMAL EVF COLOUR ON OFF SUB REC BUTTON ON The sub recording start s...

Page 121: ...ording mode is displayed Touch EXIT to close the indication The SD card requires some space to store information and manage system files so the actual usable space is slightly less than the indicated value The usable space is generally calculated as 1 GB 1 000 000 000 bytes The capacities of this unit PCs and software are expressed as 1 GB 1 024k1 024k1 024 1 073 741 824 bytes Therefore the indica...

Page 122: ...operation this unit automatically turns off to save battery life This unit will not automatically turn off even if the ECONOMY BATT is set to ON in following cases jusing the USB cable for PC etc jPRE REC is used When connected to AC adaptor about 30 minutes have passed without any operation this unit automatically turns off This unit will not automatically turn off even if the ECONOMY AC is set t...

Page 123: ... method of HDMI output l 83 Destination of the 3D full high definition quality video can be switched l 86 The output method of the 3D video can be switched l 85 AV multi connector output setting can be changed l 84 Output setting of the component terminal for the AV multi terminal can be changed l 84 QUICK POWER ON ON OFF HDMI RESOLUTION AUTO 1080p 1080i 576p 480p 3D OUTPUT LCD HDMI 3D PLAYBACK AU...

Page 124: ...g is output even if this setting is set to LIVE Vertical position focus and iris of the left and right lenses can be finely adjusted during the 3D Recording Mode l 36 You can select the language on the screen display and the menu screen INITIAL SET ALL This is for initialising all menus SCENE This is for initialising the setting of customise scene CALIBRATION H PHONE MODE LIVE The sound which has ...

Page 125: ... are not deleted by mistake Even if you protect some scenes formatting the SD card will delete them l 80 Deletes a scene l 79 Photo Setup Change the mode to and touch the play mode select icon Then set VIDEO PICTURE to PICTURE l 72 Still pictures can be protected so that they are not deleted by mistake Even if you protect some still pictures formatting the SD card will delete them l 80 Deletes a s...

Page 126: ...cognised motion picture R 1h20m Remaining time for motion picture recording l 30 Relay recording l 110 Backup recording l 110 3D Macro l 66 Surround Microphone l 50 Zoom Microphone l 50 Focus Microphone l 50 Stereo Microphone l 50 PRE REC MNL Image Stabilizer l 43 3D display l 65 R Image l 65 B 3D recording l 30 109 Progressive recording l 109 Interlace recording l 109 White Balance l 45 50i 50p 2...

Page 127: ...other products that have different picture sizes from the sizes shown above R3000 Remaining number of still pictures l 38 Red Recording still picture 1 5 6 7 8 9 D E 1 2 Display during playback l 72 75 M 3 2 1M TC 00 00 00 00 Counter Display l 56 No 0010 Scene Number In Playback Mode 15 11 2011 15 30 00 Date indication Time indication l 22 Repeat Playback l 77 Resume Playback l 77 100 0001 Still p...

Page 128: ...r it cannot be recognised by the unit If this message appears even though motion pictures and still pictures are recorded on an SD card the card may be unstable Reinsert the SD card then turn the unit off and then on again INVALID CANNOT SET Since there is a condition to use the function it is required to cancell change other settings ...

Page 129: ...en after the battery is fully charged the battery has worn out and needs to be replaced This unit cannot be operated though it is turned on This unit does not operate normally Remove the battery or AC adaptor wait about 1 minute and then reconnect the battery or AC adaptor Then about 1 minute later turn on the unit again Conducting the above operation while the media is being accessed may damage t...

Page 130: ...r you may see horizontal bars in the image The LCD monitor flickers indoors Colour or brightness of the image may change or you may see horizontal bars in the image when the object is recorded under fluorescent light mercury light or sodium light etc but this is not a malfunction Perform following operation jRecord in the Intelligent Auto Mode j When 24p SELECT is set to OFF Set the shutter speed ...

Page 131: ... products Problem Check points Although this unit is correctly connected to a TV images cannot be seen The images are squeezed horizontally Please read the operating instructions of your TV and select the channel that matches the input used for the connection Change the setting of the unit depending on the cable connecting to the TV l 83 84 If the SD card is inserted in another device it is not re...

Page 132: ... instructions on the screen Cannot see the PDF operating instructions for HD Writer XE 1 0 You will need Adobe Acrobat Reader 5 0 or later or Adobe Reader 7 0 or later to read the PDF operating instructions for HD Writer XE 1 0 Others Problem Check points Item other than the touched one is selected Calibrate the touch screen l 19 If the SD card is inserted in this unit it is not recognised If the ...

Page 133: ...s may appear and a repair is performed Repairing may take time depending on the error is displayed when abnormal management information is detected when the scenes are displayed in thumbnail Use a sufficiently charged battery or the AC adaptor Depending on the condition of the data it may not be possible to completely repair the data If recovery fails it will not be possible to play back scenes re...

Page 134: ... not spray insecticides or volatile chemicals onto the unit If the unit is sprayed with such chemicals its body may be marred and the surface finish may peel off Do not leave rubber or plastic products in contact with the unit for a long time When you use the unit in a sandy or dusty place such as a beach do not let sand or fine dust get into the body and terminals of the unit Also keep the unit a...

Page 135: ...rature and the effect increases the more the temperature rises or falls In cold areas the full charge indication may not appear or the low battery indication may appear about 5 minutes after starting use At high temperatures the protection function may be triggered making it impossible to use the unit Be sure to detach the battery after use If the battery is left attached a minute amount of curren...

Page 136: ...e AC cable from the AC outlet when you remove dirt foreign objects or dust on the terminals of the battery or the battery charger If the charging lamp is still flashing the temperature of the battery may be extremely high or extremely low or something may be wrong with the battery or battery charger Contact your dealer If you use the AC adaptor or battery charger near a radio radio reception may b...

Page 137: ... it slowly We recommend using a tripod About 3D viewing Anyone who is hyper sensitive to light suffers from heart disease or is otherwise unwell should avoid viewing 3D video Doing may have an adverse affect on such medical conditions If you feel tired uncomfortable or otherwise strange when viewing 3D video stop viewing at once Continuing to view may cause illness Please rest appropriately after ...

Page 138: ...rong force It may become hard to see or hard to recognise the touch when the LCD protection sheet is affixed In a place with drastic temperature changes condensation may form on the LCD monitor Wipe it with a soft cloth such as eye glass cleaner When the unit has become very cold for example due to storage in a cold area its LCD monitor will be slightly darker than usual immediately after the unit...

Page 139: ...ioned car to outside When a cold room has been warmed up quickly When cool wind from an air conditioner is directly blown onto this unit After rain showers When this unit is in a very humid place where the air is thick with steam e g a heated swimming pool Helpful hint If for example you have used this unit for recording on a ski slope and are taking it into a heated room place the unit inside a p...

Page 140: ... and or other countries Microsoft product screen shot s reprinted with permission from Microsoft Corporation IBM and PC AT are registered trademarks of International Business Machines Corporation of the U S Intel Pentium Celeron and Intel Core are trademarks of Intel Corporation in the U S and or other countries Mac and Mac OS are trademarks of Apple Inc registered in the U S and other countries O...

Page 141: ... 25p SD card 4 GB 18 min 16 GB 1 h 15 min 64 GB 5 h 15 min 3D 2D Recording Mode 2D Recording Mode Recording format Interlace PH HA HE Recording method AVCHD Picture size 1920k1080 50i 1920k1080 50i 1920k1080 50i SD card 4 GB 21 min 30 min 1 h 30 min 16 GB 1 h 30 min 2 h 6 h 40 min 64 GB 6 h 8 h 30 min 27 h 30 min 3D 2D Recording Mode 2D Recording Mode Recording format Progressive 1080 50p 1080 25p...

Page 142: ...ds 6 hours and the recording will automatically resume after a few seconds The recordable time may be reduced if recording with a lot of action is recorded or recording of short scene is repeated 3D 2D Recording Mode 3D Recording Mode Recording format 1080 24p Recording method AVCHD 3D Picture size 1920k1080 24p SD card 4 GB 18 min 16 GB 1 h 15 min 64 GB 5 h 15 min 3D 2D Recording Mode 2D Recordin...

Page 143: ...f recordable pictures exceeds 9999 R 9999 is displayed The number will not change when the picture is taken until the number of recordable pictures gets less than 9999 The memory capacity indicated on the label of an SD card is the total of the capacity for copyright protection and management and the capacity which can be used on the unit a PC etc Others Approximate number of recordable pictures P...

Page 144: ...Panasonic Corporation Web site http panasonic net ...

Reviews: