Operating Instructions
88
Note
•
Set the local IP address and port number for the camera on the same
LAN.
•
If the cameras will be accessed from the Internet, be sure to use the global
IP address. In this situation, local IP addresses such as 192.168. x.x
cannot be used.
4.
Click [Save] when finished.
•
New settings are saved.
•
The Multi-Camera Setup page is displayed.
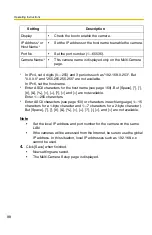
Setting
Description
Display
•
Check the box to enable the camera.
IP Address
*1
or
Host Name
*2
•
Set the IP address or the host name to enable the camera.
Port No.
•
Set the port number (1—65535).
Camera Name
*3
•
This camera name is displayed only on the Multi-Camera
page.
*1
In IPv4, set 4 digits (0—255) and 3 periods such as "192.168.0.253". But
"0.0.0.0" and "255.255.255.255" are not available.
In IPv6, set the host name.
*2
Enter ASCII characters for the host name (see page 150). But [Space], ["], ['],
[#], [&], [%], [=], [+], [?], [<] and [>] are not available.
Enter 1—255 characters.
*3
Enter ASCII characters (see page 150) or characters in each language (1—15
characters for a 1-byte character and 1—7 characters for a 2-byte character).
But [Space], ["], ['], [#], [&], [%], [=], [+], [?], [:], [<], and [>] are not available.
Summary of Contents for BB-HCM381A - Network Camera
Page 156: ...Operating Instructions 156 ...
Page 157: ...Operating Instructions 157 Index ...


