background image

8/19/03

910-198E

Model 8500

Page 5-3

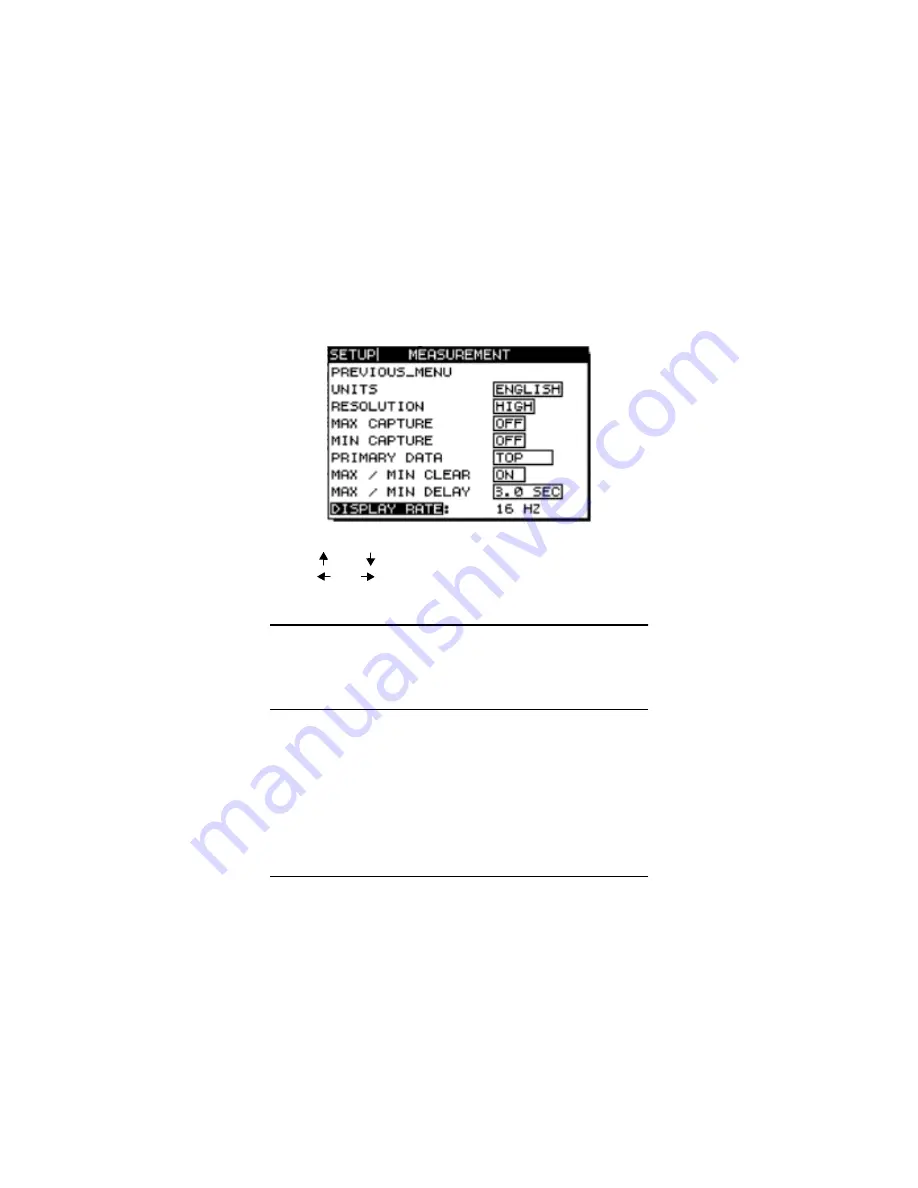
Use the [ ] and  [ ] keys to highlight the desired parameter and then 
use the  [

] or  [

]  key to select a setting. 

5.1.1 Units

The Magna-Mike 8500 can display thickness measurements in either 
English units (In) or Metric (mm) units.

5.1.2 Resolution

The Magna-Mike 8500 can display thickness measurements in either 
Low Resolution (0.001”, 0.01 mm) or High Resolution (0.0001”, 
0.001 mm). When Auto is selected, the gage determines which 
resolution to use per measurement range.

• Inches (In): Readings less than or equal to 0.1289” will read out to 

four decimal places.

• Auto Res: Readings greater than or equal to 0.129” will read out 

Artisan Technology Group - Quality Instrumentation ... Guaranteed | (888) 88-SOURCE | www.artisantg.com

Summary of Contents for 910-198E

Page 1: ...erutilized and idle equipment along with credit for buybacks and trade ins Custom engineering so your equipment works exactly as you specify Critical and expedited services Leasing Rentals Demos In st...

Page 2: ...USER S MANUAL MAGNA MIKE 8500 Hall Effect Thickness Gage Part No 910 198E Artisan Technology Group Quality Instrumentation Guaranteed 888 88 SOURCE www artisantg com...

Page 3: ...his manual may be reproduced or transmitted in any form or by any means electronic or mechanical including photocopying recording or by any information storage and retrieval system without the written...

Page 4: ...tability for intended use Olympus NDT accepts no liability for consequential or incidental damages including damage to property and or personal injury Olympus NDT warranties the probe probe cable and...

Page 5: ...articular installations as these circumstances are not within our control THE WARRANTIES SET FORTH HEREIN ARE EXCLUSIVE AND ARE IN LIEU OF ALL OTHER WARRANTIES WHETHER STATUTORY EXPRESS OR IMPLIED INC...

Page 6: ...Maintaining Accuracy 3 4 3 2 QCAL 3 5 3 3 Periodic Verification 3 6 3 4 Traceability 3 7 4 MIN MEASUREMENTS 4 1 Save Send Parameters 4 3 5 SETUP 5 1 Measurement 5 2 5 1 1 Units 5 3 5 1 2 Resolution 5...

Page 7: ...5 Diagnostics Setup 5 15 5 5 1 Keypad Test 5 16 5 5 2 Video Test 5 16 5 5 3 Hardware Test 5 17 5 6 Resets 5 18 5 6 1 Measurement Reset 5 20 5 6 2 Communication Reset 5 20 5 6 3 Dbase Reset 5 21 5 6 4...

Page 8: ...Inserting or Appending ID Location into Sequential or Sequential with Custom Point Files 6 19 6 6 Erasing Data 6 21 8 TECHNICAL SPECIFICATIONS 7 COMMUNICATIONS RS 232 DATA TRANSFER 7 1 Single Send Da...

Page 9: ...chnical Assistance 9 7 APPENDIX I RS 232 INTERFACE APPENDIX II I O FORMATS APPENDIX III REMOTE COMMANDS VIA RS 232 APPENDIX IV CALIBRATION VERIFICATION FORM APPENDIX V PROBES FIXTURES AND TARGETS FOR...

Page 10: ...nd the ball instantly displaying a thickness reading As the sample thickness changes the field strength in the probe tip also changes from a minimum when the ball is far away to a maximum when the bal...

Page 11: ...e items For best results store the probe upright in the stand away from large steel objects The contents of your new Magna Mike 8500 package include the following items in addition to this manual Magn...

Page 12: ...8 19 03 910 198E Model 8500 Page 1 3 Charger Input Probe Connector RS 232 Port Foot Switch Connector Artisan Technology Group Quality Instrumentation Guaranteed 888 88 SOURCE www artisantg com...

Page 13: ...tenance and troubleshooting information are found in the latter sections At first it may be helpful to use this manual in conjunction with the Magna Mike 8500 Charger Input Foot Switch Connector Keypa...

Page 14: ...ain area of the screen shows current thickness measurements The Secondary Display is located beneath the Primary Display and shows minimum maximum and differential measurements The bottom portion of t...

Page 15: ...910 198E 8 19 03 Page 1 6 Model 8500 Artisan Technology Group Quality Instrumentation Guaranteed 888 88 SOURCE www artisantg com...

Page 16: ...of the material Maximum thickness measurement Accuracy needed for measurement Once the criteria have been established review the descriptions below and Table 2 1 to choose an appropriate target ball...

Page 17: ...ay cause inaccurate measurements 2 2 When to Calibrate Perform a Ball Calibration Daily or at the start of a work session If changing to a different target ball size Table 2 1 Target Ball Measurements...

Page 18: ...extremes of the ball s possible locations Ball On and Ball Off and assigns these endpoints to the lookup table If no table exists for the ball then the unit automatically creates a default table from...

Page 19: ...fixture over the tip of the probe and slide it down until it stops as shown in Figure 2 1 Note Place the target ball into the red labelled fixture before plac ing the fixture onto the probe Dropping...

Page 20: ...e Multi Point Cal option located in the Calibration Setup Menu 1 Press SETUP to enter the Setup Menu screen 2 Use the and keys to select Calibration Press ENTER 3 Use the and keys to select Multi Poin...

Page 21: ...ckness value in the Secondary Display to match the thickness value printed on the blue labelled fixture 9 Press ENTER or CAL The gage display will change to Point 2 prompting the user to enter another...

Page 22: ...es the table used for all subsequent measurements employing that size target ball If a Ball Calibration is performed see Section 2 3 after a Multi Point Calibration it only adjusts the table s endpoin...

Page 23: ...910 198E 8 19 03 Page 2 8 Model 8500 Artisan Technology Group Quality Instrumentation Guaranteed 888 88 SOURCE www artisantg com...

Page 24: ...ly and the material kept perpendicular to the probe axis as shown in Figure 3 1 Inaccurate measurements may result from ball or probe tip obstructions or poor probe alignment as shown in Figures 3 2 t...

Page 25: ...2 Model 8500 Figure 3 1 Correct Method for Thickness Measurements Figure 3 2 Inaccurate Measurement Due to Obstruction of Probe Tip Artisan Technology Group Quality Instrumentation Guaranteed 888 88 S...

Page 26: ...Page 3 3 Figure 3 3 Inaccurate Measurement Due to Obstruction of Target Ball Figure 3 4 Inaccurate Measurement Due to Surface Curvature Artisan Technology Group Quality Instrumentation Guaranteed 888...

Page 27: ...gage s accuracy in order to produce consistent reliable readings Users are encouraged to perform maintenance procedures to obtain the best accuracy and productivity available from the gage See 3 3 Per...

Page 28: ...ht in the stand The default time interval between Auto QCAL activity is five 5 minutes This time interval may be changed by following the steps below 1 Press SETUP 2 Use the and keys to select Calibra...

Page 29: ...equent mea surements In order to suppress the Auto QCAL feature which by default remains ON and rely only on the manual QCAL follow the steps below 1 Press SETUP 2 Use the and keys to select Calibrati...

Page 30: ...ds and Technology N I S T may be conferred on the gage by using documented and certified standards from an appropriate metrology laboratory Use a set of traceable standards to periodically verify thic...

Page 31: ...dards gentle use is essential to avoid dents which may cause inaccurate measurements If damage occurs to the traceable disks by use Panametrics NDT suggests replacing them Artisan Technology Group Qua...

Page 32: ...y pressing the SEND SAVE or MEAS key allowing the operator to capture a new minimum reading To Activate the MIN Mode 1 Press the MIN key on the gage s keypad Notice that the word MIN is now highlighte...

Page 33: ...ue will be shown on the Primary Display By default the Primary Display is set to Top Therefore performing a Master Reset or Measurement Reset will change this parameter back to the default For more in...

Page 34: ...automatically be set to Secondary After the parameter is set simply press the SAVE or SEND key To Change the Save Send Parameters to Secondary 1 Press SETUP 2 Use the and keys to select Communication...

Page 35: ...ondary Display the Send function will automatically be set to Primary Please be aware if a Foot Switch is connected to the Magna Mike 8500 then the Save Send function will be directed by the Foot Swit...

Page 36: ...ers that are used less often than those found on the gage s keypad The Setup Menu contains the following submenus Measurement General Communication Calibration Diagnostics Resets Clock Diff Alarm Pres...

Page 37: ...ment The Measurement setup contains the Magna Mike s measurement parameters To access the Measurement Setup menu press SETUP Use the and keys to highlight the Measurement option and press ENTER The ga...

Page 38: ...on The Magna Mike 8500 can display thickness measurements in either Low Resolution 0 001 0 01 mm or High Resolution 0 0001 0 001 mm When Auto is selected the gage determines which resolution to use pe...

Page 39: ...or error due to target ball movement It is common for the target ball to drift off center or to bounce away from the test piece thereby creating false maximum readings 5 1 4 Min Capture Min Capture al...

Page 40: ...s the user presses 2ndF MIN from the Measure mode The maximum thickness value will be displayed briefly and then the gage will return to displaying the active reading and minimum reading 3 Max Capture...

Page 41: ...surement screen This function can be set to either Top or Bottom If Primary Data is set to Top the active thickness reading will be displayed on the Primary Top display and the Min Max and Diff values...

Page 42: ...e set to ON after performing a Measurement or Master Reset 5 1 7 Max Min Delay The Max Min Delay works in conjunction with the Max Min Clear function to set a time delay once a Max Min has been set or...

Page 43: ...oice for most applications and the easiest to view When the Min or Max functions are ON the Display Rate will automatically change to a fast scanning rate that has a default value of 16 Hz This rate i...

Page 44: ...s as a warning during any High or Low Alarm condition The Beeper can be turned ON or OFF By default the beeper is turned ON and it will be active after performing a Measurement or Master reset 5 2 2 I...

Page 45: ...e bottom of the main measurement screen display the currently active language Note that some messages remain displayed in English even though a different parameter is set The default language is Engli...

Page 46: ...ating a new measurement or by pressing any key By default the Backlight Timeout is set to 15 minutes and will reset to 15 minutes after performing a Measurement or Master Reset 5 2 6 Backlight The Bac...

Page 47: ...UP key Use the and keys to select Communications and press ENTER to display the Communications Setup menu When communicating with an external device it is important to make sure that the communication...

Page 48: ...SEND key on the front panel of the gage However the Foot Switch can also be set to function as the SAVE or MEAS key When operating as a MEAS key the Foot Switch can reset the Min thickness reading on...

Page 49: ...y or Secondary For more information on these parameters see Section 4 1 Saving and Sending Values 5 4 Calibration Setup The Calibration Setup menu contains the calibration setup parameters for the gag...

Page 50: ...oint CAL feature allows the user to create a customized lookup table for the probe and target ball currently in use The user should perform a Multi Point CAL when switching from one target ball size t...

Page 51: ...Beeper parameter is set to ON then the gage will beep each time a key is pressed Pressing ENTER will exit the keypad test Pressing ON OFF will turn the unit OFF The four graphic keys on the left of th...

Page 52: ...re is a debugging option located on the top area of the display If this option is turned ON a new screen appears on the Measurement display supplying hardware data information The following definition...

Page 53: ...0 has four Resets designed to quickly restore the gage to the default setup parameters Measurement Communications Dbase and Master Reset These settings are useful to new operators who are becoming fam...

Page 54: ...ess ENTER The Reset Setup menu is displayed Use the and keys to highlight a function and press ENTER Regardless of which option is selected the gage will respond with the following prompt Press ENTER...

Page 55: ...High Alarm Reference Value 0 393 Multi Point Cal is turned OFF Display Update Rate 4 Hz per second Foot Switch configured to Send Low Resolution 0 001 or 0 01 mm Backlight is turned ON Backlight Time...

Page 56: ...ent Communications and Dbase parameters are reset to default values 5 7 Clock The Clock setting feature allows the user to set the internal clock The user has the choice of U S Standard and Internatio...

Page 57: ...e actual thickness along with the difference between the actual thickness and a user set reference value The differential thickness can be used in conjunction with the Min Mode as well as with the Ala...

Page 58: ...nter the Differential referential value and press MEAS to return to the Measurement screen with the Differential active The gage displays the active thickness reading on the Primary Display and the Di...

Page 59: ...o the Low Alarm Reference Value or greater than or equal to the High Alarm Reference Value A flashing Alarm flag located in the thickness display area indicates the alarm condition and repeats an audi...

Page 60: ...ter the Low Alarm Reference Value and press ENTER Use the and keys to enter the High Alarm Reference Value Press MEAS to return to the Measurement screen with the Alarm active The displays below show...

Page 61: ...tware application imports collects and saves thickness measurement data from the gage directly into a Microsoft Excel spreadsheet When transferring data to WIN8500 the user may choose to send just one...

Page 62: ...e gage See Section 5 3 for details Two Button Probe Configuration All 802PR type probes are equipped with both the standard QCAL button and a second MAX button The function associated with the MAX but...

Page 63: ...910 198E 8 19 03 Page 5 28 Model 8500 Artisan Technology Group Quality Instrumentation Guaranteed 888 88 SOURCE www artisantg com...

Page 64: ...with each reading The operator may recall and print data or send data to a computer 6 1 Creating Data Files There are three 3 types of data files that the user may create from the Magna Mike 8500 Dat...

Page 65: ...0009 0010 limit 9999 2 initial ABC ABD ABE ABZ ACA ACB limit ZZZ 3 initial ABC 12 34 ABC 12 35 ABC 12 36 limit ABC 12 99 5 initial 1A 1B 1C 1Z 2A 2B limit 9Z Example of Incremental File Types Artisan...

Page 66: ...points in between Example of Sequential File Types Example 1 Start ID ABC123 End ID ABC135 Resulting file would contain the following list of ID s ABC123 ABC124 ABC125 ABC135 Example 2 Start ID XY GY...

Page 67: ...umber location Example of a Sequential with Custom Point File Start Finish ID mold cavity numbers such as 1 2 3 4 Custom Points areas on a bottle or part such as top bottom left right Starting ID 1 En...

Page 68: ...choose one of the three 3 file types described above and press ENTER 4 Enter any alpha numeric character in the Start ID or End ID fields by pressing the and keys 5 Use the or key to move the cursor p...

Page 69: ...ton located on the bottom portion of the display Note At any time press 2nd F or 2nd F to tab between fields After a file type is created the File Create screen will appear below In a file there are f...

Page 70: ...n to turn the Delete position ON or OFF 6 2 Saving Data Saving Data allows the operator to review data or send stored data to a computer or printer Thickness values including calibration and setup par...

Page 71: ...ions Open Create Copy Delete Send Edit Rename Reports 6 3 1 Open Use File Open to recall files stored in the Datalogger Scroll through file names and a descriptive header for the highlighted file will...

Page 72: ...eys to select a file to open and press ENTER 4 Use the or key to highlight the Open or Cancel but ton Press ENTER 6 3 2 Create Refer to Section 6 1 for details Artisan Technology Group Quality Instrum...

Page 73: ...file ID number structure only The File Copy feature is useful when a new file needs to be created with the exact structure as a previous stored file 1 Press 2nd F ID and the File Options menu will app...

Page 74: ...s or No option to include thickness data Press ENTER 6 Use the or key to highlight the Copy or Cancel but ton Press ENTER Note If an error occurs a long beep will sound and the gage will prompt the us...

Page 75: ...fields in a given file header This feature does not allow editing the File Type and is not used for editing individual measurement identifiers or actual thickness readings 1 Press 2nd F ID and the Fi...

Page 76: ...Use the or key to highlight the Done or Cancel but ton Press ENTER 6 3 7 Reports On Screen The Magna Mike 8500 is capable of generating reports from inspection data without having to connect to a PC...

Page 77: ...Reports from the list and press ENTER 3 Use the and keys to select a desired report and press ENTER a If File Summary w Stats is chosen use the and keys to highlight the desired file name then press E...

Page 78: ...tween File Select Min Thickness and Max Thick ness Press MEAS to exit c If File Comparison is chosen use the and keys to select the Reference file original file in the left column and press ENTER Use...

Page 79: ...w Edit The ID Review mode is used to view an ID location and information stored within that file such as Current ID Location Thickness Value Measurement Flags Artisan Technology Group Quality Instrume...

Page 80: ...3 Press 2nd F to jump directly to the last ID location in the file or 2nd F to jump directly to the first ID location in the file 4 Press the ID key a second time to enter the ID Edit screen and acces...

Page 81: ...7 Use the and keys to slew through the file at the new ID location on the ID Review screen 6 5 Inserting or Appending ID Locations into a File The user may wish to insert or append ID locations into a...

Page 82: ...EAS key to return to the Measure mode with the new ID as the current location The user must press the SAVE key so that the ID location will be added to the File Note The ID will be automatically sorte...

Page 83: ...ys to enter the new ID 4 Press the MEAS key if the edited ID is not part of the active file and the gage will prompt the user to Insert Append or Cancel 5 Use the or key to select Insert Append or Can...

Page 84: ...ttempting to delete a protected file Use the file Edit Rename function to turn OFF Delete Protection and then restart the erase sequence Erasing a Range of ID Locations 1 From the Measurement Mode pre...

Page 85: ...the starting ID and ending ID to be the same ID location If you wish to overwrite a stored ID with a new thickness it is easier to edit to the ID location and save over the existing thickness value Fi...

Page 86: ...Cancel the File Delete screen and use the Edit Rename function to turn Delete Protection OFF for the file you wish to delete a Press 2nd F ID file b Use the and keys to select Edit Rename from the Fi...

Page 87: ...ill be completely empty after this procedure and deleted information is NOT retrievable 1 Press SETUP 2 Use the and keys to highlight Resets then press ENTER 3 Use the and keys to select DBASE Reset P...

Page 88: ...irm that the communications parameters on the Magna Mike 8500 are identical to those on the computer or other device see Section 5 3 Note The Magna Mike 8500 can send data to any device capable of rec...

Page 89: ...the optional footswitch 4 Only the displayed measurement data with its appropriate setup flags will be transmitted and the gage will return to the original Measure mode The specific data transmitted d...

Page 90: ...on Choose the Cancel button to exit this function 7 3 File Data Transfer Data may be sent one file at a time or several filesata time toa computer or printer The data includes the Filename File Header...

Page 91: ...then an asterisk will appear next to all of the file names The Send function will be high lighted Press ENTER to confirm the transmission and the gage will begin sending all files in the data base Use...

Page 92: ...finished press 2nd F to highlight the Send button Press ENTER 7 4 Serial Communication Setup The Magna Mike 8500 can transmit stored data and displayed readings over its I O Input Output RS 232 cable...

Page 93: ...ge the parameter The settings options for each parameter is as follows Baud Rate 1200 2400 4800 9600 or 19200 Number of Stop Bits 1 or 2 Parity Bit None Odd or Even Comm Protocol Single or Multiple Se...

Page 94: ...eset when there is no future need for any of the stored data in the Datalogger There is no way to recover data once this reset is performed 1 Press SETUP 2 Use the and keys to select Resets Press ENTE...

Page 95: ...500 Note If MEAS is pressed at any time before pressing ENTER in Step 3 the gage will return to the Measure Mode without performing the reset Artisan Technology Group Quality Instrumentation Guarantee...

Page 96: ...s 240W x 200H Dot Size 0 36mm x 0 36mm KEYPAD 14 Keys sealed tactile fell beep for active key function INTERNAL DATALOGGER 95 000 thickness storage capacity ID Location can be up to 16 alpha numeric c...

Page 97: ...le NiCad battery pack BATTERY OPERATION Duty cycle 8 to 16 hours depending on display backlight usage recharge time 2 hrs POWER REQUIREMENTS OF 36CAP CHARGER ADAPTER 100 240 VAC 50 60Hz LINE CORDS PLU...

Page 98: ...3 STANDARD PROBE Approximately 0 85 dia x 6 0 long Tip radius 0 062 Quick disconnect cable Hirose connector Integral Quick Calibration button Artisan Technology Group Quality Instrumentation Guarante...

Page 99: ...57mm 0 250 6 35mm Basic Accuracy Low Res 5 001 5 025mm 4 001 4 025mm 3 001 3 025mm High Res 5 0001 5 003mm 4 0001 4 003mm 3 0001 3 003 mm Multi Point Accuracy Low Res 3 001 3 025mm 2 001 2 025mm 1 00...

Page 100: ...d display thickness shall be less than the specified basic accuracy amount if calibrated see Section 2 3 Ball Calibration Basic Accuracy is expressed as a percent of reading plus a fixed amount Multi...

Page 101: ...nt A selectable display mode that shows the lowest thickness measured since being reset High Low Alarms A selectable feature that produces an audible beep and displays a visual flag when the measured...

Page 102: ...t the target ball is not resting centered on top of the probe tip Verify that the ball is in the alignment fixture the fixture moves freely and is seated correctly on the probe and the ball is sitting...

Page 103: ...be and probe cable To clear the hardware data from the screen go back to the Diagnostics Setup menu and turn Debug to OFF 9 2 Battery The gage operates for at least eight 8 hours between charges under...

Page 104: ...black strap at the right end of the battery 3 Carefully remove the plug that connects the wire from the battery pack to the circuit board of the gage 4 Connect the new battery pack with the label sid...

Page 105: ...d to the Magna Mike 8500 and this error message appears a failure in the identification circuit for the probe occurred This problem is typically caused by a connection failure in the probe cable Verif...

Page 106: ...aged Note The serial communication parameters MUST match those of the external device No Data or Garbled Data Received by External Datalogger Host If the gage is configured for serial or RS 232 mode v...

Page 107: ...robe to contact metal objects Do not rub the probe tip over abrasive surfaces such as ceramics The user may perform a Keypad Video Display or Hardware Diagnostic test from the keypad to aid in localiz...

Page 108: ...e the United States please contact your local sales representative or Panametrics NDT office If you need to return equipment you will be given an RA Return Authorization number to attach to you packin...

Page 109: ...910 198E 8 19 03 Page 9 8 Model 8500 Artisan Technology Group Quality Instrumentation Guaranteed 888 88 SOURCE www artisantg com...

Page 110: ...e 8500 directly to devices with standard DB 25 male and female connectors as well as the IBM PC AT 9 male pin serial I O connector Use the information below to verify compatibility with particular equ...

Page 111: ...e is 20 Volts The following two hardware handshake lines are included DTR The gage sets DTR Data Terminal Ready low 2 5V when it is not able to receive data DTR will be high 2 5V at all times DSR A hi...

Page 112: ...nt units and 2 flag fields will be transmitted For example if a minimum thickness of 1 924mm is transmitted the transmission will appear as F5 Only the numerical signed or thickness data is sent 1 924...

Page 113: ...al Standard Measurement D Differential Measurement First Flag Field Measurement Loss Signal M Live Measurement L Loss of Signal Fourth Flag Field Min Max Min and Max are OFF m Minimum Measurement M Ma...

Page 114: ...and Comment ID THICKNESS UNITS FLAGS SU AA IN 1 AB IN 1 BA IN 1 BB IN 1 OK Table II 1 Fifth and Sixth Flag Field Value Definitions Fifth Flag Value Target Type Sixth Flag Value Probe Type Probe Type 1...

Page 115: ...E B FILE TYPE SEQ CUSTOM PT FILE DESCRIPTION INSPECTOR ID LOCATION NOTE FILE DELETE PROTECTION OFF OK ID THICKNESS UNITS FLAGS SU AA IN L 1 AB IN L 1 BA IN L 1 BB IN L 1 OK SU LO ALM HI ALM DIFF UNITS...

Page 116: ...L 1 BA IN L 1 BB IN L 1 OK F8 ID number Thickness Reading Setup Table and Comment ID THICKNESS UNITS FLAGS SU AA IN L 1 AB IN L 1 BA IN L 1 BB IN L 1 OK SU LO ALM HI ALM DIFF UNITS PID BID 1 0 000 20...

Page 117: ...N 1 2 OK STATISTICS OF THK 4 MEAN 0 0293 IN MEDIAN 0 0265 IN STD DEVIATION 0 0142 IN OF HIGH ALARMS 0 OF HIGH ALARMS 0 00 OF LOW ALARMS 0 OF LOW ALARMS 0 00 OF MINS 1 MIN VALUE 0 0160 OF MAXS 1 MAX VA...

Page 118: ...puter thus relieving the operator of setting up and calibrating the gage manually There are two sets of command formats Multiple Character and Single Character commands Multiple Character commands con...

Page 119: ...ry or file read from the gage Send a File Directory Command FORMAT FILEDIR r n r is an escape sequence for carriage return n is an escape sequence for line feed Send a File Read Command FORMAT FILEREA...

Page 120: ...c 99 63 CAL ID i 105 69 ID Minimum n 110 6E MIN Save s 115 73 SAVE Send t 116 74 SEND Setup 41 29 SETUP Slew Up u 85 55 Slew Down D 68 44 Slew Left L 76 4C Slew Right R 82 52 Enter p 112 70 ENTER Fil...

Page 121: ...910 198E 8 19 03 Appendix III 4 Model 8500 Artisan Technology Group Quality Instrumentation Guaranteed 888 88 SOURCE www artisantg com...

Page 122: ...purchase and maintenance of 80CAL NIS Customer ___________________________________________ Gage Model ________________________________________ Gage S N ___________________________________________ Prob...

Page 123: ...____________ Name Title ______________________________________________ Calibration Set S N _______________________Date ____________ Magna Mike 8500 System Data Using Basic Ball Calibration with 1 8 Ta...

Page 124: ...functionality to perform either the MEAS SEND or SAVE key functions via the Communications menu This versatile feature is beneficial when access to the front panel or footswitch is inconvenient The co...

Page 125: ...the connector is mounted on the side 90 degrees from its normal location The 111 probe is a standard probe with a super wear resistant material added to the tip This probe uses standard targets The 1...

Page 126: ...refore read as low as 0 1547 and as high as 0 1653 Please note that the Basic Accuracy is only guaranteed in a probe that is in good or new condition Tip distortion due to abrasive materials or magnet...

Page 127: ...910 198E 8 19 03 Appendix V 4 Model 8500 Artisan Technology Group Quality Instrumentation Guaranteed 888 88 SOURCE www artisantg com...

Page 128: ...uipment Have surplus equipment taking up shelf space We ll give it a new home Learn more Visit us at artisantg com for more info on price quotes drivers technical specifications manuals and documentat...

Reviews: