Digital Video Recorder
43
NOTE:
When the
write to CD/DVD
box is checked, you need to select the CD or DVD recorder to use, and select
the folder name to save on the CD or DVD drive by clicking the
button. You can designate the folder path by
entering “/” between the directory name and file name. For example, if you enter "abank/test", a directory named
“abank” with an ‘.exe’ file named “test.exe” will be created.
NOTE:
If the target disk for saving clip files is C:, it must have at least 800MB free space.
NOTE:
When the total file size reaches 2GB, you will be asked to continue saving by creating multiple files in 2GB
units. If you click the
OK
button, the system will continue saving by creating multiple files in 2GB units.
NOTE:
Refer to the
Clip Player
section (p. 2
)
for the reviewing the saved video clips.
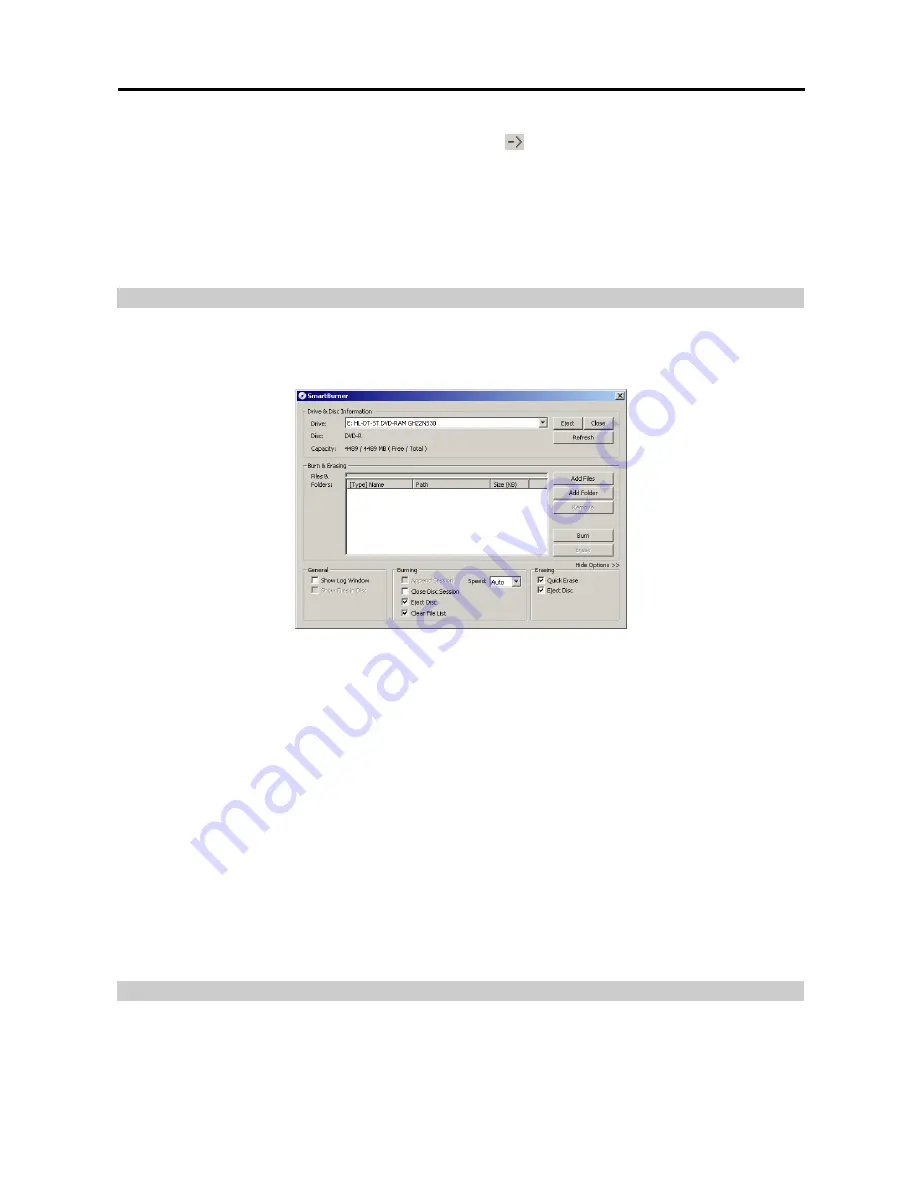
Run CD/DVD Burner
Click the
Run CD/DVD Burner
radio button to initiate the CD/DVD burning program.
NOTE:
The CD/DVD burning program will be selected during the SmartSearch Environment Setup. Refer to the
SmartSearch Environment Setup
section (p. 2) for details.
Drive & Disc Information:
Select the CD or DVD recorder to use. Click the
Eject
button if you want to eject the
media from the drive, and click the
Close
button if you want to close the drive door. Clicking the
Refresh
button
updates the list of connected recorder.
Disc
displays the disc information, and
Capacity
displays the disc capacity.
Burn & Erasing:
Select the video files or folders to save after clicking the
Add Files
or
Add Folder
. Selected files
or folders will be displayed on the list. Clicking the
Remove
button deletes the selected files or folders. The capacity
bar above the list shows the data capacity. After selecting the files or folders to save, click the
Burn
button. Click
the
Erase
button to erase all data on the disc.
Options:
Select Options to set up options required.
– General:
Check the box beside
Show Log Window
to display the log list of the program, and check the box beside
Show Files in Disc
to display files or folders saved on the selected disk.
– Burning:
Check the box beside
Append Session
to save the new data subsequently following the previous data
session, and check the box beside
Close Disc Session
to complete the burning. Checking the box beside
Clear File
List
does not display the file or folder list. Select the burning speed from the
Speed
drop-down list. The available
speed options change depending on the CD/DVD burning program, and selecting
Auto
from the drop-down list
saves data in the fastest speed automatically.
– Erasing:
Check the box beside
Quick Erase
to erase selected files more quickly, and check the box beside
Eject
Disc
to eject the disk automatically after completing burning or erasing.
NOTE:
The burning might not be successful if the remaining space of the disk is not enough when saving the new
data subsequently following the previous data session.
Clip Player
You do not need to install any special software on your personal computer to review saved video clip. The file contains
a Player program. Double-clicking the target file starts the Player program.
Summary of Contents for H264
Page 1: ......
Page 2: ......
Page 10: ...User s Manual 4 ...
Page 40: ...User s Manual 34 ...
Page 70: ...User s Manual 64 ...


