


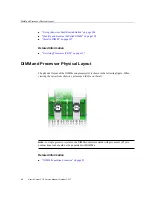
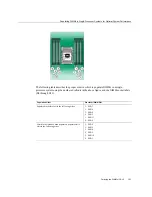

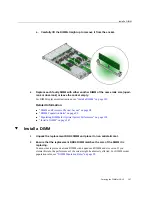

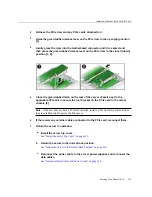


Install a DIMM
3.
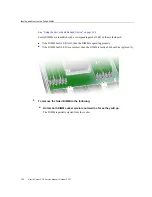
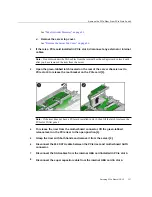
Install a DIMM.
a.
Ensure that the ejector tabs are in the open position.
b.
Align the notch in the replacement DIMM with the connector key in the
connector socket.
The notch ensures that the DIMM is oriented correctly.
c.
Push the DDR4 DIMM into the connector socket until the ejector tabs lock
the DIMM in place.
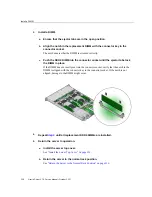
If the DIMM does not easily seat into the connector socket, verify that the notch in the
DIMM is aligned with the connector key in the connector socket. If the notch is not
aligned, damage to the DIMM might occur.
4.
until all replacement DDR4 DIMMs are installed.
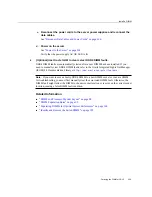
5.
Return the server to operation.
a.
Install the server top cover.
See
“Install the Server Top Cover” on page 210
b.
Return the server to the normal rack position.
See
“Return the Server to the Normal Rack Position” on page 212
.
108
Oracle Server X7-2 Service Manual • October 2017
Summary of Contents for X7-2
Page 1: ...Oracle Server X7 2 Service Manual Part No E72445 03 October 2017 ...
Page 2: ......
Page 14: ...14 Oracle Server X7 2 Service Manual October 2017 ...
Page 86: ...86 Oracle Server X7 2 Service Manual October 2017 ...
Page 96: ...96 Oracle Server X7 2 Service Manual October 2017 ...
Page 110: ...110 Oracle Server X7 2 Service Manual October 2017 ...
Page 136: ...136 Oracle Server X7 2 Service Manual October 2017 ...
Page 150: ...150 Oracle Server X7 2 Service Manual October 2017 ...
Page 162: ...162 Oracle Server X7 2 Service Manual October 2017 ...
Page 168: ...168 Oracle Server X7 2 Service Manual October 2017 ...
Page 178: ...178 Oracle Server X7 2 Service Manual October 2017 ...
Page 184: ...184 Oracle Server X7 2 Service Manual October 2017 ...
Page 192: ...192 Oracle Server X7 2 Service Manual October 2017 ...
Page 216: ...216 Oracle Server X7 2 Service Manual October 2017 ...
Page 252: ...252 Oracle Server X7 2 Service Manual October 2017 ...
Page 282: ...282 Oracle Server X7 2 Service Manual October 2017 ...
Page 306: ...306 Oracle Server X7 2 Service Manual October 2017 ...


