REFRIGERANT COMPONENTS ALL MODELS
In all instances where the indications of refrigerant
shortage continues, additional refrigerant should be
added in
lb. increments until the sight glass is
clear.
An
additional charge of
lb. should be ad-
ded as a reserve. In no case should the system be
overcharged.
LEAK TESTING SYSTEM
The following two methods are recommended when
attempting to locate refrigerant leaks in the system.
Loss of
is always indicative of a leak since
refrigerant is not consumed and does not wear out.
1. Open Flame Method This method utilizes a gas
operated torch type leak detector (J-6084). Use of
this method is recommended when checking for
leaks in confined areas. To perform test, light torch
and adjust to obtain a pale blue flame, approximately
inch in height, in burner.
Explore for leaks by moving end of search tube
around suspected area. Check bottom of connections
since Refrigerant-12 is heavier than air and will be
more apparent at underside of fittings. The flame
color will turn yellow-green when a small leak is
detected. Large leaks will turn the flame blue or
purple.
WARNING:
Do not breathe fumes
from
burning of
gas. These fumes
poisonous.
2. Liquid Leak Detectors This method utilizes a
solution which will bubble (soap solution) to signify
a gas leak. Use of this method of checking is recom-
mended for locating small leaks.
FUNCTIONAL TESTING SYSTEM
Functional testing is a measurement of the air condi-
tioner system performance to determine if discharge
air temperature, pressure in suction line, and pres-
sure in discharge line are within specific limitations.
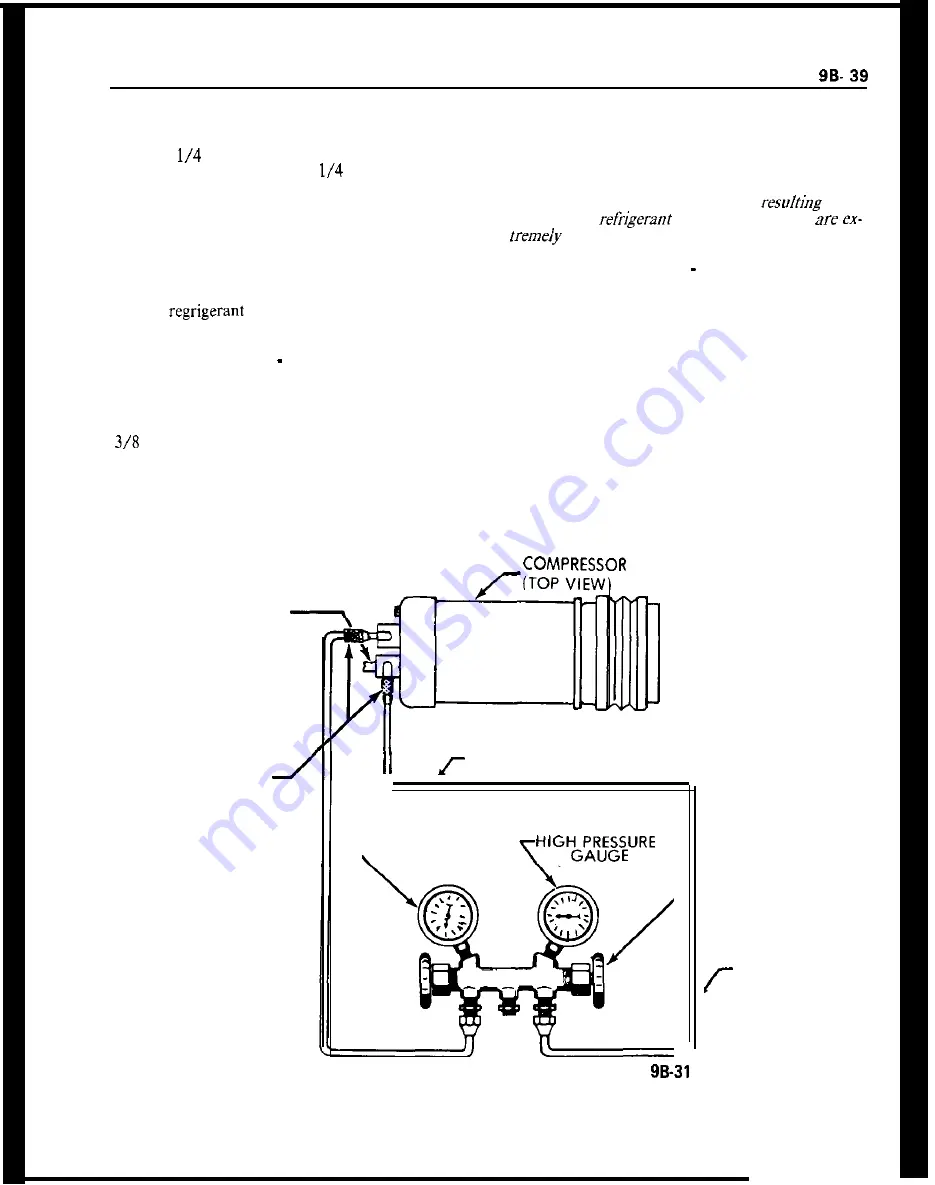
To perform Functional test proceed as follows:
1. Remove protective caps from the compressor
adapter fittings located on compressor.
SCHRADER
ADAPTER J-5420
DISCHARGE LINE
VALVE
LOW PRESSURE
G A U G E
MANIFOLD AND
-GAUGE SET
J-5725-01
GAUGE LINES
(5) J-5418
Figure 9B-40 Functional Test Set-Up
Summary of Contents for 1900 1973
Page 1: ......
Page 7: ......
Page 9: ......
Page 48: ...IGNITION SYSTEM lC 27 9 3OlC19 Figure 1 C l 3 Distributor Exploded...
Page 57: ...I I 1 D 36 1973 OPEL SERVICE MANUAL I Figure 1 D 27 Alternator Exploded View 301D27...
Page 95: ...j 1J 74 1973 OPEL SERVICE MANUAL i I m Figure 13 1 Windshield Wiper and Horn Opel 1900 Manta...
Page 96: ...I I WIRING DIAGRAMS lJ 75 Figure lJ 2 Windshield Wiper and Horn Rallye...
Page 97: ...1 J 76 1973 OPEL SERVICE IMANUAL L J Figure lJ 3 Wind hield Wiper and Horn Gl...
Page 98: ...I I I WIRING DIAGRAMS 1J 77 I I Figure 1 J 4 Turn Signal and Hazard Flasher Opel 1900 Manta I...
Page 99: ...I i L I lJ 78 1873 OPEL SERVICE MANUAL Figure lJ 5 Turn Signal and Hazard Flasher GT...
Page 100: ...I WIRING DIAGRAMS 15 79 I I Figure lJ 6 Oil Fuel Temp Tach Stop and Brake Warning Light GT I...
Page 101: ......
Page 102: ...I WIRING DIAGRAMS lJ 81 r Figure 1 J 8 Blower and Lighter GT...
Page 103: ...I I lJ 82 1973 OPEL SERVICE MANUAL Figure lJ 9 indicator Lights and Gauges Opel 1900 Manta...
Page 104: ...I I WIRING DIAGRAMS IJ 83 I Figure 1 J 10 Indicator Lights and Gauges Ratlye...
Page 106: ...EhMB SWITCH R GHiDOOR 301J12...
Page 107: ...1 J 86 1973 OPEL SERVICE MANUAL i Figure 1 J l 3 Headlamps Opel 1900...
Page 108: ...I I I WIRING DIAGRAMS lJ 87 Figure lJ 14 Headlamps Manta...
Page 109: ...1 J 88 1973 OPEL SERVICE MANUAL I 1 Figure lJ 15 Headlamp and Fog Lights Rallye...
Page 110: ...301516...
Page 111: ......
Page 113: ...1 J 92 1973 OPEL SERVICE MANUAL d 5 Figure 1 19 Starting lgniiion and Charging Opel 1900 Manta...
Page 114: ...I I WIRING DIAGRAMS lJ 93 I Figure lJ 20 Starting Ignition and Charging GT...
Page 115: ...1 J 94 1973 OPEL SERVICE MANUAL i I I Figure lJ 21 Instrument Panel GT...
Page 116: ...I I 1 I WIRING DIAGRAMS lJ 95 Figure lJ 22 A C Generator and Regulator All Models...
Page 117: ...301523...
Page 119: ...I I I 10 RED AMP GAGE 301J25...
Page 120: ...WIRING DIAGRAMS lJ 99 Figure lJ 26 Seat Belt Warning System Automatic Transmissionl GT...
Page 121: ...lJ 100 1973 OPEL SERVICES MANUAL I Figure 1 J 27 Heated Rear Glass Opel 1900 Manta...
Page 122: ...I WIRING DIAGRAMS 1 J 101...
Page 123: ...1 J 102 1973 OPEL 9ER IC MANUAL...
Page 128: ...SPECIAL BODY TOOLS GENERAL INFORMATION 2A 5 W REGULATOR INING INSTALLER J 21828 J 21549 2A 1...
Page 167: ......
Page 231: ......
Page 259: ......
Page 285: ...5C 26 1973 OPEL SERVICE MANUAL...
Page 322: ...ENGINE MECHANICAL AND MOUNTS 6A 31...
Page 350: ...CARBURETOR AND THROTTLE LINKAGE 6E 59 Figure 6E 37 Carburetor Specifications...
Page 361: ......
Page 372: ...Figure 7A 9 Exploded View of Clutch Pedal and Housing...
Page 423: ...Third Clutch Applied Low Band Released...
Page 424: ...AUTOMATIC TRANSMISSION C 63...
Page 425: ...712 64 1973 OPEL SERVICE MANUAL HYDRAULIC OPERATION I r n...
Page 427: ...7C 66 1973 OPEL SERVICE MANUAL...
Page 428: ......
Page 429: ...7C 68 1973 OPEL SERVICE MANUAL II II I...
Page 431: ...7C 70 1973 OPEL SERVICE MANUAL d...
Page 433: ...7C 72 1973 OPEL SERVICE MANUAL...
Page 435: ...7C 74 1973 OPEL SERVICE MANUAL...
Page 437: ...712 76 1973 OPEL SERVICE MANUAL...
Page 439: ...a 1973 OPEL SERVICE MANUAL...
Page 441: ...7C 80 1973 OPEL SERVICE MANUAL...
Page 499: ...7C 138 1973 OPEL SERVICE MANUAL 4 5 I Figure 7C 234 Special Tools Automatic Transmission 7C223...
Page 509: ......
Page 596: ...98 88 1973 OPEL SERVICE MANUAL Figure gB 165 Special Tools...
Page 620: ......


