background image

Handbook

|

3

Overview

A Look at the
Components and
Control Panel

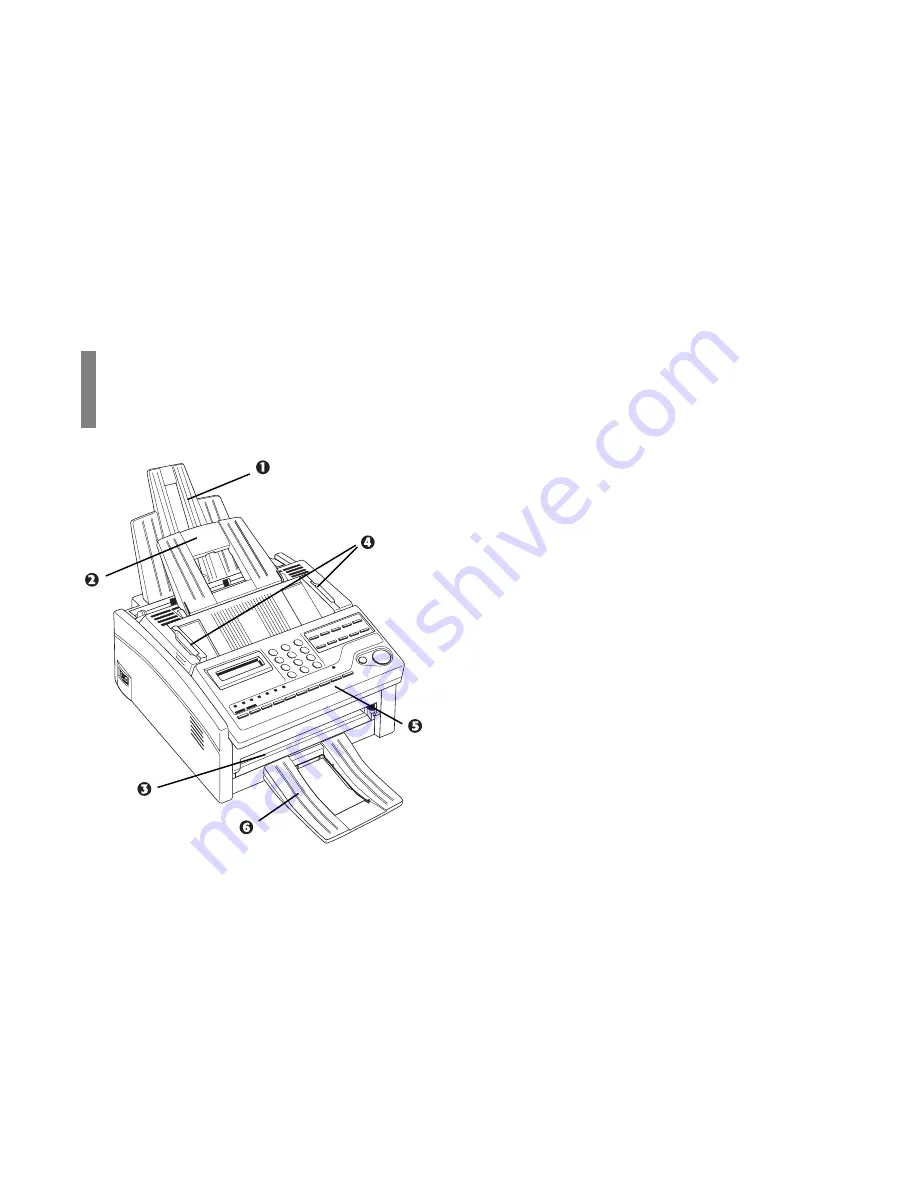
Components

1

Paper Tray/Copy Stacker

Load up to 100 sheets of paper into this tray.  Up to 30
printed pages stack on the tray.

2

Document Tray

Holds original documents that are to be scanned, copied,
or faxed—up to 20 pages.

3

Manual Paper Feeder

Load paper into this slot one at a time when you want to
use envelopes, or a type of paper different from the paper
in the paper tray.

4

Document Guides

Adjust these guides to the page width of the documents
that are to be scanned, copied or faxed.

5

Control Panel

6

Document Stacker

Hold original documents after being scanned, copied or
faxed.

Summary of Contents for OKIOFFICE 84

Page 1: ...User s Handbook English...

Page 2: ...r multilingual web site http www okidata com Year 2000 Compliance All products currently sold by Okidata are Year 2000 compliant Each product contains information technology that accurately processes...

Page 3: ...a os 1999 y 2000 y no constituyen ninguna preocupaci n de programaci n para el 9 de Septiembre de 1999 9999 Estos productos cuando se utilizan con productos de otros fabricantes que ofrecen productos...

Page 4: ...to Install Your OKIOFFICE MFP 14 What You Should Receive 14 Installing the Paper Trays 15 Removing the Protective Sheet 16 Installing the Toner Cartridge 17 Connecting to the Telephone Line 18 Install...

Page 5: ...Stored in Memory 37 Power Failures and Memory 37 Using Voice Request 37 Programming Your One Touch Directory 39 One Touch Keys 39 One Touch Parameters 40 Locating Unassigned One Touch or Auto Dial Num...

Page 6: ...r Current Settings 59 User Function Settings 59 User Function Settings List 59 Changing Your User Function Settings 63 Setting Your MFP s Distinctive Ring 64 Dial Parameter Settings 64 Dial Parameter...

Page 7: ...e Drum 83 Resetting the Drum Counter 84 Consumables and Replacement Parts 85 Supplies 85 Shipping Your MFP 85 Service and Support 86 Your Sales and Service Dealer 86 Customer Support Professionals 86...

Page 8: ...om your personal computer Fax Features Your OKIOFFICE also includes the following fax features 10 One Touch keys for automatic single key dialing of pre programmed telephone numbers 70 Auto Dial numbe...

Page 9: ...and for details on how to use it Product Options Optional handset connects directly to your MFP and works like a telephone Order Number 70031801 Advanced memory transmission and reception features in...

Page 10: ...ments that are to be scanned copied or faxed up to 20 pages 3 Manual Paper Feeder Load paper into this slot one at a time when you want to use envelopes or a type of paper different from the paper in...

Page 11: ...onnector 8 Line Terminal Terminal for connecting to an incoming telephone line 9 TEL Terminal Terminal for connecting to an optional handset or external telephone line 10 AC Power Inlet Plug the suppl...

Page 12: ...e drum cartridge contains the green photosensitive drum which receives images from the LED printhead and transfers them to the printing paper 14 Toner Cartridge This black cylinder installed inside th...

Page 13: ...6 Handbook Control Panel...

Page 14: ...Mode in the Setting Basic Features section for more information about the answering modes 5 Hyphen Key When programming One Touch keys and Auto Dial telephone numbers use this key to notify your machi...

Page 15: ...a document and manually dialed a telephone number press Copy to instantly program that number into a One Touch Key or Auto Dial number 12 Stop Key This key cancels the operation currently in progress...

Page 16: ...ch label use a pencil to write in the name then replace the cover 20 Group Key If you frequently send a fax to the same set locations programmed into One Touch keys or Auto Dial numbers you can use th...

Page 17: ...ch keys for selecting special transmission and reception functions for obtaining reports and for quick access to programming functions To select a function press the Select Function key then press the...

Page 18: ...page for clearing accumulated toner from your MFP s image drum Signal Tones Your MFP emits sounds to inform you of specific conditions Key Select Tone This is a short beep which occurs each time you...

Page 19: ...the MFP do not plug your MFP into anything other than a standard RJ 11C jack Your MFP is intended to be grounded electrically and is equipped with a three wire grounded power cord For your safety do...

Page 20: ...d toner cartridge or image drum Do not expose these components to light for more than five minutes Never expose the green drum inside the image drum unit to direct sunlight Always hold the image drum...

Page 21: ...perature is between 50 F 10 C and 92 F 32 C What You Should Receive Remove contents from the carton Be sure that all the items listed below are included 1 OKIOFFICE 84 MFP 2 Toner cartridge 3 Image dr...

Page 22: ...Handbook 15 Installing the Paper Trays 1 Install the paper tray copy stacker 2 Install the document tray 3 Install the document stacker...

Page 23: ...ctive sheet and grasp the image drum Firmly lift up to disengage the image drum then lift it out Caution Do not touch the green drum surface 3 Grasp the protective sheet and pull it out 4 Slide the im...

Page 24: ...materials If you experience any problems with toner see the Safety instructions at the beginning of this section 2 Unwrap the toner cartridge and gently shake it to distribute the toner Then carefull...

Page 25: ...er to make sure it is firmly closed Connecting to the Telephone Line 1 Insert one end of the telephone cord into the LINE jack in the back of the machine 2 Insert the other end into your wall telephon...

Page 26: ...rd into the jack located on the back of the cradle 3 Insert the end of the cord into the TEL jack on the back of the MFP The two TEL jacks are provided to allow you to connect both an external handset...

Page 27: ...k with your MFP See Setting the Answering Mode Connecting to Your Computer 1 Make sure that the computer is turned off and the OKIOFFICE is unplugged 2 Connect the end of the interface cable to your c...

Page 28: ...ize See Customizing Features and Operations 1 Adjust the paper guides to the width of your paper Set the left guide all the way to the left Set the right guide to the marker for the size you re using...

Page 29: ...ng mode based on how you want your MFP to answer calls and what telephone equipment is connected to it Choose the mode that best fits your needs Auto Receive mode FAX Your MFP is connected to a teleph...

Page 30: ...enter the remote receive number you have programmed This number activates fax reception Add something like this to your answering machine message To send a fax now press XX the programmed number Memor...

Page 31: ...sed as your Personal ID which may appear on the displays or reports of other fax machines you are communicating with Call Back Number The Call Back Number is a telephone number not a fax number which...

Page 32: ...o the next position Move the cursor to make Press the Yes and No corrections keys 8 Press the Start key to save your entry The display shows NO CALL BACK NO 9 After the display clears use the numeric...

Page 33: ...beginning of phone numbers you dial or program and automatically wait for a dial tone before dialing the rest of the number Some PBX installations may require additional adjustments to your MFP If you...

Page 34: ...that all of the outside telephone numbers you program into your MFP have to begin with your PBX s access digit Most PBX systems are digital however an analog line from your PBX is required to support...

Page 35: ...r JetSuite Pro User s Guide Printing When connected to your computer OKIOFFICE functions much like any normal printer For details on the print function see the Printing chapter in JetSuite Pro User s...

Page 36: ...Press the Copy key The display shows PRG NO OF COPIES 1SETS If you want to make just one copy you are finished Your MFP pauses briefly then begins copying 3 To make multiple copies enter the number of...

Page 37: ...e document feeder print side down with the top edge into the MFP 2 A dialog box appears saying A document has been placed into the input tray Would you like to scan it 3 Click Yes 4 A dialog box lets...

Page 38: ...w a document will fax first make a copy on your MFP load the document face down and press the Copy key If your documents are heavily bent creased or torn make a copy on a photocopier and send the copy...

Page 39: ...es before loading Don t load different size documents at the same time You can load and prepare to transmit a document while your MFP is still sending or receiving another message as long as the docum...

Page 40: ...ents that are too dark DARK 5 Your Documents are now ready for faxing or copying Sending a Fax to a Single Location 1 Load your documents 2 Select a location Refer to the instructions below To Dial Us...

Page 41: ...cal list of all of the Location IDs programmed into your MFP When selecting locations press the Search key The display shows ENTER 1 ST CHAR Repeatedly press the search key to look through the entire...

Page 42: ...ies to send the fax again You can redial a number manually at any time by pressing the Redial key Confirming Results After transmission press the Copy key once with no documents loaded to see a report...

Page 43: ...Reception mode all messages stored in memory are printed out b Print out Operation Messages stored in memory can also be printed out using the following process 1 Press the Select Function key 2 Pres...

Page 44: ...MEMORY PRINTING 2 To erase the message instead of printing it press the Stop key The display shows CANCEL 3 Press the Yes key to erase the message from your MFP s memory Power Failures and Memory If...

Page 45: ...o have either an attached handset or an external telephone to use the voice request function 1 During a fax communication press the Voice Request key 2 When the other party answers your request your M...

Page 46: ...One Touch key To find One Touch keys that are not yet registered repeatedly press the Search key Or print the telephone directory see Reports 1 Press the Select Function key 2 Press the 8 Location Pro...

Page 47: ...ay shows NO OR LOCATION 9 Enter the alternate fax number Refer to the instructions following Step 5 10 Press the Start key to finish programming the One Touch key The display shows LOCATION PROGRAMMIN...

Page 48: ...e location the One Touch key is used for as this setting increases the time to connect Locating Unassigned One Touch or Auto Dial Numbers You can also use the Search key to search for unassigned One T...

Page 49: ...number programmed with the first part of the chain dial number The display shows PRESS OT AD SRCH KEY 2 Select the One Touch key or Auto Dial number programmed with the second part of the chain dial n...

Page 50: ...y programmed fax number and location 6 After the display clears enter the fax number Refer to the instructions below To Do This Use Enter numbers Numeric keypad press once Enter spaces Space One Touch...

Page 51: ...two letters using the Press the No key to same key move to the next position Move the cursor to make Press the Yes and No corrections keys 9 Press the Start key to finish programming the One Touch key...

Page 52: ...Do This A One Touch key Press the One Touch key An Auto Dial number Press the Auto Dial key then enter the two digit Auto Dial number on the numeric keypad A group Using the numeric keypad press the k...

Page 53: ...key Each entry displays Press the Start key to accept each entry or press the NO key to delete a location 4 When all the entries have been displayed and CHECK LOCATIONS displays again press the NO key...

Page 54: ...G 4 Using the numeric keypad enter the group number 1 5 you want to program 5 The display shows the number of your current group and SELECT LOC S You can now add a location to your group or delete a l...

Page 55: ...LOCATION PROGRAMMING 8 To program another group go back to Step 3 If you are finished press the Select Function key Sending a Fax to a Group To send a group fax do the following 1 Load your document...

Page 56: ...or other No Yes transmissions while a delayed fax is waiting to be sent Sending a Delayed Fax from the Document Feeder 1 Load your documents 2 Press the Select Function key 3 Press the 1 Delayed TX On...

Page 57: ...Transmission To cancel a delayed transmission from the document feeder or from memory before it has been sent follow the instructions below 1 Press the Stop key The display shows COMMUNICATION CANCEL...

Page 58: ...ack to Step 5 If you are finished press the Select Function key Changing Your Password or Closing a Mailbox If you want to change the password of an existing mailbox or if you want to delete one follo...

Page 59: ...ceiving the fax to tell you their mail box number 1 Load your documents 2 Press the Select Function key 3 Press the 3 Confidential TX One Touch key The display asks you to enter the number of a confid...

Page 60: ...canning the message into memory and completes the set up process for the polling text For Bulletin Polling Press the YES key The display shows PERSONAL BOX NO Enter a mailbox number between 0 8 With B...

Page 61: ...an program your MFP to initiate a relay broadcast obtain the following information from the operator of the fax machine you intend to use as a relay key station Relay Password This is the 4 digit rela...

Page 62: ...key then enter the two digit Auto Dial number on the numeric keypad A group Using the numeric keypad press the key then enter the number of the group A number dialed on Dial the number as you the num...

Page 63: ...access to the machine To set this feature 1 Press the Select Function key 2 Press the 9 User Program One Touch key The display shows 1 FUNC PROGRAMMING 3 On the numeric keypad press 7 The display sho...

Page 64: ...n Do While Receiving a Fax While your MFP is receiving a fax you can Load another document and prepare it for transmission You can continue to load documents as long as memory is available When the fi...

Page 65: ...f copies you want to make on the numeric keypad Then press the Copy key again Your MFP begins making copies Using the Manual Paper Feeder Your MFP s manual paper feeder allows you to make copies on a...

Page 66: ...ess the Yes key The report begins printing User Function Settings User function settings allow you to customize the general operation of your MFP Refer to User Function Settings List to determine whic...

Page 67: ...en programmed into your MFP s One Touch keys or Auto Dial numbers Using this function you can set up a closed network of fax machines If you do not want your MFP to transmit faxes to or receive faxes...

Page 68: ...e of paper you are using in your MFP s paper tray Available settings are A4 letter legal 13 and legal 14 14 USER LANGUAGE This function allows you to switch between the two languages programmed into y...

Page 69: ...f and this setting is set off the call will not be answered 22 NO TONER MEM RX With this function turned on your MFP will automatically receive and store messages in its memory when it is low on toner...

Page 70: ...h Parameters settings for a One Touch key see Programming Your One Touch Directory Changing Your User Function Settings 1 Press the Select Function key 2 Press the 9 User Program One Touch key The dis...

Page 71: ...key to confirm your selection 9 Press the Select Function key to finish Dial Parameter Settings These functions allow you to control the way your MFP dials telephone numbers Refer to Dial Parameter Se...

Page 72: ...untries Available settings are 75 ms 85 ms and 100 ms PBX LINE Turn this function on if your MFP is connected to a PBX Once this function has been turned on and the access digit function has been prog...

Page 73: ...DIAL PARAMETER 4 Press the Yes key until the display shows the dial parameter MH ONLY This function controls the type of compression method your MFP uses during communication Available settings are on...

Page 74: ...hone number of the location are printed For receptions the MFP s personal ID or its telephone number are printed The communication mode used for each transmission or reception The number of pages sent...

Page 75: ...firmation Report Use this report to confirm the results of a multiple location transmission or broadcast Information provided on this report includes The date and time at which the broadcast started T...

Page 76: ...uto Dial codes and groups The information includes The Location ID and main fax number for each One Touch key and Auto Dial code The alternate number OR for each One Touch key The One Touch Parameter...

Page 77: ...cation was completed successfully PUNIT This error code indicates a problem with the printing unit Contact your service person R_JAM A paper jam occurred in your MFP while it was receiving a fax and i...

Page 78: ...ns paper there may be one or more sheets of paper jammed in the machine To clear a paper jam follow the instructions below If you are experiencing frequent paper jams it may be due to the type of pape...

Page 79: ...firmly on both ends of the image drum until it snaps into place 5 Close the top cover 6 Close the control panel then press down until it snaps into place 7 Pull the paper out of the paper tray If any...

Page 80: ...ard until it stops Press down firmly on the cover to make sure it is closed and latched NO PAPER FAX CHECK PAPER OR PATH No Paper The paper tray is out of paper Add more paper PAPER OUT JAM FAX CHECK...

Page 81: ...ARM 3 TEL REFER TO USER GUIDE or PRINTER ALARM 4 TEL REFER TO USER GUIDE Open and close the cover If this does not clear these messages turn off your MFP and call for service Important When you turn o...

Page 82: ...rience may be due to improper programming If you are experiencing a problem read through the list of problems and solutions before calling your dealer The display is blank Check the power cord to make...

Page 83: ...one line conditions can also cause communication errors Try sending the fax again and check to make sure you are dialing the correct telephone number If you have to dial a prefix number to get an outs...

Page 84: ...n you are dialing with an Auto Dial code be sure to press the Auto Dial key before you enter the code If your MFP has the Auto Start feature turned off you have to press the Start key before dialing w...

Page 85: ...your MFP always answers first If you are using an external telephone change your MFP s ring response user function setting See the Customizing Features and Operations section Your received faxes some...

Page 86: ...the print density is high enough you can continue to use the toner cartridge without replacing it until the print density becomes too low If the print density becomes low even before your MFP displays...

Page 87: ...e drum unit For disposal place it in the plastic bag you received with your new toner cartridge Warning Be careful when handling the toner cartridge Do not let toner spill onto your clothing or other...

Page 88: ...Handbook 81 6 Lower the right side down into the toner well 7 Push the lock lever forward until it stops 5 Insert the left side of the toner cartridge into the toner well placing it under the tab a a...

Page 89: ...the cleaning wipe provided with your new toner cartridge gently wipe back and forth across the full length of the LED array 9 Close the cover and front panel Press down on the top cover to make sure...

Page 90: ...for continuous printing up to 8 000 pages at 3 pages per job and about 4 500 pages at 1 page per job Warning Never expose the image drum unit to light for more than 5 minutes Never expose the image d...

Page 91: ...inside the image drum unit 4 Insert the new drum cartridge aligning it under the tabs Press down firmly on both ends to lock the drum in place 5 Install a new toner cartridge Follow Steps 3 7 in Repla...

Page 92: ...on the Internet at http www okidata com Click on the where to buy link Supplies Toner Cartridge Part Number 52111701 Image Drum Part Number 40709901 Shipping Your MFP When shipping the MFP once it is...

Page 93: ...nimum charges may vary Proof of purchase is required for warranty work Be sure to retain your purchase documents Customer Support Professionals 1 800 OKIDATA 1 800 654 3282 Toll Free in the U S and Ca...

Page 94: ...ystem Automated Attendant is available 24 hours a day 7 days a week The system can provide immediate assistance with Basic Operating Procedures Sales and Service Referrals Parts and Consumable Referra...

Page 95: ...ory 37 Chain Dialing 41 Cleaning Page 72 Communication Codes in Reports 70 Communication Error 76 Confidential Fax Creating a mailbox 51 Mailbox password 51 Sending 52 Confidential TX key 10 Consumabl...

Page 96: ...ultiple Page 31 Size 31 Drum Counter 84 Dual Access Feature 56 E End of Session Tone 11 Error Messages 73 Error Tones 11 F Fax Identification Setting 24 Faxing Preparing Documents 31 G Group Faxing to...

Page 97: ...ing to Broadcasting 45 N No key 7 Numeric Keypad 9 O One Touch Directory Programming 39 One Touch Keypad 9 One Touch Keys 39 One Touch Labels 9 One Touch Parameters 40 P Paper Loading 21 Paper Jam 71...

Page 98: ...9 Relay Broadcast 54 Telephone Directory 69 Restricted Access 56 S Scanning 30 Preparing documents 31 Search Key 7 Dialing 34 Select Function Key 8 Sender ID 24 Service Dealers 86 Shipping 85 Signal T...

Page 99: ...ers Locating 41 Unassigned Keys Locating 41 Unique Key 9 Unpacking 12 14 Unsolicited Fax Messages 55 User Functions 59 Changing 63 Settings 59 User Program Key 11 V Voice Request 37 Voice Request Key...

Reviews: