background image

Operating Instructions

Multi-Function Printer 

Model No.


KX-MB781C

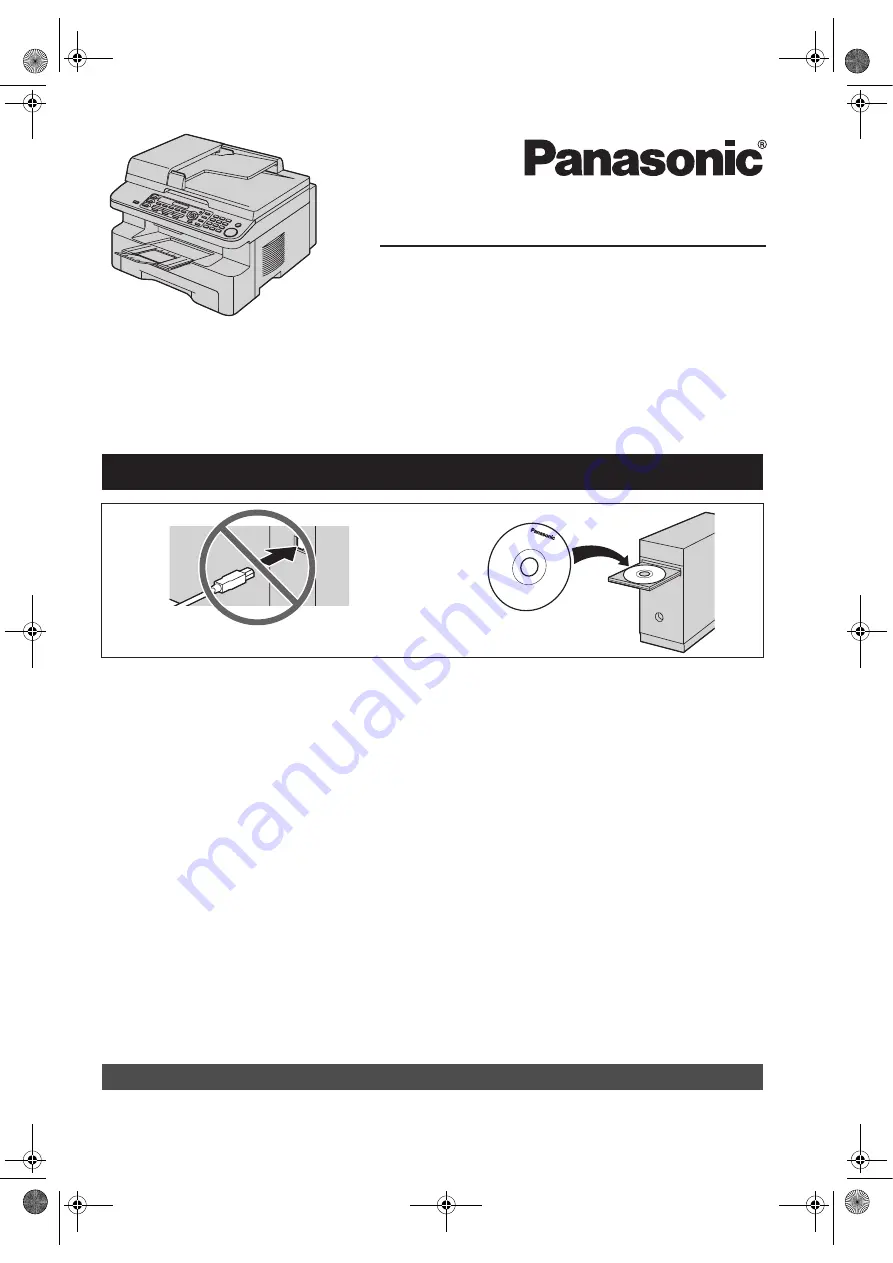
Do NOT connect the USB cable until prompted by the Multi-Function Station (CD-ROM).

1

2

Designed to be used only in Canada.

L

This unit is compatible with Call Display. To use this feature, you must subscribe to the 
appropriate service of your service provider.

MB781C-PFQX2742ZA-OI-en.

PDF

  Page 1  Tuesday, September 4, 2007  1:24 PM

Summary of Contents for KX-MB781C

Page 1: ... until prompted by the Multi Function Station CD ROM 1 2 Designed to be used only in Canada L This unit is compatible with Call Display To use this feature you must subscribe to the appropriate service of your service provider MB781C PFQX2742ZA OI en PDF Page 1 Tuesday September 4 2007 1 24 PM ...

Page 2: ... trademark of Intel Corporation in the United States and or other countries L Screen shots reprinted with permission from Microsoft Corporation L Adobe and Reader are either registered trademarks or trademarks of Adobe Systems Incorporated in the United States and or other countries L Avery is a registered trademark of Avery Dennison Corporation L XEROX is a registered trademark of Xerox Corporati...

Page 3: ...tes after printing Location L To avoid malfunction do not position the unit near appliances such as TVs or speakers which generate an intense magnetic field Static electricity L To prevent static electricity damage to the interface connectors or other electrical components inside the unit touch a grounded metal surface before touching the components Environment L Keep the unit away from electrical...

Page 4: ...8 6 5 Sending a computer document as a fax message from your computer 40 Receiving Faxes 6 6 Receiving a fax automatically Auto answer ON 40 6 7 Receiving a fax manually Auto answer OFF 41 6 8 Using the unit with an answering machine 42 6 9 Junk fax prohibitor preventing fax reception from undesired callers 43 6 10 Receiving a fax into your computer 44 7 Call Display Call Display 7 1 Call Display ...

Page 5: ...ning the white plates and glass 80 13 2 Cleaning the document feeder rollers 83 14 General Information Printed Reports 14 1 Reference lists and reports 84 Specifications 14 2 Specifications 84 Copyrights 14 3 Information of copyrights and licences 87 15 Index 15 1 Index 94 MB781C PFQX2742ZA OI en book Page 5 Tuesday September 4 2007 1 24 PM ...

Page 6: ...nit operates properly we recommend using the Panasonic toner cartridge and drum unit Replacement toner cartridge 1 L Model No Part No KX FAT92A Replacement drum unit L Model No Part No KX FAD93A Optional handset unit L Model No Part No KX FA103A 1 Approx 2 000 sheets of letter size paper can be printed with KX FAT92A 1 Power cord 2 CD ROM 3 Drum unit 4 Starter toner cartridge 1 5 Quick reference g...

Page 7: ...op an operation or programming session L To erase a character number M FAX AUTO ANSWER L To turn the auto answer setting ON OFF page 40 N FAX L To switch to the fax mode page 16 35 O BROADCAST L To send a document to multiple parties page 38 P MANUAL BROAD L To send a document to multiple parties manually page 38 Q Station keys L To use the one touch dial feature page 36 37 R Navigator key L To se...

Page 8: ...Document cover 5 Output tray 6 Top cover release lever 7 Document entrance 8 Paper input tray 9 Recording paper exit j Document exit 1 2 4 3 6 8 7 9 j 5 A Recording paper guides B Speaker C Handset unit optional connection jack D Power inlet E Manual input tray Rear cover F External telephone jack G Telephone line jack H USB interface connector I LED J LAN interface connector A F H I G B C J D E 1...

Page 9: ...y damage to the unit or degradation of print quality which may occur from the use of a non Panasonic toner cartridge and drum unit L Do not leave the toner cartridge out of the protection bag for a long time It will decrease the toner life L Do not add toner to the toner cartridge 1 Before opening the protection bag of the new toner cartridge shake it vertically more than 5 times 2 Remove the tone...

Page 10: ...uch the transfer roller 9 L If the lower glass j is dirty clean it with a soft and dry cloth 7 Install the drum and toner unit k by holding the tabs L Make sure that the triangles l match to install the drum and toner unit correctly 8 9 7 j k l MB781C PFQX2742ZA OI en book Page 10 Tuesday September 4 2007 1 24 PM ...

Page 11: ...it operates properly we recommend the use of Panasonic toner cartridge Model No KX FAT92A and drum unit Model No KX FAD93A See page 6 for accessory information L To maintain print quality and machine life we recommend you to clean slots and openings page 3 and the inside of the unit page 80 83 when replacing the toner cartridge and or drum unit Waste disposal method Waste material should be dispos...

Page 12: ...The output tray can hold up to approximately 150 sheets of printed paper Remove the printed paper before the output tray becomes full If the top part of the extender is detached 1 With the top part of the extender in the open position insert the tab 1 into the left hole 2 of the extender 2 Slide the other tab 3 into the right hole 4 of the extender from below until it clicks into place 2 1 2 1 4 3...

Page 13: ... 16 lb to 20 lb paper Up to 230 sheets of 80 g m2 21 lb paper Up to 200 sheets of 90 g m2 24 lb paper L Please refer to page 85 for information on recording paper L The unit is set for printing letter size paper by default If you want to use A4 or legal size paper change the setting feature 380 on page 50 1 Pull the paper input tray 1 until it clicks into place then pull it completely out lifting ...

Page 14: ...s 7 5 Insert the paper input tray to the unit lifting the front part of the tray Then push it completely into the unit Note L If the paper is not loaded correctly re adjust the paper guides or the paper may jam L If the paper input tray does not close the plate in the paper input tray may be lifted Push the paper and make sure that the paper is laid flat in the paper input tray Caution for the pap...

Page 15: ...rovided by your provider Please attach the filter j to the telephone line cord of the unit 1 Power cord L Connect to a power outlet 120 V 60 Hz 2 Telephone line cord L Connect to a single telephone line jack RJ11C 3 EXT jack L You can connect an answering machine or an extension telephone Remove the stopper if attached 4 Answering machine not included 5 Handset unit optional connection jack L You ...

Page 16: ...can select the desired mode by pressing one of the following buttons SCAN Select this mode when using the unit as a scanner for the computer page 27 COPY Select this mode when using the unit as a copier page 30 FAX Select this mode when using the unit as a fax machine page 35 Note L The default operation mode is the copy mode L You can change the default operation mode feature 463 on page 50 and t...

Page 17: ...has dried completely L Remove clips staples or other fasteners L Do not set the following types of documents Make a copy of the document using the scanner glass and set the copy instead Chemically treated paper such as carbon or carbonless duplicating paper Electrostatically charged paper Badly curled creased or torn paper Paper with a coated surface Paper with printing on the opposite side that c...

Page 18: ...l information on the following topics which can be printed for reference purposes as follows BASIC SETTINGS FEATURE LIST DIRECTORY FAX RECEIVING COPIER REPORTS CALL DISPLAY 1 Press MENU repeatedly to display HELP 2 Press or repeatedly to display the desired item i SET 3 Press MENU to exit 128 mm 5 128 mm 5 600 mm 23 5 8 216 mm 8 1 2 216 mm 8 1 2 208 mm 8 3 16 4 mm 5 32 4 mm 5 32 5 mm 3 16 5 mm 3 1...

Page 19: ...1 5 M 08 D 10 Y 07 TIME 10 15AM 2 Press repeatedly to select PM 3 SET 4 Press MENU to exit Note L The other party s fax machine will print the date and time on the top of each page you send according to your unit s date and time setting L If you have selected French as the language feature 110 on page 49 the time is set using a 24 hour clock Example 15 15 Press 1 5 1 5 L After setting the date and...

Page 20: ...racters press and hold STOP 2 9 Your fax number You can program your fax number so that it appears on the top of each page sent 1 MENU i 1 0 3 i SET NO 2 Enter your fax number up to 20 digits L To enter a press L To enter a space press L To enter a hyphen press FLASH L To erase a number press STOP 3 SET 4 Press MENU to exit To correct a mistake Press or to move the cursor to the incorrect number a...

Page 21: ...not manage the network with a DHCP server When two or more units are connected to the LAN You need to assign an IP address subnet mask and default gateway manually 1 MENU i 5 0 0 DHCP ENABLED V 2 Press 0 to select DISABLED i SET 3 Set each item For the IP address 1 Press 5 0 1 IP ADDRESS PRESS SET 2 SET i Enter the IP address of the unit i SET For the subnet mask 1 Press 5 0 2 SUBNET MASK PRESS SE...

Page 22: ...ded Please purchase a shielded Type A male Type B male USB cable 2 11 2 Installing Multi Function Station on a computer L Install Multi Function Station CD ROM before connecting the unit to a computer with USB cable If the unit is connected to a computer with USB cable before installing Multi Function Station the Found New Hardware Wizard dialogue box will appear Click Cancel to close it L The scr...

Page 23: ... Panasonic i the unit s name i Add Printer Driver Then follow the on screen instructions Note L You cannot connect more than one unit to the same computer at the same time To modify the software You can select the components to install anytime after the installation For Windows 2000 Windows XP and Windows Vista users you must be logged in as an administrator in order to modify Multi Function Stati...

Page 24: ...ing situations When the unit is connected to a computer that was custom built by the user When the unit is connected to the computer via a PCI card or other expansion card When the unit is connected to another piece of hardware such as a USB hub or interface adapter and not connected directly to the computer To change the settings You can change the settings for Multi Function Station beforehand 1...

Page 25: ...ed tab Change the printer settings then click OK 4 Click Print or OK L The unit will start printing Note L To stop printing from the unit see page 61 L To load paper see page 13 26 L When using the manual input tray load the recording paper after step 4 L For details about the paper specifications see page 85 L If a printing error occurs the Device Monitor will be started automatically and display...

Page 26: ...FOR PC PRINTING L To use the manual input tray you must change the paper source in the Basic tab when setting the printer properties page 25 You can also select the desired media type To print on labels Use labels designed for laser printing We recommend the following Avery 5160 5161 5162 5163 5164 5165 5167 5168 XEROX LWH100 LWH110 LWH120 LWH130 LWH140 L Use the manual input tray to print labels ...

Page 27: ...PDF as a file format the software that is associated to open PDF file will start Note L To stop scanning see page 61 L You can save the images in TIFF JPEG BMP or PDF formats L See page 17 for document requirements 4 1 2 Scan to save as a file 1 Set the original page 17 2 SCAN 3 Press V or repeatedly to select FILE i SET 4 For USB connection Press V or repeatedly to select USB HOST i SET For LAN c...

Page 28: ...cessary change the scanning settings Press press V or repeatedly to select the desired setting i SET i START Note L If you select black white for the scan type you can save the images in TIFF or PDF formats If you select greyscale or colour for the scan type you can save the images in JPEG or PDF formats 4 1 4 Scan to OCR With OCR software you can convert an image into text data that can be edited...

Page 29: ...again 6 Scan L If you preview the scanned image using the auto document feeder in step 5 set the document again and click Scan L The scanned image will be displayed in the Multi Function Viewer window after scanning L To save the scanned image select Save As from the File menu L To cancel scanning while the document is being scanned click Cancel Note L You can display images in applications that s...

Page 30: ... to the type of document L To select the resolution see page 30 L To select the contrast see page 30 4 If necessary enter the number of copies up to 99 5 START L The unit will start copying 6 After you finish copying press STOP to reset the settings you set in step 3 and 4 Note L To stop copying see page 61 L You can change the default operation mode feature 463 on page 50 and the timer before ret...

Page 31: ...ess V or repeatedly to change the enlargement reduction rate by 1 at a time from 25 to 400 You can also enter the desired percentage specifically by using the dial keys 3 SET 4 If necessary enter the number of copies up to 99 i START 5 After you finish copying press STOP to reset this feature Note L Enlargement reduction copy is not available for quick ID copy feature page 32 poster feature page 3...

Page 32: ...following table for details The shaded area will be scanned 2 Press PAGE LAYOUT repeatedly to select QUIK ID COPY i SET 3 Press V or repeatedly to select the number of original documents from 2 in 1 4 in 1 or 8 in 1 i SET 4 Press V or repeatedly to select the page layout from LANDSCAPE or PORTRAIT i SET 5 If necessary enter the number of copies up to 99 i START L The unit will scan 1 page 6 To con...

Page 33: ...er 1 Set the original page 17 L To make a portrait copy set the original in portrait direction To make a landscape copy set the original in landscape direction 2 Press PAGE LAYOUT repeatedly to select N in 1 i SET 3 Press V or repeatedly to select the number of original documents from 2 in 1 4 in 1 or 8 in 1 i SET 4 Press V or repeatedly to select the layout from PORTRAIT or LANDSCAPE i SET 5 If n...

Page 34: ...late multiple copies page 34 During N in 1 feature 1 Set the original and enter necessary settings for N in 1 copy steps 2 to 4 on 5 2 4 To copy several pages onto 1 page N in 1 feature page 33 2 Press COLLATE repeatedly to display ON and continue copying steps 3 to 6 on 5 2 5 To collate multiple copies page 34 Proof set feature To make 1 set of collate copy first press COLLATE repeatedly to displ...

Page 35: ...nt 5 levels light to dark are available Press CONTRAST repeatedly i SET To redial the last number REDIAL i START L If the line is busy the unit will automatically redial the number 1 time Note L To stop sending see page 61 Reserving the fax transmission Dual Access You can reserve the fax transmission even when the unit is just receiving a fax or sending a fax from memory Up to 3 reservations when...

Page 36: ...al feature 6 items and navigator directory 100 items L Station 1 and 2 can be used alternatively as broadcast keys page 38 L Make sure that the FAX light is ON 6 2 1 Storing one touch dial item 1 Press MENU repeatedly to display DIRECTORY SET 2 Select the desired station key For stations 1 2 1 Press one of the station keys Example STATION 1 DIAL MODE V 2 SET For station 3 Press the station key For...

Page 37: ...ution page 35 and the desired contrast page 35 3 Enter the fax number Using stations 1 3 Press the desired station key Using stations 4 6 Press LOWER then press the desired station key Using navigator directory Press DIRECTORY then press V or repeatedly to display the desired item L To send a single page skip to step 6 L To send multiple pages go to the next step 4 Press QUICK SCAN to scan the doc...

Page 38: ...T 1 BROADCAST 2 Press V or repeatedly to select BROADCAST For MANUAL BROADCAST using the dial keypad 1 MANUAL BROAD 2 Press V or repeatedly to select MANUAL BROAD 3 SET 4 Program items Using stations 1 3 Press the desired station key Using stations 4 6 Press LOWER then press the desired station key Using navigator directory Press V or repeatedly to display the desired item i SET Using the dial key...

Page 39: ...e 17 2 If necessary change to the desired resolution page 35 and the desired contrast page 35 3 Press BROADCAST or MANUAL BROAD L To send a single page skip to step 5 L To send multiple pages go to the next step 4 Place the next page i SET L To send more pages repeat this step 5 START L After transmission the unit will automatically print a report broadcast sending report Note L To stop sending se...

Page 40: ...eds the memory capacity of the unit sending will be cancelled L For details see the help file by selecting p from Multi Function Station L Click Select to change the active unit Receiving Faxes 6 6 Receiving a fax automatically Auto answer ON 6 6 1 Activating FAX ONLY mode Press FAX AUTO ANSWER repeatedly to display FAX ONLY MODE L The display will show the ring count in FAX ONLY mode If you wish ...

Page 41: ...to receive faxes 1 When the extension telephone rings lift the handset of the extension telephone 2 When document reception is required a fax calling tone slow beep is heard or no sound is heard press 9 default fax activation code firmly 3 Replace the handset Note L To stop receiving see page 61 L To receive fax documents using the extension telephone make sure remote fax activation is turned ON f...

Page 42: ...ess to Phone Companies Voice Mail if you subscribed Note L If the call is a phone call the answering machine will record voice messages If a fax calling tone is detected the fax machine will receive a fax automatically Receiving a voice message and fax document in one call The caller can leave a voice message and send a fax document during the same call Inform the caller of the following procedure...

Page 43: ...them 1 Press MENU repeatedly to display JUNK FAX PROH 2 Press repeatedly to display JUNK LIST SET i SET 3 Press V or repeatedly to display the party you wish to prevent fax reception from i SET 4 Press STOP 2 times to exit To display the junk fax prohibitor list 1 Press MENU repeatedly to display JUNK FAX PROH 2 Press repeatedly to display JUNK LIST DISP i SET 3 Press V or to display the items on ...

Page 44: ...ent through the unit Note L You can view print or transfer the received document using your computer Viewing a received document 1 Select PC FAX from Multi Function Station 2 Select Received Log in Communication Log 3 Click the item you want to view 4 Click File in the menu bar then select View or click View icon in the toolbar L The received fax will be displayed If the unit s memory stores a rec...

Page 45: ...ialed from an area which does not provide Call Display service PRIVATE CALLER The caller requested not to send caller information LONG DISTANCE The caller made a long distance call To confirm caller information by printing the Callers list To print manually see page 84 To print automatically after every 30 new calls activate feature 216 page 50 7 2 Viewing and calling back using caller information...

Page 46: ...PLAY 2 Press V or repeatedly to display the desired item 3 MENU 4 Select the station key or navigator directory For stations 1 2 1 Press the desired station key 2 Press V or repeatedly to select DIAL MODE i SET i SET For station 3 Press the station key i SET For stations 4 6 Press LOWER then press the desired station key i SET For navigator directory Press or i SET 5 SET Note L To edit a name or n...

Page 47: ...e answering machine is connected set the ring count of the answering machine to more than 2 8 3 Using three or more phone numbers on a single telephone line You may wish to use three or more phone numbers for a single telephone line In order to distinguish which number the call was addressed to a different ring pattern must be assigned for each number Example Using three phone numbers To use one p...

Page 48: ... also access the unit by entering its IP address on the web browser 2 Select the desired category from the menu bar Device Configuration features of the unit Network Configuration features of the network 3 Type root as the user name then enter the password feature 155 on page 50 i OK 4 Select the desired feature tab at the top of the right frame 5 Change the settings or edit information L This ste...

Page 49: ...r logo using the dial keypad See page 20 for details Setting your fax number 1 0 3 Enter your fax number using the dial keypad See page 20 for details Selecting the language 1 1 0 The display and reports will be in the selected language 1 ENGLISH default English is used 2 FRENCH French is used 1 MENU i 1 1 0 2 Press 1 or 2 to select the desired language i SET i MENU Setting the dialing mode 1 2 0 ...

Page 50: ...omatically adjusted when caller information is received 1 AUTO default The date and time setting will be automatically adjusted 2 MANUAL Deactivates this features Setting the recording paper size in the paper input tray 3 8 0 1 LETTER default Letter size paper 2 A4 A4 size paper 3 LEGAL Legal size paper Setting the waiting time for the power save mode 4 0 3 To set the length of time before the uni...

Page 51: ... 8 2 0 OFF default Deactivates this feature 1 ON The toner cartridge will last longer Note L This feature may lower the print quality by reducing toner consumption Feature Code Selection MB781C PFQX2742ZA OI en book Page 51 Tuesday September 4 2007 1 24 PM ...

Page 52: ...you wish to re send the document Note L This feature is not available for broadcast transmission L Calling charges may be higher than usual Sending a fax at a specific time 4 1 2 This feature allows you to take advantage of low cost calling hours offered by your telephone company This feature can be set up to 24 hours in advance of the desired time 0 OFF default 1 ON To send a document 1 If the FA...

Page 53: ...han your recording paper 0 OFF The unit will print the original size 1 ON default The unit will fit received documents onto your recording paper Changing the fax activation code 4 3 4 If you wish to use an extension telephone to receive faxes activate this feature and program the activation code Important L The fax activation code must be different from the code that you programmed on the answerin...

Page 54: ...nition of the connection 2 CONNECTED If the unit recognizes the connection to the computer it will transfer a received document to the computer If the unit cannot recognize the connection it will print out the data Setting the computer for PC fax reception 4 4 3 To select the computer that will be used for receiving a fax See page 21 for details Resetting fax features to their default settings 4 5...

Page 55: ...is feature 1 ENABLED The unit will hold the previous setting Holding the previous zoom enlargement reduction setting 4 6 8 0 DISABLED default Deactivates this feature 1 ENABLED The unit will hold the previous setting Holding the previous collate setting 4 6 9 0 DISABLED default Deactivates this feature 1 ENABLED The unit will hold the previous setting Feature Code Selection Changing the data timeo...

Page 56: ...LAN connection only This feature can be programmed only by the web browser page 59 Registering the scan to e mail destinations via e mail server LAN connection only L This feature can be programmed only by the web browser When you send scanned files via e mail server you can register e mail destinations up to 30 destinations to the unit using the web browser in advance 1 Start Multi Function Stati...

Page 57: ...N using the dial keypad i SET i MENU Setting the secondary DNS server for the LAN connection 5 0 5 This feature is available when feature 500 is deactivated 1 MENU i 5 0 5 i SET 2 Enter the secondary DNS server of the network on the LAN using the dial keypad i SET i MENU Setting the machine name 5 0 7 1 MENU i 5 0 7 i SET 2 Enter the name of the unit to recognize on the LAN up to 15 characters see...

Page 58: ...etting HTTPD for the LAN connection 5 3 4 0 DISABLED Denies access to the web browser 1 ENABLED default Allows access to the web browser Feature Code Selection MB781C PFQX2742ZA OI en book Page 58 Tuesday September 4 2007 1 24 PM ...

Page 59: ...ion where you use this unit LAN FEATURE Enter the location information of the unit SMTP setting for scan to e mail via e mail server E MAIL FEATURE Enter the SMTP server information to send scanned image from the unit via e mail server Consult your service provider or network administrator for details Setting the error notify feature ERROR NOTIFY ENABLED The unit will send an e mail to registered ...

Page 60: ...toring or erasing items for broadcast transmission page 38 Viewing items in the journal report page 35 Storing the journal report as the computer file Viewing items in the Callers list page 45 Storing caller information into directories page 46 Storing the Callers list as the computer file 1 Start Multi Function Station i Remote Control L The Multi Function Remote Control window will appear 2 Sele...

Page 61: ...ing its IP address on the web browser 2 Select the category from the menu bar Status Toner and paper information etc Device Current status of the unit etc Network Network information etc L When you select Device or Network you can change which features are displayed by clicking the feature tabs at the top of the right frame 3 Confirm the status of the unit Note L The status of the unit will be upd...

Page 62: ...tion jack if attached 3 Insert the tab 3 and rib 4 Caution L When moving the unit be sure to hold by the grip Do not hold by the handset unit To remove the handset unit 1 Pull the handset unit slightly forward 1 then lift it in the direction of the arrow 2 to remove the rib 2 Remove the tab 3 then disconnect the handset connector 4 1 2 4 3 Correct Incorrect 1 2 3 4 MB781C PFQX2742ZA OI en book Pag...

Page 63: ...tor feature of this unit rejected fax reception MEMORY FULL L The memory is full of received documents due to a lack of recording paper or a recording paper jam Install paper page 13 or remove the jammed paper page 74 L If feature 442 is set to ALWAYS page 54 check the connection between the computer and the unit NO DOCUMENT FAILED PICKUP L The document was not fed into the unit properly Re insert...

Page 64: ...over is open Close it L A recording paper jam occurred near manual input tray rear cover Remove the jammed paper page 74 DIRECTORY FULL L There is no space to store new items in navigator directory Erase unnecessary items page 37 DRUM LIFE LOW REPLACE SOON L The drum life is near to an end Replace the drum unit as soon as possible FAX IN MEMORY L The unit has a document in memory See the other dis...

Page 65: ...rding paper is installed in the manual input tray when trying to copy receive faxes or print reports Remove the recording paper from manual input tray REPLACE DRUM CHANGE SUPPLIES L The drum unit s service life is finished Replace the drum unit immediately RX MEMORY FULL L The memory is full of received documents due to a lack of recording paper or a recording paper jam Install paper page 13 or re...

Page 66: ...installed on your computer See the Microsoft web site for details L If you have any other multifunction softwares installed on your computer uninstall them L Check that your computer has enough memory and hard disk space If your computer warns of insufficient memory close other applications If there is not enough space on the hard disk delete unnecessary files L Uninstall Multi Function Station on...

Page 67: ...re correction fluid has dried completely Coloured text is printed in black instead of greyscale when printing from Microsoft PowerPoint or other applications L Select Color or remove the check next to Grayscale in the print dialogue so that coloured text will be printed in greyscale Problem Cause Solution I cannot scan L When scanning at a high resolution a large amount of available memory is requ...

Page 68: ...cument Change the contrast page 30 and make a lighter copy of the document using TEXT resolution page 30 Problem Cause Solution I cannot send documents L The telephone line cord is connected to the EXT jack on the unit Connect to the LINE jack page 15 L The other party s fax machine is busy or has run out of recording paper Try again L The other party s machine is not a fax machine Check with the ...

Page 69: ...ONNECTING but faxes are not received L The incoming call is not a fax Set to TEL mode Press FAX AUTO ANSWER repeatedly to turn OFF the FAX AUTO ANSWER light The printing quality of the received documents is poor L If documents can be copied properly the unit is working normally The other party may have sent a faint document or there may be something wrong with the other party s machine Ask them to...

Page 70: ...party complains they only hear a fax tone and cannot talk L FAX ONLY mode is set Tell the other party the number is only used for faxes L If you use a Distinctive Ring service make sure you have set the same ring pattern assigned by the telephone company page 47 The REDIAL or PAUSE button does not function properly L If this button is pressed during dialing a pause will be inserted If pressed imme...

Page 71: ...s in the range of the number specified in the class corresponding to your local network scale Class Subnet mask IP address Class A 255 0 0 0 10 0 0 1 10 255 255 254 Class B 255 255 0 0 172 xx 0 1 172 xx 255 254 1 Class C 255 255 255 0 192 168 xx 1 192 168 xx 254 2 1 xx should be the same value for the unit and for the computer as shown in the following example Example 172 16 0 1 172 16 255 254 The...

Page 72: ...ws Security Alert dialogue box appears and asks if you want to block PCCMFLPD and I cannot operate the following functions after installing the Microsoft Windows XP Service Pack 2 PC printing Scanning Remote Control PC FAX Device Monitor L Click Keep Blocking and run the Windows Firewall Setting Tool to allow the data transmission for Multi Function Station page 72 Problem Cause Solution I cannot ...

Page 73: ...e and PCCMFLPD are displayed and checked on the Programs and Services list To confirm the security settings For Windows Vista users 1 Start i Control Panel i Security Center L The Windows Security Center window will appear 2 Windows Firewall L The Windows Firewall dialogue box will appear 3 Change Settings L The User Account Control dialogue box will appear 4 Continue 5 Click the Exceptions tab 6 ...

Page 74: ...he jammed paper forcibly before opening the top cover L To prevent injuries be careful not to put your hands under the top cover Case 1 When the recording paper has jammed near the manual input tray 1 Pull open the paper input tray 1 2 Open the manual input tray 2 and remove the jammed paper 3 carefully by pulling it upwards Then close the manual input tray 1 3 2 MB781C PFQX2742ZA OI en book Page ...

Page 75: ...ecording paper has jammed near the drum and toner unit 1 Pull open the paper input tray 1 2 Lift the top cover release lever 2 and open the top cover 3 Note L Do not touch the transfer roller 5 4 Caution The fuser unit 4 gets hot Do not touch it 1 2 4 3 5 MB781C PFQX2742ZA OI en book Page 75 Tuesday September 4 2007 1 24 PM ...

Page 76: ...paper 6 carefully by pulling it upwards Remove the jammed paper 7 carefully by pulling it toward you 4 Close the paper input tray 5 Close the top cover until locked 6 7 MB781C PFQX2742ZA OI en book Page 76 Tuesday September 4 2007 1 24 PM ...

Page 77: ... touch the transfer roller 4 2 Lift both green levers 5 until they stop 3 Remove the jammed paper 6 carefully by pulling it upwards 4 Push back the green levers 7 to the original position 5 Close the top cover until locked Caution The fuser unit 3 gets hot Do not touch it 1 3 2 4 5 6 7 MB781C PFQX2742ZA OI en book Page 77 Tuesday September 4 2007 1 24 PM ...

Page 78: ...ay Then push it completely into the unit Note L If the error message is still displayed check the recording paper specifications and re install recording paper See page 13 for details 12 1 3 When the recording paper in the manual input tray is not fed into the unit properly The display will show the following CHECK PICK UP INPUT TRAY 2 1 Remove the recording paper 2 Re insert the recording paper N...

Page 79: ...ing the ADF cover 1 Open the ADF cover 1 while holding the document cover 2 2 Remove the jammed document 3 carefully When the document has jammed near the document entrance When the document has jammed near the document exit 3 Close the ADF cover 1 2 3 3 MB781C PFQX2742ZA OI en book Page 79 Tuesday September 4 2007 1 24 PM ...

Page 80: ... party Caution L Be careful when handling the drum and toner unit See the caution for the drum unit on page 9 for details L Do not use paper products such as paper towels or tissues to clean the inside of the unit 13 1 1 White plates and scanner glass 1 Open the document cover 1 2 Hold the document cover 2 while cleaning the white plates 3 and the scanner glass 4 3 Close the document cover 5 1 2 3...

Page 81: ...Do not touch the transfer roller 4 3 Remove the drum and toner unit 5 by holding the tabs 4 Clean the lower glass 6 with a soft and dry cloth 5 Reinstall the drum and toner unit 7 by holding the tabs Caution The fuser unit 3 gets hot Do not touch it 1 3 2 4 5 6 7 MB781C PFQX2742ZA OI en book Page 81 Tuesday September 4 2007 1 24 PM ...

Page 82: ...install the drum and toner unit correctly 6 Close the top cover until locked Caution L To prevent injuries be careful not to put your hands under the top cover 7 Re connect the power cord 8 MB781C PFQX2742ZA OI en book Page 82 Tuesday September 4 2007 1 24 PM ...

Page 83: ...t the power cord 2 Open the ADF cover 1 while holding the document cover 2 3 Clean the document feeder rollers 3 with a cloth moistened with isopropyl rubbing alcohol and let all parts dry thoroughly 4 Close the ADF cover 5 Re connect the power cord 1 2 3 MB781C PFQX2742ZA OI en book Page 83 Tuesday September 4 2007 1 24 PM ...

Page 84: ...sion 2 Scanning density Scanning resolution Up to 600 1 200 dpi Optical Up to 9 600 9 600 dpi Interpolated Copy resolution Up to 600 600 dpi Scanner glass Up to 600 300 dpi Auto document feeder Fax resolution Horizontal 8 pels mm 203 pels inch Vertical 3 85 lines mm 98 lines inch in standard resolution 7 7 lines mm 196 lines inch in fine photo resolution 15 4 lines mm 392 lines inch in super fine ...

Page 85: ...rint on one side Try using the other side of the paper if you are not happy with the print quality or if misfeeding occurs L For proper paper feeding and best print quality we recommend using long grained paper L Do not use paper of different types or thickness at the same time This may cause paper jams L Avoid double sided printing L Do not use paper printed from this unit for double sided printi...

Page 86: ...phone Answering Machine Table of Contents2 1 Table of Contents 1 1 Included accessories 1 2 Accessory information Finding the Controls 1 3 Description of buttons 1 4 Overview Installation1 5 Toner cartridge and drum unit 1 6 Document tray 1 7 Output tray1 8 Recording paper2 Preparation 2 1 Connections 2 2 Turning the power switch ON Help Button2 3 Help function Volume 2 4 Adjusting volume Initial ...

Page 87: ...CIAL EXEMPLARY OR CONSEQUENTIAL DAMAGES INCLUDING BUT NOT LIMITED TO PROCUREMENT OF SUBSTITUTE GOODS OR SERVICES LOSS OF USE DATA OR PROFITS OR BUSINESS INTERRUPTION HOWEVER CAUSED AND ON ANY THEORY OF LIABILITY WHETHER IN CONTRACT STRICT LIABILITY OR TORT INCLUDING NEGLIGENCE OR OTHERWISE ARISING IN ANY WAY OUT OF THE USE OF THIS SOFTWARE EVEN IF ADVISED OF THE POSSIBILITY OF SUCH DAMAGE Copyrigh...

Page 88: ...Copyright c 1988 Stephen Deering Copyright c 1988 University of Utah Copyright c 1988 1989 1993 The Regents of the University of California All rights reserved Copyright c 1988 1991 1993 The Regents of the University of California All rights reserved Copyright c 1988 1992 1993 The Regents of the University of California All rights reserved Copyright c 1988 1993 The Regents of the University of Cal...

Page 89: ...right c 1998 1999 2000 2001 The NetBSD Foundation Inc All rights reserved Copyright c 1998 2000 The NetBSD Foundation Inc All rights reserved Copyright c 1998 2000 2001 The NetBSD Foundation Inc All rights reserved Copyright c 1999 The NetBSD Foundation Inc All rights reserved Copyright C 1999 WIDE Project All rights reserved Copyright c 1999 2000 Jason L Wright jason thought net All rights reserv...

Page 90: ...ology Inc copyright notice BSD Copyright c 2001 2003 Networks Associates Technology Inc All rights reserved Redistribution and use in source and binary forms with or without modification are permitted provided that the following conditions are met Redistributions of source code must retain the above copyright notice this list of conditions and the following disclaimer Redistributions in binary for...

Page 91: ...ANY WAY OUT OF THE USE OF THIS SOFTWARE EVEN IF ADVISED OF THE POSSIBILITY OF SUCH DAMAGE Part 4 Sun Microsystems Inc copyright notice BSD Copyright c 2003 Sun Microsystems Inc 4150 Network Circle Santa Clara California 95054 U S A All rights reserved Use is subject to license terms below This distribution may include materials developed by third parties Sun Sun Microsystems the Sun logo and Solar...

Page 92: ...L DAMAGES OR ANY DAMAGES WHATSOEVER RESULTING FROM LOSS OF USE DATA OR PROFITS WHETHER IN AN ACTION OF CONTRACT NEGLIGENCE OR OTHER TORTIOUS ACTION ARISING OUT OF OR IN CONNECTION WITH THE USE OR PERFORMANCE OF THIS SOFTWARE Copyright 1995 1998 1999 2000 by Jef Poskanzer jef acme com All rights reserved Redistribution and use in source and binary forms with or without modification are permitted pr...

Page 93: ...endent JPEG Group Copyright 1995 by Jef Poskanzer jef acme com Copyright 1998 by Jef Poskanzer jef acme com Copyright 1999 by Jef Poskanzer jef acme com Copyright 1995 2000 by Jef Poskanzer jef acme com Copyright 1999 2000 by Jef Poskanzer jef acme com Copyright 1995 1998 2000 by Jef Poskanzer jef acme com MB781C PFQX2742ZA OI en book Page 93 Tuesday September 4 2007 1 24 PM ...

Page 94: ...t 55 A Accessories 6 Address list 84 Answering machine 42 Auto document feeder 17 31 36 Auto IP Feature 533 57 Auto reduction Feature 432 53 B Basic features 49 Broadcast programming list 84 Broadcast transmission 38 C Call Display Calling back 45 Storing 46 Caller s list Feature 216 45 Character entry 60 Cleaning 80 83 Collate hold Feature 469 55 Confirmation report Feature 401 35 52 Connecting t...

Page 95: ... features 55 Power failure 72 Power save Feature 403 50 Printer test list 84 Programming 48 Pull scan 29 Push scan 27 Q Quick scan 36 Quick setup Feature 100 49 R Receiving faxes Automatically 40 Manually 41 Recording paper 13 Recording paper size 85 Redialing 35 37 Reports Address 84 Broadcast programming 84 Broadcast sending 39 Call Display 50 84 Confirmation 35 52 Journal 35 84 Power down 72 Pr...

Page 96: ...PFQX2742ZA CM0807DT0 CD MB781C PFQX2742ZA OI en book Page 96 Tuesday September 4 2007 1 24 PM ...

Reviews: