- 53 -
Scanning to E-mail
4
Scanning
Step 2 Configuring the E-mail Settings of Your Machine
To configure the E-mail Settings of your machine, follow the 3 sub steps below:
●
“Step 2-1 Checking the E-mail Settings of the Computer” P.53
●
“Step 2-2 Setting the E-mail Address for Your Machine” P.54
●
“Step 2-3 Configuring Your Machine’s E-mail Settings” P.54
Check the values for each item in the Setup Information Form through the above steps.
Setup Information Form
No.
Item
Outline Introduction
Example
User Value
* You can look at the following pages
and make notes on the details you
have checked or the settings you
have configured.
B-1
E-mail address for
your machine
The e-mail address used when
sending e-mails from the machine
mc362@test.
com
(Up to 80 characters)
B-2
SMTP server address The address of the server used
when sending e-mails
smtp.test.com
B-3
POP3 server address
The address of the server used
when receiving e-mails
pop3.test.com
B-4
Authentication
method
Sending mail server authentication
SMTP
B-5
SMTP user ID
Sending mail server account name
OKIMC562
B-6
SMTP password
Sending mail server password
okimc562
B-7
POP user ID
Receiving mail server account name user
B-8
POP password
Receiving mail server password
okimc562
B-9
Name of the e-mail
destination
The name of the recipient to whom
you are sending a scan-to-mail from
the machine
User
B-10 E-mail address of the
e-mail destination
The e-mail address of the recipient
to whom you are sending a scan-to-
mail from the machine
Step 2-1 Checking the E-mail
Settings of the Computer
Note
● If a network administrator specifies values such as mail
server account, password and e-mail address for your
machine, enter them in the Setup Information Form.
Memo
●
The procedure below uses Windows Live Mail on Windows
7. If you are using different mail software, refer to the
manual for the e-mail software.
1
Click [Start] and select [Windows Live
Mail].
2
Select the [Tools] menu > [Accounts].
If the menu bar is not displayed, click the
[Menus] icon and then select [Show menu
bar].
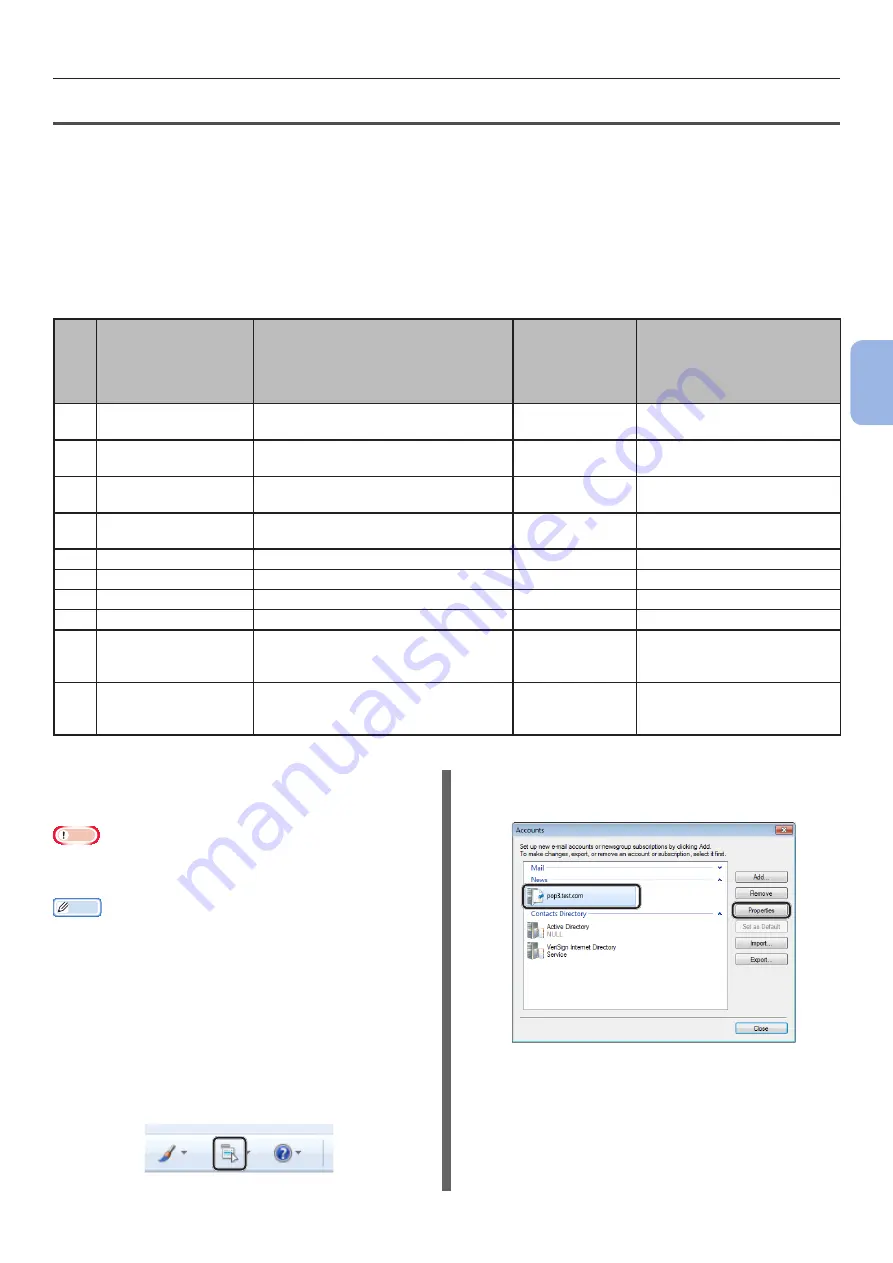
3
Select the mail account and then click
[Properties].
Summary of Contents for ES3452 MFP
Page 119: ...119...


