6/Service
6-11 6-11
Servo-controlled Humidifier Repair Procedures
WARNING
The heater is hot enough to cause skin burns. Unplug the humidifier and allow
the heater to cool (approximately 30 minutes) before disassembly or cleaning.
Valve Housing Disassembly
Note: The lid, gasket, heatsink and connector support are not service replaceable
parts. Order the entire heater, valve and lid kit to replace these parts. To replace the
valve it is not necessary to disassemble the entire valve housing. You only need to
remove the two screws that secure the valve to the valve shaft in the valve housing.
1. Slide humidifier tray out.
2. Remove lid.
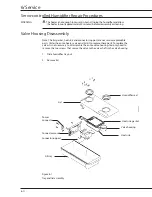
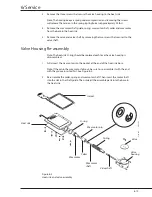
Humidifier seal
Heat sink gasket
CI.18.052
Valve housing
Connector support
Connector mount
Lid
Fill tray
Heat sink
Power
connector
Figure 6-1
Tray and lid assembly
Summary of Contents for Ohio Care Plus
Page 20: ...2 General Information 2 4 2 4 Notes...
Page 24: ...4 Using the Servo controlled Humidifier 4 2 4 1 Notes...
Page 46: ...6 Service 6 18 6 18...
Page 53: ...8 Schematics 8 1 Figure 8 1 Wiring Diagram Servo controlled Humidifier 8 Schematics CI 18 059...
Page 55: ...8 Schematics 8 3 Figure 8 3 Digital section of the Control Display Board Assembly CI 18 061...
Page 56: ...8 Schematics 8 4 Figure 8 4 Analog section of the Control Display Board Assembly CI 18 062...
Page 58: ...8 Schematics 8 6 Figure 8 6 Display section of the Control Display Board Assembly CI 18 064...
Page 67: ......


