
96 - 97
Instruction Manual
AC 02/2019-rev.1.1
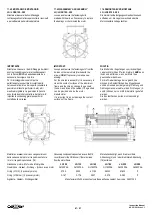
13.3 MOTORI CON FRENO TIPO Rr - K
13.3 MOTORS WITH BRAKE TYPE Rr - K
13.3 MOTOREN MIT BREMSE TYP Rr - K
1
Rimuovere il servoventilatore e
l’encoder/resolver seguendo le istruzioni
riportate precedentemente.
1
Remove the auxiliary fun and the
encoder/resolver following the instructions
above mentioned.
1)
Entfernen Sie den Servolüfter und den
Encoder/Resolver nach den oben
aufgeführten Anweisungen.
2
Contrassegnare e rimuovere la calotta di
copertura freno
2
Mark and remove the brake guard.
2)
Markieren und entfernen Sie die
Bremsabdeckkappe.
3
Verificare il traferro esistente tra
l’elettromagnete ed il contromagnete che
non deve essere superiore a 0,5 mm.
3
Verify the airgap between the
electromagnet and the countermagnet that
should not be higher than 0,5 mm.
3)
Überprüfen Sie den vorhandenen Luftspalt
zwischen Elektro- und Gegenmagnet. Er darf
höchstens 0,5 mm betragen.
4
Allentare le viti di fissaggio dell’elettromagnete.
4
Loose the electromagnet fixing screws.
4)
Lösen Sie die Arretierschrauben des
Elektromagneten
5
Regolare il traferro tramite gli appositi
registri e bloccare le viti di fissaggio
elettromagnete.
5
Adjust the existing airgap between the
adjuster nuts and tighten the fixing
screws.
5)
Stellen Sie den Luftspalt mit Hilfe der
vorgesehenen Regler ein und verriegeln Sie
die Arretierschrauben des Elektromagneten.
6
Verificare il traferro esistente tra
l’elettromagnete ed il contromagnete che deve
essere compreso tra i 0,2 ed i 0,3 mm.
6
Verify the airgap between the
electromagnet and the countermagnet that
should be 0,2
–
0,3 mm.
6)
Prüfen Sie den vorhandenen Luftspalt
zwischen Elektro- und Gegenmagnet. Er
muss zwischen 0,2 und 0,3 mm liegen
7
Verificare che il traferro sia uniforme su
tutta la circonferenza.
7
Verify the uniformity of the airgap on all the
circumference.
7)
Überprüfen Sie, ob der Luftspalt rundum
gleichmäßig ist.
8
Alimentare il freno e controllare che il disco
non sia bloccato o sfreghi durante la
rotazione manuale dell’asse motore.
8
Supply the brake and check that the disc is
not jammed and is free to rotate when the
shaft of the motor is turned manually.
8)
Versorgen Sie die Bremse und prüfen Sie, ob
die Scheibe bei der Drehung der Motorachse
von Hand nicht blockiert oder reibt.
9
Alimentare il motore e controllare che non vi
sia sfregamento tra il disco ed il
contromagnete.
9
Supply the motor and check that there is no
friction or rubbing between the disc and the
counter-magnet.
9)
Versorgen Sie den Motor und prüfen Sie, ob
keine Reibung zwischen Scheibe und
Gegenmagnet vorliegt.
10*
Contrassegnare e rimuovere
l’elettromagnete, il contromagnete il disco
freno solo se necessario e se il materiale di
attrito è usurato. In tal caso è necessario
sostituire i componenti usurati con altrettanti
nuovi ed originali.
10*
Mark and remove the electromagnet, the
countermagnet, the brake disk only in case
of necessity and if the friction material is
worn out. In this case change all the worn
out components with new and original
ones.
10)*
Markieren und entfernen Sie den
Elektromagneten, den Gegenmagneten und
die Bremsscheibe nur im Bedarfsfall, wenn
der Reibwerkstoff abgenutzt ist. In diesem
Fall müssen die abgenutzten Teile durch
neue Originalersatzteile ersetzt werden.
11*
Rimontare il tutto seguendo il procedimento
inverso partendo dal punto 5).
11*
Reassemble all the parts following the
above in reverse starting from the point 5).
11)*
Bauen Sie die Teile ab Punkt 5) in
umgekehrter Reihenfolge wieder ein.
* Eseguire solo se necessario
* Execute only if necessary
* Nur ausführen, soweit erforderlich
13.4 REGISTRAZIONE DELLA COPPIA DI
FRENATURA
(solo per freno tipo K)
13.4 ADJUSTMENT OF THE BRAKING
TORQUE
(only for brake type K).
13.4 EINSTELLUNG DES
BREMSDREHMOMENTS
(nur für Bremsen Typ K)
E’ possibile regolare la coppia di frenatura
agendo sulla ghiera di regolazione.
Verificare il corretto funzionamento del freno e la
coppia frenante che non deve eccedere il valore
nominale.
Controllare la coppia statica del freno prima di
avviare il motore.
It is possible to adjust the braking torque by
the torque adjuster ring.
Verify the correct brake operation and the
braking torque that have not to exceed the
nominal value.
Check the static torque before start up the
motor.
Das Bremsdrehmoment kann mit Hilfe der
Regelnutmutter eingestellt werden.
Überprüfen Sie den korrekten Bremsbetrieb und
das Bremsdrehmoment, das den Nennwert nicht
überschreiten darf.
Kontrollieren Sie das statische Bremsdrehmoment,
bevor Sie den Motor starten.
ATTENZIONE
Evitare assolutamente di lubrificare le parti
interne del freno ed in particolar modo il disco e
le superfici di sfregamento.
Mettere in rotazione il motore solo se il freno è
alimentato e sbloccato.
Non rimuovere mai un motore autofrenante prima
di aver assicurato meccanicamente il carico e gli
organi di trasmissione.
WARNING
Under no circumstances should the internal
parts of the brake be lubricated, especially the
disc and the friction surfaces.
Operate the motor only if the brake is supplyed
and unlocked.
Never remove a self-braking motor before having
mechanically ensured the load and the
transmission organs.
ACHTUNG
Schmieren Sie niemals die inneren Teile der
Bremse. Das gilt insbesondere für die Scheibe und
die Reibflächen.
Setzen Sie den Motor nur mit versorgter und
entriegelter Bremse in Betrieb. Entfernen Sie
niemals einen Motor mit Eigenbremsung, bevor
Last und Antriebsorgane mechanisch gesichert
wurden.