
88 - 97
Instruction Manual
AC 02/2019-rev.1.1
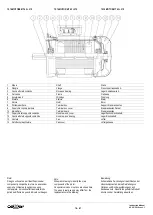
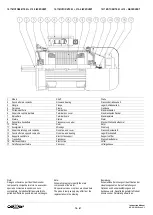
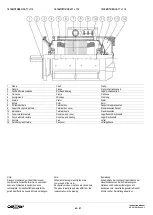
11.5 SMONTAGGIO E MONTAGGIO
–
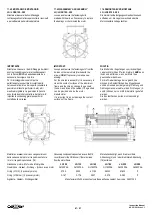
LQ 280
(carcassa tonda)
11.5 DISASSEMBLY AND ASSEMBLY
–
LQ 280
(round frame)
11.5 DEMONTAGE UND MONTAGE
–
LQ 280
(Karkasse Runde)
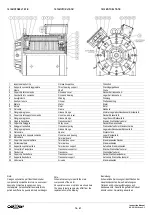
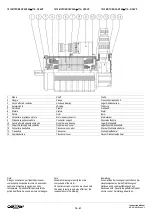
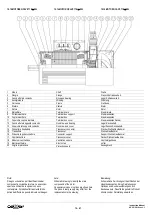
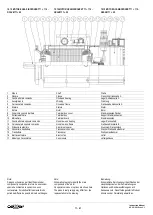
1
Selezionare dalle pagine precedenti il
disegno in sezione contenente la
nomenclatura dei componenti ed accertarsi
che sia corrispondente al tipo di motore da
manutenzionare.
1
Select from the preceding pages the cross
section drawing containing the part list of
the components and make sure it is
corresponding to the type of motor to be
maintained.
1
Von den vorangehenden Seiten die
Schnittzeichnung mit der Stückliste
aussuchen und sicherstellen, dass es sich
um den zu wartenden Motor handelt.
2
Rimuovere il motore dalla
macchina/impianto.
2
Remove the motor from the
machine/system.
2
Den Motor von der Maschine/Anlage
demontieren.
3
Contrassegnare e rimuovere l'organo di
trasmissione (giunto, puleggia etc.) per
mezzo di un estrattore evitando colpi che
danneggerebbero i cuscinetti e gli eventuali
accessori (trasduttori, freni etc.).
3
Mark and remove the transmission organ
(joint, pulley, etc.) by means of an
extractor. Avoid knocking the bearings and
any accessories (encoder, resolver, brakes,
etc.) as these can be easily damaged.
3
Mit einem Abzieher Übertragungsorgane
(Kupplung, Riemenscheibe etc.) abziehen.
Dabei Schläge vermeiden, die Lager oder ev.
vorhandenes Zubehör (Drehgeber, Bremsen
etc.) beschädigen könnten.
4
Contrassegnare e rimuovere il copritrasduttore.
4
Mark and remove the transducer cover.
4
Drehgeberdeckel markieren und abziehen.
5
Rimuovere il trasduttore contrassegnando
la posizione e prestando la massima cura.
Vedi paragrafo 12.0 per maggiori dettagli.
5
Remove the transducer marking its position
with the utmost attention. See paragraph
12.0 for further details.
5
Drehgeberposition sorgfältig markieren und
diesen abziehen. Siehe Abschnitt 12.0 für
weitere Details.
6
Allentare e rimuovere le viti di fissaggio delle
flangie blocca cuscinetto (dove presenti).
6
Loosen and remove the fastening screws from
the bearing flanges (where these exist).
6
Schrauben der Lagerflansche lösen und
entfernen (wo vorhanden)
7
Allentare e rimuovere le viti di fissaggio del
coperchio anteriore
7
Loosen and remove the screws from the
drive-end cover.
7
Schrauben des Lagerdeckels Rückseite B
lösen und entfernen.
8
Estrarre la chiavetta dall’albero lato
comando ed eventuali anelli di tenuta.
8
Extract the key from the shaft (drive side)
and possible seal rings installed.
8
Die Passfeder und ev. vorhandene
Wellendichtringe der Antriebseite abziehen.
9
Estrarre il rotore dallo statore prestando
attenzione a non urtare gli avvolgimenti.
9
Pull the rotor out from the stator avoiding
any impact to the windings.
9
Den Rotor vom Stator abziehen, ohne die
Windungen zu beschädigen.
10
Contrassegnare ed estrarre gli eventuali
spessori di rasamento.
10
Mark and extract any airgap rings if
present.
10
Luftspaltringe markieren und abziehen, falls
vorhanden.
11
Procedere con i controlli e la degli
avvolgimenti se necessario.
11
Proceed with the controls and cleaning the
windings if necessary.
11
Windungen kontrollieren und falls notwendig
reinigen.
12 Sostituire i cuscinetti
12 Replace the bearings.
12
Lager ersetzen
13
Inserire il rotore nello statore (prestando
attenzione a non urtare gli avvolgimenti),
applicare gli spessori di rasamento
eventualmente rimossi precedentemente,
montare la flangia supporto cuscinetto e
serrare i bulloni.
13
Introduce the rotor into the stator (avoiding
any impact to the windings). Fit any shims
which have been removed before. Mount
the bearing support flange and tighten the
bolts.
13
Den Rotor in den Stator montieren (ohne die
Windungen zu beschädigen). Luftspaltringe
einsetzten, die vorher demontiert wurden.
Der Lagerträgerflansch montieren und
festschrauben.
14
Rimontare gli altri componenti seguendo il
procedimento inverso.
14
Re-assemble the other components
following the inverse procedure.
14
Die Komponenten in umgekehrter
Reihenfolge wieder montieren.
15
Controllare che il motore non sia a massa e
non vi siano cortocircuiti negli avvolgimenti.
15
Check that the motor is not grounded and
that there are no short-circuits in the
windings.
15
Prüfen ob der Motor nicht geerdet ist und
keine Kurzschlüsse in den Windungen
vorliegen.
16
Provare il motore possibilmente a tensione
ridotta seguendo tutte le norme e gli
accorgimenti sopra descritti per quanto
riguarda le protezioni e la sicurezza.
16
Test the motor, possibly with a reduced
voltage, following all the regulations and
procedures described above with regard to
the protection and safety.
16
Den Motor möglichst mit geringerer
Spannung prüfen, unter Berücksichtigung der
oben beschriebenen Regeln, Verfahrens-
weisen und Sicherheitsvorschriften.
17
Seguire quanto indicato nei paragrafi 5.7
–
6.0
–
6.1
–
ed in tutte le altre noti pertinenti.
17
Follow what it is indicated in paragraphs
5.7 - 6.0 -6.1 and all other pertaining notes.
17
Den Indikationen der Abschnitte 5.7 - 6.0 -6.1
und allen anderen einschlägigen
Bemerkungen.
Non allentare I tiranti che fissano tra loro i
coperchi lato comando e lato opposto
comando.
Do not loose the long screws used to
assemble the drive end and non-drive end
covers.
Die Zugstangen zur Verbindung der Deckel
A- und B-Seite nicht lösen.
Le istruzioni ed i disegni potrebbero non
coincidere perfettamente con l’effettiva
costruzione del motore. Accessori particolari ed
esecuzioni speciali non possono essere
contemplate nelle istruzioni seguenti.
Per i motori completi di trasduttore è
necessario seguire anche quanto indicato
nel paragrafo 12
Per i motori completi di freno è
necessario seguire anche quanto
indicato nel paragrafo 13
Per la sostituzione dei cuscinetti è
necessario seguire quanto indicato nel
paragrafo 14
The instructions and drawings could not
reflect exactly the actual construction of the
motor. Specific accessories and special
executions are not contemplated in the following
instructions:
For the motor equipped with transducer it is
necessary to follow also what is indicated in
paragraph 12
For the motor equipped with brake it is
necessary to follow also what is indicated in
paragraph 13.
For the replacement of bearing it is
necessary to follow also what is indicated in
paragraph 14
Die Anweisungen und Zeichnungen könnten
nicht völlig mit der Motorkonstruktion
übereinstimmen. Besonderes Zubehör und
spezielle Ausführungen können in den folgenden
Anweisungen nicht betrachtet werden:
Für Motoren mit Drehgebern ist es ebenfalls
notwendig die Anweisungen im Abschnitt 12
zu befolgen.
Für Motoren mit Bremsen ist es ebenfalls
notwendig die Anweisungen im Abschnitt 13
zu befolgen.
Für den Ersatz der Lager ist es notwendig
die Anweisungen im Abschnitt 14 zu
befolgen.


