135
Inverter zwembad warmtepomp
NL
12
WARNING: Installation must be carried out by a qualified engineer.
This section is provided for information purposes only and must be checked and adapted if
necessary according to the actual installation conditions.
3.6 Hydraulic connection
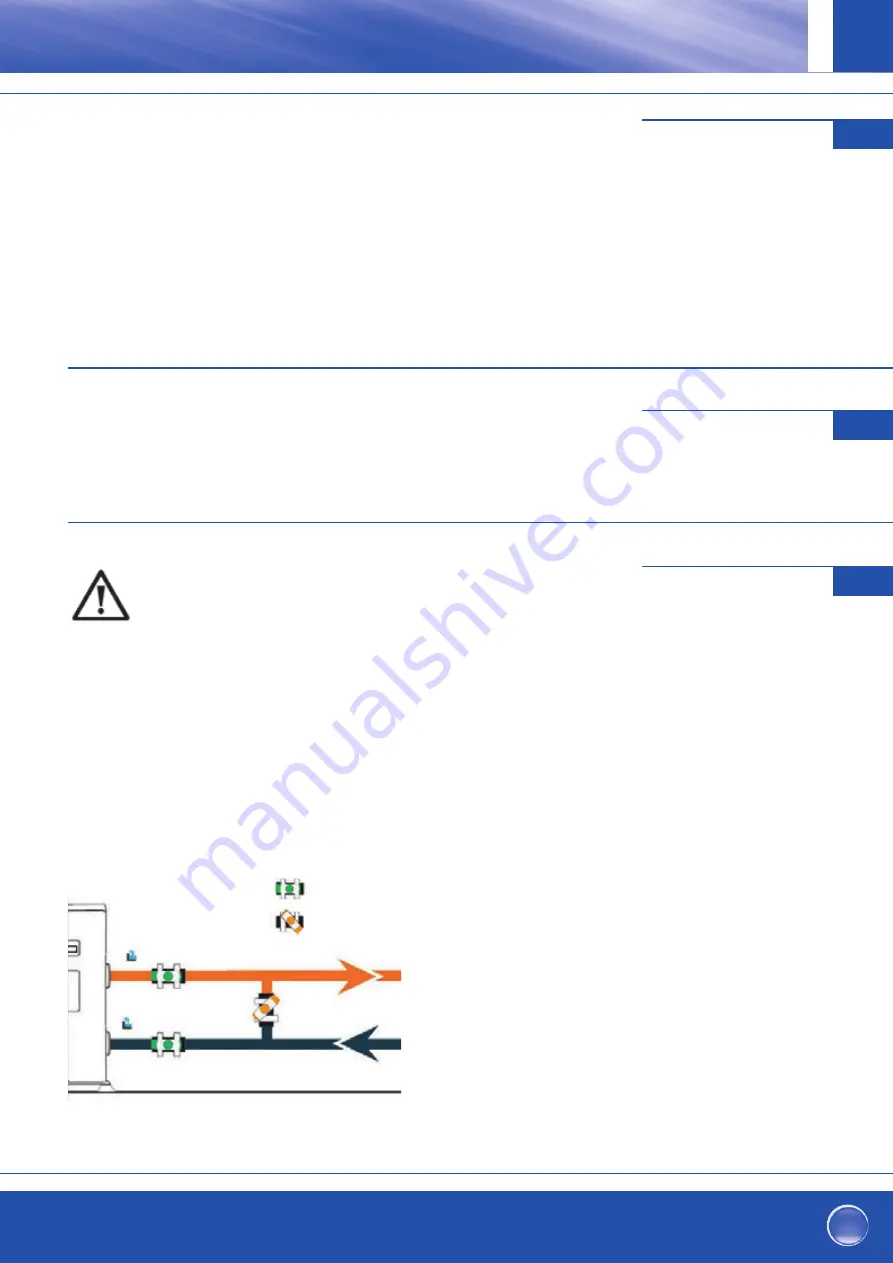
By-Pass assembly
The heat pump must be connected to the pool by means of a
By-Pass assembly.
A By-Pass is an assembly consisting of 3 valves that
regulate the flow circulating in the heat pump.
During maintenance operations, the By-Pass permits the heat
pump to be isolated from the system without interrupting your
installation.
Making a hydraulic connection with the By-Pass kit
WARNING: Do not run water through the hydraulic circuit for 2 hours after applying the adhesive.
Step 1: Take the necessary steps to cut your pipes.
Step 2: Make a straight perpendicular cut through the PVC pipes with a saw.
Step 3: Assemble your hydraulic circuit without connecting it in order to check that it perfectly fits your
installation, then dismantle the pipes to be connected. Step 4: Chamfer the ends of the cut pipes with sandpaper.
Step 5: Apply stripper to the ends of the pipes to be connected. Step 6: Apply the adhesive in the same place.
Step 7: Assemble the pipes.
Step 7: Clean off any adhesive remaining on the PVC.
Step 8: Leave to dry for at least 2 hours before putting the hydraulic circuit into water.
naar zwembad
van zwembad
uitgang
ingang
11
3.3 Installation layout
3.4 Connecting the condensation draining kit
While operating, the heat pump is subject to condensation. This will result in a more or less large run-off of
water, depending on the degree of humidity. To channel this flow, we recommend that you install the
condensation drainage kit.
How do you install the condensation drainage kit|?
Install the heat pump, raising it at least 10 cm with solid water-resistant pads, then connect the drainage pipe to
the opening located under the pump.
3.5 Installing the unit on noise-damping supports
In order to minimize the noise pollution associated with heat pump vibrations, it can be positioned on vibration
absorbing pads.
To do this, you simply have to position a pad between each of the unit’s feet and its support, and then fix
the heat pump to the support with suitable screws.
klep half open
klep compleet open
11
3.3 Installation layout
3.4 Connecting the condensation draining kit
While operating, the heat pump is subject to condensation. This will result in a more or less large run-off of
water, depending on the degree of humidity. To channel this flow, we recommend that you install the
condensation drainage kit.
How do you install the condensation drainage kit|?
Install the heat pump, raising it at least 10 cm with solid water-resistant pads, then connect the drainage pipe to
the opening located under the pump.
3.5 Installing the unit on noise-damping supports
In order to minimize the noise pollution associated with heat pump vibrations, it can be positioned on vibration
absorbing pads.
To do this, you simply have to position a pad between each of the unit’s feet and its support, and then fix
the heat pump to the support with suitable screws.
Tijdens bedrijf heeft de warmtepomp de neiging om condensatie te vormen. Afhankelijk
van de luchtvochtigheid veroorzaakt dit, dat grotere of kleinere hoeveelheden condensaat
ontsnappen. Om het condensaat af te voeren, adviseren wij de installatie van een conden-
saatafvoerset.
Hoe installeert u de condensaatafvoerset?
Installeer de warmtepomp met behulp van stabiele en vochtbestendige blokken op een
afstand van minimaal 10 cm van de vloer. Sluit vervolgens de meegeleverde condensaat-
leiding inclusief slangtuit onder de warmtepomp aan op de ronde opening in de bodem-
plaat / lekbak.
Zie ook pagina 126, 3.3 positie condensafvoer.
Om het geluid veroorzaakt door trilling van de warmtepomp te verminderen, kan deze op
geluiddempers worden geplaatst. Plaats eenvoudig een blok tussen de voet en de basis
van de warmtepomp en bevestig de warmtepomp vervolgens met geschikte schroeven
op de basis.
Aataansluiting conden-
saatafvoerset
3.4
Installatie van
geluiddempers
3.5
Hydraulische aansluiting
3.6
BELANGRIJKE OPMERKING:
De installatie moet worden uitgevoerd door een gekwalifi ceerde speci-
alist. Deze sectie is uitsluitend bedoeld ter informatie en moet worden
gecontroleerd en indien nodig aangepast, rekening houdend met de
installatievoorwaarden ter plekke.
Bypass Set
Een bypass-set is verplicht voor het aansluiten van de warmtepomp op het zwembad.
De set bestaat uit 3 kleppen die de stroom in de warmtepomp regelen. Tijdens onderhoud
kan de bypass de warmtepomp van het systeem loskoppelen zonder de werking van het
zwembad te onderbreken.


