background image

12

Output applications

12-6

CS665 Pro

12.2

Setting binding direction for duplex copies

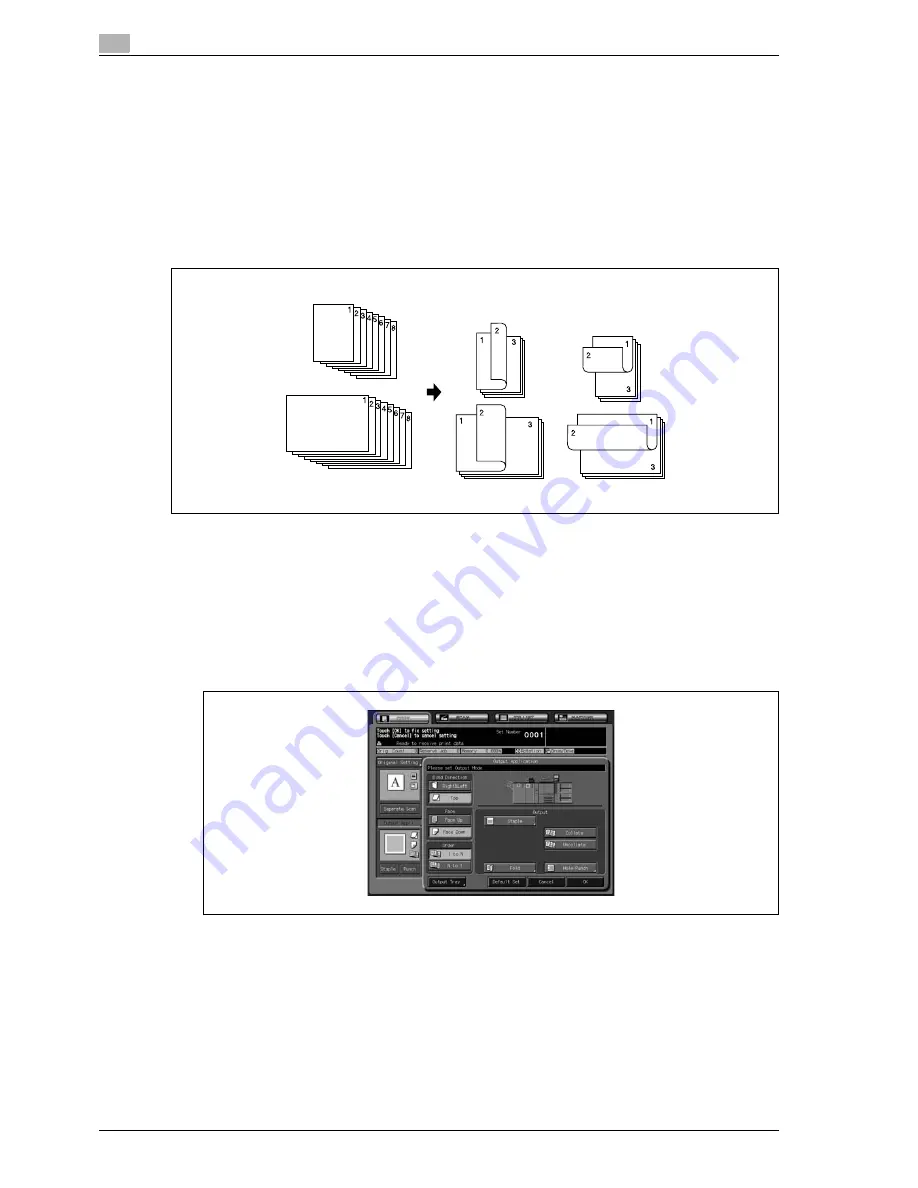
Use this function to specify the binding direction of output copies when setting duplex mode (1->2/ 2->2). 
Select [Top] when making top-bound duplex copies (printed upside down on back pages) from side-bound 
simplex/duplex originals (front and back pages have the same side up).

!

Detail 

To make side-bound duplex copies (front and back pages have the same side up) from top-bound 
duplex originals (printed upside down on back pages), use the setting for binding direction of duplex 
originals. See page 9-3 for details.

0

The top binding mode is effective only when duplex mode is selected.

0

Resetting the machine will restore the right & left binding mode.

1

Position the original.

2

Touch [Output Appli.] on the Copy Screen.

The Output Application Screen will be displayed.

3

Touch [Top] under Bind Direction to select it.

4

Touch [OK].

Binding Direction for Duplex copying

Originals

Copies

<R & L>

<Upper>

Summary of Contents for CS665 Pro

Page 1: ...Oc CS665 Pro User manual Copy Operations...

Page 2: ...Oc Oc Technologies B V makes no representation or warranties with respect to the contents hereof and specifically disclaims any implied warranties of merchantability or fitness for any particular pur...

Page 3: ...and original information 3 1 Paper information 3 3 3 2 Original information 3 13 4 Supplies handling 4 1 Loading paper 4 3 4 2 Loading cover paper 4 15 4 3 Loading tabbed sheets 4 17 4 4 Adding toner...

Page 4: ...original Direction 9 5 9 1 3 Specifying original type Image type 9 7 9 1 4 Copying mixed size originals Mixed 9 9 9 1 5 Copying Z folded original Z folded 9 10 9 1 6 Specifying original thickness Thi...

Page 5: ...t Image repeat 11 34 11 12 1 Setting repeat times automatically 11 34 11 12 2 Specifying repeat times Repeat 11 37 11 13 Eliminating copy marks along borders Frame center erase 11 39 11 14 Copying ima...

Page 6: ...ing copies in three Multi tri fold 12 61 12 9 6 Punching file holes in copies Punch 12 63 12 10 Cover sheet feeding Paper inserter 12 65 12 11 Using Finisher FS 520 FS 607 manually 12 66 12 12 Loading...

Page 7: ...1 Introduction Safety information...

Page 8: ......

Page 9: ...After reading the guide store it in the designated holder so that it can easily be referred to when questions or problems arise during operation The illustrations used in this guide may appear slight...

Page 10: ...ro User s guide POD Administrator s reference This guide provides you with detailed information about the machine management and how to customize the machine according to your daily use Please refer t...

Page 11: ...0 minutes 90 minutes 120 minutes or 240 minutes This function can be disabled in the user setting or Machine Administrator setting Automatic shut off This function achieves further energy conservation...

Page 12: ...tion Inc 59 Temple Place Suite 330 Boston MA 02111 1307 USA Everyone is permitted to copy and distribute verbatim copies of this license document but changing it is not allowed Preamble The licenses f...

Page 13: ...f this License along with the Program You may charge a fee for the physical act of transferring a copy and you may at your option offer warranty protection in exchange for a fee 2 You may modify your...

Page 14: ...full compliance 5 You are not required to accept this License since you have not signed it However nothing else grants you permission to modify or distribute the Program or its derivative works These...

Page 15: ...ALITY AND PERFORMANCE OF THE PROGRAM IS WITH YOU SHOULD THE PROGRAM PROVE DEFECTIVE YOU ASSUME THE COST OF ALL NECESSARY SERVICING REPAIR OR CORRECTION 12 IN NO EVENT UNLESS REQUIRED BY APPLICABLE LAW...

Page 16: ...e it does Less to protect the user s freedom than the ordinary General Public License It also provides other free software developers Less of an advantage over competing non free programs These disadv...

Page 17: ...nt an application does not supply such function or table the facility still operates and performs whatever part of its purpose remains meaningful For example a function in a library to compute square...

Page 18: ...ng that work also fall under Section 6 whether or not they are linked directly with the Library itself 6 As an exception to the Sections above you may also combine or link a work that uses the Library...

Page 19: ...omatically receives a license from the original licensor to copy distribute link with or modify the Library subject to these terms and conditions You may not impose any further restrictions on the rec...

Page 20: ...DATA OR DATA BEING RENDERED INACCURATE OR LOSSES SUSTAINED BY YOU OR THIRD PARTIES OR A FAILURE OF THE LIBRARY TO OPERATE WITH ANY OTHER SOFTWARE EVEN IF SUCH HOLDER OR OTHER PARTY HAS BEEN ADVISED O...

Page 21: ...A PARTICULAR PURPOSE ARE DISCLAIMED IN NO EVENT SHALL THE OpenSSL PROJECT OR ITS CONTRIBUTORS BE LIABLE FOR ANY DIRECT INDIRECT INCIDENTAL SPECIAL EXEMPLARY OR CONSEQUENTIAL DAMAGES INCLUDING BUT NOT...

Page 22: ...WARRANTIES INCLUDING BUT NOT LIMITED TO THE IMPLIED WARRANTIES OF MERCHANTABILITY AND FITNESS FOR A PARTICULAR PURPOSE ARE DISCLAIMED IN NO EVENT SHALL THE AUTHOR OR CONTRIBUTORS BE LIABLE FOR ANY DIR...

Page 23: ...tion Creates a multiple page signature booklet copied on both sides of paper in 1 2 or 2 2 copy mode Chapters Starts chapter pages on the right side front pages of the finished document Only duplex mo...

Page 24: ...tically selects the paper size of each original Auto Zoom mode allows you to select one paper size for all originals Mode memory Programs up to 30 jobs and recalls each job by job number as needed All...

Page 25: ...reduces image to prevent image loss reduce shift amount from 0 250mm in 1mm increments Program overlay Same as for Image Overlay except the overlay image is stored in memory Power save Automatically t...

Page 26: ...t of the original to be printed on the same part of the tabbed copy paper Weekly timer Can be set according to the needs of each work environment Turns main body power Off On daily or weekly during lu...

Page 27: ...ral Identification cards badges or insignias Copyrighted works without permission of the copyright owner In addition it is prohibited under any circumstances to copy domestic or foreign currencies or...

Page 28: ...old waste Please refer to the information of your local community or contact our dealers regarding the proper handling of end of life electric and electronic equipment Recycling of this product will h...

Page 29: ...contents of this section may not correspond with the purchased product Warning and precaution symbols The following indicators are used on the warning labels or in this guide to categorize the level o...

Page 30: ...the laser beam source could cause blindness Warning Symbol Use only the power cord supplied in the package If a power cord is not supplied only use the power cord and plug that is specified in POWER...

Page 31: ...t connecting to inadequate power supply volt age current capacity grounding and may result in fire or shock If proper wall outlet is not available the customer shall ask qualified electrician for the...

Page 32: ...ug and plug in the power cord with a wet hand as an electrical shock could result Plug the power cord all the way into the power outlet Failure to do this could result in a fire or electrical shock Ca...

Page 33: ...er cord from the power outlet and then call your authorized service representative Caution Symbol After installing this product mount it on a secure base If the unit moves or falls it may cause person...

Page 34: ...shock could result Do not keep using this product if this product has been dropped or its cover damaged Immediately turn OFF the power switch unplug the power cord from the power outlet and then call...

Page 35: ...d other ca bles Failure to do this could damage the cord or cable resulting in a fire electrical shock or breakdown When moving this product always hold it by the locations specified in the user s gui...

Page 36: ...ctor Do not touch melted hot paste as it may cause burn injury If it sticks on your skin cool that part of the skin with cold water immediately and consult a doctor Do not touch the paste tank unit im...

Page 37: ...armful interference in which case the user will be required to correct the interference at his own expense 7 WARNING The design and production of this unit conform to FCC regulations and any changes o...

Page 38: ...rdiodens h jeste styrke er 15 mW og b lgel ngden er 775 800 nm For Norway users 7 ADVARSEL Dette en halvleder laser Dersom apparatet brukes p annen m te enn spesifisert i denne bruksanvisning kan bruk...

Page 39: ...CS665 Pro 1 33 Introduction Safety information 1...

Page 40: ...ce largement ventil e Une quantit d ozone n gligable est d gag e pendant le fonctionnement de l appareil quand celui ci est utilis normalement Cependant une odeur d sagr able peut tre ressentie dans...

Page 41: ...mation 1 1 9 Caution notations and labels Safety precaution notations and labels appear on this machine at the following positions Be very careful that an accident does not occur when operations such...

Page 42: ...1 Introduction Safety information 1 36 CS665 Pro...

Page 43: ...CS665 Pro 1 37 Introduction Safety information 1...

Page 44: ...tion labels or notations If any caution label or caution notation is soiled please clean to make legible If you cannot make them legible or if the caution label or notation is damaged please contact y...

Page 45: ...ments detailed below To whole machine may weigh approx 1 180 5 kg at maximum depending on the combination of options Be sure to choose a level and solid floor for the installation place Combination si...

Page 46: ...1 Introduction Safety information 1 40 CS665 Pro Unit mm Unit mm main body DF 609 PF 602 side view main body DF 609 PF 602 SD 506 side view...

Page 47: ...CS665 Pro 1 41 Introduction Safety information 1 Unit mm Unit mm Unit mm main body DF 609 PF 602 RU 504 FS 521 main body DF 609 PF 602 RU 504 FD 503 main body DF 609 PF 602 RU 504 SD 506...

Page 48: ...troduction Safety information 1 42 CS665 Pro Unit mm Unit mm Unit mm main body DF 609 PF 602 RU 504 LS 505 main body DF 609 PF 602 RU 504 FD 503 SD 506 FS 521 main body DF 609 PF 602 RU 504 FD 503 SD...

Page 49: ...CS665 Pro 1 43 Introduction Safety information 1 Unit mm Unit mm main body DF 609 PF 602 RU 504 LS 505 PB 501 PB 502 main body DF 609 PF 602 RU 504 SD 506 PB 501 PB 502...

Page 50: ...1 Introduction Safety information 1 44 CS665 Pro Unit mm Unit mm main body DF 609 PF 602 RU 504 FD 503 SD 506 PB 501 PB 502 main body DF 609 PF 602 RU 504 PB 501 PB 502...

Page 51: ...CS665 Pro 1 45 Introduction Safety information 1 Unit mm Unit mm main body LU 202 RU 504 FS 521 main body LU 202 RU 504 FD 503 FS 521...

Page 52: ...er Be sure to allow a clearance of 200 mm or more at the back of this machine for the ventilation duct Unit mm Unit mm Unit mm main body DF 609 LU 202 FS 607 PI 502 main body DF 609 LU 202 FS 520 PI 5...

Page 53: ...ctuations as possible Operating environment The environmental requirements for correct operation of the machine are as follows Operating temperature 10 C 50 F to 30 C 86 F Humidity 10 to 80 Storage of...

Page 54: ...1 Introduction Safety information 1 48 CS665 Pro...

Page 55: ...2 Preparation for use...

Page 56: ......

Page 57: ...on screens See page 8 3 for details 5 Control panel Use to specify the various settings and perform operations such as starting copying See page 8 3 for details 6 Work table Provides a convenient work...

Page 58: ...per No Name Description 1 2 3 4 5 6 No Name Description 1 Conveyance fixing unit Withdrawn for removal of mishandled paper For handling levers and knobs of this unit follow the instruction on the scre...

Page 59: ...5 Hold 3 000 sheets of SRA3 w SRA4 w v A3 w B4 w A4 w v B5 w v A5 w v B6 w A6 w 13 e 19 w 12 e 18 w 11 e 17 w 8 5 e 14 w 8 5 e 11 w v plain paper 80 g m2 Load the paper of 64 g m2 to 300 g m2 3 Tray...

Page 60: ...ever Can be moved downward to ease removal of mishandled paper 2 Tray top door Opens to allow paper loading or removal of mishandled paper 3 Tray left side door Opens to allow removal of mishandled pa...

Page 61: ...sed to suspend the current output job in order to take out printed sheets from the tray To restart the output job press Start on the con trol panel 6 Inlet lever Opens leftward to remove mishandled pa...

Page 62: ...2 Preparation for use 2 8 CS665 Pro Folding unit FD 503 1 2 3 4 5 6 7 8 12 1 2 3 4 5 6 7 9 10 8 9 11 9...

Page 63: ...o Name Description 1 Inlet lever Opens leftward to remove mishandled paper 2 Post inserter conveyance lever be hind the inlet lever Opens leftward to remove mishandled paper 3 Waste basket Holds waste...

Page 64: ...ker goes down in order to allow takeout of printed sheets 5 Paper removal button Pressed to take out printed sheets from the stacker 6 Large capacity stacker door Opens to take out printed sheets from...

Page 65: ...s downward to remove mishandled paper 13 Stacker Holds sets output in Non sort mode or Collate mode offset 14 Outlet lever Opens downward to remove mishandled paper 15 Carriage Carries paper together...

Page 66: ...ove mishandled paper 3 Multi tri folding mode tray Holds sets output in multi tri folding mode 4 Secondary Sub tray Holds non sorted sets output from the machine on the right side of the Saddle stitch...

Page 67: ...mishandled paper 5 Inlet lever Opens leftward to remove mishandled paper 6 Feeding knob Can be turned clockwise to feed mishandled paper to the Folding unit 7 Folding unit conveyance lever Opens righ...

Page 68: ...uck inside the paste hopper 2 Secondary Sub tray Holds sets output without being processed by the perfect binder 3 Front door of Perfect binder PB 501 PB 502 Opens to remove mishandled paper and waste...

Page 69: ...Cover conveyance lever left Opens upward to remove mishandled cover sheet 9 Cover conveyance lever right Opens leftward to remove mishandled cover sheet 10 Cover conveyance lever lower Opens leftward...

Page 70: ...cription 1 Finisher door Opens to the internal finisher to allow clearing mishandled paper re plenishing staples and emptying waste basket of punch kit 2 Primary Main tray Holds sets output in Non sor...

Page 71: ...mishandled paper 3 Punch kit PK 512 PK 513 option Punches file holes in the output copies 4 Entrance lever Opens downward to remove mishandled paper 5 Stacker conveyance lever Opens lower leftward to...

Page 72: ...l finisher to allow clearing mishandled paper re plenishing staples and emptying waste basket of punch kit 2 Folding mode tray Holds sets output in Multi Half Fold mode Fold Staple mode or Multi Tri F...

Page 73: ...andled paper 5 Waste basket option Holds waste paper punched out 6 Stacker unit Folds or folds staples copies into booklet styled sets and also folds max 3 copies in three 7 Knob Can be turned to ease...

Page 74: ...Upper unit release lever Can be moved to slide the upper unit of paper inserter for removal of mishandled paper 3 Upper tray guide plates Hold cover sheets to fix the position 4 Upper tray Holds cover...

Page 75: ...CS665 Pro 2 21 Preparation for use 2 Standard optional equipment main body FD 503 LS 505 SD 506 LS 505 LS 505 FD 503 SD 506 FD 506 HD 506 IC 305 IC 304 PF 602 HT 504 RU 504 DF 609 OC 506...

Page 76: ...2 Preparation for use 2 22 CS665 Pro main body HD 506 IC 305 IC 304 PF 602 HT 504 RU 504 DF 609 OC 506 SD 506 IC 408...

Page 77: ...CS665 Pro 2 23 Preparation for use 2 main body FS 521 FS 521 FD 503 FS 521 LS 505 FS 521 SD 506 FS 521 SD 506 FD 503 HD 506 IC 305 IC 304 PF 602 HT 504 RU 504 DF 609 OC 506...

Page 78: ...main body PB 501 PB 502 PB 501 PB 502 SD 506 PB 501 PB 502 SD 506 FD 503 PB 501 PB 502 LS 505 HD 506 IC 305 IC 304 PF 602 HT 504 RU 504 DF 609 OC 506 main body FS 521 FS 521 FD 503 HD 506 IC 305 IC 30...

Page 79: ...CS665 Pro 2 25 Preparation for use 2 main body FS 607 FS 520 HD 506 IC 305 IC 304 LU 202 HT 503 OT 502 DF 609 OC 506 IC 408 PI 502 PI 502 PK 512 PK 513 PK 512 PK 513 PF 602 HT 504...

Page 80: ...ontrol panel will light in red 2 Turn on the sub power switch The sub power switch is located at the front of the main body When the sub power switch is turned on the Power LED will turn green 3 The W...

Page 81: ...main power switch in usual operation 0 When the machine is under control of the Weekly Timer function do not turn off the sub power switch Turning it off will deactivate the function 1 Turn off the su...

Page 82: ...riginal Setting Normal Color Full color Zoom 1 000 Application None Quality Adjustment Standard Output Application Selection available in the Utility mode Simplex Duplex 1 1 Paper Setting Auto Detail...

Page 83: ...Off See the following description for details This function can also be activated manually For details see page 2 31 Automatically conserving energy Auto low power This function conserves energy by l...

Page 84: ...Shut Off follows Auto Low Power after a specified period initially 30 minutes of copier inactivity with the Power Save LED lit and all other LEDs on the control panel and touch panel turned off The Po...

Page 85: ...ger otherwise the following message will be displayed and the Shut Off Low Power mode will not be activated Press POWER SAVER more than one second then release it for Shut off mode Keep POWER SAVER pr...

Page 86: ...d is not entered Or if the following message is displayed proceed to step 3 Input desired copy time hour s minute s 2 Enter the Timer Interrupt password then press Start Enter a 4 digit Timer Interrup...

Page 87: ...password section name and or section password specified by the administrator are verified Copy quantity limit for each section can also be set When the machine is turned on one of the following User...

Page 88: ...n name max 8 characters and or 8 digit section password 2 Touch OK Check that the screen message changes to Ready for copy 3 Start machine operation Normal copying printing scanning job is available o...

Page 89: ...3 Paper and original information...

Page 90: ......

Page 91: ...machine without finisher Refer to the following information on paper capacity for each Paper weight 2 Reminder Be sure to use paper only of the weight specified for the tray otherwise copy quality may...

Page 92: ...m2 Double Parallel Gate Fold 64 to 91 g m2 Large Capacity Stacker LS 505 Secondary sub tray 64 to 300 g m2 Stacker 64 to 256 g m2 Saddle stitcher SD 506 Secondary sub tray 64 to 300 g m2 Saddle stitch...

Page 93: ...m2 SRA3 w SRA4 w v A3 w B4 w Foolscap 8K w 13 e 19 w 12 e 18 w 11 e 17 w 8 5 e 14 w Primary main tray Staple Max 100 sheets 80 g m2 per set 2 9 sheets stapled 150 sets 10 20 sheets stapled 50 sets 21...

Page 94: ...y fully withdrawn Trimming Max trimmed sheets 50 sheets 80 g m2 e 2 or 49 sheets 80 g m2 1 200 g m2 e 2 Multi Half Fold Max folded sheets 5 sheets 80 g m2 Tray capacity 30 sets Saddle stitcher tray Mu...

Page 95: ...8 5 w v 2 500 sheets 80 g m2 A4 w v B5 w v 16K w v 8 5 e 11 w v 7 25 e 10 5 w v 1 500 sheets 80 g m2 A3 w B4 w Foolscap 8K w v 12 e 18 w 11 e 17 w 8 5 e 14 w Primary main tray Staple Max 50 sheets 60...

Page 96: ...e to limit the pagination to 30 sheets or 29 sheets 1 200 g m2 Finisher FS 520 information Up to 2 cover sheets 200 g m2 max can be inserted from paper inserter In this case the stapling capacity ment...

Page 97: ...5 Lower tray Max 330 mm e 487 mm to Min 100 mm e 148 mm Tab Paper A4 v 8 5 e 11 v Tray 4 Large Capacity Unit LU 202 Standard Size SRA3 w SRA4 w v A3 w B4 w A4 w v B5 v 13 e 19 w 11 e 17 w 8 5 e 11 v...

Page 98: ...w 11 e 17 w 8 5 e 14 w 8 5 e 11 w Custom Size Max 305 mm e 458 mm to Min 210 mm e 279 mm Primary main tray normal Standard Size SRA3 w SRA4 w v A3 w B4 w Foolscap A4 w v B5 w v A5 w v B6 w A6 w 8K w...

Page 99: ...m Size Max 330 mm e 487 mm to Min 100 mm e 148 mm Tab Paper A4 v 8 5 e 11 v Primary main tray normal Standard Size SRA3 w 1 SRA4 w A3 w B4 w Foolscap A4 w v B5 w v A5 w 1 v B6 w 1 8K w 16K w v 12 e 18...

Page 100: ...functioned Tray Priority is available Select On at 03 ATS Permit Setting Select the paper type setting of the tray which is automatically selected when ATS functions at 04 Auto Paper Type Load the fo...

Page 101: ...on paper thicker than 50 g m2 during double sided copying Original that are bound for example with staples or paper clips Original that are bound in a book or booklet Original that are bound together...

Page 102: ...iginal 35 g m2 to 210 g m2 Double sided original 50 g m2 to 210 g m2 Use the Thick original mode to copy original thicker than 129 g m2 Use the Thin original mode to copy original thinner than 50 g m2...

Page 103: ...v 11 e 17 w 8 5 e 14 w 8 5 e 11 w v 5 5 e 8 5 w v Original weight Single sided original 35 g m2 to 210 g m2 Double sided original 50 g m2 to 210 g m2 Use the Thick original mode to copy original thic...

Page 104: ...3 Paper and original information 3 16 CS665 Pro...

Page 105: ...4 Supplies handling...

Page 106: ......

Page 107: ...in a tray becomes empty the indicator blinks on the tray key Follow the procedure below to supply the empty tray with copy paper 2 Reminder Paper setting for each tray can be made from the Machine St...

Page 108: ...se the paper feed roller may not open or machine trouble may be caused 2 Open the paper feed roller To load the same size as loaded before proceed to step 4 If changing the paper size proceed to the n...

Page 109: ...per misfeed may be caused 6 When paper is seated properly close the paper feed roller 7 Gently push in the tray until it locks into place The indicator on the Machine Status Screen or Copy Screen will...

Page 110: ...and adjust the paper guides to the paper size Do not load more than 250 sheets 80 g m2 or above the limit indicated on the paper guides otherwise paper misfeed may be caused The indicator on the Machi...

Page 111: ...t side lining of the tray Pushing the guide lock release lever move the front edge guide to the edge of the paper 6 When paper is seated properly close the paper feed roller 7 Push in the tray until i...

Page 112: ...annot detect those paper sizes 0 Be sure that the machine is powered ON before withdrawing the tray 0 Only one tray can be withdrawn at a time 0 If you want to use another paper than any loaded in the...

Page 113: ...edge is aligned with the left side lining of the tray Pushing the guide lock release lever move the front edge guide to the edge of the paper 6 Push in the tray 5 until it locks into place The indicat...

Page 114: ...s up completely The bottom plate of the tray automatically goes up when returned in position When that automation is completed the paper amount indicator on the Machine Status Screen and Copy Screen c...

Page 115: ...uide to the edge of the paper 8 Push in the tray until it locks into place The indicator on the Machine Status Screen or Copy Screen will change 2 Reminder Do not load above the limit level and carefu...

Page 116: ...used See page 9 33 for details 1 Open the tray top door The tray bottom plate will go up To load the same size as loaded before proceed to step 3 If changing the paper size proceed to the next step 2...

Page 117: ...ccording to the size indication on the size indication on the bottom plate Turn the two rear stopper knobs clockwise to fix the rear stopper 3 Load paper into the tray 4 Press the paper loading button...

Page 118: ...65 Pro 2 Reminder Do not load above the limit indicated on the tray paper guides Be sure that the rear stopper is correctly positioned according to the paper size to be loaded otherwise paper misfeed...

Page 119: ...the perfect binder tray To use the other trays as cover tray source load cover paper into the desired tray referring to page 4 4 and page 12 19 The paper setting for loaded cover paper will be require...

Page 120: ...hen paper is seated properly close the paper feed roller 6 Push in the tray until it locks into place 2 Reminder Do not load above the limit level and carefully load the paper to be seated under the p...

Page 121: ...ets on the tray Place paper referring to the illustration shown above 4 Move the side guide plates to the edge of the paper Set paper aligning it to the paper feed roller side of the tray Press the re...

Page 122: ...he right side of the machine 2 Specify the paper type as tabbed sheets for the bypass tray See page 9 33 for specifying the paper type of the bypass tray 3 Place tabbed sheets on the tray Place paper...

Page 123: ...ve the side guide plates to the edge of the paper Set paper aligning it to the paper feed roller side of the tray Press the release lever of the front side guide plate to move the side guide plates an...

Page 124: ...of tray 4 as tabbed sheets 2 Open the tray top door 3 Press the paper loading button to lower the tray bottom plate 4 Move the tray paper guides and rear stopper to the edge of the paper Set paper ali...

Page 125: ...toner bottle 2 Reminder Use the same number toner bottle as described on the label applied on the toner bottle cover Otherwise machine trouble may be caused 7 WARNING Precaution for the empty toner bo...

Page 126: ...empty toner bottle 3 Partially withdraw the toner bottle then turn it to set the up arrow mark at the top 4 Fully withdraw the toner bottle straightforward to remove the bottle 5 Loosen toner in the n...

Page 127: ...mark at the top and aligning the two hollow parts of the toner bottle with the salients on the bottle entrance fully insert the new toner bottle until it locks in place 8 Close and lock the toner bot...

Page 128: ...ery Box indicator on the Machine Status Screen will light Follow the procedure below to exchange the toner recovery box 7 WARNING Precaution for the toner recovery box If it is thrown into a fire the...

Page 129: ...icker Remove the sticker from the toner recovery box then put it on the used toner inlet 4 Set the new toner recovery box then close the toner recover box door 2 Reminder Be sure to completely cover t...

Page 130: ...ish staples Inserting a new staple cartridge into Finisher FS 521 When the staple cartridge of the Finisher FS 521 becomes empty the Staple Cartridge indicator lights in red in the option status area...

Page 131: ...Open the staple cartridge cover then set the staple roll into the cartridge Close the cover then remove the lock tape pulling it in horizontal direction 5 Set the staple cartridge Return the staple c...

Page 132: ...her is empty the Staple Cartridge indicator lights in red in the option status area of the Machine Status Screen If printing job is in progress a message will be displayed on the Copy Screen Follow th...

Page 133: ...CS665 Pro 4 29 Supplies handling 4 3 Set the new cartridge Check that the top side of the staple cartridge is up otherwise it cannot be inserted 4 Close the left side door of the Saddle stitcher...

Page 134: ...dicator lights in red in the option status area of the Machine Status Screen Follow the procedure below to replenish staples 1 Open the Finisher door 2 Pull out the stacker unit Pull out the stacker u...

Page 135: ...le cartridge 5 Insert the new staple case into the staple cartridge Do not remove the staples remaining inside the cartridge otherwise the first sheet output after the replenishment will not be staple...

Page 136: ...the Finisher FS 607 becomes empty the Staple Cartridge indicator lights in red in the option status area of the Machine Status Screen Follow the procedure below to replenish staples 1 Open the Finishe...

Page 137: ...he empty staple case from the staple cartridge 5 Insert the new staple case into the staple cartridge Firmly insert the staple case into the staple cartridge while aligning the arrow sides of both cas...

Page 138: ...34 CS665 Pro 6 Set the staple cartridge Insert the cartridge while sliding it along the stapler rail then push down and in to secure it in place 7 Return the stacker unit to its original position 8 Cl...

Page 139: ...he job immediately and the binding operation also becomes unavailable 2 Reminder Be sure to use the paste GC 501 exclusively provided for Perfect binder PB 501 PB 502 Handle melted hot paste with grea...

Page 140: ...ag 2 Open the paste hopper cover 3 Supply the paste hopper with paste pellet 4 Close the paste hopper cover 2 Reminder Do not add the paste pellet above the limit level indicated inside the paste hopp...

Page 141: ...ollow the procedure below to dispose punch waste Emptying waste basket of Folding unit FD 503 When the waste basket of Folding unit FD 503 becomes full the Punch Waste Basket indicator lights in red i...

Page 142: ...4 Supplies handling 4 38 CS665 Pro 3 Return the waste basket to its original position then close the Folding unit door securely...

Page 143: ...Punch kit PK 512 PK 513 installed in Finisher FS 520 FS 607 becomes full the Punch Waste Basket indicator lights in red in the option status area of the Machine Status Screen Follow the procedure bel...

Page 144: ...4 Supplies handling 4 40 CS665 Pro 4 Return the waste basket to its original position then close the Finisher door securely...

Page 145: ...full the Trim Waste indicator lights in red in the option status area of the Machine Status Screen If printing job is in progress a message will be displayed on the Copy Screen Follow the procedure be...

Page 146: ...4 42 CS665 Pro 4 Close the top cover of the waste basket then return it to its original position 2 Reminder Be sure to return the waste basket to its original position otherwise the trimming function...

Page 147: ...becomes full the Trim Dust indicator lights in red in the option status area of the Machine Status Screen If printing job is in progress a message will be displayed on the Copy Screen Follow the proce...

Page 148: ...iginal position 5 Close the front door of the perfect binder 2 Reminder Do not open the front door while machine operation is in progress otherwise a paper jam may be caused Be sure to confirm that th...

Page 149: ...per in position when moving the carriage To remove finished sets 1 Press the Paper removal button The stacker unit will move down to the carriage 2 Open the large capacity stacker door Once the stacke...

Page 150: ...e capacity stacker Once lowering the stacker unit for the purpose of removing mishandled paper or checking output sheets be sure to remove all the sheets from the carriage If the carriage is returned...

Page 151: ...holder Pull the two projections of paper stopper to the holder then raise the other side as illustrated 3 Hold the paper using the paper stopper Turn the paper stopper to the paper 4 Push down the pap...

Page 152: ...4 Supplies handling 4 48 CS665 Pro 6 Return the paper stopper to its original position Return the paper stopper properly otherwise the Stacker door may not be closed...

Page 153: ...essed till the LED starts blinking To let the LED blink keep the Suspension button pressed for approximately one second The machine temporarily stops printing and then the LED of the Suspension button...

Page 154: ...Supplies handling 4 50 CS665 Pro To cancel the suspended job 1 Press Stop on the control panel A popup menu will be displayed for selecting whether or not to cancel the suspended job 2 Touch Stop Job...

Page 155: ...5 Troubleshooting...

Page 156: ......

Page 157: ...ake note of the report code number C indicated in the second line of the message area 2 Turn OFF the sub power switch and main power switch 3 Unplug the machine 4 Contact your service representative a...

Page 158: ...e for machine repair immediately 1 If the limited use of the copier is available the following message is displayed in the message area instead of the report code ex Tray 2 failure Press Reset to sele...

Page 159: ...be displayed Follow the procedure below for recovery To clear the stuck paste pellets 1 Open the paste hopper cover 2 Raise the pellet stacking correction lever 3 Push in the pellet stacking correcti...

Page 160: ...Pro 5 Close the paste hopper cover Detail If this action for recovery fails the message Please Call Service SC15 17 will be displayed on the touch panel Service Call Screen Please contact your service...

Page 161: ...priority Action to remove mishandled paper is displayed in the message area and touching Illustration will display subsequent screens for the disposal action Follow the procedure below to remove misha...

Page 162: ...rface 3 When completed the Machine Status Screen will be restored If any misfeed location is left the Jam Position Screen will be restored with the next disposal procedure in the message area and the...

Page 163: ...and follow the instruction on the screen Paper misfeed If a paper misfeed occurs with the print scan job in progress while you are setting a reserve job the machine stops operation and the MACHINE tab...

Page 164: ...ss Start Copy paper will be delivered from newly selected tray to continue the printing operation To supply the empty tray with paper 1 Load paper in the empty tray 2 Touch Close to restore the Machin...

Page 165: ...d tray should be replaced according to the paper setting specified in print data setting and displays the following popup screen Follow the procedure for each to continue the machine operation 1 Repla...

Page 166: ...scanning the first job the machine immediately stops and displays one of the following popup menus 1 When memory overflow occurs while scanning the first job the machine immediately stops and displays...

Page 167: ...reserve job but print out all the data already scanned into memory touch Stop Scan To print out all the data already scanned for the reserve job and continue scanning as the current job gradually ena...

Page 168: ...nal of the copier Please turn power Off On will be displayed in the message area Follow the procedure below to turn the machine power off then on To turn machine power off on 1 Turn OFF the sub power...

Page 169: ...r Large capacity stacker door completely COPYING DOES NOT RESUME AFTER MISHANDLED PAPER IS REMOVED Check copier diagram on touch panel for additional indications of mishandled paper COPY QUALITY IS PO...

Page 170: ...ISHER STAPLE RESULT IS NOT AS EXPECTED The 2 staple position functions only on copy paper that is loaded vertically por trait style Check to see if Rotation functions Release it if necessary COPIES SK...

Page 171: ...6 Maintenance...

Page 172: ......

Page 173: ...th a soft dry cloth The glass may also clean with a soft cloth dampened slightly with water if it is difficult to clean Cleaning the ADF guide cover Keep the ADF guide cover clean otherwise soil marks...

Page 174: ...detergent 2 Reminder Be sure to turn off the main power switch before cleaning it Cleaning the control panel Clean the control panel with a soft dry cloth 2 Reminder Pressing too hard on the control...

Page 175: ...nd editing the CMS part count list part name P N limit and also resetting the count For details please contact your service representative If the machine is installed with Perfect binder PB 501 PB 502...

Page 176: ...be displayed If printed list is not desired touch Exit to exit the Utility mode and restore the previous screen 5 Print the counter list Touch COPY tab to display the Copy Screen Select the desired p...

Page 177: ...ray stand Never fail to open the tray stand otherwise the machine may be damaged 2 Clean the surface of the two conveyance belts with a soft cloth dampened slightly with alcohol cleaner 3 Move the con...

Page 178: ...ottom plate with a soft cloth slightly dampened with alcohol cleaner 5 Return the tray stand to its original position then return the saddle stitcher tray 2 Reminder Be sure to clean the whole round o...

Page 179: ...appears on the right side of Trim Waste indicator in the option status area of Machine Status Screen If the above message is displayed please contact your service representative Detail The machine man...

Page 180: ...hen preventive maintenance is due a message and the PM icon will prompt you to contact your service representative for maintenance Detail The machine manager can call for service using the Utility set...

Page 181: ...ion in adhesiveness resulting in poor binding performance Precautions for Perfect binder Use only the paste GC 501 for this binder Handle melted hot paste only with great care If you need to clean or...

Page 182: ...6 Maintenance 6 12 CS665 Pro...

Page 183: ...7 Specifications...

Page 184: ......

Page 185: ...0 dpi Printing resolution 600 dpi e 600 dpi 1 800 dpi when selecting printer smoothing func tion Gradation Color 256 8 bits C M Y K Paper types Main body trays tray1 to 3 64 g m2 to 209 g m2 64 g m2 t...

Page 186: ...p sizes and K series sizes can also be detected by switching them for other de tectable sizes in Paper Setting Image blank Leading edge front and rear Less than 2 0 mm 2 0 mm Trailing edge Less than 1...

Page 187: ...uration 2 paper trays Paper sizes SRA3 w SRA4 w v A3 w B4 w A4 w v B5 w v A5 v B6w 13 e 19 w 12 e 18 w 11 e 17 w 8 5 e 14 w 8 5 e 11 w v 5 5 e 8 5 w A5 v and B6 w are only loaded in tray 5 Paper type...

Page 188: ...e 1 020 H mm Weight Approx 110 kg Item Description Name FS 521 Finisher type Offset catch tray Function Straight delivery collated uncollated Offset delivery collate and offset uncollate and offset St...

Page 189: ...e p 3 5 for details Power source Supplied from finisher Dimensions 400 W e 723 D e 1 231 H mm Width including primary main tray 667 mm 784 mm pulled out Weight Approx 130 kg Item Description Name SD 5...

Page 190: ...pes Perfect binder tray Plain Fine body Fine Coated cover Secondary sub tray Plain Fine Coated Special Labels Tab paper Stack capacity Cover feeding Tray 1 000 sheets 82 g m2 5 00 sheets 162 g m2 Perf...

Page 191: ...ays 1 to 5 or bypass tray Paper Types Primary main tray 60 to 105 g m2 See p 3 3 for details Paper Sizes See p 3 9 for details Paper tray capacity See p 3 5 for details Maximum power consumption 80 W...

Page 192: ...7 Specifications 7 10 CS665 Pro Other options Original cover OC 506 Dehumidification fan heater HT 503 504 Hard disk unit HD 506 Relay unit RU 504 Image controller...

Page 193: ...8 Before making copies...

Page 194: ......

Page 195: ...memory 5 Proof Copy key Prints a single set of sample copy to check whether the current set tings are specified properly 6 Start key Activates various machine operations 7 Start LED Lights in green w...

Page 196: ...Screen that provides information on the currently se lected function 15 Power Save key Enables temporary use of the machine when the Power Save LED is lit or activates power saving mode for times when...

Page 197: ...ndicates the print quantity entered from the control panel keypad 9 Application key Touched to select various application functions 10 MACHINE tab Used to display the Machine Status Screen 11 Output i...

Page 198: ...rea Displays the icon of the original settings currently specified 24 Original Setting key Touched to specify the condition of the original to be scanned 25 Machine status icons Display to indicate va...

Page 199: ...paper sizes loaded in the Post inserter The currently selected tray will be indicated in different color 8 Job list Displays the current status of the jobs to be operated on the machine 9 PB heater k...

Page 200: ...es 8 8 CS665 Pro 18 Message area Displays messages concerning machine status With Perfect binder PB 501 PB 502 installed also indicates the current state of the equip ment such as warming up shut off...

Page 201: ...1 Position the original For details on positioning the original see page 8 12 2 Display Copy Screen Touch COPY tab on the Machine Status Screen to display the Copy Screen 3 Set copy conditions as desi...

Page 202: ...rol panel When the machine starts scanning the original the current job status will be displayed on the popup menu The reserve job setting is available from this popup menu Touch Yes or Close to retur...

Page 203: ...achine Status Screen initially selected or the Copy Screen The popup menu will vary depending on this selection The Job List Screen is provided to change the operation order of reserve jobs or cancel...

Page 204: ...erwise the selected copy conditions may be altered automatically 0 Do not load more than 100 sheets of the original or over the limit line indicated on the paper guides otherwise the original may be m...

Page 205: ...depth as shown in the illustration 2 Position the original FACE UP with page one UP in the ADF The direction of the original should conform to the original direction icon displayed on the Copy Screen...

Page 206: ...l on original glass Use the original glass when the original is not suitable for use with the ADF e g when size is incompatible or when the original is folded stapled torn or in generally poor conditi...

Page 207: ...e of the procedure unless the control panel keypad is temporarily used for entering other values Enter the desired print quantity from the control panel keypad Entered quantity will be displayed on th...

Page 208: ...y Screen to check that the message Ready to set reserve job is displayed in the message area A few seconds after the Wake up Screen appears on the touch panel the Machine Status Screen will be display...

Page 209: ...ndicated at the upper right corner of the screen Detail The screen to be displayed after machine power is turned on can be selected either from the Machine Status Screen initially selected or the Copy...

Page 210: ...pup menu displayed right after pressing Start for scanning the original of reserve job the current job cannot be canceled even if Stop is pressed According to the procedure on page 8 21 touch an appro...

Page 211: ...Job to cancel the job or touch Continue to complete the job 2 Reminder Touching Stop Job will delete all the scanned data Batch printing is in progress Touch Stop Job to cancel the job or touch Conti...

Page 212: ...making copies 8 20 CS665 Pro Scanning and printing the job using program job Touch Stop Job to cancel the job or touch Continue to complete the job 2 Reminder Touching Stop Job will delete all the sca...

Page 213: ...play the Copy Screen as the initial screen touch MACHINE tab to restore the Machine Status Screen 3 Press Stop Machine operation will be ceased and the following popup menu will be displayed 4 Select...

Page 214: ...8 Before making copies 8 22 CS665 Pro...

Page 215: ...9 Basic job settings...

Page 216: ......

Page 217: ...pied sets will be exactly the same in page arrangement as the originals Use this function to obtain the single or double sided copies having the same edge as page top from double sided originals print...

Page 218: ...binding direction of copies in Output Application setting automatically For details see the User s guide POD Administrator s reference 1 Position the original 2 Touch Original Setting on the Copy Scre...

Page 219: ...s Key Description Select for the original positioned with the top to ward the rear of the machine Initially selected as factory default Select for the original positioned with the top to ward the fron...

Page 220: ...on the Copy Screen The Original Setting Screen will be displayed 3 Touch the desired original direction key to highlight it 4 Touch OK to complete the setting and return to the Copy Screen Touch Defau...

Page 221: ...ide POD Administrator s reference The density level can be shifted in each of four Image modes This function is provided in the User Setting See the User s guide POD Administrator s reference Key Desc...

Page 222: ...l be displayed 3 Touch the desired mode key to highlight it Select the desired mode for each of Image and Type 4 Touch OK to complete the setting and return to the Copy Screen Touch Default Set to res...

Page 223: ...al glass Separate Scan mode is required For details see Separate scan mode on page 9 16 0 With Mixed specified Auto Paper Select will function automatically To copy onto a single and desired paper siz...

Page 224: ...in the ADF 0 This mode requires more scanning time to detect the original size 1 Position the original Normal originals can be set together with the Z folded original 2 Touch Original Setting on the C...

Page 225: ...he other functions 1 Position the original in the ADF 2 Touch Original Setting on the Copy Screen The Original Setting Screen will be displayed 3 Touch Thin or Thick to highlight it For the original o...

Page 226: ...ll the registered size when needed 0 Use Full Area on the Custom Size menu for small original that cannot be detected in Standard mode 0 Special sizes can be registered in this mode Registered size in...

Page 227: ...3 Touch OK to return to the Custom Size Screen with specified size displayed Registering a special size 1 Touch Size Input to display the Size Setting Screen 2 Select the lengthwise widthwise dimensio...

Page 228: ...Size Setting Screen 8 Touch OK to return to the Custom Size Screen with specified size displayed Recalling a special size 1 Touch Size Input to display the Size Setting Screen 2 Touch Size Recall to d...

Page 229: ...en loading tabbed copy paper in a tray specify the paper type as Tab Paper for that tray in Paper Setting See page 9 33 for details 0 Tab extension width for tabbed original 12 5 mm or less 0 The magn...

Page 230: ...sheets or above the limit mark otherwise paper misfeed or damage to the original may be caused 0 Separate Scan mode is necessarily used and operates automatically in the following functions Making dou...

Page 231: ...ows you to check the remaining memory Repeat steps 4 and 5 for all original pages to be scanned 6 When scanning is completed touch Separate Scan to exit the Separate Scan mode 7 Enter the desired prin...

Page 232: ...olor mode or Black mode for copying 0 This machine is provided with color adjustment function See Section 10 Color Adjustment 0 Some adjustments cannot be made in Black and Single Color modes Hue Satu...

Page 233: ...ontrol panel If the machine is equipped with the ADF close it securely before pressing Reset The initial setting will be restored Check that e1 0 is highlighted to indicate that the 1 000 magnificatio...

Page 234: ...nification Zoom proportional Touch to highlight the proportional zoom key at the upper left corner in the Zoom area Then use the screen keypad to enter the desired magnification ratio The entered rati...

Page 235: ...ings 9 Enlarge Reduce Touch the desired zoom key in the Enlarge Reduce area Preset Zoom Touch the desired preset zoom key in the Preset Zoom area 3 Touch OK to return to the Copy Screen Touch Cancel t...

Page 236: ...scanned original size Detail For details of Paper Setting see page 9 30 0 Auto Zoom is incompatible with Auto Paper Select while Rotation is available 0 Auto Zoom will not function if the tray of the...

Page 237: ...opies from the single sided or double sided original scanned from the ADF 0 Specify the original direction on the Original Setting Screen according to that of the original loaded in the ADF 0 The doub...

Page 238: ...to display the Original Setting Screen 2 Touch to highlight the original direction key according to the direction of the original loaded in the ADF 3 To make normal double sided copies having the same...

Page 239: ...the Copy Screen to display the Output Application Screen 2 Touch the desired binding direction key to highlight it To make double sided copies arranged upside down on the back pages select Top 3 Touc...

Page 240: ...first page of the original FACE DOWN then close the ADF If Book Copy Non Image Area Erase Size Auto Detect mode of Image Repeat or Image Centering is selected keep the ADF open throughout the scanning...

Page 241: ...py Screen For details on specifying binding direction of double sided copies see page 12 6 4 Select additional copy conditions as desired 5 Press Start to scan The front side image of the double sided...

Page 242: ...ecify the original direction on the Original Setting Screen according to that of the original loaded in the ADF 0 The normal single sided copies having the same edge as page top can be made from doubl...

Page 243: ...2 Touch to highlight the original direction key according to the direction of the original loaded in the ADF 3 To make normal single sided copies having the same edge as page top from double sided or...

Page 244: ...paper specifications preset for each tray can temporarily be altered new specifications can be registered and registered specifications can be recalled The following describes how to use Auto Paper S...

Page 245: ...Paper Select See the User s guide POD Administrator s reference The machine can be set to deactivate Auto Paper Select when original is set in the ADF or on the original glass 0 Auto Paper Select is i...

Page 246: ...nistrator s reference The copier is initially set to activate the Rotation function automatically Follow the procedure below to release resume this function 0 Copy paper sizes A4 v w B5 v w 0 Original...

Page 247: ...g from Normal to Coated GL it may take a certain period of time before copying operation becomes available due to the fixing temperature adjustment 1 On the Copy Screen check the tray setting for eac...

Page 248: ...ations of the tray either by selecting the one previously registered or by programming a new setting To recall a setting 1 Touch Recall 2 Use Next or Previous to scroll the list to the desired Paper T...

Page 249: ...am a new setting 1 Touch Change In this case the paper name cannot be changed 2 Touch Paper Type then select the desired paper type Touch OK to complete the setting The trays 4 and 5 exclusively allow...

Page 250: ...00 g m2 4 Touch Both Sides Touch Front or Back to select the printed side select the adjustment item vertical zoom horizontal zoom vertical shift horizontal shift or registration loop and then touch t...

Page 251: ...Punched if the paper has punch holes or touch No Punched if not then touch OK 7 Make a selection for Colored Paper Touch Non White when using colored paper or touch White for white paper 8 Touch OK t...

Page 252: ...3 Use Next or Previous to scroll the list to the key to be registered with a new setting then touch it to highlight it Selecting a key having a name already displayed will overwrite and clear the exi...

Page 253: ...lected the machine will output printed sets trimmed by the specified amount Entered amount should fall within 1 40 mm 4 Touch Lead Edge Rear Edge or Center to specify the desired image position 5 Touc...

Page 254: ...ing Screen 10 Touch OK to complete the setting and return to the Paper Setting Screen Touching Fix will complete the setting and directly return to the Copy Screen To recall a registered custom size 1...

Page 255: ...art for the Both Sides Adjustment follow the procedure below to set the adjustment value 1 Touch Front on the Both Sides Adjustment Screen to select the printed side then touch Chart Adjustment 2 Touc...

Page 256: ...of the main body 2 Turn the fixing conveyance unit lever leftward to withdraw the conveyance fixing unit 3 Holding the handle on the left side of the fixing unit push it up to open the left side cover...

Page 257: ...ld not be moved unless the copy print result requires the adjustment When copying printing is completed with the knob moved be sure to return it to the original position where the arrow mark on the kn...

Page 258: ...ll be displayed Touching No will return to the Machine Status Screen In this case touching COPY tab will display the Copy Screen and allows you to make the reserve job setting If the machine is initia...

Page 259: ...CS665 Pro 9 45 Basic job settings 9 9 8 Copy conditions incompatible with basic job settings...

Page 260: ...9 Basic job settings 9 46 CS665 Pro...

Page 261: ...CS665 Pro 9 47 Basic job settings 9...

Page 262: ...9 Basic job settings 9 48 CS665 Pro...

Page 263: ...t Warning message displays A Condition in the top row is selected automatically Unreleasable B Condition in the top row is selected automatically Releasable C Not specified D Condition in the far left...

Page 264: ...ected and vice versa 11 1 1 or 1 2 mode is selected automatically With 1 2 selected Separate Scan mode is also selected 12 ADF mode is activated automatically 13 Full Color mode is selected automatica...

Page 265: ...10 Color adjustment...

Page 266: ......

Page 267: ...lors Primary colors cannot be produced from other colors These colors however can be combined to make up any other color color mixture The color mixture provides two different types three primary colo...

Page 268: ...etc and the purity vivid dull etc of the color The color perception reddish bluish etc is defined as hue H The strength or purity of the color is defined as saturation S and the lightness or darkness...

Page 269: ...ixing four pigments the three primary colors cyan C magenta M yellow Y and black K To enhance the copy quality this machine allows you to modify colors by means of the three attributes of color based...

Page 270: ...10 Color adjustment 10 6 CS665 Pro Adjust the hue saturation and brightness Original Hue Saturation Brightness...

Page 271: ...stment leads the color of the image to another color adjacent in the color circle of red R yellow Y green G cyan C blue B and magenta M Change the hue by varying the image s red R green G and blue B i...

Page 272: ...10 Color adjustment 10 8 CS665 Pro Change the hue by varying the image s cyan C magenta M yellow Y and black K individually or mutually Original Cyan Magenta Yellow Black...

Page 273: ...rovides two methods Line Screen and Dot Screen The Line Screen uses many halftone lines like scanning lines of a television while Dot Screen uses small dots to reproduce the image The Screen methods p...

Page 274: ...inter may add colors in large or bold characters to reproduce the text in the same way as the photo While scanning such originals this machine detects and determines the photo portion and text area so...

Page 275: ...o the color adjustment and image reproduction methods this machine allows you to apply the following filters to improve the copy image quality Sharpen the outline of the image Sharpness Increase the c...

Page 276: ...of scanned image For further improvement use Copy Density or apply filters for Sharpness Contrast and Glossy To use keys under Quality Adjust on the copy screen When any setting is made on the Quality...

Page 277: ...nsity to be selected automatically using Automatic exposure can be adjusted on the machine See the User s guide POD Administrator s reference To adjust copy density Follow the procedure below to selec...

Page 278: ...The Quality Adjustment Screen will be restored Do you want to resume the previous setting Touch Cancel Do you want to restore the initial setting Touch Default Set Do you want to check the adjustment...

Page 279: ...he background whiteness when copying newspaper or recycled paper original 1 Position the original 2 Touch Quality Adjust on the Copy Screen The Quality Adjustment Screen will be displayed 3 Touch Adj...

Page 280: ...n will be restored Do you want to resume the previous setting Touch Cancel Do you want to restore the initial setting Touch Default Set Do you want to check the adjustment result Touch Adj Proof Copy...

Page 281: ...als 1 Position the original 2 Touch Quality Adjust on the Copy Screen The Quality Adjustment Screen will be displayed 3 Touch B Side Prevent to display the B Side Prevent Screen 4 Adjust the density l...

Page 282: ...initial setting Touch Default Set Do you want to check the adjustment result Touch Adj Proof Copy to print a sample copy 6 Touch Close on the Quality Adjustment Screen The Copy Screen will be restore...

Page 283: ...f each color of colored original giving effect to the strength of black or single color on a printed image Detail To reproduce the yellow part of the original which cannot be printed normally in Singl...

Page 284: ...Do you want to resume the previous setting Touch Cancel Do you want to restore the initial setting Touch Default Set Do you want to check the adjustment result Touch Adj Proof Copy to print a sample c...

Page 285: ...Adjust on the Copy Screen The Quality Adjustment Screen will be displayed 3 Touch Hue to display the Hue Screen 4 Make the desired adjustment Touch the desired level key from 1 to 4 to make yellow cl...

Page 286: ...h OK The Quality Adjustment Screen will be restored Do you want to resume the previous setting Touch Cancel Do you want to restore the initial setting Touch Default Set Do you want to check the adjust...

Page 287: ...Adjust on the Copy Screen The Quality Adjustment Screen will be displayed 3 Touch Saturation to display the Saturation Screen 4 Make the desired adjustment Touch the desired level key from 1 to 4 to...

Page 288: ...Adjustment Screen will be restored Do you want to resume the previous setting Touch Cancel Do you want to restore the initial setting Touch Default Set Do you want to check the adjustment result Touch...

Page 289: ...st on the Copy Screen The Quality Adjustment Screen will be displayed 3 Touch Brightness to display the Brightness Screen 4 Select the desired brightness level Touch the desired level key from 1 to 4...

Page 290: ...tore the initial setting Touch Default Set Do you want to check the adjustment result Touch Adj Proof Copy to print a sample copy 6 Touch Close on the Quality Adjustment Screen The Copy Screen will be...

Page 291: ...ition the original 2 Touch Quality Adjust on the Copy Screen The Quality Adjustment Screen will be displayed 3 Touch Sharpness to display the Sharpness Screen 4 Select the desired sharpness level Touc...

Page 292: ...store the initial setting Touch Default Set Do you want to check the adjustment result Touch Adj Proof Copy to print a sample copy 6 Touch Close on the Quality Adjustment Screen The Copy Screen will b...

Page 293: ...sition the original 2 Touch Quality Adjust on the Copy Screen The Quality Adjustment Screen will be displayed 3 Touch Contrast to display the Contrast Screen 4 Select the desired contrast level Touch...

Page 294: ...estore the initial setting Touch Default Set Do you want to check the adjustment result Touch Adj Proof Copy to print a sample copy 6 Touch Close on the Quality Adjustment Screen The Copy Screen will...

Page 295: ...ded Text Photo proportion adjustment and Black Color text proportion adjustment Text Photo changes the ratio of detecting the text area of the original Color Text changes the proportion in detecting t...

Page 296: ...e proportion of colored text Touch Standard to select the middle level 6 Touch OK The Quality Adjustment Screen will be restored Do you want to resume the previous setting Touch Cancel Do you want to...

Page 297: ...nding on the original type In this case try another screen type Detail Dot 2 and Line 2 also provide the lower line screen type 2 as an option This setting can be made in the Administrator setting See...

Page 298: ...t if reproducing method should be selected automatically 5 Touch OK The Quality Adjustment Screen will be restored Do you want to resume the previous setting Touch Cancel Do you want to restore the in...

Page 299: ...be made in each density area shadow mid tone or highlight of the individual color or in the whole density area of each color The adjustment value ranges from 10 to 10 To adjust color balance 1 Positio...

Page 300: ...ller number to make the color lighter or larger number to make it darker The adjustment can be made for each density area 6 Touch OK The Quality Adjustment Screen will be restored Do you want to resum...

Page 301: ...Quality Adjustment Screen will be displayed 3 Touch Glossy to highlight it 4 Touch Close on the Quality Adjustment Screen The Copy Screen will be restored with the Glossy key displayed and highlighted...

Page 302: ...10 Color adjustment 10 38 CS665 Pro 10 12 Copy conditions incompatible with color adjustment...

Page 303: ...CS665 Pro 10 39 Color adjustment 10...

Page 304: ...ll be released A Condition in the top row is selected automatically Unreleasable B Condition in the top row is selected automatically Releasable C Not specified D Condition in the far left column does...

Page 305: ...11 Application functions...

Page 306: ......

Page 307: ...If you touch a function key another screen or two will display to enable you to enter the appropriate settings except for Program Job Non Image Area Erase Neg Positive Reverse and Image Centering Vari...

Page 308: ...rectly jump to the setting screen or Application Screen for the function without subsequent screen if any setting change is desired Detail You may find a Bookmark key on some subsequent screens Touch...

Page 309: ...Print or Blank settings are compatible Function Description Front Cover Print The first page of the original will be printed onto the front cover When making double sided copies the second page of th...

Page 310: ...the inser tion which will be the 3rd sheet of copied set With page 6 specified the same result will be obtained 2 2 The 9th and 10th pages of double sided original are copied onto both sides of the in...

Page 311: ...oaded Check the tray information on the Machine Status Screen or Copy Screen and use the specified paper otherwise machine trouble may occur To use any other paper type size than the specified paper t...

Page 312: ...t Screen Touch the desired tray key to select the cover sheet tray source Select the desired front back cover mode Touch None if no cover is desired Print to insert a copied front back cover or touch...

Page 313: ...ry touch Delete Repeat this procedure to make all the page entry Up to 30 insertion locations can be specified including front and back covers To enter the 16th to 30th page locations touch to scroll...

Page 314: ...Cancel to restore the previous setting 9 Confirm the setting information on the screen The Insert Sheet Screen provides the information of the setting made on each subsequent screen If no setting cha...

Page 315: ...page can be copied on the sheet from another tray source Print Insertion 0 Use Stamp together with this function to print chapter number onto chapter page in addition to page number numbering or wate...

Page 316: ...ion of paper tray for copying title pages touch Print Insertion on the Chapters Screen to enable the Insertion Tray key Use this key to change the currently selected paper tray displayed on the screen...

Page 317: ...under the Application key Use this key to jump to the subsequent screen to make any setting change 7 Enter the desired print quantity from the control panel keypad then press Start 2 Note Touch Bookl...

Page 318: ...e Originals The direction of the page arrangement will vary according to the specified original binding margin Setting item Description 2 in 1 Select this setting to print two original images onto one...

Page 319: ...elected Available to be changed manually 1 Position the original 2 Touch Application on the Copy Screen 3 Touch Combine Originals on the Application Screen 8 in 1 Select this setting to print eight or...

Page 320: ...tion with the current setting remained touch Function Off 6 Touch OK on the Application Screen The Copy Screen will be restored with highlighted Combine Originals key displayed under the Application k...

Page 321: ...ginal sizes are A3 w B4 w A4 w v and B5w v 0 Original pages should be a multiple of 4 in 1 2 mode or a multiple of 2 in 2 2 mode otherwise blank pages are automatically inserted to the last 0 Trays fo...

Page 322: ...uce Shift mode as follows Touch Page Margin on the Application Screen Select Reduce Shift and Double Sided then specify the desired shift amount For details see page 11 46 Touch OK to complete the set...

Page 323: ...al from 1 to 999 pages 0 Separate Scan mode is automatically selected Simplex Duplex Description 1 1 The first scanned image will be inserted after page 2 of the original and the second scanned image...

Page 324: ...t this procedure to make all the page entry Up to 30 image insertion locations can be specified To enter the 16th to 30th locations touch to scroll to the next page What if an entered page number is l...

Page 325: ...that the Separate Scan mode is automatically selected 8 Select additional copy conditions as desired 9 Press Start on the control panel The machine starts scanning the original loaded in the ADF 10 Pl...

Page 326: ...automatically arranged in booklet format in correct order to make a multiple page signature booklet on both sides of paper e g Scanning a book original from the original glass Mode key Description Spr...

Page 327: ...parately Mode key Description Spread Booklet Pagina tion Front Back Cover Spread Booklet Pagina tion Mode key Description Left Bind Page spread originals will be scanned from the left page to the righ...

Page 328: ...electing the Front Cover or Front Back Cover Spread mode follow the procedure on page 11 22 to scan the front cover first 2 Touch Application on the Copy Screen 3 Touch Book Copy on the Application Sc...

Page 329: ...om and Auto Paper Select are released and e1 0 magnification is selected automatically Be sure not to select Top as binding direction on the Output Application Screen 9 Press Start on the control pane...

Page 330: ...quent jobs 0 Max 100 jobs can be programmed for an output job 0 Program Job settings cannot be stored in Program Memory 1 Position the original 2 Touch Application on the Copy Screen 3 Touch Program J...

Page 331: ...he current job images To delete the scanned images touch Cancel 8 Repeat above steps until all job originals are scanned 9 When all originals are scanned touch Separate Scan to exit the Separate Scan...

Page 332: ...11 Application functions 11 28 CS665 Pro 12 Press Start The machine will start printing in conditions specified for each job...

Page 333: ...will be selected automatically 0 The output size can be selected standard size or determined when a magnification ratio is entered on the screen 1 Position the original on the original glass then clo...

Page 334: ...io 6 Touch OK to complete the setting To restore the previous setting touch Cancel To release the Multi Page Enlargement function with the current setting remained touch Function Off 7 Touch OK on the...

Page 335: ...ation on the Copy Screen 3 Touch Non Image Area Erase on the Application Screen The incompatible function keys will be dimmed to show inactivity 4 Touch OK on the Application Screen The Copy Screen wi...

Page 336: ...Image Area Erase by adjusting the density level of the original manually See the User s guide POD Administrator s reference Non Image Area Erase may perform incorrectly if the lighting in the work pla...

Page 337: ...reversed image according to the original image detected as Full Color or Black 1 Position the original 2 Touch Application on the Copy Screen 3 Touch Neg Positive Reverse on the Application Screen Th...

Page 338: ...ge by specifying the scanning area 0 Size Auto Detect mode uses Non Image Area Erase to automatically detect the original size with the ADF original cover kept open 1 Position original on the original...

Page 339: ...ed touch Input With Keypad to display the Image Size Input Screen Touch Horizontal or Vertical to highlight it then enter the desired horizontal vertical width Touch Close to complete the setting and...

Page 340: ...7 Enter the desired print quantity from the control panel keypad then press Start The machine will start printing when ready for output Detail Using Size Auto Detect mode Image Repeat may perform inc...

Page 341: ...o e1 0 100 Rotation becomes unavailable if this magnification ratio is changed manually 0 The scanning area will be a portion of the selected paper size equally divided according to the selected mode...

Page 342: ...pplication Screen The Copy Screen will be restored with highlighted Image Repeat key displayed under the Application key Use this key to jump to the subsequent screen to make any setting change Auto Z...

Page 343: ...1 mm increments 0 Frame erase and Center erase can be used in combination 0 The Frame erase amount can be specified both collectively for all four sides and individually for each side 1 Position the...

Page 344: ...ode To specify the erase amount for Erase All Sides Confirm that all the frame erase amounts in the illustration are highlighted Use and or touch panel keypad to enter the desired erase amount To spec...

Page 345: ...mplete the setting To restore the previous setting touch Cancel To release the Frame Center Erase function with the current setting remained touch Function Off 7 Touch OK on the Application Screen The...

Page 346: ...n the center of the copy paper without image division performed 4 Touch OK on the Application Screen The Copy Screen will be restored with highlighted Non Image Area and Image Centering keys displayed...

Page 347: ...ion is available only when Booklet Pagination or 2 Repeat mode of Image Repeat has been already selected Use this function to make the desired amount of blank space between the two images on a page If...

Page 348: ...y the shift direction and amount Use Top or Bottom to shift the image in lengthwise direction and Right or left in widthwise direction Touch the desired shift direction key to highlight it then use an...

Page 349: ...the Application key Use this key to jump to the subsequent screen to make any setting change 10 Enter the desired print quantity from the control panel keypad then press Start The machine will start p...

Page 350: ...ut reducing the original image see Adjusting position of copy image Page margin Shift on page 11 43 0 Auto Zoom is automatically selected and cannot released Reduction ratio will depend on the specifi...

Page 351: ...ion and Right or left in widthwise direction Touch the desired shift direction key to highlight it then use and or touch panel keypad to enter the desired shift amount Setting the shift amount in 0 1...

Page 352: ...in stamp numbering for multiple sets page number for multiple pages date time watermark watermark numbering and copy protect The following seven modes are provided for the Stamp function See page 11 7...

Page 353: ...ne adjustment for printed position Start number setting for Set Numbering mode Start number setting for Page No mode Character size type setting for Page No and Date Time modes Cover Insert print sett...

Page 354: ...n the Copy Screen 3 Touch Stamp Image Overlay on the Application Screen 4 Touch Built in Stamp 5 Select the desired stamp type printing position character size print page and color Touch one of the tw...

Page 355: ...setting remained touch Function Off 7 Touch OK on the Application Screen The Copy Screen will be restored with highlighted Stamp Overlay key displayed under the Application key Use this key to jump t...

Page 356: ...desired numbering type printing position character size print page start number and color Touch one of the four numbering type keys to highlight it Touch one of the nine printing position keys to high...

Page 357: ...setting remained touch Function Off 7 Touch OK on the Application Screen The Copy Screen will be restored with highlighted Stamp Overlay key displayed under the Application key Use this key to jump t...

Page 358: ...65 Pro 11 17 3 Printing page number Page no Print a page number onto the specified position of copies 1 Position the original 2 Touch Application on the Copy Screen 3 Touch Stamp Image Overlay on the...

Page 359: ...or see page 11 66 Touch Change Character to select the character size and type See page 11 65 for details To specify the start number touch Start Number See page 11 65 for details 6 Touch OK twice to...

Page 360: ...ed date time type printing position character size type print page and color Touch one of the five date type keys and one of the three time type keys to highlight it Touch one of the nine printing pos...

Page 361: ...setting remained touch Function Off 7 Touch OK on the Application Screen The Copy Screen will be restored with highlighted Stamp Overlay key displayed under the Application key Use this key to jump t...

Page 362: ...ine 1 Position the original 2 Touch Application on the Copy Screen 3 Touch Stamp Image Overlay on the Application Screen 4 Touch Watermark 5 Select the desired watermark type color and text density To...

Page 363: ...setting remained touch Function Off 7 Touch OK on the Application Screen The Copy Screen will be restored with highlighted Stamp Overlay key displayed under the Application key Use this key to jump t...

Page 364: ...age Overlay on the Application Screen 4 Touch Set Numbering in the Watermark area 5 Select the desired watermark numbering type character size start number color and text density Touch one of the four...

Page 365: ...setting remained touch Function Off 7 Touch OK on the Application Screen The Copy Screen will be restored with highlighted Stamp Overlay key displayed under the Application key Use this key to jump t...

Page 366: ...Select the desired type for both watermark and background pattern Alternative printing of these two is unavailable 0 Select the desired watermark pattern color from black magenta and cyan 0 The water...

Page 367: ...the setting To restore the previous setting touch Cancel To release the Stamp Image Overlay function with the current setting remained touch Function Off 7 Touch OK on the Application Screen The Copy...

Page 368: ...irection Right or left 1 Touch the desired direction key to highlight it then use and or touch panel keypad to enter the desired amount 2 Touch OK to complete the setting and return to the previous sc...

Page 369: ...can be specified 2 Touch Start Page under Page No to highlight it then enter the desired start page 3 Touch Start Number under Chapter to highlight it then use and or touch panel keypad to enter the d...

Page 370: ...nder Cover to highlight it 2 Select one of the keys under Print Insert if Print mode has been specified or one of the two under Blank Insert for Blank mode 3 Touch OK to complete the setting and retur...

Page 371: ...remained touch Function Off 6 Touch OK on the Application Screen The Copy Screen will be restored with highlighted Stamp Overlay key displayed under the Application key This key can also be used to di...

Page 372: ...ss Start to scan Repeat steps 9 and 10 for all originals 11 Touch Separate Scan to exit the Separate Scan mode 12 Enter the desired print quantity from the control panel keypad then press Start The ma...

Page 373: ...ied in the job To use this function the optional HDD HD 506 is required to be installed in the machine Follow the steps 1 2 3 and 9 for printing only 1 Position the overlaying original facedown on the...

Page 374: ...Enter the desired image name to be stored Use the touch screen keypad to enter the desired name up to 8 characters The date when making this entry will be stored automatically 7 Touch OK The Copy Scre...

Page 375: ...g remained touch Function Off 11 Touch OK on the Application Screen The Copy Screen will be restored with highlighted Stamp Overlay key displayed under the Application key This key can also be used to...

Page 376: ...both OK and Cancel keys are displayed the image with the entered name applied can be overwritten Touch Cancel to overwrite the existing image data To store the new data with a new name touch OK If the...

Page 377: ...CS665 Pro 11 73 Application functions 11 11 20 Copy conditions incompatible with application functions...

Page 378: ...11 Application functions 11 74 CS665 Pro...

Page 379: ...CS665 Pro 11 75 Application functions 11...

Page 380: ...11 Application functions 11 76 CS665 Pro...

Page 381: ...CS665 Pro 11 77 Application functions 11...

Page 382: ...is unavailable 10 Available combinations of Stamp Watermark Image Overlay Program Overlay are as shown below 15 Compatible if Booklet Pagination is selected in combination 16 Back cover cannot be att...

Page 383: ...12 Output applications...

Page 384: ......

Page 385: ...original 2 Touch Output Appli on the Copy Screen The Output Application Screen will be displayed Output tray positions are indicated as square marks on the front image of the machine and the tray mark...

Page 386: ...a Pile Setting key is displayed to show you a popup menu when touched On the popup menu touch Permit if you allow paper from several jobs to pile up in the large capacity stacker or touch Prohibit if...

Page 387: ...output tray Open the tray stand when fully withdrawn 2 Reminder Never return the Saddle stitcher tray to its original position with the tray stand opened Be careful not to exceed the finisher tray st...

Page 388: ...nd duplex copies front and back pages have the same side up from top bound duplex originals printed upside down on back pages use the setting for binding direction of duplex originals See page 9 3 for...

Page 389: ...3 copied sets from 4 original sheets Mode Description Non sort Non sort mode simply means that the offset stacker finisher modes are not selected Copies will be stacked upon exit without being offset...

Page 390: ...on sort Collate Uncollate output to the primary main tray Stapled output to the primary main tray Collate Uncollate output to the secondary sub tray Mode Description Non sort Col late Non sort Collate...

Page 391: ...f the machine and the tray mark currently selected appears highlighted If the primary main tray is not selected touch Output Tray to select it See page 12 3 for details 3 Select the desired output mod...

Page 392: ...d specifications see page 3 3 and page 7 6 1 Position the original 2 Touch Staple on the Copy Screen Stapled sheets will be delivered to the primary main tray The Output Application icon shows the sta...

Page 393: ...estored 7 Touch OK on the Output Application Screen The specified output mode icon will be displayed on the Copy Screen 2 Reminder The primary main tray gradually goes down while printed materials are...

Page 394: ...devices Change the output tray and select the desired output mode by following the procedure below Detail For detailed specifications see page 3 3 and page 7 6 1 Position the original 2 Touch Output...

Page 395: ...ce Up and output order 1 to N N to 1 as needed 5 Touch OK on the Output Application Screen The specified output mode icon will be displayed on the Copy Screen 2 Reminder Be careful not to exceed the f...

Page 396: ...d and Half Fold Specify the print side outside or inside for each folding mode except Z Fold With Folding unit FD 503 installed on the machine as a single finishing option the two output trays are ava...

Page 397: ...ition the original 2 Touch Punch on the Copy Screen Punched sheets will be delivered to the primary main tray The Output Application icon shows the number of punch holes and punch position currently s...

Page 398: ...rent number of punch holes and punch position setting remained touch Function Off The Output Application Screen will be restored 7 Touch OK on the Output Application Screen The specified output mode i...

Page 399: ...inisher FS 521 installed manually pull down the exit guides of the primary main tray of Finisher FS 521 before starting the job 1 Position the original 2 Touch Output Appli on the Copy Screen The Outp...

Page 400: ...h OK on the Output Application Screen The specified output mode icon will be displayed on the Copy Screen 2 Reminder Be careful not to exceed the finisher tray capacity when selecting the print quanti...

Page 401: ...33 for details Used in combination with the Perfect binder PB 501 PB 502 cover sheets loaded in the post inserter tray can be attached to the output copies to make perfect bound books See page 4 15 fo...

Page 402: ...the post inserter Three paper rollers are attached to each of the upper and lower trays Lock the rollers on both sides to prevent paper from skewing As shown below push the both roller lock levers in...

Page 403: ...positions saddle stitched in the center Use Trimming mode to trim the edge that opens the booklet if desired Detail For detailed specifications see page 3 3 and page 7 7 1 Position the original 2 Touc...

Page 404: ...isplayed on the Copy Screen Booklet Pagination in Application is selected automatically 7 Withdraw the saddle stitcher tray Open the tray stand when fully withdrawn 2 Note The folded and stapled and t...

Page 405: ...ddle stitcher tray 0 Using Multi Tri Fold mode the finished sets will be delivered to the multi folding mode tray 1 Position the original 2 Touch Output Appli on the Copy Screen The Output Application...

Page 406: ...e displayed on the Copy Screen With Multi Half Fold selected Booklet Pagination in Application is also selected automatically 6 When using Multi Half Fold withdraw the saddle stitcher tray Open the tr...

Page 407: ...s see page 3 3 and page 7 6 0 When using folder finisher stitcher functions manually paper should be placed only in the upper tray of the post inserter 0 Multi feed detection is a feature that automat...

Page 408: ...selecting 2 or 4 hole punching press the Punch selection button to turn on the desired mode lamp When selecting folding from 6 styles press the Fold selection button to turn on the desired mode lamp P...

Page 409: ...shed sets will be delivered to the saddle stitcher tray Be sure to withdraw the saddle stitcher tray and open the tray stand when fully withdrawn See page 12 3 for details Detail The Suspension button...

Page 410: ...Binding mode both simplex and duplex copy modes are available for the body set and also the cover sheet can be blank simplex printed or duplex printed and even trimmed to match with the thickness of...

Page 411: ...umber of originals Body set simplex Cover print off Body set duplex Cover print off Body set duplex Cover print on Cover print side simplex Body set duplex Cover print on Cover print side duplex Blank...

Page 412: ...r of originals Body set simplex Cover print off Body set duplex Cover print off Body set duplex Cover print on Cover print side simplex Body set duplex Cover print on Cover print side duplex Blank Bla...

Page 413: ...n the sub power switch of the main body does not turn on the heater of the perfect binder at the same time to start warming up automatically Detail The heater of the perfect binder can be set to start...

Page 414: ...he heater by touching PB heater on the Machine Status Screen To turn off the heater of the perfect binder When the job using perfect binder is completed the heater of the perfect binder will automatic...

Page 415: ...o 162 g m2 0 Paper type Body Standard Recycled Fine Colored Matted Cover Fine Coated 0 Paper grain direction Parallel to the spine of the book for both body and cover 0 Number of sheets to be bound St...

Page 416: ...om the Perfect Binding Screen The custom cover size can also be selected from the registered custom sizes For details on registering the custom size see page 9 33 2 You can specify the paper weight av...

Page 417: ...ify them during this procedure If Cover Trimming is desired be sure to use the size that secures 3 mm to 40 mm of trimming width 3 Touch COPY tab to display the Copy Screen select the tray loaded with...

Page 418: ...ater with required warmup time then manually turn it on by touching PB heater on the Machine Status Screen Do you want to stop using the perfect binder The perfect binder will not stop warming up even...

Page 419: ...y tray other than tray 1 to 5 is selected the Cover Print setting in step 7 will be limited to Cover Print Off Touch Size Setting to display the Size Setting Screen If the desired cover size is previo...

Page 420: ...rly Paper misfeed may also be caused If registration of the entered cover size is desired touch Size Registration See page 9 33 for details To recall the registered cover size touch Size Recall See pa...

Page 421: ...then touch OK twice If unsuitable selection is made the binding operation will not be performed Select the desired one from 81 105 g m2 106 135 g m2 and 136 162 g m2 The binding operation may not be p...

Page 422: ...e cover tray source Select On to print on covers or Off to attach blank covers Also select Simplex to print only on the front side or Duplex to have both front and back sides printed For details of fi...

Page 423: ...the adjustment value then use the screen keypad upper lower arrow keys or the control panel keypad to enter the desired value To adjust the trimming width touch Cover Trimming Adj Touch the positive...

Page 424: ...y If the cover width has been specified improperly the machine temporarily stops its operation with a popup menu displayed to ask you whether or not to continue the operation Machine manager can set t...

Page 425: ...ke out the books then close the perfect binder tray cover 2 Reminder Never open the front door of the perfect binder while the machine operation is in process otherwise the machine immediately stops t...

Page 426: ...d sets from 3 original sheets Mode Description Non sort Non sort mode simply means that the offset stacker finisher modes are not selected Copies will be stacked upon exit without being offset by sort...

Page 427: ...ort Collate Uncollate output to the primary main tray Stapled output to the primary main tray Non sort Collate Uncollate output to the secondary sub tray Mode Description Non sort Col late Non sort Co...

Page 428: ...and the tray mark currently selected appears highlighted If the primary main tray is not selected touch Output Tray to select it For details on selecting an output tray see page 12 3 3 Select the des...

Page 429: ...d specifications see page 3 3 and page 7 5 1 Position the original 2 Touch Staple on the Copy Screen Stapled sheets will be delivered to the primary main tray The Output Application icon shows the sta...

Page 430: ...estored 7 Touch OK on the Output Application Screen The specified output mode icon will be displayed on the Copy Screen 2 Reminder The primary main tray gradually goes down while printed materials are...

Page 431: ...devices Change the output tray and select the desired output mode by following the procedure below Detail For detailed specifications see page 3 3 and page 7 5 1 Position the original 2 Touch Output...

Page 432: ...llate to highlight it Select output face Face Down Face Up and output order 1 to N N to 1 as needed 5 Touch OK on the Output Application Screen The specified output mode icon will be displayed on the...

Page 433: ...gned to the paper otherwise the copies may not be punched in position Detail For detailed specifications see page 3 3 and page 7 5 1 Position the original 2 Touch Punch on the Copy Screen Punched shee...

Page 434: ...e Punch function with the current number of punch holes and punch position setting remained touch Function Off The Output Application Screen will be restored 7 Touch OK on the Output Application Scree...

Page 435: ...d sets from 4 original sheets Mode Description Non sort Non sort mode simply means that the offset stacker finisher modes are not selected Copies will be stacked upon exit without being offset by sort...

Page 436: ...ort Collate Uncollate output to the primary main tray Stapled output to the primary main tray Non sort Collate Uncollate output to the secondary sub tray Mode Description Non sort Col late Non sort Co...

Page 437: ...of the machine and the tray mark currently selected appears highlighted If the primary main tray is not selected touch Output Tray to select it See page 12 3 for details 3 Select the desired output mo...

Page 438: ...d specifications see page 3 3 and page 7 9 1 Position the original 2 Touch Staple on the Copy Screen Stapled sheets will be delivered to the primary main tray The Output Application icon shows the sta...

Page 439: ...estored 7 Touch OK on the Output Application Screen The specified output mode icon will be displayed on the Copy Screen 2 Reminder The primary main tray gradually goes down while printed materials are...

Page 440: ...devices Change the output tray and select the desired output mode by following the procedure below Detail For detailed specifications see page 3 3 and page 7 9 1 Position the original 2 Touch Output...

Page 441: ...llate to highlight it Select output face Face Down Face Up and output order 1 to N N to 1 as needed 5 Touch OK on the Output Application Screen The specified output mode icon will be displayed on the...

Page 442: ...1 to 105 g m2 Fold Staple 20 sheets 64 to 80 g m2 16 sheets 81 to 105 g m2 0 Output tray Folding mode tray 0 Folding mode tray capacity 33 sets max of 3 sheet multi half folded booklet paper length 30...

Page 443: ...d bypass tray 0 Printed side Selectable inside or outside 0 Output tray Folding mode tray 0 Tray capacity 50 sets one tri fold sheet 0 The output order will automatically be set to N to 1 for Inside P...

Page 444: ...5 Touch OK To restore the previous setting touch Cancel To release the function with current setting remained touch Function Off The Output Application Screen will be restored 6 Touch OK on the Output...

Page 445: ...gned to the paper otherwise the copies may not be punched in position Detail For detailed specifications see page 3 3 and page 7 9 1 Position the original 2 Touch Punch on the Copy Screen Punched shee...

Page 446: ...e Punch function with the current number of punch holes and punch position setting remained touch Function Off The Output Application Screen will be restored 7 Touch OK on the Output Application Scree...

Page 447: ...ooklet type cover will be attached to the multiple page signature booklets Paper setting for the covers to be loaded in paper inserter is required See page 9 33 for details 0 Upper Lower tray capacity...

Page 448: ...onfiguration are described below Finisher FS 520 Paper inserter PI 502 Staple 1 staple 2 staples Finisher FS 520 Paper inserter PI 502 Punch kit PK 512 PK 513 Staple 1 staple 2 staples Punch Finisher...

Page 449: ...gn the guide plate with the paper 2 Press Staple mode selection button and Punch button to select the desired mode To select Staple 1 staple 2 staples Fold Staple or Multi Tri Fold press Staple mode s...

Page 450: ...selected appears highlighted If the stacker or secondary sub tray is not selected touch Output Tray to select the desired one See page 12 3 for details 3 Select the desired output mode For Non sort ou...

Page 451: ...the Output Application Screen The specified output mode icon will be displayed on the Copy Screen 2 Reminder Be careful not to exceed the stacker or secondary sub tray capacity when selecting the prin...

Page 452: ...12 Output applications 12 70 CS665 Pro 12 13 Copy conditions incompatible with output applications...

Page 453: ...CS665 Pro 12 71 Output applications 12...

Page 454: ...12 Output applications 12 72 CS665 Pro...

Page 455: ...CS665 Pro 12 73 Output applications 12...

Page 456: ...grayed out but unavailable 15 Compatible if Booklet Pagination is selected in combination 16 Back cover cannot be attached 20 Unavailable to select APS 21 Incompatible if cover sheets are fed from a...

Page 457: ...13 Advanced information...

Page 458: ......

Page 459: ...Separate Scan mode for more than 100 sheets of original or originals to be scanned from original glass 1 Position the original then select the desired copy conditions on the Copy Screen Or use Separa...

Page 460: ...ck Screen to return to the checking steps When Bookmark has been checked on some subsequent screen selecting the application function key will jump to that screen See page 11 4 for details Do not pres...

Page 461: ...ll be resumed Press Stop to suspend the proof copying In this case the scanned image data will not be deleted from memory If any setting change is required press Mode Check and return to step 3 If the...

Page 462: ...sition the original then select the desired copy conditions on the Copy Screen Or use Separate Scan mode to scan all originals 2 Press Proof Copy on the control panel A sample copy will be output whil...

Page 463: ...ay is in use The Call for Service message displays or a paper misfeed occurs Already using Interrupt mode 0 Reserve job cannot be operated in Interrupt mode 0 Auto Low Power or Auto Shut off will not...

Page 464: ...copy job setting 0 Available settings Basic setting Original Setting Special Image Application Output Application Print quantity 0 Stored job is given a job number 01 30 and alphabetical name dispens...

Page 465: ...isplayed can be overwritten The key with a lock icon displayed is locked and cannot be selected Touch OK to proceed to the screen for entering the job name 6 Enter the desired job name then touch OK E...

Page 466: ...en press Mode Memory on the control panel The Mode Memory Screen will be displayed 3 Touch a job number key to select a job you want to recall The job keys numbered from 01 to 18 are displayed on the...

Page 467: ...ings can be recalled even after the machine power is turned off then on 1 Position the original 2 Press Mode Memory on the control panel The Mode Memory Screen will be displayed 3 Touch Pre Job Recall...

Page 468: ...eys on Copy Screen 02 Scan provides information on function and operation of the keys on Scanner Screen 03 Job List provides information on function and operation of the keys on Job List Screen 04 Mac...

Page 469: ...users who have difficulty in touching keys with accuracy Detail The POD Administrator s reference describes how to set the desired response time 0 Response time can be selected from Normal 0 5 second...

Page 470: ...el screen job condition and state of the machine can be monitored using the automatic reload function of the web browser The remote panel can be displayed in an exclusive window Multi Monitor function...

Page 471: ...menu such as paper misfeed prompt will not be updated automatically when using Remote Panel After a long period of inactivity click Reload at the upper corner of the screen to display the current sta...

Page 472: ...lities screen The state of the machine touch panel screen and job condition will be displayed Clicking the touch panel screen on the Remote Monitor will display the Remote Panel in an exclusive window...

Page 473: ...ondition of up to 10 machines are displayed in tile view The Remote Panel will also be displayed in the same browser Clicking the touch panel screen on the desired Remote Monitor displayed in the brow...

Page 474: ...13 Advanced information 13 18 CS665 Pro...

Page 475: ...14 Job management...

Page 476: ......

Page 477: ...letters on the key turn red if any suspended job remains The jobs referred here include printer jobs and scanner jobs Follow the procedure below to display the Job List Screen 1 Touch JOB LIST tab on...

Page 478: ...croll if 8 or more jobs are entered 3 Select the desired job then select the job operation 2 Reminder This will not function if printing operation has already been started for the selected job To spec...

Page 479: ...play output history as a list The list includes following information Job No consecutive numbers of both copy and print jobs User Name user who transmitted the job Mode Copy or Printer Sheets max 4 di...

Page 480: ...ress to which the data was transmitted Result Complete or Cancel Time time when data transmission was executed Follow the procedure below to check the settings of transmitted jobs 1 Touch JOB LIST tab...

Page 481: ...llowing information Job No consecutive numbers of both copy and print jobs User Name user who transmitted the job Cause Memory Full Cancel etc cause for which the job was not completed 1 Touch JOB LIS...

Page 482: ...tab on the Copy Screen then touch Suspended The letters Suspended on the key appears red to prompt you that a suspended job remains in the machine 2 Check the status of the suspended jobs Touch Next t...

Page 483: ...15 Index...

Page 484: ......

Page 485: ...17 Built in stamp 11 50 Bypass tray 4 6 C Call for service screen 5 3 Caution notations and labels 1 35 Chapters 11 11 Chart adjustment screen 9 41 Checking copy count 6 5 Cleaning conveyance belt 6...

Page 486: ...onformity in paper setting 5 11 Insert image 11 19 Insert sheet 11 5 Installation 1 27 Interrupt key 8 3 Interrupt mode 13 7 J Job list screen 14 3 Job management 14 3 K Keypad 8 3 L Large capacity st...

Page 487: ...3 6 Proof copy key 8 3 13 5 13 6 Punch 12 14 12 51 12 63 Punch waste basket indicator 4 37 4 39 Punching file holes 12 15 12 51 12 63 R Recalling previous job settings 13 11 Recalling stored job setti...

Page 488: ...shooting tips 5 15 Turning on off the power 2 26 U Uncollate 12 7 12 8 12 44 12 45 12 53 12 54 12 68 Unsuitable ADF originals 3 13 User authentication 2 33 Using Finisher FS 520 FS 607 manually 12 66...

Page 489: ...ual convenient in size readability and arrangement page layout chapter order etc O Yes O No Could you find the information you were looking for O Always O Most of the times O Sometimes O Not at all Wh...

Page 490: ...n your occupation Name Occupation Company Phone Address City Country Please return this sheet to Oc Technologies B V For the attention of ITC User Documentation P O Box 101 5900 MA Venlo The Netherlan...

Page 491: ...1100 Toronto Ontario M2N 6K8 Canada http www oce ca Oc Office Equipment Beijing Co Ltd Xu Mu Cheng Chaoyang District Beijing 100028 China http www oce com cn Oc Czech Republic ltd Hanusova 18 140 21...

Page 492: ...hd 3 01 Level 3 Wisma Academy Lot 4A Jalan 19 1 46300 Petalig Jaya Selangor Darul Ehsan Malaysia http www ocemal com my Oc Mexico S A de C V Prolongaci n Reforma 1236 4to Piso Col Santa F Del Cuajimal...

Page 493: ...SA Business Park Mas Blau Osona 2 08820 El Prat de Llobregat Barcelona Spain http www oce es Oc Svenska AB Sollentunav gen 84 191 27 Sollentuna Sweden http www oce se Oc Schweiz AG S gereistrasse 10...

Reviews: