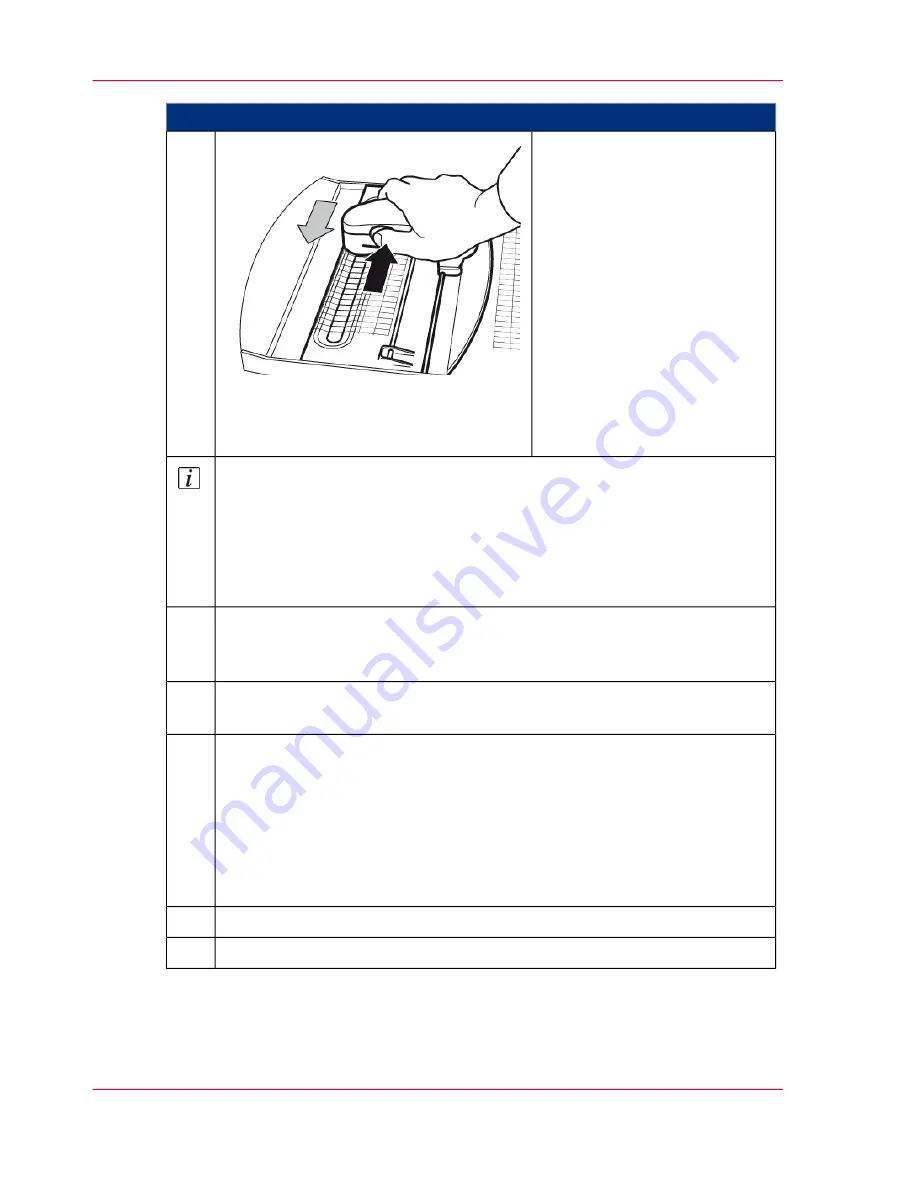
Proceed as follows:
Scan the test strips:
■
Place the measuring device in
the guide rails as shown and
move it next to the first test
strip.
■
Depress the button on the
left of the measuring device
until you hear a beep.
■
Draw the measuring device
across the entire test strip
with a slow and smooth
movement. You can scan
from left to right or right to
left.
9.
Note
The individual test strips of the blocks are displayed on the operator panel.
■
When a test strip has been fully scanned, the display above the relevant test
strip changes to green and a confirmation sound is emitted.
■
If not all fields of the test strip were scanned, an error message is displayed.
The scanning of this test strip must then be repeated.
Once the test strips of all blocks for the upper print unit have been scanned,
press the 'Record next page' button and repeat steps 8 and 9 for the test print
of the lower print unit.
10.
When you have successfully completed the scanning process, press the 'Cancel
recording' button.
11.
Select where the scanned data is to be transferred:
■
'Data storage on file system'
The data can be transferred to a USB removable storage device (Memory
Stick) for later evaluation.
■
'Transmission of data to printer'
The data is transferred to the transfer area (a directory on the drive of the
controller hard disk).
12.
Depending on the selection click the 'Save' or 'Transfer and close' button.
13.
‘Analyzing Test Pages for Color Calibration’
on page 253
14.
Chapter 6 - Operating the Printing System
252
Scanning Test Pages for Color Calibration
Summary of Contents for ColorStream
Page 1: ...o More Power When Printing Oc ColorStream User Manual Continuous Printing System...
Page 10: ...10 Contents...
Page 11: ...Chapter 1 Notes on the Printing System Documentation...
Page 30: ...Chapter 1 Notes on the Printing System Documentation 30 Statutory requirements...
Page 31: ...Chapter 2 Safety...
Page 50: ...Chapter 2 Safety 50 Accident prevention regulation for replacement carts option...
Page 51: ...Chapter 3 Description of the Printing System...
Page 80: ...Chapter 3 Description of the Printing System 80 Paper specifications...
Page 81: ...Chapter 4 Description of the Opera tor Panel...
Page 105: ...Chapter 5 Working with the Operator Panel...
Page 137: ...Chapter 6 Operating the Printing System...
Page 203: ...Chapter 6 Operating the Printing System 203 5C_PrintQualityInspection 600 Test Print Job...
Page 204: ...Chapter 6 Operating the Printing System 204 5C_PrintQualityInspection 600 Test Print Job...
Page 267: ...Chapter 7 Cleaning the Printing Sys tem...
Page 310: ...Chapter 7 Cleaning the Printing System 310 Cleaning the Developer Station Shelf Optional...
Page 311: ...Chapter 8 Replacing Consumables...
Page 344: ...Chapter 8 Replacing Consumables 344 Fill in Developer...
Page 345: ...Chapter 9 Replacing Expendables...
Page 472: ...Chapter 9 Replacing Expendables 472 Replacing Expendables in Expert Mode...
Page 473: ...Chapter 10 Correcting Errors...
Page 490: ...Chapter 10 Correcting Errors 490 Correcting Print Image Errors...
Page 491: ...Appendix A Technical Data...
Page 506: ...Appendix A Technical Data 506 Ruler for Checking Paper Path Synchronization...
Page 507: ...Appendix B Comments...
Page 521: ...3...
Page 522: ...3...
Page 523: ...3...


