background image

9-11

Advanced

Mode

Designating Areas with the Edit Pen

9

Designating Areas f

or Cop

ying

1

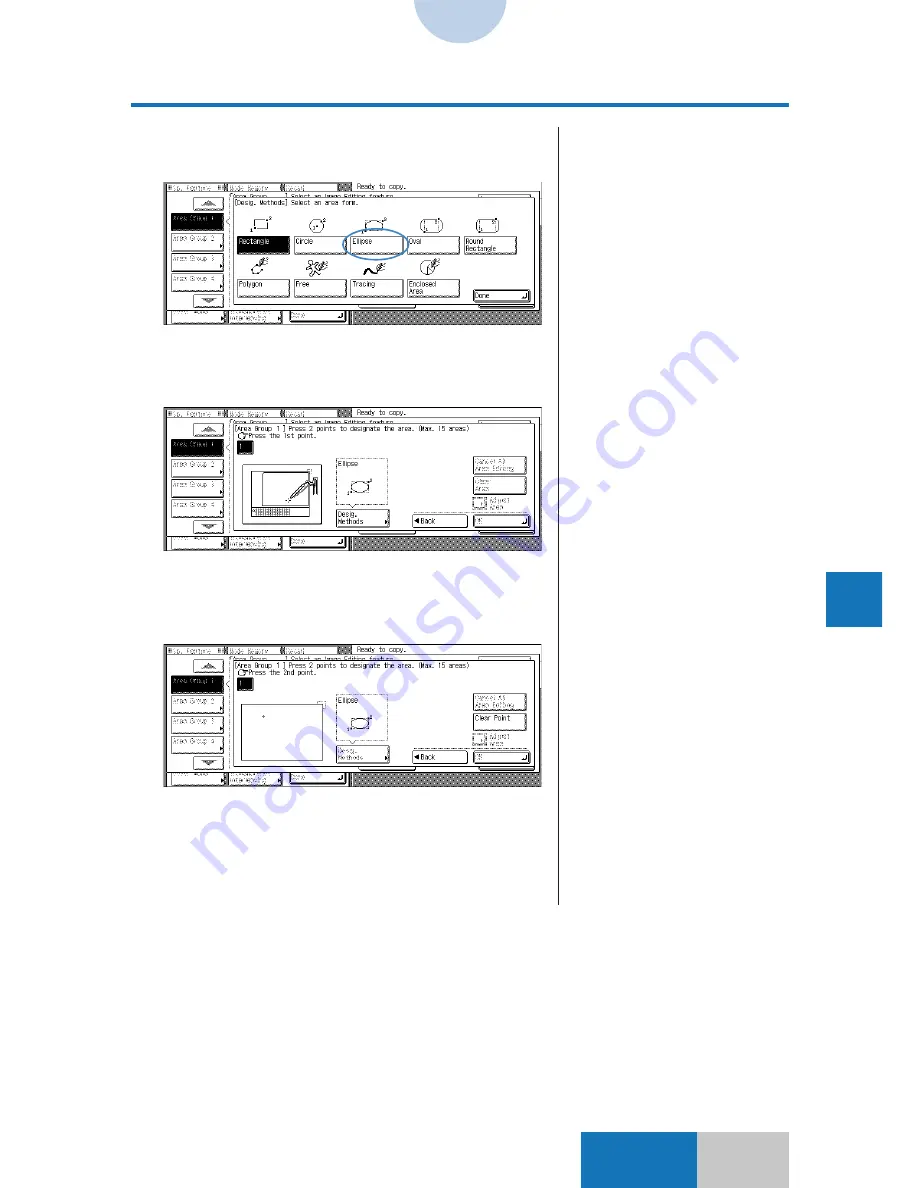
Press the [Ellipse] key, and then
the [Done] key.

2

Press the first point with the edit
pen.

3

Press the second point with the
edit pen.

4

Press the [OK] key.

The display returns to the screen for selecting an image
editing function.

Area Designation Type and Method

To designate other areas of the
same type, continue specifying
the points.  Upon completion of
consecutive area designation,
press the [OK] key.

Summary of Contents for COLOR SYSTEM 110

Page 1: ...COLOR SYSTEM 110 115 Operator s Manual Please read this manual before operating this equipment After you finish reading this manual store it in a safe place for future reference...

Page 2: ...erating the CS 110 115 please carefully read these manuals to gain a clear understand ing of the various functions so that you can use them effectively to meet your copying needs After reading the man...

Page 3: ...anings of the terms used on the Touch Panel Display or the Operator s User s Manuals Glossary or to find pages for detailed explanation of a specific topic General Index Configuration of Operator s Ma...

Page 4: ...nal image It includes how to make copies with image contours only how to make copies by slanting an image and how to make copies by repeating an image Chapter 9 Designating Areas for Copying This chap...

Page 5: ...r resumes the interrupted copy job If you are copying from the platen glass temporarily remove the original from the platen glass If you are copying from the original tray of the optional Feeder perfo...

Page 6: ...Platen Glass 2 12 When Placing an Original in the Single Sheet Document Feeder of the Optional Feeder 2 14 Original Size Recognition 2 16 Center Shift 2 17 Using Other Control Panel Keys 2 18 Making...

Page 7: ...iginals 3 24 Book 2 sided Making Two sided Copies from the Left and Right Pages of a Bound Original 3 26 Advanced Mode CHAPTER 4 Copying by Changing the Image Position 4 1 Changing the Image Position...

Page 8: ...Adjustment 6 27 Hide Background 6 27 Hide Backside Image 6 29 Color Range Adjustment 6 31 Black Adjustment 6 33 Complexion Adjustment 6 35 CHAPTER 7 Designating Colors Setting Color Creation Mode 7 1...

Page 9: ...ombinations 9 21 Designating Areas with the Markers 9 22 How to Designate Areas 9 22 How to Designate Areas with the Markers 9 26 Restrictions on Marker Editing 9 28 CHAPTER 10 Making Copies of Design...

Page 10: ...t 13 9 Inch Entry 13 11 Confirmation Window Auto Display 13 13 Auto Sort 13 15 Drawer Eligibility for APS ADS 13 17 Audible Tones 13 19 Exposure Level Switch 13 21 Transparency Feed Location 13 23 Thi...

Page 11: ...stment CS 110 115 NC 13 68 Original Type Selection for Printer CS 110 115 NC 13 70 APPENDIX A 1 Using the Guide A 2 Using the Guide for Each Purpose A 2 Using the Guide for Each Function A 4 Checking...

Page 12: ...1 Before Using the Copier 1 1 Before using the Copier Before Using the Copier This chapter describes the following items Components and Thire Functions Editor F1 CHAPTER 1...

Page 13: ...d Touch Panel Display Components and Their Functions Display Contrast Counter Check Control Panel Full Color key ON when selected Sets the Full Color mode in which copies are made in four colors p 2 1...

Page 14: ...key Stops the current copy job p 2 18 Energy Saver key ON when selected Turns ON OFF the Power Save mode p 2 18 Power lamp Lit green when the power is ON Start key Starts the copy job Clear key Clears...

Page 15: ...ng programmed The contents of the default copy settings can be changed For details on how to make such changes see Standard Settings Change on p 13 35 The screen displayed when the Sp Feature Mode Mem...

Page 16: ...s the currently selected paper feed location Paper size display Indicates the paper size of the currently selected paper feed location Paper supply indicator Indicates the remaining amount of copy pap...

Page 17: ...yed only on the CS 115 Press to select the type of two sided copy mode Original type key Press to select the type of original Sorter key option Displayed only when the optional Stapler Sorter F1 is in...

Page 18: ...Display of keys If a key displayed on the screen is pressed touched the key is highlighted and the corresponding mode or function is set Some keys are not highlighted depending on the nature of the k...

Page 19: ...ve the following contents Copy ratio 100 Paper selection Auto Paper Selection Copy quantity 1 Copy exposure Center value Original type Text Printed Image ACS Auto Color Selection On Original Recogniti...

Page 20: ...o not use the Editor near strong magnetic fields cordless telephone etc Do not pull hard on the edit pen cord Do not use the edit pen with the tip near the cord Do not touch the tip of the edit pen to...

Page 21: ...the Editor Place an original face up and align the upper right corner of the original with the mark When moving the original from the Editor to the platen glass turn it over in the left right directio...

Page 22: ...eet In the custom sheet user s original colors can be registered changed p 13 29 If a color has been registered or changed in the custom sheet print the custom sheet as a new color sheet p 13 28 and t...

Page 23: ...Basic Mode Basic Copying CHAPTER 2 Basic Copying This chapter describes the following operation procedures Making Copies Using the Control Panel Keys Making the Copy Settings Confirming the Copy Sett...

Page 24: ...to copy message The Start key light will be in orange The Start key light will be in green The screen shown on the left is hereinafter referred to as the standard display throughout this manual If a...

Page 25: ...y authorized copies are made Use of this key enables managing the use of this copier Appoint a specific manager for this copier for control and management to prevent unauthorized copying When Using th...

Page 26: ...ed ID number 1 Press the Dept ID key and enter the registered department ID number using the number keys 2 Press the Password key and then enter the password using the number keys The entered password...

Page 27: ...copier to warm up after a maintenance inspection or troubleshooting job When the message Please wait Auto Start is possible is displayed you can set Auto Start 1 Place your original on the platen gla...

Page 28: ...When the copier is turned ON the standard copy settings are in effect The standard copy settings can be changed in the Additional Functions mode For details see Standard Settings Change on p 13 35 1...

Page 29: ...rformed for approximately two minutes after a copy job is completed or after a key has been pressed the screen automatically returns to the standard display This function is called the Auto Clear func...

Page 30: ...e Sorting Mode Enter the copy quantity using the number keys When the copy quantity is entered the quantity appears on the screen Changing the copy quantity If an incorrect copy quantity was entered o...

Page 31: ...f the color is faint almost white or almost black the Black Monochrome mode may be selected In this case press the Full Color key to manually select the Full Color mode The ACS function is selected an...

Page 32: ...ower is turned ON in the default state of the copier Press the Full Color key The Full Color key indicator is lit 1 2 3 4 5 6 7 8 9 ID 0 C Reset ACS Full Color Black Original Recognition Center Shift...

Page 33: ...ed ON in the default state of the copier Press the Black key The Black key indicator is lit 1 2 3 4 5 6 7 8 9 ID 0 C Reset ACS Full Color Black Original Recognition Center Shift Guide Additional Funct...

Page 34: ...Composition copy job Also the Interrupt mode cannot be selected during another interrupted copy recovering or Auto Start copy job When Placing an Original on the Platen Glass 1 Press the key When the...

Page 35: ...upt mode 7 Remove the original for the interrupt copy job from the platen glass 8 Place the previous original on the platen glass 9 Press the Start key The copier resumes the interrupted copy job If y...

Page 36: ...nt feeder of the feeder 4 Program the necessary copy settings If a department ID and or a password are already registered the screen appears to prompt you to enter the registered ID number Enter the c...

Page 37: ...iginal for the interrupt copy job and close the single sheet document feeder 9 Place the previous original on the platen glass 10 Press the Start key You can only insert one sheet at a time failure to...

Page 38: ...ator is lit when the power is turned ON in the default state of the copier Press the Original Recognition key The Original Recognition key indicator is lit Canceling the Original Recognition Function...

Page 39: ...state of the copier If the original size and the copy paper size are the same and the copy ratio is set to 100 Direct the Shift functions cannot be used Press the Center Shift key The Center Shift ke...

Page 40: ...key is pressed Energy Saver key Press when a copy operation will not be performed for a while Press again to resume copy operation The standard copy settings are in effect Reset key Press to restore t...

Page 41: ...rd paper size to another when copies are made LGL LTR 78 11 x17 LGL 11 x15 LTR 73 11 x17 LTR 64 50 MIN 25 To place the original horizontally means to set it horizontally on the platen glass A sheet si...

Page 42: ...2 20 Basic Mode 3 Press the Done key The screen returns to the standard display with the selected copy ratio displayed 4 Press the Start key The copy job begins Making the Copy Settings Preset Zoom...

Page 43: ...e used when the copy paper size is selected automatically If Auto Paper Selection is selected the paper in the upper drawer is automatically selected The Auto Zoom function cannot be used for transpar...

Page 44: ...g to the Paper Size Making the Copy Settings 5 Press the Auto Zoom key 6 Press the Done key The screen returns to the standard display and Auto is displayed 7 Press the Start key The copy job begins T...

Page 45: ...with the direct copy ratio it is also necessary to specify the Entire Image mode In this case use copy paper of 12 x18 Copy ratios with Entire Image specified 11 x17 96 8 LGL 96 2 LTR 93 7 To cancel t...

Page 46: ...for the following types of originals Turn off Original Size Recognation and manually select the copy paper size Transparencies or other highly transparent originals Extremely thin originals When the O...

Page 47: ...2 25 2 Basic Copying Basic Mode Making the Copy Settings 3 Press the Done key The screen returns to the standard display and Auto is displayed 4 Press the Start key The copy job begins Paper Selection...

Page 48: ...sed to manually select the desired copy paper size Paper Selection Making the Copy Settings 1 Press the Paper Select key 2 Press a desired paper size key 3 Press the Done key The screen returns to the...

Page 49: ...yed 3 Adjust the slide guides to fit the paper size Be sure to fit the slide guides to the paper size as failure to do so will cause the paper to feed at a slant resulting in a paper jam Be sure to se...

Page 50: ...age Special Paper 2 Paper with Special Paper 2 indicated on its package Thin Paper Paper lighter than plain paper of 17 to 20 lb bond 64g m2 to 79g m2 6 Press the Start key The copy job begins Making...

Page 51: ...y Settings If paper is already placed in the stack bypass 1 Press the Paper Select key 2 Press the Manual Paper Selection key The subsequent procedure is the same as Step 4 onwards when copy paper is...

Page 52: ...ring to Manual Feed Copying on p 2 27 To make a copy onto 12 x18 paper be sure to place it in the Stack Bypass This size of paper cannot be loaded into a drawer 1 Place a sheet of paper in the Stack B...

Page 53: ...2 31 2 Basic Copying Basic Mode Making the Copy Settings Manual Feed Copying 5 Press the Start key The copy job begins...

Page 54: ...r size is displayed 2 Press the key for Irregular Size 3 Press the X or Y key to enter the size of the Stack Bypass paper and input the size using the numeric keys on the screen 4 Press the OK key Irr...

Page 55: ...xt key 6 Select the paper type and press the OK key The display returns to the paper selection screen indicating that the Stack Bypass paper has been selected 7 Press the Start key The copy job begins...

Page 56: ...pying on p 2 28 Manual Feed Two sided Copying Two sided copies can be made using the stack bypass When making two sided copies with the stack bypass use the stack bypass for both the first and second...

Page 57: ...r in the stack bypass with the side that has been copied facing down 7 Repeat Steps 2 to 5 to make the second side copy When making the second side copy in the Two sided mode press the 2nd Side key th...

Page 58: ...n unused transparencies to their package and store the package in a cool dry location When loading transparencies into a drawer When copying onto transparencies loaded into a drawer which has been reg...

Page 59: ...s the Transp Type key 5 Press either the Transparent Type or Reflective Type key and press the Done key If a dark image is projected from a transparency copied with the Transparent Type key selected m...

Page 60: ...the Done key 7 Press the Start key The copy job begins When making a copy onto multiple transparencies you can interleave a sheet of copy paper between each transparency For details see Transparency...

Page 61: ...ition the corner with the white triangle at the right front corner Horizontal placement LTRR Position the corner with the white triangle at the left front corner The screen to select paper size is dis...

Page 62: ...7 Press the Done key 8 Press the Start key The copy job begins If a dark image is projected from a transparency copied with the Transparent Type key selected make another copy by selecting the Reflect...

Page 63: ...t Photo Select when the original contains both text and photos Text Select when the original consists only of text Map Select when the original contains detailed drawings and small text such as on a m...

Page 64: ...e according to the darkness of the original Light Dark keys Press to manually adjust the copy exposure To lighten the copy exposure Press the Light key To darken the copy exposure Press the Dark key C...

Page 65: ...nd mode press the Setting Confirmation key If you want to change the settings you can change the target item on the displayed screen 1 Press the Setting Confirmation key and then the key corresponding...

Page 66: ...Advanced Zoom Copying Two sided Copying This chapter describes how to use the following functions Advanced Zoom Functions Two sided Copying Functions CHAPTER 3 3...

Page 67: ...ts 1 Press the Copy Ratio key 2 Press the or key to enter the copy ratio 3 Press the Done key The copier is now ready to make copies The copy ratio can also be entered with the number keys on the Cont...

Page 68: ...copy ratio needed to make a copy of the specified size from an original of the specified size There are two methods for setting the copy ratio Zoom Sets the same ratio in both the horizontal and vert...

Page 69: ...ize key and enter the copy size using the number keys displayed on the screen 6 Press the OK key The copier is now ready to make copies Zoom Program To enter values in units of mm press the mm key To...

Page 70: ...1 Press the XY Zoom key 2 Enter the X and Y sizes of the original respectively using the number keys displayed on the screen 3 Enter the X and Y sizes of the copy respectively using the number keys di...

Page 71: ...3 6 Advanced Zoom Functions Basic Mode 4 Press the OK key The copier is now ready to make copies Zoom Program...

Page 72: ...ing different copy ratios in the horizontal and vertical directions The horizontal and vertical copy ratios can be set from 25 to 400 respectively in 1 increments Manually Setting the Copy Ratios The...

Page 73: ...reen 5 Press the OK key The copier is now ready to make copies When the Auto key is pressed the copy ratios are automatically selected so that the image will fit to the size of the copy paper To use t...

Page 74: ...s so that the copy ratios will be set automatically according to the selected copy paper size 1 Place the original and press the Paper Select key 2 Select the paper size and press the Done key 3 Press...

Page 75: ...10 Advanced Zoom Functions Basic Mode 4 Press the Other Zoom key 5 Press the XY Zoom key 6 Press the Auto key for X and Y respectively 7 Press the OK key The copier is now ready to make copies XY Zoo...

Page 76: ...The copy ratios can be specified up to a maximum of 400 in 1 increments If the paper size and the number of output pages are specified the copy ratio is calculated automatically and then the copy is p...

Page 77: ...Between Copy Ratio and Paper Size on p 3 17 The copy ratio can also be entered with the number keys displayed on the screen To set different copy ratios in the X andY directions press the XY Zoom key...

Page 78: ...zontal X and vertical Y directions The procedure below follows Step 4 in the operation of Specifying the Enlargement Size by Entering the Copy Ratio s on p 3 11 1 Press the XY Zoom key 2 Press the X o...

Page 79: ...Enlargement Size by Entering the Output Page Count The number of copies divided sections is given the priority in the multi page enlargement mode 1 Press the Copy Ratio key 2 Press the Other Zoom key...

Page 80: ...t the paper size and press the Done key 7 Select the number of output pages The transparency feeding location is grayed out and cannot be selected For the proper page count selection refer to Relation...

Page 81: ...Press the OK key The copier is now ready to make copies If the Stop key is pressed during multi page enlargement copying and then the Start key is pressed copying will resume from the first page of th...

Page 82: ...e copy ratio is not shown in this table The size of the original can be specified up to 11 x17 regardless of whether or not it is a standard size and the copy ratio can be specified up to 400 The hori...

Page 83: ...vertical Based on the above consulting the Table on p 3 17 indicates that the copy ratio is 200 the most suitable paper size is 11 x17 and six pages 2 x 3 will be output Multi page Enlargement Copy r...

Page 84: ...ases the image on each of the divided copies may sometimes overlap slightly with the image on the adjacent copy When pasting together the sections trim off any overlapping portions and blank space The...

Page 85: ...To make two sided copies on heavier paper 28 lb bond to 110 lb index 106 g m2 to 209 g m2 use the Stack Bypass see p 2 27 1 2 Sided 2 2 Sided and Book 2 sided copies cannot be made onto paper in the...

Page 86: ...y in the Sort mode with the original placed in the Feeder Dark originals should be copied on the second side whenever possible 1 2 sided copies cannot be made onto the following types of paper Paper o...

Page 87: ...ies properly by specifying the number of original pages odd even without using the Auto Original Counting function When the Auto Original Counting function is set to OFF the copying time can be reduce...

Page 88: ...ne sided Copies fromTwo sided Originals This function automatically reverses a two sided original placed in the Feeder and makes two one sided copies 1 Place the original in the Feeder 2 Press the Two...

Page 89: ...The copy quantity can be set up to 50 The copy quantity can be set up to 20 only when making a copy in the Sort mode with the original placed in the Feeder 2 2 sided copies cannot be made onto the fol...

Page 90: ...3 25 3 Advanced Zoom Copying Two sided Copying Basic Mode Advanced Zoom Functions 4 Press the OK key The copier is now ready to make copies 2 2 sided Making Two sided Copies from Two sided Originals...

Page 91: ...the Feeder When making copies in the Non sort mode the copy quantity can be set up to 50 Book 2 sided copies cannot be made onto the following types of paper Paper of 17 to 20 lb bond 64 to 79 g m2 Tr...

Page 92: ...ed Zoom Copying Two sided Copying Basic Mode Advanced Zoom Functions 4 Press the OK key The copier is now ready to make copies Book 2 sided Making Two sided Copies from the Left and Right Pages of a B...

Page 93: ...4 1 4 Copying by Changing the Image Position Advanced Mode Creating Margin CHAPTER 4 Copying by Changing the Image Position This chapter describes how to use the following functions Shift Margin...

Page 94: ...e position of an original image to the top bottom left right or corner of the copy paper when copies are made Designated Shift Changes the position of an original image to a designated position on cop...

Page 95: ...d original cannot be recognized automatically the image cannot be moved 1 Press the Sp Feature key 2 Press the Shift key 3 Press the key for the direction you want to move the image 4 Press the OK key...

Page 96: ...ows you to move the entire image of an original to a position designated with the number keys when making copies The destination position of the image to be moved is designated by a distance from the...

Page 97: ...the values to specify the destination position The distance from the center of the copy sheet to the top bottom left or right is entered with the number keys displayed on the screen Press the key for...

Page 98: ...rence point on the image to be moved using the edit pen and then designate the shift destination position The distance from the reference point to the shift destination position is automatically displ...

Page 99: ...pen 6 Designate the shift destination position with the edit pen and press the Next key When this mode is used with a dark original the reference point may be slightly changed Correctly place the orig...

Page 100: ...e display returns to the Sp Feature screen and the Shift key is highlighted The copier is now ready to make copies Moving the Image to a Designated Position Pen Entry The shifting distance can be chan...

Page 101: ...5 This mode allows you to select a rectangular area on the original and to make a copy of the area onto another rectangular area designated on a copy sheet It is also possible to automatically enlarg...

Page 102: ...first point of the area to be moved with the pen 6 Press the second point of the area to be moved with the pen 7 Confirm the designated area and then press the Next key 8 Press the first point of the...

Page 103: ...ition Advanced Mode Creating Margin 9 Press the second point of the shift destination area with the pen 10Confirm the designated shift destination area 11 Press the Auto Zoom key Place the original on...

Page 104: ...destination area Area Priority The image designated to be moved is inserted in the destination area as is Therefore a part of the image may not be inserted depending on the size of the destination are...

Page 105: ...ft the original image to the top bottom left or right by a set distance and create a margin on copies when making copies Four types of margins can be created left right top or bottom margin 1 Press th...

Page 106: ...s from an original with a margin in combination of Margin mode and Two sided mode 1 1 Sided It is unnecessary to set the margin Use the standard copy procedure 1 2 Sided Set the margin for the back si...

Page 107: ...CHAPTER 5 Copying by Other Special Methods This chapter describes how to use the following functions Two page Separation Frame Erase Image Combination Cover Mode Transparency Interleaving 5...

Page 108: ...eeder is attached and an original is placed on the platen glass be sure to make copies with the Feeder lifted so that the original size will be correctly recognized Making Copies by Dividing the Image...

Page 109: ...the edges of the copy paper with a specified width of white background Original Frame Erase Erases any shadows around a copied image using a white background when the original size is smaller than the...

Page 110: ...es Sheet Frame Erase This function erases any frames or shadows from a copied image using a specified width of white background 1 Press the Sp Feature key 2 Press the Frame Erase key 3 Press the Sheet...

Page 111: ...alues in units of mm press the mm key Press the Adjust Each Dim key to specify the top bottom left and right frame erase widths independently of each other For details see To specify different values...

Page 112: ...ress the Top Left Right or Bottom key and enter each width value using the and keys 3 Press the OK key The display returns to the Sp Feature screen and the Frame Erase key is highlighted The copier is...

Page 113: ...you copy an original smaller than a copy sheet shadows may sometimes appear around the copied image The Original Frame Erase function allows you to erase such shadows when making copies 1 Press the S...

Page 114: ...erase width Care must be taken To enter values in units of mm press the mm key Press the Adjust Each Dim key to specify the top bottom left and right frame erase widths independently of each other For...

Page 115: ...se If you copy a bound original such as a book shadows may appear around or at the center of the copied image The Book Frame Erase function erases such shadows when copies are made 1 Press the Sp Feat...

Page 116: ...now ready to make copies Book Frame Erase Press the Adjust Each Dim key to specify the top bottom left right and center frame erase widths independently of each other For details see To specify differ...

Page 117: ...y and enter each width value using the and keys 3 Press the OK key The display returns to the Sp Feature screen and the Frame Erase key is highlighted The copier is now ready to make copies Book Frame...

Page 118: ...ingle copy sheet when making copies There are two types of Image Combination functions 2 On 1 Images of two originals are reduced and copied onto one sheet of paper 2 On 1 Two Sided Images of four ori...

Page 119: ...On 1 key or 2 On 1 Two Sided key to select an Image Combination feature and then press the Next key 5 Press the desired copy paper size key to select the copy paper 6 Press the OK key The display retu...

Page 120: ...ecifying the number of original pages without using the Auto Original Counting function When the Auto Original Counting function is set to Off the copying time can be reduced 1 Press the Off key for A...

Page 121: ...om that for the main text copies There are two methods for adding a cover Front Covers Adds a front cover to the copy Front Back Covers Adds a front cover and a back cover to the copy It is also possi...

Page 122: ...Advanced Mode Making Copies by Adding a Front and or Back Cover 1 Press the Sp Feature key 2 Press the Cover Mode key 3 Press the Front Covers key or Front Back Covers key and then the Next key Cover...

Page 123: ...s selected 5 Press the Next key 6 Press the key for the cover copy stock location The selected copy stock location key is highlighted 7 Press the Next key Cover Mode The stack bypass paper can also be...

Page 124: ...er is now ready to make copies Cover Mode If there is no paper loaded of the same size as the front cover only the cover paper stock feeding location is highlighted other feeding locations are grayed...

Page 125: ...s InterleavingSheetsofPaperBetweenTransparencies 1 Press the Sp Feature key 2 Press the Transparency Interleaving key 3 Select the transparency feeding location The selected key for the feeding locati...

Page 126: ...owing message is displayed Load paper of the same size Then load the paper of the same size as the transparency to the feeding location 4 Press the Next key 5 Select the interleaf sheet feeding locati...

Page 127: ...justing Colors 6 Adjusting Colors and Image Quality CHAPTER 6 Adjusting Colors and Image Quality This chapter describes how to use the following functions Color Balance One Touch Color Sharpness Image...

Page 128: ...magenta cyan and black respectively 4 Press the OK key The display returns to the Sp Feature screen and the Color Balance key is highlighted The copier is now ready to make copies Press the Recall Reg...

Page 129: ...used to generate colors on a color TV or a computer CRT The primaries of material are cyan C magenta M and yellow Y produced when the primaries of light overlap each other By mixing C M and Y in vari...

Page 130: ...justs the vividness of an image The saturation can be adjusted for all colors as a whole or for individual colors separately including yellow green red magenta blue and cyan 1 Press the Sp Feature key...

Page 131: ...just the saturation of all the colors press the All key 5 Adjust the saturation using the Low key and High key 6 Press the OK key The Saturation Adjustment key is highlighted 7 Press the OK key The di...

Page 132: ...or example red will be actually red with a strong yellow component or yellow will be actually close to yellow green and so on Hues can be adjusted for all colors as a whole or for individual colors se...

Page 133: ...The Hue Adjustment key is highlighted 7 Press the OK key The display returns to the Sp Feature screen and the Color Balance key is highlighted The copier is now read to make copies Hue Adjustment When...

Page 134: ...8 Advanced Mode Adjusting Colors Adjusting the Hue for Each Color 1 Press the Sp Feature key 2 Press the Color Balance key 3 Press the Hue Adjustment key 4 Press the Color By Color key Hue Adjustment...

Page 135: ...to green Closer to cyan Closer to blue Closer to magenta Closer to red Closer to yellow Closer to red Closer to yellow Closer to green Closer to cyan Closer to blue Closer to magenta Pressing the key...

Page 136: ...e color density for yellow magenta cyan and black individually in high dark portion medium and low light portion density areas 1 Press the Sp Feature key 2 Press the Color Balance key 3 Press the Dens...

Page 137: ...ensity for high medium and low density areas using the and keys 6 Press the OK key The Density Fine Adjust key is highlighted 7 Press the OK key The display returns to the Sp Feature screen and the Co...

Page 138: ...r balance settings can be registered Saturation adjustments hue adjustments and density fine adjustments are not registered To register the Color Balance settings You can register the adjusted Color B...

Page 139: ...ed the registered settings are displayed If no settings have been registered Unregistered is displayed 4 Press the Recall Register key 5 Press the Store Erase key 6 Press the Register key 7 Press the...

Page 140: ...is displayed and then the screen to select the Color Balance settings to be recalled appears 9 Press the OK key The screen to adjust the Color Balance is displayed 10Press the OK key The display retur...

Page 141: ...n assign a name to the registered Color Balance settings 1 Press the Recall Register key 2 Press the Store Erase key 3 Press the Register Name key 4 Press the key for the Color Balance to be named and...

Page 142: ...screen for recalling registering the Color Balance settings Each time the Entry Mode key is pressed the entry mode is changed to alphabet and symbol modes in that order If your target character or sym...

Page 143: ...e Quality To delete registered Color Balance settings You can delete registered Color Balance settings Registering Erasing Recalling Color Balance 1 Press the Sp Feature key 2 Press the Color Balance...

Page 144: ...to be deleted and then press the OK key 7 Press the Yes key The message Erased is displayed on the screen and the screen to select the Color Balance to be recalled is displayed several seconds later R...

Page 145: ...djusting Colors 6 Adjusting Colors and Image Quality Registering Erasing Recalling Color Balance 8 Press the Cancel key 9 Press the OK key The display returns to the Sp Feature screen and Color Balanc...

Page 146: ...gistered Color Balance settings Registering Erasing Recalling Color Balance You can make changes to the recalled Color Balance settings 1 Press the Sp Feature key 2 Press the Color Balance key 3 Press...

Page 147: ...ed Mode Adjusting Colors 6 Adjusting Colors and Image Quality Registering Erasing Recalling Color Balance 5 Press the OK key The display returns to the Sp Feature screen and the Color Balance key is h...

Page 148: ...marily in the low density areas and makes copies with heavier tones Density Fine Adjustment Highlight Reproduction Increases the density in the low density areas and faithfully reproduces highlights t...

Page 149: ...It is not possible to select the following combinations of items in the One Touch Color mode In addition only one color can be selected for the color intensity adjustment Vivid Colors Tranquil Colors...

Page 150: ...fine adjustments to the color intensity You can finely adjust the color intensity in the One Touch Color mode 1 Press the Fine key 2 Press the Low key or High key to finely adjust the color intensity...

Page 151: ...s uneven color stripes known as the moire effect can be suppressed The Sharpness settings to be made vary with the original type For details on how to set the original type see Original Type Selection...

Page 152: ...ontours For Text Printed Image Text Photo or Color Copy original For Text or Map original 5 Press the OK key The display returns to the Sp Feature screen and the Sharpness key is highlighted The copie...

Page 153: ...de is copied Note that you cannot select both features together for the same copy job Assume that the copy exposure is already set to A on the standard display In this case if the Image Quality Adjust...

Page 154: ...the initial level 4 Press the Fine key 5 Press the Light key or Dark key to fine adjust the hiding level of red green blue and yellow respectively 6 Press the OK key The display returns to the screen...

Page 155: ...ng Image Quality 6 Adjusting Colors and Image Quality Hide Backside Image 1 Press the Sp Feature key 2 Press the Image Quality Adjustment key 3 Press the Hide Backside Image key 4 Press the Fine key B...

Page 156: ...image to be copied On the contrary if the level is set closer to Dark a light color portion will not be hidden from the original image but the backside image may not be hidden completely 6 Press the O...

Page 157: ...ficult to be differentiated Assume that the copy exposure is already set to A on the standard display In this case if the Image Quality Adjustment key is pressed and the image quality is adjusted the...

Page 158: ...toward the left end of the scale adjustment is made so that fine differences in a low saturation portion can be reproduced If the compression rate is set to the minimum the left end of the scale no Co...

Page 159: ...ck without influencing other colors Assume that the copy exposure is already set to A on the standard display In this case if the Image Quality Adjustment key is pressed and the image quality is adjus...

Page 160: ...if black is weakened a black portion will be slightly lighter but it allows readily reproducing fine differences in black 5 Press the OK key The display returns to the screen for selecting an Image Q...

Page 161: ...y set to A on the standard display In this case if the Image Quality Adjustment key is pressed and the image quality is adjusted the A setting for the copy exposure will be canceled On the contrary if...

Page 162: ...ns to the screen for selecting an Image Quality Adjustment feature The Complexion Adjustment key is highlighted 6 Press the OK key The display returns to the Sp Feature screen and the Image Quality Ad...

Page 163: ...7 Designating Colors Setting Color Creation Mode CHAPTER 7 Designating Colors Setting Color Creation Mode This chapter describes how to use the following functions Color Designation Color Registratio...

Page 164: ...olor is the same for the operation of other functions Fine adjustments of a color are effective only for the copy mode that has made those adjustments If that color is selected in another copy mode th...

Page 165: ...Press the desired color on the color palette using the edit pen 5 Press the OK key 6 Press the Done key The display returns to the Sp Features screen and the Color Creation key is highlighted The cop...

Page 166: ...ge made in the following procedure is only temporary so the original color sheet will be effective when the color designation is completed To retain the color sheet change use the Additional Functions...

Page 167: ...ette Selection To select a color on the color sheet with the number keys 1 Press the Sp Feature key 2 Press the Color Creation key 3 Press the Single Color key 4 Press the Number Key Entry key To chan...

Page 168: ...n 6 Press the Done key 7 Press the OK key 8 Press the Done key The display returns to the Sp Feature screen and the Color Creation key is highlighted The copier is now ready to make copies For the cor...

Page 169: ...r are effective only for the copy mode that has made those adjustments If that color is selected in another copy mode the original color without adjustments is selected The fine adjustments of a color...

Page 170: ...low magenta cyan and black of the selected color is displayed on the right of the screen 6 Press the OK key 7 Press the Done key The display returns to the Sp Feature screen and the Color Creation key...

Page 171: ...tments of a color are effective only for the copy mode that has made those adjustments If that color is selected in another copy mode the original color without adjustments is selected The fine adjust...

Page 172: ...ted from the registered colors 6 Press the OK key 7 Press the Done key The display returns to the Sp Feature screen and the Color Creation key is highlighted The copier is now ready to make copies A k...

Page 173: ...an designate a color on the original or on the color designation sheet using the edit pen Designated Color Selection 1 Press the Sp Feature key 2 Press the Color Creation key 3 Press the Single Color...

Page 174: ...int of the target color on the original using the edit pen 7 Press the OK key 8 Press the Done key The display returns to the Sp Feature screen and the Color Creation key is highlighted The copier is...

Page 175: ...e designated using the edit pen Without reversing the top bottom orientation of the color designation sheet and the original turn both of them face down and place them on the platen glass On the plate...

Page 176: ...olor of the original for the ending color in Color Gradation The method for selecting a color is the same for the operation of other functions 1 Press the Sp Feature key 2 Press the Color Creation key...

Page 177: ...nal has been selected 8 Press the OK key The screen to select the beginning and ending colors for the gradation is displayed and Original Color is indicated for the ending color 9 Press the OK key The...

Page 178: ...eight original colors created by the user with assigned names Fine adjustments of a color are temporary and effective only for the copy function that has made those adjustments However registered col...

Page 179: ...assign a name to the registered color For details see To assign a name to the registered color on p 7 19 The key with a color already registered has a black square displayed on the lower right of the...

Page 180: ...eturns to the Sp Feature screen To check the registered color You can output and check the registered color Press the key of the registered color and then press the Sample Print key The registered col...

Page 181: ...e Next key 3 Enter a name using the character keys displayed on the screen 4 Press the OK key The screen to select a Color Creation feature is displayed Each time the Entry Mode key is pressed the ent...

Page 182: ...ete a registered color 1 Press the Erase key 2 Select the key of the registered color to be deleted and then press the OK key 3 Confirm the content of the color to be deleted and then press the Yes ke...

Page 183: ...Select a color 5 Press the OK key The screen to select a Color Creation feature is displayed and the Single Color key is highlighted 6 Press the Done key The display returns to the Sp Feature screen a...

Page 184: ...mode adds gradations of a specified color to an image or background on a black and white original The Color Gradation mode has seven types of gradation patterns 1 Press the Sp Feature key 2 Press the...

Page 185: ...st color of the gradation You can perform any of the following three types of adjustments depending on the selected gradation pattern Frame Adds a frame with the gradation pattern For details see To a...

Page 186: ...to the Color Creation screen and the Color Gradation key is highlighted 12 Press the Done key The display returns to the Sp Feature screen and the Color Creation key is highlighted The copier is now r...

Page 187: ...ame with the gradation pattern The following three types of gradation patterns can be used for the frame 1 Select a gradation pattern 2 Press the Frame key If an image has been selected for the target...

Page 188: ...dvanced Mode Color Creation Color Gradation 3 Press the key indicating the width of a frame to be added The location available for frame setting varies with the selected gradation pattern 4 Press the...

Page 189: ...adation Gradation can be repeated by specifying the repetition pitch 1 Select the gradation pattern 2 Press the Repeat key 3 Select the pitch where the gradation repeats Pitch in the vertical directio...

Page 190: ...horizontal directions 4 Press the OK key To make fine adjustments to the gradation The smoothness of the gradation can be finely adjusted 1 Select the gradation pattern 2 Press the Gradation Adjust k...

Page 191: ...e a photograph taken by a camera equipped with a color filter The strength exposure of the filter can be adjusted as desired 1 Press the Sp Feature key 2 Press the Color Creation key 3 Press the Color...

Page 192: ...and the Color Filter key is highlighted 8 Press the Done key The display returns to the Sp Feature screen and the Color Creation key is highlighted The copier is now ready to make copies There are fou...

Page 193: ...or to an area bounded by lines in a black and white original Coloring 1 Place the original face up on the Editor aligning the original with the mark 2 Press the Sp Feature key 3 Press the Color Creati...

Page 194: ...e added to the designated area To clear an individual point press the key for the point to be cleared and then press the Clear Point key To clear all the designated points of an area press the Clear A...

Page 195: ...ure screen and the Color Creation key is highlighted The copier is now ready to make copies To add color to the background There are two modes for adding color to the background Designated Area and En...

Page 196: ...or Creation 2 Select a Background Coloring mode To add color to the image Color is added to parts of the image that are inside the designated area Press the Image Coloring key on the Coloring setting...

Page 197: ...olor Creation Coloring To change the position of the designated point You can change the position of the designated point 1 Select the point to be moved 2 Press the Move Point key 3 Press the arrow di...

Page 198: ...the background 5 Press the OK key The Color Creation screen is displayed and the Base Color key is highlighted 6 Press the Done key The display returns to the Sp Feature screen and the Color Creation...

Page 199: ...han blue Blue Background 1 Press the Sp Feature key 2 Press the Color Creation key 3 Press the Blue Background key 4 Select a background pattern If a gradation pattern other than that in the lower rig...

Page 200: ...Done key The display returns to the Sp Feature screen and the Color Creation key is highlighted The copier is now ready to make copies There are four methods for selecting a color Color Palette Select...

Page 201: ...tion Mode Color Creation Color Conversion This mode changes a specific color in an original to a different color on the copies 1 Place the original face up on the Editor aligning it with the mark 2 Pr...

Page 202: ...e Next key after selecting whether to apply the gradation Then proceed to Step 13 to select a color after the color conversion 4 Press the Color Conversion key 5 Using the edit pen designate the area...

Page 203: ...rent color tones are used in the original widen the color recognition range to make color conversion of colors with similar tones 10 Press the Low key or High key to adjust the intensity of the filter...

Page 204: ...is highlighted 15 Press the Done key The display returns to the Sp Feature screen and the Color Creation key is highlighted The copier is now ready to make copies Color Conversion Color Creation Ther...

Page 205: ...ode Image Creation 8 Setting the Image Creation Mode CHAPTER 8 Setting the Image Creation Mode This chapter describes how to use the Image Creation features for adding various types of changes to an o...

Page 206: ...Flat Shadow Only is specified in the Text Editing mode the Nega Posi settings are canceled 1 Press the Sp Feature key 2 Press the Image Creation key 3 Press the Nega Posi key 4 Press the Done key The...

Page 207: ...e copy paper If the Original Size Recognition function is set to ON Image Repeat can be carried out for an original smaller than the selected paper size without designating an image area In this case...

Page 208: ...the Image Creation screen and the Image Repeat key is highlighted 6 Press the Done key The display returns to the Sp Feature screen and the Image Creation key is highlighted The copier is now ready to...

Page 209: ...8 5 Advanced Mode Image Creation 8 Setting the Image Creation Mode Original placement and Image Repeat direction The image is repeated in the vertical direction of the platen glass Image Repeat...

Page 210: ...Point key to delete the designated point Press the Clear Area key to delete the designated area To designate an image area with the edit pen 1 Press the Framing key 2 Press the Pen Entry key and then...

Page 211: ...y Entry key and then the Next key 3 Designate the image area using the number keys Press the X1 Y1 X2 or Y2 key and enter the respective values using the number keys displayed on the screen 4 Press th...

Page 212: ...xis Top Symmetry The image is flipped up with the top edge of the original as the axis The true image and the flipped image are both then copied onto a single sheet Bottom Symmetry The image is flippe...

Page 213: ...y to designate an area of the image For details see Framing an Area to be Repeated on p 8 6 A small white gap will appear between the true image and the flipped image The Top Symmetry Bottom Symmetry...

Page 214: ...of the slant The angle of the slant can be specified from 45 deg to 45 deg If the Slanted Image setting causes a part of the copy image to fall outside the paper only the part that falls on the paper...

Page 215: ...key is highlighted The copier is now ready to make copies Framing a Slanted Image Frame an original image to be copied as the slanted image The framing can be performed with the number keys or the ed...

Page 216: ...three functions for text editing Color for Text Makes copies with specified colors for text Contour Makes copies using only the contours with colors Shadow Makes copies with shadows added to text or w...

Page 217: ...ted 8 Press the Done key The display returns to the Sp Feature screen and the Image Creation key is highlighted Text Editing There are five methods for selecting a color Color Palette Selection see p...

Page 218: ...Using Only the Contours This mode makes copies of only the contours of the image The color of the contours can be specified Text Editing 1 Press the Sp Feature key 2 Press the Image Creation key 3 Pre...

Page 219: ...ted 7 Press the Done key The display returns to the Image Creation screen and the Text Editing key is highlighted 8 Press the Done key The display returns to the Sp Feature screen and the Image Creati...

Page 220: ...be made with a specified color 1 Press the Contour Color key 2 Select a color 3 Press the OK key The display returns to the Contour screen To specify the contour type The direction for thickening the...

Page 221: ...r the shadow There are two types of shadows 3 D shadow A three dimensional shadow is added to the image Flat shadow A flat shadow is added to the background of the image 3 D shadow Only The only three...

Page 222: ...y returns to the Image Creation screen and the Text Editing key is highlighted A color can be specified for the selected Shadow type To specify a color press the Shadow Color key For details see To sp...

Page 223: ...ength key The screen to specify the shadow length is displayed 2 Press the or key to specify the shadow length The shadow length can be specified in units of 0 25 mm If Flat Shadow or Flat Shadow only...

Page 224: ...can be combined to produce the following text No Settings Color for Text Contour 3 D Shadow Only Flat Shadow Only Color for Text 3 D Shadow Color for Text Flat Shadow 3 D Shadow Flat Shadow Color for...

Page 225: ...mode scans a texture or pattern from cloth paper etc and then adds it to the image on the copy 1 Press the Sp Feature key 2 Press the Image Creation key 3 Press the Texture key 4 Place the pattern of...

Page 226: ...re To designate an area of the pattern to be scanned press the Scan Area Designation key For details see Designating a Scan Area on p 8 23 If no area is designated the area of 5 8 x 5 8 16 mm x 16 mm...

Page 227: ...ation key The screen to designate the center of the scan area 5 8 x 5 8 16 mm x 16 mm with the edit pen is displayed 2 Place the texture original on the Editor 3 Designate the center of the scan area...

Page 228: ...be specified for the original Reduced Gradation Reduces the number of gradations in the original when making a copy Solarization Reverses colors in the middle of gradations when making a copy Setting...

Page 229: ...5 Press the Low or High key to specify the gradation level 6 Press the OK key The display returns to the Image Creation screen and the Special Effects key is highlighted 7 Press the Done key The disp...

Page 230: ...8 26 Advanced Mode Image Creation Special Effects Setting Solarization 1 Press the Sp Feature key 2 Press the Image Creation key 3 Press the Special Effects key 4 Press the Solarization key...

Page 231: ...oothly reversing the gradation changes above a certain brightness 1 to the level of distinctly reversing with clear gradation changes 3 6 Press the OK key The display returns to the Image Creation scr...

Page 232: ...CHAPTER 9 Designating Areas for Copying This chapter describes how to designate areas for image editing 9...

Page 233: ...or each area group HOT INFORMATION NEW SHOP Area Group 1 Nega Posi Area Group 4 Original type MAP Area Group 3 Single Color Black Area Group 2 Original type PHOTO 1 Place the original face up on the E...

Page 234: ...its designation method see Area Designation Type and Method on p 9 8 It is not possible to combine an enclosed area and another area type within a single area group Set the respective area types in d...

Page 235: ...designating all necessary points press the OK key 8 Press the key for the image editing to be set For details on the respective function setting methods see the following pages Framing Framing Blanki...

Page 236: ...Upon completion of image editing setting press the OK key The display returns to the Sp Feature screen and the Area Designation key is highlighted The copier is now ready to make copies How to Design...

Page 237: ...area to be moved by pressing the corresponding key 2 Press the Adjust Area key 3 Enter a distance to move using the direction keys 4 Press the Done key The display returns to the screen for designati...

Page 238: ...ea with the direction keys is displayed 3 Press the Enlar Redu Area key 4 Change the area size using the direction keys 5 Press the Done key The display returns to the screen for designating areas How...

Page 239: ...nine types of methods for designating areas First press the Desig Methods key on the screen for designating areas Rectangle Enter two of the opposing corners of the rectangular area using the edit pe...

Page 240: ...en for selecting an image editing function Circle Enter the center of a circle and then specify one point on the circumference of the circle using the edit pen 2 1 1 Press the Circle key and then the...

Page 241: ...ompletion of consecutive area designation press the OK key 2 Press the center of the circle with the edit pen 3 Press one point on the circumference with the edit pen 4 Press the OK key The display re...

Page 242: ...the first point with the edit pen 3 Press the second point with the edit pen 4 Press the OK key The display returns to the screen for selecting an image editing function Area Designation Type and Meth...

Page 243: ...d then the Done key 2 Press the first point with the edit pen 3 Press the second point with the edit pen 4 Press the OK key The display returns to the screen for selecting an image editing function Ar...

Page 244: ...e rounded rectangle can hold 2 1 1 Press the Round Rectangle key and then the Done key 2 Press the first point with the edit pen 3 Press the second point with the edit pen 4 Press the OK key The displ...

Page 245: ...th the edit pen 3 After pressing the final point press the Set key Area Designation Type and Method When the third point is entered the Set key is displayed Enter three or more points to designate a p...

Page 246: ...n the edit pen breaks contact with the Editor 1 Press the Free key and then the Done key 2 Trace the outside of the area with the edit pen 3 Press the OK key The display returns to the screen for sele...

Page 247: ...line traced with the edit pen on the Editor is recognized as an area 1 Press the Tracing key and then the Done key 2 Trace the area with the edit pen 3 Press the Tracing Width key 4 Select the tracin...

Page 248: ...losed area may not be correctly processed when the entire images are not contained completely within the copy paper resulting in broken borders during enlarged copying Do not designate a point on any...

Page 249: ...ire Enclosed Desig Area When there is a second border within the first border enclosed area designated with the edit pen the area excluding the region inside the inner border is recognized as the desi...

Page 250: ...ting always takes priority regardless of the order in which the editing function settings were made If Framing and Blanking areas overlap The one designated last has priority Area Editing 1 Framing Ar...

Page 251: ...functions that are specified for area editing Color Balance Color Balance can be specified a total of four times for one original three times in area editing and once for the entire original Specific...

Page 252: ...n S i n g l e C o l o r C o l o r C o n v e r s i o n C o l o r G r a d a t i o n i m a g e C o l o r G r a d a t i o n b a c k g r o u n d B a s e C o l o r C o l o r F i l t e r C o l o r B a l a n...

Page 253: ...sed Highlight Markers are recommended for use One point Designation and Encircled Designation can be set for each marker color By using all three colors a maximum of six functions can be designated in...

Page 254: ...ey 2 Press the Red Blue or Green key to select the color of the marker to be designated How to Designate Areas For details on the color numbers of the color sheet refer to the Quick Index manual The r...

Page 255: ...Color After Copying key 6 Select a color For details on One point Designation see To make a one point designation on p 9 26 For details on Encircled Designation see To make an encircled designation on...

Page 256: ...ls see Base Color on p 7 36 Additional Settings key Allows you to make settings for the Color Filter Paint Text Editing Nega Posi and Original Type Selection modes For details see Color Filter on p 7...

Page 257: ...ide the border with a marker The region inside the border is recognized as an area The designation cannot be made if a portion of the border in the image is open A maximum of 4 000 items can be specif...

Page 258: ...ch areas may not be recognized properly Any number of bordered areas can be designated on one original The encircled area should have a diameter of at least 5 mm and the border should be at least 1 mm...

Page 259: ...O O O O O O O O O O O O O O O O O O O O O O O O O O O O O O O O O O O Editing function that was set first Framing Blanking Nega Posi Shadow Contour Color for Text Single Color Base Color Color Filter...

Page 260: ...ptional IP ED Board and Editor are installed Without IP ED With With Both IP ED and Editor only Editor and Editor Touch Panel key Framing Blanking Framing Blanking Area Designation Max points 10 point...

Page 261: ...keys or edit pen However it is not possible to use both the number keys and the edit pen for the area designation at the same time For area designation with the edit pen the optional Editor is needed...

Page 262: ...K key The display returns to the Sp Feature screen and the Framing Blanking key is highlighted The copier is now ready to make copies To enter values in units of mm press the mm key Up to four areas c...

Page 263: ...can be designated In the Multi point Entry mode up to 10 points can be designated for each area When the first point is designated the Clear Point key appears Press this key to clear the point that w...

Page 264: ...eturns to the Sp Feature screen and the Framing Blanking key is highlighted The copier is now ready to make copies Press the Clear Area key to delete the designated area To designate another area pres...

Page 265: ...s to designate an area for image editing with the edit pen 1 Press the Multi Point Designation key 2 Press points using the edit pen 3 When the last point specification is complete press the Confirm M...

Page 266: ...ages Framing Blanking To re enter an area 1 Press the Area No key corresponding to the area to be re entered 2 Press the Re enter Clear Area key 3 Specify new points and then press the OK key An area...

Page 267: ...nter Clear Area key 3 Press the Clear Area key for the area designated with the edit pen or Cancel key for the area designated with the number keys For the area designated with edit pen t h For the ar...

Page 268: ...1 Inserting Text Images Advanced Mode Inserting Text CHAPTER 11 Inserting Text Images This chapter describes how to use the following functions Image Composition Character Composition Offset Plate Ori...

Page 269: ...ction makes copies by inserting a color image into a black and white original The extracted image for insertion is copied in full color three colors The original used as the background is copied in bl...

Page 270: ...extracted image is to be inserted 8 Press the Next key For instructions on designating an area by pressing the Desig Methods key and selecting an area shape see Area Designation Type and Method on p 9...

Page 271: ...y ratio 10 Place the originals on the platen glass A B C 11 Press the OK key The display returns to the Sp Feature screen and the Composition key is highlighted The copier is now ready to make copies...

Page 272: ...Settings and Composition Modes on p 11 7 Image Composition To select a Composition mode 1 Press the key for Composition 2 Press either the Image Priority or Area Priority key If the Image Priority ke...

Page 273: ...irections 1 Press the XY Zoom key 2 Press the or key or the Auto key to enter each copy ratio in X and Y directions When the Auto key is pressed the size of the image to be inserted is automatically e...

Page 274: ...ith some enlargement priority is given to the copy ratio with a lower enlargement ratio in the X orY direction Area Priority The extracted color image is inserted into the destination area on the back...

Page 275: ...you to add color contour or shadow to text inserted into the image There are basically two Character Composition modes Superimpose and Window Inserting Text in the Superimpose Mode This function make...

Page 276: ...the Next key 7 Press the or key to specify the mixing ratio at which the background color original is reproduced For details on the respective Text Editing functions see the following pages Making Co...

Page 277: ...layed 10Place the color original for the background on the platen glass 11Press the OK key The display returns to the Sp Feature screen and the Composition key is highlighted The copier is now ready t...

Page 278: ...the image quality to be scanned 1 Press the Scan Image Adjustment key 2 Press the Low or High key to adjust the image quality Press the High key to increase the scanning density Press the Low key to d...

Page 279: ...e image inside the designated area Press the Blanking key to scan only the image outside the designated area 3 Place the text original on the Editor 4 Press two points of the opposing corners of the a...

Page 280: ...indow into a color original when copies are made A window refers to a portion other than text in a designated area You can specify a color for the text and the window respectively as desired 1 Press t...

Page 281: ...olor For Text Shadow and or Contour for the text Transparent Allows the background to show through the text 6 Press the Next key 7 Press the Desig Methods key and then select a Window area shape 8 Pre...

Page 282: ...9 6 To delete an entered point press the Clear Point key To delete all the designated areas press the Cancel All Area Editing key For details on the respective Text Editing functions see the followin...

Page 283: ...n of scanning the message Scan completed is displayed and the screen to make a copy of the background original is displayed 19Place the color original for the background on the platen glass To adjust...

Page 284: ...Special Feature screen and the Composition key is highlighted The copier is now ready to make copies To adjust the image quality to be scanned 1 Press the Scan Image Adjustment key 2 Press the Low or...

Page 285: ...f the area to be scanned using the edit pen and then press the OK key To adjust the Window area Press the Adjust Area key so that you can change the position and size of the designated window area To...

Page 286: ...n a black and white original and then insert it into a color original The function is used with either Superimpose or Window Making Character Composition Shift in the Superimpose Mode 1 Press the Sp F...

Page 287: ...it pen 7 Press the Post Shift Area key 8 Designate a shift destination area of the image with the edit pen Character Composition Shift To delete an entered point press the Clear Point key To delete th...

Page 288: ...ages Advanced Mode Inserting Text 9 Press the Next key The screen to select a Text Editing feature and a color for the window is displayed For the subsequent procedures use Step 5 onwards on p 11 9 Ch...

Page 289: ...ting Text Making Character Composition Shift in the Window Mode 1 Press the Sp Feature key 2 Press the Composition key 3 Press the Char Compos Shift key and then the Next key 4 Press the Window key Ch...

Page 290: ...lows the background to show through the text 6 Press the Next key 7 Place the text original on the Editor 8 Press the Window Area key Character Composition Shift To delete the designated area press th...

Page 291: ...10Press the Post Shift Area key 11Designate a shift destination area with the edit pen 12Press the Next key The screen to select a Text Editing feature and a color for the Window is displayed For the...

Page 292: ...s for both Superimpose and Window or for different types of text editing at the same time for one original in one operation Making Character Composition Multiple Editing in the Superimpose Mode 1 Pres...

Page 293: ...ollowing pages Making Copies with Specified Colors for Text p 8 12 Making Copies Using Only the Contours p 8 14 Making Copies with Shadows Added to Text p 8 17 Making Copies with only shadows of the t...

Page 294: ...on of scanning the message Scan completed is displayed and the screen to make a copy of the background original is displayed 14Place the background color original on the platen glass To adjust the ima...

Page 295: ...11 28 Advanced Mode Inserting Text 15Press the OK key The display returns to the Special Feature screen and the Composition key is highlighted Character Composition Multiple Editing...

Page 296: ...erting Text Making Character Composition Multiple Editing in the Window Mode 1 Press the Sp Feature key 2 Press the Composition key 3 Press the Multiple Editing key and then the Next key 4 Press the W...

Page 297: ...e background as is Transparent Allows the background to show through the text 6 Press the Next key 7 Place the text original on the Editor 8 Press the Multiple Editing group No key to make the setting...

Page 298: ...pies with Specified Colors for Text p 8 12 Making Copies Using Only the Contours p 8 14 Making Copies with Shadows Added to Text p 8 17 Making Copies with only the shadows of the text p 8 17 There are...

Page 299: ...scanning the message Scan completed is displayed and the screen to make a copy of the background original is displayed 16Place the color original for the background on the platen glass 17Press the OK...

Page 300: ...and creates four black copies one each for the magenta cyan yellow and black separations The copies are output in the order of magenta cyan yellow and black separations 1 Press the Sp Feature key 2 Pr...

Page 301: ...CHAPTER 12 Setting Recalling Mode Memory This chapter describes how to use the Mode Memory and Recall function 12...

Page 302: ...Color Balance and Image Creation can be stored Once a copy mode setting is stored it is retained in memory even if the power is turned OFF 1 Make the copy mode settings Example Image Creation Text Ed...

Page 303: ...e screen with the content of the stored copy settings is displayed The mode memory key where copy settings are already stored shows a small black square in the lower right corner of the key If the mod...

Page 304: ...storing the copy mode settings keep pressing the Store Erase key so that you can continue to register a name for the mode memory key Any scanned image data and the Projector shading data are erased w...

Page 305: ...the keys displayed on the screen and then press the OK key The screen to recall copy settings from mode memory is displayed Each time the Entry Mode key is pressed the entry mode changes to kana upper...

Page 306: ...1 Press the Erase key 2 Press the mode memory key to delete the copy settings and then the Next key 3 Press the Yes key The message Erased is displayed and then the screen to recall the copy settings...

Page 307: ...ling Mode Memory The stored copy settings can be recalled to help make complicated settings easily in a single step If the selected mode memory key has no stored copy settings the OK key is grayed out...

Page 308: ...nged settings When the Copy Settings are Stored in Recall Memory The standard copy settings and the Additional Functions settings are not stored in Recall memory The current copy settings are automati...

Page 309: ...ll Additional Functions 13 Additional Functions CHAPTER 13 Additional Functions This chapter describes how to use the following functions of the Additional Functions mode Custom Settings Timer Setting...

Page 310: ...oaded Thin Paper Feed Location Register where thin paper is loaded Change Color Sheet Change or register the color sheet settings or print the colors of a selected color sheet Feeder Auto Start Specif...

Page 311: ...ly adjust gradations Text Photo Priority Adjust the text and photo priority level control Feeder Cleaning Select to clean the original feeder rollers of the optional Feeder Wire Cleaning Select to cle...

Page 312: ...Two sided Mode Sorter Shift One Touch Color Color Balance Margin Image Quality Adjustment Sharpness Frame Erase Color Creation Image Creation Two page Separation Marker Editing Framing Blanking Image...

Page 313: ...the Custom Settings items displayed and W Settings is displayed for Standard Key Settings Custom Settings Standard Key Settings If the selected key has already been registered as the standard key the...

Page 314: ...s in Additional Functions Mode Custom Settings 8 Press the Done key The display returns to the screen for selecting an Additional Functions feature 9 Press the Done key The screen returns to the stand...

Page 315: ...atures Mode Memory or Recall mode is selected for Standard Display Window the display with the selected mode window opened is used as a part of the standard display The standard display does not show...

Page 316: ...play Window 5 Press the Done key The display returns to the screen for selecting an Additional Functions feature 6 Press the Done key The screen returns to the standard display If the standard display...

Page 317: ...r mode allows you to set the energy save level to 10 25 50 mode or Return to Standard mode Energy Saver Level Recovery Time 10 mode Approx 1 min 15sec 25 mode Approx 3 min 30sec 50 mode Approx 7 min R...

Page 318: ...returns to the Custom Settings screen and the selected energy saver level is displayed for Energy Saver Adjustment 5 Press the Done key The display returns to the screen for selecting an Additional Fu...

Page 319: ...n be toggled between inch and mm When the mode is set to Off a numeric value is entered in units of mm only The factory preset initial setting is On 1 Press the key and then the Custom Settings key 2...

Page 320: ...The display returns to the screen for selecting an Additional Functions feature 6 Press the Done key The screen returns to the standard display How to enter a number in units of mm Enter a numeric val...

Page 321: ...en changes have been made to the Special Features setting When the confirmation window has been set not to be displayed press the Setting Confirmation key on the Touch Panel so that the window will be...

Page 322: ...Press the On or Off key 5 Press the OK key The display returns to the Custom Settings screen and the specified status is displayed 6 Press the Done key The display returns to the screen for selecting...

Page 323: ...The Auto Sort mode specifies whether or not to automatically sort copies with the option Feeder when the optional Feeder and Stapler Sorter are installed The factory preset initial setting is On 1 Pr...

Page 324: ...n or Off key 5 Press the OK key The display returns to the Custom Settings screen and the specified status is displayed 6 Press the Done key The display returns to the screen for selecting an Addition...

Page 325: ...n if a selected drawer runs out of paper during a continuous copy job this function automatically selects another drawer containing the same size paper If a drawer holds heavier paper though the same...

Page 326: ...K key The display returns to the Custom Settings screen 6 Press the Done key The display returns to the screen for selecting an Additional Functions feature 7 Press the Done key The screen returns to...

Page 327: ...ree types the entry sound produced when a value is entered the alert sound generated when a paper jam failure or operation error occurs and the job end sound when a copy job is completed The factory p...

Page 328: ...ress the On or Off key for each type of sound 5 Press the OK key The display returns to the Custom Settings screen 6 Press the Done key The display returns to the screen for selecting an Additional Fu...

Page 329: ...rd display can be changed to 9 or 17 levels If set to 17 gradations the exposure can be set to a value between each of the nine marks on the scale making even finer adjustments possible The factory pr...

Page 330: ...ey 5 Press the OK key The display returns to the Custom Settings screen and the specified status is displayed 6 Press the Done key The display returns to the screen for selecting an Additional Functio...

Page 331: ...is necessary to register that drawer as a transparency feed location in advance No drawer is registered for transparency feeding until the registration is made with this function Transparency Feed Lo...

Page 332: ...Additional Functions feature 7 Press the Done key The screen returns to the standard display Only the LTR or LTRR size paper drawer can be specified for the transparency feeding location If a transpar...

Page 333: ...m2 from a drawer it is necessary to register that drawer as a thin paper feed location in advance No drawer is registered for thin paper feeding until the registration is made with this function Thin...

Page 334: ...returns to the screen for selecting an Additional Functions feature 7 Press the Done key The screen returns to the standard display If a thin paper feed location is already registered the correspondi...

Page 335: ...hange the color sheet settings This function can be used to print the colors of a color sheet It is also used to register color in the Custom Sheet Changing the Color Sheet Settings The factory preset...

Page 336: ...Functions feature 7 Press the Done key The screen returns to the standard display To print the colors of a color sheet 1 Press the sheet name key for color printing 2 Press the Print key on the right...

Page 337: ...olors already registered show a black square in the lower right If one of those keys is pressed the components of the registered color are indicated on the right of the screen 2 Press the number key t...

Page 338: ...he number keys for color registration displayed The number key with the color registered is highlighted and the components of the registered color are displayed on the right of the screen There are fo...

Page 339: ...tering colors are displayed 2 Press the Copy Sheet key The screen to select a color sheet to be duplicated is displayed 3 Press the key corresponding to the sheet name for duplication 4 Press the OK k...

Page 340: ...the Done key The display returns to the Custom Settings screen There are four methods for selecting a color Color Palette Selection see p 7 2 Color Wheel Selection see p 7 7 Registered Color Selectio...

Page 341: ...es whether or not to automatically start copying when you feed an original into the single sheet document feeder of the Feeder p 4 17 The factory preset initial setting is On Feeder Auto Start 1 Press...

Page 342: ...he On or Off key 5 Press the OK key The display returns to the Custom Settings screen and the specified status is displayed 6 Press the Done key The display returns to the screen for selecting an Addi...

Page 343: ...rd copy settings that are in effect when the power is turned ON or the key is pressed In addition you can restore the standard copy settings to the factory preset initial settings 1 Make the settings...

Page 344: ...the Yes key is pressed the message Stored in memory or Settings Initialized is displayed and the display returns to the Custom Settings screen 7 Press the Done key The display returns to the screen fo...

Page 345: ...ific modes such as the Department ID Management mode open only to the system manager without entering the registered system settings password If the system settings password is not registered no restr...

Page 346: ...returns to the Custom Settings screen 5 Press the Done key The display returns to the screen for selecting an Additional Functions feature 6 Press the Done key The screen returns to the standard disp...

Page 347: ...ctions Additional Functions Setting List System Settings Password 3 Enter a 4 digit number to be registered as the new password 4 Press the OK key The display returns to the Custom Settings screen Pre...

Page 348: ...ration Up to 100 types of ID numbers can be registered Copy count management Up to 100 different departments can be registered If the system settings password has been registered it is necessary to en...

Page 349: ...all Additional Functions Additional Functions Setting List 13 Additional Functions 4 Enter the system settings password 5 Press the OK key 6 Press the On key 7 Press the Store Dept ID Password key Dep...

Page 350: ...epartment on p 13 43 8 Press an entry area to register a department ID number and then enter a 4 digit department ID number using the number keys 9 Press an entry area to register a password and then...

Page 351: ...stem settings password has been registered it is necessary to enter registered password before making the settings for Department ID Management Department ID Management If the system settings password...

Page 352: ...t 4 Enter the registered system settings password and then press the OK key 5 Press the On key 6 Press the Copy Totals key 7 Confirm the displayed copy counts and then press the OK key Department ID M...

Page 353: ...3 Additional Functions Department ID Management 8 Press the OK key The display returns to the Custom Settings screen 9 Press the Done key The display returns to the screen for selecting an Additional...

Page 354: ...n The changed custom settings can be restored to the factory preset initial values The Department ID Management settings requiring the system settings password entry are not initialized 1 Press the ke...

Page 355: ...s the Yes key The message Settings Initialized is displayed and the display returns to the Custom Settings screen 5 Press the Done key The display returns to the screen for selecting an Additional Fun...

Page 356: ...y settings if the copier is in the Ready mode and not used for a certain period of time without any key input The Auto Clear Time value can be set from 0 min no setting to 9 min in one minute incremen...

Page 357: ...Functions 4 Press the OK key The display returns to the Timer Settings screen and the specified time is displayed 5 Press the Done key The display returns to the screen for selecting an Additional Fun...

Page 358: ...Ready mode and not used for a certain period of time without any key input The Auto Energy Saver Time can be set to the following values 0 min no setting 1 min 2 min 5 min 10 min 20 min 30 min 1 to 8...

Page 359: ...tions 4 Press the OK key The display returns to the Timer Settings screen and the specified time is displayed 5 Press the Done key The display returns to the screen for selecting an Additional Functio...

Page 360: ...3 Press the or key to specify the Auto Power Off Time The Auto Power Off Time function automatically turns off the copier power if the copier is in the Ready mode or Energy Saver mode and not used for...

Page 361: ...ature 6 Press the Done key The screen returns to the standard display Auto Power Off Time When the copier power is turned Off by Auto Power Off Time any scanned image data is erased After the power is...

Page 362: ...ize between the original and the copy image The Zoom Fine Adjustment function is used to correct this error The X horizontal direction and Y vertical direction copy ratios can be independently adjuste...

Page 363: ...The display returns to the Adjustment Cleaning screen 6 Press the Done key The display returns to the screen for selecting an Additional Functions feature 7 Press the Done key The screen returns to th...

Page 364: ...osure If copies are a little lighter or darker than originals when the copy exposure is adjusted manually to the standard center value use this function to recalibrate the copy exposure 1 Press the ke...

Page 365: ...ctions Adjustment Cleaning 13 Additional Functions 5 Press the Done key The display returns to the screen for selecting an Additional Functions feature 6 Press the Done key The screen returns to the s...

Page 366: ...the usual tones If you notice that the colors on your copies are a little different than usual perform the test print operation to adjust the copier to the optimum condition 1 Press the key and then t...

Page 367: ...he far side of the platen glass and the printed side is face down 5 Press the Scan key 6 Press the Test Print 2 key The message Printing Test Print 2 is displayed and the Test Print 2 is output 7 Plac...

Page 368: ...f scanning Automatic Gradation Adjustment is completed The display returns to the Adjustment Cleaning screen 9 Press the Done key The display returns to the screen for selecting an Additional Function...

Page 369: ...in pencil adjust this setting to Text to make even higher quality copies of photographs adjust this setting to Photo 1 Press the key and then the Adjustment Cleaning key 2 Press the key for Text Phot...

Page 370: ...pencil etc Perform this function if black lines or other dirt appears on originals after being passed through the Feeder Place blank copy sheets in the Feeder and the Feeder will automatically clean i...

Page 371: ...e message Now cleaning the feeder is displayed and the feeder cleaning is started 6 Press the Done key The display returns to the screen for selecting an Additional Functions feature 7 Press the Done...

Page 372: ...ng Wire Cleaning This function cleans the primary corona assembly wire Carry out the wire cleaning as necessary such as when there are marks on the copies 1 Press the key and then the Adjustment Clean...

Page 373: ...eaning wire is displayed and the wire cleaning is started When the wire cleaning is finished the display returns to the Adjustment Cleaning screen 5 Press the Done key The display returns to the scree...

Page 374: ...ation Adjustment is set to ON smooth gradations can be produced on print outputs This setting is not effective when copies are made The factory preset initial setting is On 1 Press the key and then th...

Page 375: ...f key and then the OK key The display returns to the Adjustment Cleaning screen and the specified status is displayed 5 Press the Done key The display returns to the screen for selecting an Additional...

Page 376: ...n M magenta Y yellow and K black The image is output to more closely match the hues produced in the actual printing process offset printing If this function is used for RGB images the image becomes li...

Page 377: ...ey 5 Press the or key to adjust each color 6 Press the OK key The display returns to the Adjustment Cleaning screen 7 Press the Done key The display returns to the screen for selecting an Additional F...

Page 378: ...s output via the CS 115 controller the resolution can be changed according to the original type This setting is not effective when copies are made The factory preset initial setting is Photo 1 Press t...

Page 379: ...ect the Original Type 5 Press the OK key The display returns to the Adjustment Cleaning screen 6 Press the Done key The display returns to the screen for selecting an Additional Functions feature 7 Pr...

Page 380: ...A 1 Appendix APPENDIX This chapter describes how to use the following functions Guide Counter...

Page 381: ...ided Mode Two page Separation and Coloring and how to use those functions Various Papers Displays the explanation of how to make copies on standard size copy paper as well as on transparencies heavy p...

Page 382: ...to be checked 4 Press the Done key Using the Guide for Each Purpose If the guidance consists of multiple pages the and or key is displayed Press the key to display the next page and press the key to...

Page 383: ...rocedure during setting you can verify the operation or the setting method If the key is pressed during copy mode setting the guide message screen is displayed for that mode The guide messages are dis...

Page 384: ...pressed on the control panel the copy counter value is displayed on the screen 1 Press the key on the control panel The copy counter value is displayed for each copy type 2 Press the Done key The scr...

Page 385: ...is displayed turn OFF the power switch and then turn it ON again Even if the copier recovers to the normal condition the first copy might have unclear color If the copier does not still operate proper...

Page 386: ...65 Base Film 1 4 65 Bin Shift key 4 30 Black 2 11 7 8 Black Adjustment 6 33 Black key 1 2 1 10 Blue Background 7 37 Book Frame Erase 5 3 5 9 Book 2 sided 3 26 Bottom margin 4 13 Bottom Symmetry 8 8 B...

Page 387: ...om Settings Initialization 13 3 13 46 Custom sheet 1 11 7 2 D Deleting the registered Color Balance settings 6 17 Deleting the settings from mode memory 12 6 Density Fine Adjustment 6 10 Department ID...

Page 388: ...t 2 12 Interrupt copy with an original in the single sheet document feeder 2 14 Interrupt copy with an original on the platen glass 2 12 Interrupt key 1 2 1 10 IP ED Board 4 2 K Keys for optional unit...

Page 389: ...12 P Paint 9 24 9 28 Paper Deck E1 1 7 4 6 Paper Deck release lever 4 6 4 9 Paper feed location indication 1 5 Paper jam behind the left side door 3 8 Paper jam behind the right side door 3 5 Paper j...

Page 390: ...hanger 4 89 Repeat 7 23 Replacing the staple cartridge 4 50 Reset key 1 2 1 10 Resistance knob 1 9 3 16 Right feeder cover 4 12 4 22 Right front door 1 8 Right margin 4 13 Right side door 1 8 3 5 Rota...

Page 391: ...lor 7 18 To delete a Framing Blanking area 10 8 To delete the registered color 7 20 To make copies from transparencies 2 6 To make fine adjustments to the gradation 7 28 To re enter a Framing Blanking...

Page 392: ...A 13 Appendix XY Zoom Zoom Program 3 3 Z Zoom 3 2 Zoom Zoom Program 3 3 Zoom Fine Adjustment 13 3 13 54 Zoom Program 3 3 Symbol mark Editor 1 9 4 2 Index...

Reviews: