background image

Transmission

3

Network Fax

3-3

Trans

m

ission

Ch

ap

te

r 3

4

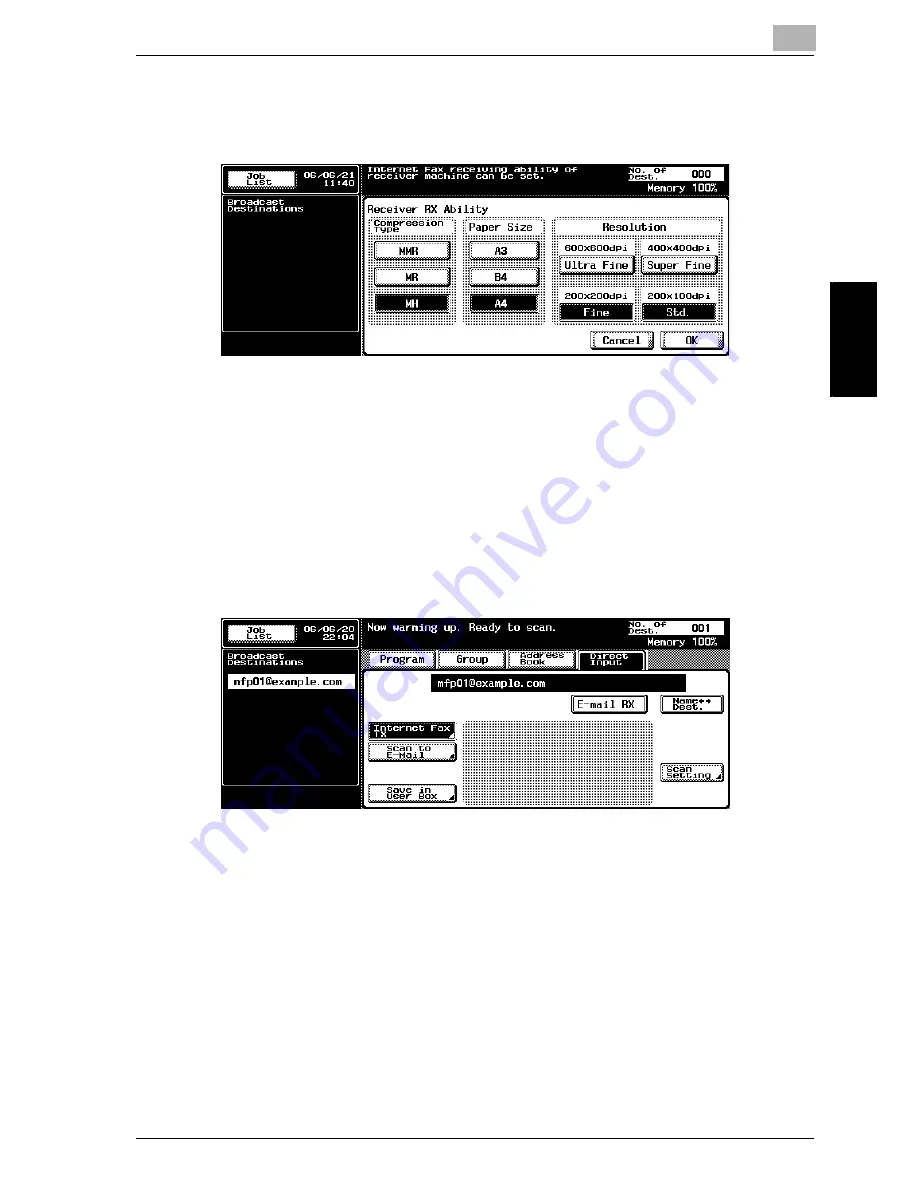
On the screen displayed by pressing [Receiver RX Ability], select 
Compression Type, Paper Size and Resolution according to the 
reception ability of the other party, and then press [OK].

The initial value is set as shown below:

Compression Type

MH

Paper Size

A4

Resolution

Fine/Std.

5

Press [OK] to display Direct Input screen.

The destination that has been specified is displayed in the 
Broadcast Destinations.

6

Press [Scan Setting] to set the function and then press [OK].

Summary of Contents for CM4520

Page 1: ...For Oc and Imagistics Models Oc User s Guide Network Fax Operations cm4520...

Page 2: ...nt Internet Fax 2 2 2 2 Transmission and Reception of E Mail 2 2 2 3 Operating Environment IP Address Fax 2 4 2 4 Features and System Configuration of Internet Fax 2 5 2 5 Features and System Configur...

Page 3: ...he Address Book from the Mode Check screen 3 22 3 6 Method for Specifying Addresses 3 24 3 6 1 Specifying only One Mail Address Internet Fax 3 24 3 6 2 Specifying only destination IP Address Fax 3 29...

Page 4: ...2 Cannot Send Messages IP Address Fax 5 3 5 3 Cannot Receive Messages 5 4 5 4 Error Message Displayed 5 5 5 5 Call for Service 5 7 6 Specifications 6 1 Specifications Internet Fax 6 2 6 2 Specificati...

Page 5: ...rom Administrator Setting 10 4 10 2 FAX Utility Mode List 10 5 10 2 1 User Setting Display Setting Fax Basic Screen Default Setting 10 5 10 2 2 User Setting Display Setting Fax Active Screen 10 5 10 2...

Page 6: ...ator Setting Fax Setting Network Fax Setting 10 15 10 2 20 Administrator Setting Security Setting Security Details Restrict Fax TX10 16 10 3 Fax Basic Screen Default Setting 10 17 10 4 Fax Active Scre...

Page 7: ...rk Fax RX Error Report 11 12 11 6 MDN Message 11 13 11 7 DSN Message 11 14 11 8 Receipt Mail Text 11 15 11 9 Address Book List 11 16 11 10 Group Address List 11 19 11 11 Program List 11 22 11 12 E Mai...

Page 8: ...up 12 25 12 10 Program Registration 12 29 12 11 Memory RX User Box 12 36 13 Appendix 13 1 Number of Stored Pages to Memory 13 2 13 2 Entering Text 13 3 13 3 Internet Fax Terminology 13 6 13 4 FAX Term...

Page 9: ......

Page 10: ...1 Introduction Chapter 1 Introduction...

Page 11: ...r optimum condition For correct operation also read the User s Guide Copy Operations before starting operation ACKNOWLEDGEMENT Oc and the Oc logo are registered trademarks or trademarks of Oc N V Adob...

Page 12: ...eule condition que la somme d indices d equivalence de la sonnerie de tous les dispositifs n excede pas 5 1 1 2 For U S A FCC PART 68 REQUIREMENTS This equipment complies with Part 68 of the FCC rules...

Page 13: ...notice in order for you to make necessary modifications to maintain uninterrupted service If trouble is experienced with this equipment cm3500210 for repair or war ranty information please contact the...

Page 14: ...ies arise in such circumstances 5 The grant of a Telepermit for any item of terminal equipment indicates only that Telecom has accepted that the item complies with minimum conditions for connection to...

Page 15: ...cision 1999 5 EC for pan European single terminal connection to the public switched telephone network PSTN However due to differences between the individual PSTNs provided in different countries the a...

Page 16: ...ax and the IP Address Fax are corresponding to each function Frame erasure mode You can send a FAX by erasing dark bands sometimes created when trans mitting a document bound in the form of book You c...

Page 17: ...l For details see Scan Size on page 7 21 Setting and sending document pages of mixed sizes in a single opera tion You can send pages of mixed sizes because the facsimile recognizes each size and sends...

Page 18: ...ts Binding style allows the pages of the document to be read ap propriately by determining right to left or top to bottom Detail For details see Bind Position on page 7 9 To be sent with the density i...

Page 19: ...that blurred char acters are made clear to give them a smooth impression Detail For details see Sharpness on page 7 18 Send it in color A fax in color can be sent or received Detail For details see p...

Page 20: ...in this manner contains references and supplemental information concerning operating procedures and other descriptions We recommend that this information be read carefully Names highlighted as shown a...

Page 21: ...n this manual the first value al ways refers to the width of the paper shown as Y in the illustration and the second to the length shown as X 1 4 2 Paper Orientation Lengthwise w If the width Y of the...

Page 22: ...using Scan to E Mail Scan to FTP and Scan to SMB User s Guide Box Operations This manual contains details on operating procedures for using the boxes Refer to this User s Guide for details on operati...

Page 23: ...e standard built in printer controller For details on the printing functions refer to User s Guide PDF file on User Software CD ROM Quick Guide Print Operations This manual contains details on operati...

Page 24: ...2 Before Use Chapter 2 Before Use...

Page 25: ...ion of E Mail Documents transmitted files attached to E mail may be damaged due to network condition Be sure to check the documents transmitted for damage Even though is marked on the transmission res...

Page 26: ...fore Use 2 Network Fax 2 3 Before Use Chapter 2 2 Reminder Turning the power OFF ON repeatedly may cause an fault After turning OFF the equipment wait for more than 5 seconds before turning it ON agai...

Page 27: ...s Fax function this machine is required to be provided with a fax kit However the use of an extension line is not allowed The IP address fax operates only between model types that are corresponding to...

Page 28: ...nd the Internet Since the communication is made by way of the intranet Internet the communication cost can be significantly reduced as compared to the normal fax communication 2 Note A mail server is...

Page 29: ...unication With the IP address or host name of the other party specified transmit a message SMTP is used as a protocol for transmission and reception The use only in the Internet is available No mail s...

Page 30: ...arious screens and messages Specify the various settings by directly touching the panel 3 Access key If user authentication or account track settings have been applied press this key after entering th...

Page 31: ...ration cannot begin 13 Main Power indicator Lights up in green when the machine is turned on with the main power switch 14 Data indicator Lights up at the time of transmission or reception of FAX and...

Page 32: ...h panel with force and never use a hard or pointed object to make a selection in the touch panel When the screen instructing you to call your service representative appears and copying is no longer po...

Page 33: ...one and a pause When using the Internet fax press Internet Fax TX When using the IP Address Fax press IP Address Fax TX 6 No of Dest The number of destinations to which transmission has been set is di...

Page 34: ...olution or Application is set 13 Comm Setting Not used for Network Fax mode 14 Destination Indicator The destination set is displayed 15 Sub Area The description according to the operations being set...

Page 35: ...f these items are not set properly Administrator Machine Setting Input Machine Address E Mail Network Setting TCP IP Setting Network Fax Function Settings Internet Fax ON OFF The Network Fax Setting i...

Page 36: ...the FAX communication if these items are not set properly Administrator Machine Setting Administrator Registration E Mail Address Network Setting TCP IP Setting Network Setting Network Fax Setting Net...

Page 37: ...he Password are to be entered Entering the necessary information in the screen displayed shows the normal screen For particulars of the department name and the user name contact your administrator 2 9...

Page 38: ...3 Transmission Chapter 3 Transmission...

Page 39: ...sending a one sided document using the basic procedure various functions are available for each step of the procedure to make sending facsimiles even more convenient Refer Transmission Applications o...

Page 40: ...ution according to the reception ability of the other party and then press OK The initial value is set as shown below Compression Type MH Paper Size A4 Resolution Fine Std 5 Press OK to display Direct...

Page 41: ...ity Standard Simplex Duplex Single sided Resolution Fine For details see Setting Transmission Conditions on page 3 16 For details see Transmission Applications on page 7 2 7 Press Application to set t...

Page 42: ...s Then check the destination to see if it is correct and press TX Refer to p 7 27 for details To interrupt transmission press STOP When it can not transmit see page 5 2 If the transmission fails TX Re...

Page 43: ...panel to open the FAX screen 2 When sending a message in the color mode select Color 3 Specify the IP address of the other party or the Host Name The following method can be used for the specificatio...

Page 44: ...e time of purchase Original Image Type Text Density Standard Simplex Duplex Single sided Resolution Fine For details see Setting Transmission Conditions on page 3 16 For details see Transmission Appli...

Page 45: ...inal and transmission starts When the Destination Check Display function is set to ON the Check Destination screen appears Then select the destination and press TX To interrupt transmission press STOP...

Page 46: ...als can be scanned automatically In addition two sided originals can be sent Using the ADF 1 Close the ADF 2 Align the originals starting with the first page 3 Place the originals in the ADF with the...

Page 47: ...ace the original FACE DOWN in the left rear corner aligning the edge with the left measuring guide 3 Gently close the ADF 3 3 3 Sending Multiple Originals from the Platen Glass Originals that cannot b...

Page 48: ...d press Start Repeat this procedure until all originals to be sent have been scanned The scanned originals are stored in memory 6 Press Finish The Document reading mode is canceled 7 Press Start Trans...

Page 49: ...FAX screen is not displayed press Fax on the control panel to open the FAX screen 2 Specify a destination 3 Set the desired functions as necessary 4 Place the original on the platen glass Press Scan...

Page 50: ...mission Chapter 3 7 Press Start Transmission begins Box Access ABC DEF JKL GHI MNO TUV PQRS WXYZ Mode Memor Mode Memory Mode Chec Mode Check Utility Counter Fax Scan Copy Reset Interrupt Power Stop Pr...

Page 51: ...me transmission mode When using the color transmission mode set the mode by following the steps given below 0 A fax in color can be sent or received only when using the IP Address Fax 0 For the Intern...

Page 52: ...cally judged and a scanning is made according to the original Full Color A scanning is made in full color Gray Scale A selection is made when there is a lot of half tone as with a black and white pict...

Page 53: ...ing to the type of original to be sent Detail The condition for transmission cannot be set in units of page Setting Transmission Conditions 1 Press Scan Setting on the FAX screen 2 Press the key desir...

Page 54: ...nned neutral tints of the pictures turn black without being reproduced Text Photo Press this when scanning originals containing both text and pho tographs half tone Select this mode in either case whe...

Page 55: ...al There are 3 types Single sided is set at the time of purchase Light Press to scan originals so that they are lighter than the density de tected with Standard Std Press to scan originals at a densit...

Page 56: ...reases and more time is required for transmission When Ultra Fine or Super Fine has been selected and the receiving machine is not equipped with the resolution originals are sent at a resolution corre...

Page 57: ...sing Mode Check on the control panel Confirming Settings and Communication Results 1 Press Fax on the control panel 2 Press Mode Check on the control panel 3 Press a key of setting you want to confirm...

Page 58: ...ernet Fax the Subject and the Text can be changed In the case of the IP Address Fax E mail Setting is not used For the From mail address of the sender in the Internet fax an E mail address of the copi...

Page 59: ...creen 1 Press Fax on the control panel 2 Press Mode Check on the control panel 3 Press Destination 4 Select destination that you want to register in Address Book and then press Details 5 Press Save in...

Page 60: ...K 7 Press Name to enter the registration name and then press OK 8 When there is no trouble found with the entries press Yes When canceling the registration press No 9 Press Close three times to return...

Page 61: ...s for multi station transmission 3 6 1 Specifying only One Mail Address Internet Fax The following methods can be used when specifying 1 destination Direct Input Program Address Book Direct Input 1 Pr...

Page 62: ...ine For details see Placing the Original on the Machine on page 3 9 5 Press Start Transmission begins Box Access ABC DEF JKL GHI MNO TUV PQRS WXYZ Mode Memor Mode Memory Mode Chec Mode Check Utility C...

Page 63: ...pressing Program 1 Press Program in the FAX screen 2 Select the programmed destination you want to use The setting for the registered function is activated Press or when desiring to display the next...

Page 64: ...e search character to search Searching in Detail Search Press Detail Search Press Name FAX Number or E Mail and enter an item you want to make a search for Press OK The results of the search will be d...

Page 65: ...name to which you want to send the Internet Fax An alphabet shown before the key represents the following description A Dial B Box E E Mail I Internet Fax P IP Address Fax The destination that has be...

Page 66: ...ing Program 1 Press Program in the FAX screen 2 When sending a message in the color mode select Color When Color is selected addresses Address Book Group Program displayed are limited only to those in...

Page 67: ...he FAX screen 2 When sending a message in the color mode select Color 3 Press the search character to search Searching in Detail Search Press Detail Search Press Name FAX Number or E Mail and enter an...

Page 68: ...name to which you want to send the Internet Fax An alphabet shown before the key represents the following description A Dial B Box E E Mail I Internet Fax P IP Address Fax The destination that has be...

Page 69: ...Destination Input contact your administrator 1 Press Direct Input in the FAX screen 2 When sending a message in the color mode select Color 3 When using IP Address Transmission press IP Address Fax TX...

Page 70: ...s Book see p 9 3 For more information about registering the Group see p 9 8 4 Place the original on the machine For details see Placing the Original on the Machine on page 3 9 5 Press Start Transmissi...

Page 71: ...er Size and the Resolution fixed at the lowest ability MH A4 Fine or Standard Broadcast transmission mixed of the Internet faxes and the G3 faxes 605 faxes in total of 500 in the Address Book and 105...

Page 72: ...d addresses Address Book Group Program displayed are limited only to those in which the model type of the other party is set to Color In case of Group Press Group in the FAX screen Press the group num...

Page 73: ...ddress Fax Comm Setting and E mail Setting are not used In the color mode Communication Setting and E mail Setting are not displayed 3 Confirm destinations 4 To delete a destination select the destina...

Page 74: ...Transmission 3 Network Fax 3 37 Transmission Chapter 3 6 Press Close twice The FAX screen will be restored...

Page 75: ...When Memory Capacity is Exceeded While in the memory transmission when there are a lot of originals or when there are a lot of information due to the image quality being fine and close a memory over...

Page 76: ...2 Redialing Redialing refers to dialing the number of the same destination again If a facsimile cannot be sent due to a busy signal from the other party machine or for some other reason the machine r...

Page 77: ...an still be made even when redialed a screen is displayed in which you can check that the job was not successfully completed 2 Press OK To delete a job of failed transmission press the Job List and de...

Page 78: ...usly displayed on the Job List screen 3 9 1 Canceling Communication in Progress When communication is in progress transmission can be canceled with the procedure described below Canceling Communicatio...

Page 79: ...ated in the memory can also be checked by the job list displayed on the screen 1 Press Job List on the FAX screen 2 Press Fax TX 3 Press Current Jobs 4 Press Active Jobs Pressing or displays the previ...

Page 80: ...ssing Job List in the fax screen allows you to check the results of transmission 1 Press Job List on the control panel 2 Press Print Fax TX or RX User Box 3 Press Job History 4 Confirm the communicati...

Page 81: ...Account Name is displayed while in the account track In the cases of other than the above the Type of the COPY PRINT and FAX RX etc is displayed Document Name The name of the document that has been re...

Page 82: ...Transmission 3 Network Fax 3 45 Transmission Chapter 3 5 Press Exit twice after completion of confirmation Screen before Job List will be restored...

Page 83: ...y Text the sender information is added to the Inside Body Text 3 12 1 Set to Inside Body Text Detail The FAX ID and sender name set with FAX ID No name entry on the Utility Mode Fax Basic Screen Defau...

Page 84: ...Transmission 3 Network Fax 3 47 Transmission Chapter 3 3 12 3 Set to OFF Detail OFF cannot be selected depending on the country See Header Footer Position on page 10 47 for information about setting...

Page 85: ...Transmission Chapter 3...

Page 86: ...4 Reception Chapter 4 Reception...

Page 87: ...X is turned on in the Utility Mode messages are saved in the Memory RX User Box The messages thus saved can be printed as required For details refer to p 8 2 Detail An attached file up to 2000 pages a...

Page 88: ...eption 4 Network Fax 4 3 Reception Chapter 4 Manual Reception E mail can be manually received from the POP server 1 Press FAX on the control panel of copier and then press Direct Input 2 Press E mail...

Page 89: ...Fax When the copier receives an IP address fax it is automatically printed When the Memory RX is turned on in the Utility Mode document texts are saved in Memory RX User Box These texts thus saved ca...

Page 90: ...receive faxes the error message is displayed Take corrective actions by referring to Error Message Displayed on page 5 5 Press Stop to clear the error message display Detail Documents may not be able...

Page 91: ...print a received document the received document is stored in the memory until it becomes printable This function is referred to as the Memory substitute reception The stored document is printed when y...

Page 92: ...fax in the color mode the text is always recorded in life size When receiving a fax in the color mode the use of Print Separate Fax Pages is not available The use of the color mode is available only...

Page 93: ...dth and length of the received document and the fax is recorded on paper of that size If papers of appropriate size are not set on the paper tray the data are recorded on papers of the nearest size af...

Page 94: ...length to set to the machine body Width of the received doc ument Reception in formation re cording position Length of the received document A4 OFF or Inside Body Text 0 150 151 305 306 390 391 or mor...

Page 95: ...rint Separate Fax Pages is set to ON in the Utility Mode the facsimile looks for paper to record the document on more than one paper Width of the received doc ument Reception in formation re cording p...

Page 96: ...from top to bottom 5 5 8 5 v 8 5 11 w 8 5 11 v 8 5 14 w 11 17 w 5 5 8 5 w 8 5 11 v 8 5 11 w 11 17 w A3 w A5 v A4 w A4 v B4 w B4 w A5 w A4 v A4 w A3 w 8 5 14 w 8 5 11 w 8 5 14 w 8 5 14 w 8 5 11 w 8 5...

Page 97: ...s when recorded Appropriate paper 5 5 8 5 v 8 5 11 w 8 5 11 v 8 5 14 w 11 17 w Paper order from top to bottom 5 5 8 5 v 8 5 11 w 8 5 11 v 8 5 14 w 11 17 w 5 5 8 5 w A4 w 8 5 11 w 11 17 w A3 w A5 v 8 5...

Page 98: ...Copy Operations for more detailed information If the required paper size is only set in the manual insertion tray the document is printed on the paper fed from the tray however if the automatic paper...

Page 99: ...for RX Print is set to other than Auto It is recorded to fit in the size of the paper in the paper tray except manual insertion tray that is set in Tray Selection for RX Print If Print Paper Selectio...

Page 100: ...aper size is not available it is recorded on the larger paper size Detail The Print Separate Fax Page is not available You cannot record an image larger than 11 x 17 size If appropriate paper is not a...

Page 101: ...in the same size of paper Recorded after be ing reduced to fit in the specified size of paper Long original longer than the Standard size The page division re cording OFF Recorded at full scale to fit...

Page 102: ...4 Detail When Duplex Print RX is set a record can be made on the screen for paper See p 10 52 for more information In the color mode a fax is always recorded on the regular size paper in life size An...

Page 103: ...ment Detail In the color mode of the IP address fax Outside Body Text cannot be used Even when set to Outside Body Text information received is added to Inside Body Text The setting of Footer Position...

Page 104: ...5 Troubleshooting Chapter 5 Troubleshooting...

Page 105: ...n the transmission result screen or activity report signifies that the transmission has successfully reached your server When Message Disposition Notification MDN is received OK is marked in the space...

Page 106: ...he destina tion being called correct Are pro gram dialing or abbreviated dialing numbers registered cor rectly Using program dialing or abbreviated dialing there may be an error in registration of the...

Page 107: ...paper jammed in the machine In case of paper jam received documents are stored in memory Removed the jammed paper Refer to the Us er s Guide Copy Operations for the procedure for cor recting paper ja...

Page 108: ...f there occurs any ab normal condition with the network such as the disconnection of a cable N13 Connection er ror No response re ceived from the net work No Check the condition of the other par ty ma...

Page 109: ...ced or the resolution for read reduced send it again Code Classification Details of the error Redi al Corrective Action Code Classification Details of the error Corrective Action N50 SMTP recep tion S...

Page 110: ...the procedure for reporting a network fax problem to your service representative by phone 7 CAUTION To prevent the risk of serious accident perform the following when the call for service screen is di...

Page 111: ...Troubleshooting Chapter 5...

Page 112: ...6 Specifications Chapter 6 Specifications...

Page 113: ...n mode File Type monochrome TIFF Transmission coding methods TIFF S MH TIFF F MR MMR Max scanning size A3 420 mm 297 mm Width 297 mm Length MAX 432 mm Max recording size A3 420 mm 297 mm Originals in...

Page 114: ...minutes Manual POP re ception Possible Reception by specifying a box Not Available except Memory RX Received docu ment size width A4 B4 A3 Reception coding system TIFF S MH TIFF F MR MMR List report...

Page 115: ...the case of storing standard A4 size pages containing approximately 700 characters at fine resolution Scanning line density Ultra Fine 600 dpi 600 dpi Super Fine 400 dpi 400 dpi Fine 200 dpi 200 dpi N...

Page 116: ...7 Transmission Applications Chapter 7 Transmission Applications...

Page 117: ...set to open the screen in which you can set the function You can combine more than one function however you cannot select functions that are not compatible with a function previously selected Those fu...

Page 118: ...r the application setting The use of the color mode is available only for the IP Address Fax 4 Conduct either of the following operations When the dedicated screen is displayed Set a function in the s...

Page 119: ...nd correct vertically the rear face of the original page 7 9 Frame Erase When transmitting pages in a book this function allows you to erase dark bands that would otherwise be reproduced in the margin...

Page 120: ...untry Detail The use of the color mode is available only for the IP Address Fax The key representing the function you select will be appear reversed File Type For the Internet fax TIFF is fixed In the...

Page 121: ...n is not available for the network fax While in the broadcast fax mixed with the G3 fax the Password TX the F Code TX and the Line Setting can be set for the network fax function The details of the se...

Page 122: ...xed size original are specified simultaneously Original size takes priority 0 Functions incompatible Bind Position 1 Press Fax on the control panel to view the FAX screen if it is not already displaye...

Page 123: ...page 7 4 for information about setting functions in the Scan Setting or Application screen 7 Designate the destination See Method for Specifying Addresses on page 3 24 for designating the destination...

Page 124: ...ides The binding style you select will allow the pages of a two sided document to be read appropriately by binding right to left or top to bottom 0 Specifications The ADF must be used The platen glass...

Page 125: ...reen will be restored 8 Set other functions if necessary See Setting Transmission Conditions on page 3 16 for information about setting functions in the FAX screen See Application Functions Overview o...

Page 126: ...pplications 7 Network Fax 7 11 Transmission Applications Chapter 7 Detail To cancel transmission see Canceling Transmission on page 3 41 If transmission fails refer to Cannot Send Messages Internet Fa...

Page 127: ...duced when the original is a book or read with the ADF left open Frame erasure transmission prevents reproduction of dark bands 0 Specifications Memory TX is selected automatically You can use both Pl...

Page 128: ...ored 6 Press OK The Scan Setting screen will be restored 7 Press OK The FAX screen will be restored 8 Set other functions if necessary See Setting Transmission Conditions on page 3 16 for information...

Page 129: ...riginal document See Placing the Original on the Machine on page 3 9 for information about setting the document 11 Press Start Transmission begins Detail To cancel transmission see Canceling Transmiss...

Page 130: ...of the original is colored the base sheet of the original may turn black with the colors read On such an occasion like this a message can be sent after adjusting the density in the background color o...

Page 131: ...s OK The Application screen will be restored 6 Press OK The Scan Setting screen will be restored 7 Press OK The FAX screen will be restored 8 Set other functions if necessary See Setting Transmission...

Page 132: ...pplications 7 Network Fax 7 17 Transmission Applications Chapter 7 Detail To cancel transmission see Canceling Transmission on page 3 41 If transmission fails refer to Cannot Send Messages Internet Fa...

Page 133: ...the Sharpness to allows the characters to be adjusted clearly And setting it to allows them to be adjusted so that they have a smooth impression 0 Specifications Both of the platen glass and the ADF c...

Page 134: ...X screen will be restored 8 Set other functions if necessary See Setting Transmission Conditions on page 3 16 for information about setting functions in the FAX screen See Application Functions Overvi...

Page 135: ...Applications 7 20 Network Fax Transmission Applications Chapter 7 Detail To cancel transmission see Canceling Transmission on page 3 41 If transmission fails refer to Cannot Send Messages Internet Fa...

Page 136: ...accommodate the image being transmitted the original image will be reduced to fit the paper size This feature gives you the option to print a portion of the image with no reduction 0 Specifications Me...

Page 137: ...8 Set other functions if necessary See Setting Transmission Conditions on page 3 16 for information about setting functions in the FAX screen See Application Functions Overview on page 7 4 for inform...

Page 138: ...pplications 7 Network Fax 7 23 Transmission Applications Chapter 7 Detail To cancel transmission see Canceling Transmission on page 3 41 If transmission fails refer to Cannot Send Messages Internet Fa...

Page 139: ...the Header in the Utility Mode Set the method to attach the Header Information in the Header Footer Position in the Utility Mode Detail Header Setting cannot be selected depending on the country Refe...

Page 140: ...page 10 44 for setting the Header Setting 6 Press OK The Scan Setting screen will be restored 7 Press OK The FAX screen will be restored 8 Set other functions if necessary See Setting Transmission Co...

Page 141: ...Applications 7 26 Network Fax Transmission Applications Chapter 7 Detail To cancel transmission see Canceling Transmission on page 3 41 If transmission fails refer to Cannot Send Messages Internet Fa...

Page 142: ...N at the time of the Function ON OFF Setting Refer to page 10 55 for more information on the setting of the Destination Check Display function 1 Press Fax on the control panel to view the FAX screen i...

Page 143: ...Transmission Applications Chapter 7...

Page 144: ...8 Useful Functions for Reception Chapter 8 Useful Functions for Reception...

Page 145: ...Memory Reception is already set up Detail To set up for Memory Reception see Memory RX on page 10 58 8 1 1 Printing a Document Held in Memory Printing a Document Held in Memory Perform the following p...

Page 146: ...ent using or and press Print 5 Press Start The designated document will print Detail When you want to display the next or previous screen press or To interrupt operation press Close before pressing Pr...

Page 147: ...displayed 2 Select System User Box tab and press Memory RX User Box 3 Enter the password and press OK To interrupt operation press Cancel If you press C clear the information you have entered will be...

Page 148: ...arious Reception Information When Duplex Print RX is set to ON When Duplex Print RX is set to ON in transmission reception mode setting of the Utility Mode documents are printed on both sides of the p...

Page 149: ...Useful Functions for Reception Chapter 8...

Page 150: ...9 Registering Settings Chapter 9 Registering Settings...

Page 151: ...n 2 Press One Touch Registration In the Utility Mode it is also possible to enter a number displayed in the key through the keypad for selection In the case of One Touch Registration enter the 1 on th...

Page 152: ...Search Character This section describes the procedures of registering the Address Book Detail Address Book Group and Program can be also registered using the Web Connection Using the Web Connection s...

Page 153: ...n the key through the keypad for selection In the case of Address Book enter the 1 on the keypad 3 Press Internet Fax Address 4 Press New 5 Set the functions Index Select the Search key of the Search...

Page 154: ...f the destination When an MDN Response has been received the ability information obtained of the other party is automatically overwritten on the Address Book registered 6 Press OK Registration is perf...

Page 155: ...x 1 See Displaying the Fax Registration Screen on page 9 2 to display the Fax Registration screen 2 Press Address Book In the Utility Mode it is also possible to enter a number displayed in the key th...

Page 156: ...on Receiving Model Type Specify the model type Full Color Black of the other party Port Number Specify the port number Even when changing the Address Book that has been registered the model type Full...

Page 157: ...ion after registering the destination in the Address Book For details of registering the Address Book see Registering the Address Book p 9 3 Each Group can have a Group name The explanation here is gi...

Page 158: ...ring the Group is as follows 1 See Displaying the Fax Registration Screen on page 9 2 to display the Fax Registration screen 2 Press Group In the Utility Mode it is also possible to enter a number dis...

Page 159: ...Internet Fax Address that is registered in Group Internet Fax Address can be not registered together with User Box and E mail at the same time 5 Press OK Registration is performed and the registered...

Page 160: ...ing the Fax Registration Screen on page 9 2 to display the Fax Registration screen 2 Press Group In the Utility Mode it is also possible to enter a number displayed in the key through the keypad for s...

Page 161: ...et to Full Color IP Address Fax Destinations that can be registered are restricted only to those in which the model type of the other party is set to the color copier When the model type of the other...

Page 162: ...have a Program name The explanation here is given of the operation to register the Program Detail Address Book Group and Program can be also registered using the Web Connection Using the Web Connecti...

Page 163: ...ect an address from Select from Address Book or enter it directly through Direct Input When Address Book is specified for an address the details of the setting for Program take precedence over those f...

Page 164: ...Registering Settings 9 Network Fax 9 15 Registering Settings Chapter 9 When proceeding with the registration of the Program go to Step 3 7 Press Exit on the sub area...

Page 165: ...n be registered to 10 and the Text of E Mail can be registered to 10 Registering the Subject of the E Mail The procedure for registering the Subject of the E Mail is as follows 1 See Displaying the Fa...

Page 166: ...xt for E mail In No an unused number is displayed 6 Enter the Subject in the screen displayed and then press OK For the operation of the entering character see page 13 3 7 Press OK Registration is per...

Page 167: ...tion Screen on page 9 2 to display the Fax Registration screen 2 Press Subject Text for E mail In the Utility Mode it is also possible to enter a number displayed in the key through the keypad for sel...

Page 168: ...nd pressing Details 5 Press Subject 6 Change the Subject in the screen displayed and then press OK For the operation of the entering character see page 13 3 7 Press OK To stop registering press Cancel...

Page 169: ...ult of the Subject of the E Mail is as follows 1 See Displaying the Fax Registration Screen on page 9 2 to display the Fax Registration screen 2 Press Subject Text for E mail In the Utility Mode it is...

Page 170: ...Registering Settings 9 Network Fax 9 21 Registering Settings Chapter 9 5 Press Close 6 Press Exit on the sub area...

Page 171: ...E Mail is as follows 1 See Displaying the Fax Registration Screen on page 9 2 to display the Fax Registration screen 2 Press Subject Text for E mail In the Utility Mode it is also possible to enter a...

Page 172: ...r E mail In No an unused number is displayed 6 Enter the Text in the screen displayed and then press OK For the operation of the entering character see page 13 3 7 Press OK Registration is performed a...

Page 173: ...tion Screen on page 9 2 to display the Fax Registration screen 2 Press Subject Text for E mail In the Utility Mode it is also possible to enter a number displayed in the key through the keypad for sel...

Page 174: ...xt and pressing Details 5 Press Text 6 Change the Text in the screen displayed and then press OK For the operation of the entering character see page 13 3 7 Press OK To stop registering press Cancel T...

Page 175: ...ault of the Text of the E Mail is as follows 1 See Displaying the Fax Registration Screen on page 9 2 to display the Fax Registration screen 2 Press Subject Text for E mail In the Utility Mode it is a...

Page 176: ...Registering Settings 9 Network Fax 9 27 Registering Settings Chapter 9 5 Press Close 6 Press Exit on the sub area...

Page 177: ...tering Settings Chapter 9 9 6 Setting the Memory RX User Box When Memory RX is set as ON by the Utility Mode a receiving document is saved in the Memory RX User Box Detail For the printing method of M...

Page 178: ...10 Utility Mode Chapter 10 Utility Mode...

Page 179: ...fic person be authorized as Utility Mode to prevent con fusion The procedures for entering in and exiting the Utility Mode and setting FAX functions are described below 10 1 1 Entering User Setting En...

Page 180: ...Administrator Setting 1 Press Fax and press Utility Counter on the control panel 2 Press Administrator Setting 3 Enter the password and press OK Detail The password for the administrator can be change...

Page 181: ...10 Utility Mode 10 4 Network Fax Utility Mode Chapter 10 10 1 4 Exiting from Administrator Setting Exiting from Administrator Setting 1 Press Exit on the sub area...

Page 182: ...em Description Available value Default Tab Set the default of the destination column in the fax screen Program Group Ad dress Book Direct Input Default Pro gram Set the default of the Program Temporar...

Page 183: ...the IP address fax page 10 27 Item Description Available value Fax Current Setting Before entering the Utility Mode each of the items that have been set on the touch panel is registered as the defaul...

Page 184: ...ng When a setting is made to ON set the IP Address the Subnet Mask and the Default Gateway page 10 31 Refer to User s Guide Network Scanner for more information about TCP IP Setting Item Description A...

Page 185: ...whether or not the E mail TX Setting is used Allow Restrict SMTP Server Address Specify the SMTP server address or host name Connection Timeout Specify the value of con nection timeout 30 300 60 sec S...

Page 186: ...E mail RX Setting is used ON OFF POP Server Address Specify the POP server ad dress or host name Login Name Set a log in name to the POP server Password Set a password to log in to the POP server Deta...

Page 187: ...n timeout while in the SMTP transmission 30 300 60 sec SMTP RX Setting SMTP RX A setting is made to decide whether or not the SMTP re ception function is used ON OFF Port No Set a port number while in...

Page 188: ...ription Available value Header Posi tion 1 Set a position in which the sender infor mation is printed The use of Outside Body Text is una vailable for the Internet Fax IP Address Fax Even if set to Ou...

Page 189: ...etting this function ON inch series form of paper is preferentially selected for the received original OFF ON Print Paper Se lection When the priority of each size is set A record is made in the prior...

Page 190: ...n used to receive documents and store in memory so that you can print them out later as necessary ON OFF Item Description Available value Activity Report Determines whether to print the report and the...

Page 191: ...whether to print the MDN message automatically Do not Print Print DSN Message Sets whether to print the received DSN message automatically Do not Print Print Receipt Mail Text Sets whether to print t...

Page 192: ...the reception ability re lated to the paper size A3 A4 B4 Resolution Set the reception ability re lated to the resolution Std Fine Super Fine Ultra Fine When Ultra Fine is set in Internet Fax Ad vance...

Page 193: ...ity Setting Security De tails Restrict Fax TX Disable the functions for FAX transmission page 10 66 Item Description Available value Restrict Fax TX All the functions for the FAX trans mission are dis...

Page 194: ...ayed in the key through the keypad for selection In the case of Display Setting enter 2 through the numeric keypad Item Description Available value Default Tab Set the default of the destination colum...

Page 195: ...0 3 Press Fax Basic Screen Default Setting 4 Select the item you wish to set To close the Utility Mode screen press Exit in the sub area 5 Select the parameter you wish to set 6 Press Close The value...

Page 196: ...y Setting Some items may not be displayed depending on the optional settings In the Utility Mode it is also possible to enter a number displayed in the key through the keypad for selection In the case...

Page 197: ...ode Chapter 10 4 Select Transmission Display or Receipt Display To close the Utility Mode screen press Exit in the sub area 5 Select the parameter you wish to set 6 Press Close The value of the parame...

Page 198: ...etting on page 10 2 2 Press Initial Setting Some items may not be displayed depending on the optional settings In the Utility Mode it is also possible to enter a number displayed in the key through th...

Page 199: ...e 10 22 Network Fax Utility Mode Chapter 10 3 Press Factory Default and then press OK When you want to stop the setting press Cancel 4 Press Close The value of the parameter is changed 5 Press Exit on...

Page 200: ...me items may not be displayed depending on the optional settings In the Utility Mode it is also possible to enter a number displayed in the key through the keypad for selection In the case of System S...

Page 201: ...ity Mode 10 24 Network Fax Utility Mode Chapter 10 4 Press Entering Power Save Mode Fax 5 Select the parameter you wish to set 6 Press Close The value of the parameter is changed 7 Press Exit on the s...

Page 202: ...g Administrator Setting on page 10 3 2 Press System Setting Some items may not be displayed depending on the optional settings In the Utility Mode it is also possible to enter a number displayed in th...

Page 203: ...Mode 10 26 Network Fax Utility Mode Chapter 10 4 Press Restrict Operation Setting 5 Press Restrict Fax Broadcasting and select ON 6 Press Close The value of the parameter is changed 7 Press Exit on th...

Page 204: ...trator Setting on page 10 3 2 Press Administrator Machine Setting Some items may not be displayed depending on the optional settings In the Utility Mode it is also possible to enter a number displayed...

Page 205: ...ity Mode 10 28 Network Fax Utility Mode Chapter 10 4 Press Name and E Mail Address to register the administrator and press OK 5 Press Close The value of the parameter is changed 6 Press Exit on the su...

Page 206: ...2 Press Administrator Machine Setting Some items may not be displayed depending on the optional settings In the Utility Mode it is also possible to enter a number displayed in the key through the key...

Page 207: ...ode 10 30 Network Fax Utility Mode Chapter 10 4 Press Machine Name and E Mail to register the E mail address of copier and press OK 5 Press Close The value of the parameter is changed 6 Press Exit on...

Page 208: ...the Administrator Setting screen See Entering Administrator Setting on page 10 3 2 Press Network Setting Some items may not be displayed depending on the optional settings In the Utility Mode it is a...

Page 209: ...g 4 Press ON and then Fwd 5 Set the parameter you wish to set 6 Press OK A message for restarting the copier is displayed 7 Turn off and on the main power of the copier for restarting Turn off the mai...

Page 210: ...ion Available value E Mail TX SMTP E Mail TX Set ting A setting is made to decide whether or not the E mail TX Setting is used Allow Restrict SMTP Server Address Specify the SMTP server address or hos...

Page 211: ...nter a number displayed in the key through the keypad for selection In the case of Network Setting enter 5 through the numeric keypad 3 Press E Mail Setting 4 Press E Mail TX SMTP 5 Set the item you w...

Page 212: ...a log in name to the POP server Password Set a password to log in to the POP server Detail Setting APOP Authenti cation Set the APOP Authentica tion and specify the value of port number and connectio...

Page 213: ...r Setting on page 10 3 2 Press Network Setting Some items may not be displayed depending on the optional settings In the Utility Mode it is also possible to enter a number displayed in the key through...

Page 214: ...Utility Mode 10 Network Fax 10 37 Utility Mode Chapter 10 5 Set the item you wish to set 6 Press OK 7 Press Close The value of the parameter is changed 8 Press Exit on the sub area...

Page 215: ...ng screen See Entering Administrator Setting on page 10 3 2 Press Network Setting Some items may not be displayed depending on the optional settings In the Utility Mode it is also possible to enter a...

Page 216: ...Utility Mode 10 Network Fax 10 39 Utility Mode Chapter 10 3 Press Forward 4 Press Network Fax Setting 5 Press Network Fax Function Settings 6 Set the item you wish to set...

Page 217: ...10 Utility Mode 10 40 Network Fax Utility Mode Chapter 10 7 Press OK 8 Press Close The value of the parameter is changed 9 Press Exit on the sub area...

Page 218: ...played in the key through the keypad for selection In the case of Network Setting enter 5 through the numeric keypad Item Description Available value SMTP TX Set ting Port No Set a port number while i...

Page 219: ...10 Utility Mode 10 42 Network Fax Utility Mode Chapter 10 3 Press Forward 4 Press Network Fax Setting 5 Press SMTP TX Setting or SMTP RX Setting...

Page 220: ...etwork Fax 10 43 Utility Mode Chapter 10 6 Set the item you wish to set In case of SMTP TX Setting In case of SMTP RX Setting 7 Press OK 8 Press Close The value of the parameter is changed 9 Press Exi...

Page 221: ...pad for selection In the case of Fax Setting enter 8 through the numeric keypad Item Description Available value Sender Name The name registered is printed on the doc ument received by the other party...

Page 222: ...e and press OK See Entering Text on page 13 3 for more information 6 When registering the multiple sender names press Sender Name Registration 7 With a list selected that you want to register press Ed...

Page 223: ...de Chapter 10 Sender names registered can be selected from the Scan Setting screen while in the transmission For details refer to p 7 24 8 Press OK and then press Close The Sender Name you have entere...

Page 224: ...ng station is both of the FAX ID and the name For details see Sender Information on page 3 46 Item Description Available value Header Posi tion 1 Set a position in which the sender information is prin...

Page 225: ...Fax Setting Some items may not be displayed depending on the optional settings In the Utility Mode it is also possible to enter a number displayed in the key through the keypad for selection In the ca...

Page 226: ...Utility Mode 10 Network Fax 10 49 Utility Mode Chapter 10 5 Select the parameter you wish to set 6 Press Close The value of the parameter is changed 7 Press Exit on the sub area...

Page 227: ...g on the country indicates factory default setting Telephone Line Settings 1 Open the Administrator Setting screen See Entering Administrator Setting on page 10 3 2 Press Fax Setting Some items may no...

Page 228: ...e Line Setting 4 Select the item you wish to set Use or to go to the next or previous screen When you want to stop the setting press Exit in the sub area 5 Select the parameter you wish to set 6 Press...

Page 229: ...orm of paper is preferentially selected for the received original OFF ON Print Paper Se lection When the priority of each size is set A record is made in the priority size When no priority size is set...

Page 230: ...Open the Administrator Setting screen See Entering Administrator Setting on page 10 3 2 Press Fax Setting Some items may not be displayed depending on the optional settings In the Utility Mode it is a...

Page 231: ...4 Select the item you wish to set Use or to go to the next or previous screen To close the Utility Mode screen press Exit in the sub area 5 Select the parameter you wish to set 6 Press Close The value...

Page 232: ...transmission reception functions 1 Open the Administrator Setting screen See Exiting from Administrator Setting on page 10 4 2 Press Fax Setting Some items may not be displayed depending on the optio...

Page 233: ...Function Setting 4 Press Function ON OFF Setting If any function of Memory RX Forward TX Setting Fax RX Setting or TSI User Box Setting is ON other items are not displayed 5 Select the item you wish t...

Page 234: ...Utility Mode 10 Network Fax 10 57 Utility Mode Chapter 10 6 Select the parameter you wish to set 7 Press Close The value of the parameter is changed 8 Press Exit on the sub area...

Page 235: ...print the document received in memory reception mode see Memory Reception on page 8 2 Setting up Memory RX 1 Open the Administrator Setting screen See Exiting from Administrator Setting on page 10 4...

Page 236: ...ord box with the password 8 digits needed to print out the document received The password is a number of up to 8 digits If you press C clear the information you have entered will be deleted When you w...

Page 237: ...the report TX Report ON If TX Fails OFF Sequential TX Report ON OFF Broadcast Re sult Report Set up the Broadcast Result Report print ing method All Dest 1 Dest at a time TX Result Re port Check Deter...

Page 238: ...a redial is tried with no successful transmission available When a transmission is terminated normally no report is issued Report Settings 1 Open the Administrator Setting screen See Entering Adminis...

Page 239: ...0 4 Select the report you wish to set Use or to go to the next or previous screen To close the Utility Mode screen press Exit in the sub area 5 Select the item you wish to set 6 Press Close The value...

Page 240: ...ternet Fax RX Ability Compression Type Set the reception ability re lated to the Compression Type MH MR MMR Paper Size Set the reception ability re lated to the Paper Size A3 A4 B4 Resolution Set the...

Page 241: ...ting Some items may not be displayed depending on the optional settings In the Utility Mode it is also possible to enter a number displayed in the key through the keypad for selection In the case of F...

Page 242: ...o set 5 Select the item you wish to set and then press OK 6 Press Close The value of the parameter is changed 7 Press Exit on the sub area In case of Black Compression Level IP Address Fax In case of...

Page 243: ...pen the Administrator Setting screen See Entering Administrator Setting on page 10 3 2 Press Security Setting Some items may not be displayed depending on the optional settings In the Utility Mode it...

Page 244: ...tility Mode Chapter 10 4 Press To close the Utility Mode screen press Exit in the sub area 5 Press Restrict Fax TX 6 Select the parameter you wish to set 7 Press Close The value of the parameter is ch...

Page 245: ...Utility Mode Chapter 10...

Page 246: ...11 Explanation of Reports and Lists Chapter 11 Explanation of Reports and Lists...

Page 247: ...t Fax TX tab Job History Comm Setting Activity Report TX Report RX Report TX Report The transmission result is printed automatically The Utility Mode sets transmission reports printing to always durin...

Page 248: ...List Explanation Address Book List Numbers registered for Address Book can be printed out Program List Numbers registered for Program can be printed out Group Address List Numbers registered for Grou...

Page 249: ...being printed out automatically either the transmission record transmission report only reception record reception report only or a record of both transmissions and receptions Activity Report can be...

Page 250: ...Press Activity Report TX Report or RX Report 6 Press Print The report is printed out Detail A message is displayed when the required paper is not placed in the pa per tray for reports and lists Add p...

Page 251: ...the result with Message Disposition Notification MDN or by other means When Message Disposition Notification MDN is received OK is marked in the space for the Transmit result screen or activity report...

Page 252: ...ion due to the line being busy M Full Memory full is shown when the FAX file memory became full during reception and reception failed LOVR Receiving Length Over When the length of an original received...

Page 253: ...ort For details see Report Settings on page 10 61 11 3 2 Automatic Printout Automatic printout can be set to ON If TX Fails or OFF with TX Report at Report Settings of Utility Mode For details see Rep...

Page 254: ...h is turned off TEL Shown when there has been an incoming tele phone call NG Shown when a communication error has oc curred Cont Shown when an error has occurred and the FK 502 has switched to error p...

Page 255: ...ng All Dest 1 Dest at a time can be specified in the Broadcast Result Report For details see Report Settings on page 10 61 The actual reports may be different from the reports in this manual Destinati...

Page 256: ...error has oc curred Cont Shown when an error has occurred and the FK 502 has switched to error page redialing No Ans Shown when the destination being called did not answer Busy Shown when unable to c...

Page 257: ...a network fax Automatic printout can be set to ON or OFF with Network Fax RX Error Report at Report Settings of Utility Mode For details see Report Settings on page 10 61 Destination Mail address of t...

Page 258: ...to Print or Do not Print with MDN Message at Report Settings of Utility Mode For details see Report Settings on page 10 61 Detail Details of Internet FAX Rx Report MDN vary depending on the remote st...

Page 259: ...d Automatic printout can be set to Print or Do not Print with DSN Message at Report Settings of Utility Mode For details see Report Settings on page 10 61 Detail Details of Internet FAX Rx Report DSN...

Page 260: ...Mail Text at Report Settings of Utility Mode For details see Report Settings on page 10 61 Detail The contents of the Receipt Mail Text vary by mails to be received Subject Mail transmitting conditio...

Page 261: ...rd and press OK The password for the administrator can be changed in Security Setting The administrator should have a responsibility for the management of the password 4 Press One Touch Registration I...

Page 262: ...ion Type you want to print The specification can be made up to 100 Pressing moves the cursor to the left and pressing moves it to the right When deleting characters entered press C clear on the contro...

Page 263: ...d Lists Chapter 11 How to see the Address Book List The actual reports may be different from the reports in this manual No Abbreviated dialing number Name Registration name Dial Number Registration Fa...

Page 264: ...assword and press OK The password for the administrator can be changed in Security Setting The administrator should have a responsibility for the management of the password 4 Press One Touch Registrat...

Page 265: ...No The specification can be made up to 20 Pressing moves the cursor to the left and pressing moves it to the right When deleting characters entered press C clear on the control panel 8 Press Print 9...

Page 266: ...How to see the Group Address List The actual reports may be different from the reports in this manual No Registration group number Name Registration group name Addr No Abbreviated dialing numbers reg...

Page 267: ...and press OK The password for the administrator can be changed in Security Setting The administrator should have a responsibility for the management of the password 4 Press One Touch Registration In...

Page 268: ...en Direct Input is selected specify Destination Type The specification can be made up to 50 Pressing moves the cursor to the left and pressing moves it to the right When deleting characters entered pr...

Page 269: ...of Reports and Lists Chapter 11 How to see the Program List The actual reports may be different from the reports in this manual No Registration program number Name Registration name Address Book Addre...

Page 270: ...inistrator Setting 3 Enter the password and press OK The password for the administrator can be changed in Security Setting The administrator should have a responsibility for the management of the pass...

Page 271: ...Explanation of Reports and Lists Chapter 11 7 Select tray to print 8 Press Start The E Mail Subject Title List is printed out Detail When no necessary paper is set in the paper tray Start flashes in...

Page 272: ...xplanation of Reports and Lists Chapter 11 How to see the Subject Text List Title List No Registration number Subject Subject registered for the Subject Text for E Mail Text List No Registration numbe...

Page 273: ...tor Setting 3 Enter the password and press OK The password for the administrator can be changed in Security Setting The administrator should have a responsibility for the management of the password 4...

Page 274: ...1 29 Explanation of Reports and Lists Chapter 11 6 Select tray to print 7 Press Start The Fax Settings List is printed out Detail When no necessary paper is set in the paper tray Start flashes in red...

Page 275: ...ts and Lists 11 30 Network Fax Explanation of Reports and Lists Chapter 11 How to see the Fax Setting List The actual reports may be different from the reports in this manual Item Item of Utility Mode...

Page 276: ...Explanation of Reports and Lists 11 Network Fax 11 31 Explanation of Reports and Lists Chapter 11...

Page 277: ...11 Explanation of Reports and Lists 11 32 Network Fax Explanation of Reports and Lists Chapter 11 The actual reports may be different from the reports in this manual...

Page 278: ...12 Web Connection Chapter 12 Web Connection...

Page 279: ...llowing the setting method to use the Web Connection for the Network FAX functions is explained E Mail RX POP E Mail TX SMTP I Fax Advanced Setting SMTP TX Setting SMTP RX Setting Address Book Group P...

Page 280: ...he Enter key http IP_address_of_the_machine e g When IP Address of the machine is 192 168 1 20 http 192 168 1 20 If user authentication is enabled a page for entering the user name and password appear...

Page 281: ...play If an error occurred in the machine the status of the malfunction error and other error information are displayed 7 Help The page specified in Online Manual URL is dis played For details refer to...

Page 282: ...tility is accessed again In addition since the machine s control panel remains locked and cannot be used the machine must be restarted In order to avoid this problem disable the cache The menus and co...

Page 283: ...cation is performed it is necessary to log off first then log on again To log off 1 Click Logout at the upper left of the window When logged on a timeout occurs and you will automatically be logged of...

Page 284: ...Web Connection 12 Network Fax 12 7 Web Connection Chapter 12 The user is logged off and the Login page appears...

Page 285: ...e two procedures for logging on to User mode one for a registered user and one for a public user If user authentication is not performed log on as a public user 1 In the Login page select Public User...

Page 286: ...d log on with a specific user name 0 Click the icon to the right of the User Name box and then select a user name from the list 0 For specifying the box administrator settings refer to User s Guide Bo...

Page 287: ...12 Web Connection 12 10 Network Fax Web Connection Chapter 12 The User mode page appears...

Page 288: ...ttings log on to Administrator mode 0 When logged on to Administrator mode the control panel of this machine is locked and cannot be used 0 Depending on the status of the machine you may not be able t...

Page 289: ...12 Web Connection 12 12 Network Fax Web Connection Chapter 12 2 Type in the password for the machine s administrator and then click OK The Administrator mode page appears...

Page 290: ...X POP 4 Set the item you wish to set 5 Click Apply and then click OK A setup is saved E Mail RX Setting A setting is made to decide whether or not the E mail RX Setting is used POP Server Address Spec...

Page 291: ...pecify the value of connection timeout Port No Specify the value of Port number Use SSL TLS Not used for Internet Fax mode Auto Receive Check A setting is made to decide whether or not a mail is autom...

Page 292: ...Mail TX SMTP 1 Open the Administrator Setting screen See p 12 11 2 Press Network and then select E Mail Setting 3 Select E Mail TX SMTP 4 Set the item you wish to set 5 Click Apply and then click OK A...

Page 293: ...is restricted Server Capacity When the size of a mail to be sent is restricted set a maximum capacity per mail that the SMTP server can receive Admin Mail Address Enter the E mail address of administr...

Page 294: ...I Fax Advanced Setting 4 Set the item you wish to set 5 Click Apply and then click OK A setup is saved MDN Request A setting is made to decide whether or not an MDN request is made DSN Request A sett...

Page 295: ...12 Web Connection 12 18 Network Fax Web Connection Chapter 12 Max Resolution Sets the max resolution...

Page 296: ...the Administrator Setting screen See p 12 11 2 Press Network and then select Network Fax Setting 3 Select SMTP TX Setting 4 Set the item you wish to set 5 Click Apply and then click OK A setup is save...

Page 297: ...2 11 2 Press Network and then select Network Fax Setting 3 Select SMTP RX Setting 4 Set the item you wish to set 5 Click Apply and then click OK A setup is saved SMTP RX A setting is made to decide wh...

Page 298: ...destinations can be registered for the fax scanning functions The Scan tab appears only when registrations by users are permitted To register new destinations Internet Fax 1 Click Scan tab and then se...

Page 299: ...rs Index Select the search word for searching destinations I Fax Address Enter the destination e mail address up to 320 characters Resolution Set the Resolution according to the ability of the other p...

Page 300: ...x 12 23 Web Connection Chapter 12 To register new destinations IP Address Fax 1 Click Scan tab and then select Address Book 2 Click New Registration 3 Click IP Address Fax and then click Next 4 Enter...

Page 301: ...ination up to 24 characters Index Select the search word for searching destinations Receiving Model Type Specify the model type Full color Black of the other party Host Address Enter the IP address or...

Page 302: ...tion Chapter 12 12 9 Group Multiple destinations registered in the Address Book can be registered as a group To register group Internet Fax 1 Click the Scan tab and then click Group 2 Click New Regist...

Page 303: ...6 Network Fax Web Connection Chapter 12 4 Enter the Name 5 Click 6 Select the desired destinations to be registered to the group from the Address Book List and click Apply 7 Click Apply 8 Click OK Reg...

Page 304: ...Web Connection 12 Network Fax 12 27 Web Connection Chapter 12 To register group IP Address Fax 1 Click the Scan tab and then click Group 2 Click New Registration 3 Select Store Fax and then click Next...

Page 305: ...Connection Chapter 12 4 Enter the Name 5 Select Color Model or Mono Medel 6 Click 7 Select the desired destinations to be registered to the group from the Address Book List and click Apply 8 Click App...

Page 306: ...12 29 Web Connection Chapter 12 12 10 Program Registration Transmission conditions and an address can be registered as a Program To register program Internet Fax 1 Click the Scan tab and then click Pr...

Page 307: ...12 Web Connection 12 30 Network Fax Web Connection Chapter 12 3 Select Internet Fax and then click Next...

Page 308: ...Web Connection 12 Network Fax 12 31 Web Connection Chapter 12 4 Enter the Settings and click Apply 5 Click OK Registration is performed...

Page 309: ...ng File Type Select the file format Subject Specify the subject When Not Specified was selected the default title is used Click to check the contents Text Specify the text When Not Specified is select...

Page 310: ...onnection 12 Network Fax 12 33 Web Connection Chapter 12 To register program IP Address Fax 1 Click the Scan tab and then click Program 2 Click New Registration 3 Select IP Address Fax and then click...

Page 311: ...ply 5 Click OK Registration is performed When IP Address Fax is selected No Enter the registration number Name Enter the registration name Receiving Model Type Specify the model type Full color Black...

Page 312: ...r photo Color Select Auto Full Color or Gray Scale Density Adjust the density Background Removal Adjust the background darkness Scan Size Select the original size Auto or Standard Size Feed Direction...

Page 313: ...Memory RX User Box The Memory RX User Box can be opened to check the contents from the Web Connection To open Memory RX User Box 1 Click the Box tab and then select Open User Box 2 Select Memory RX U...

Page 314: ...b Connection 12 Network Fax 12 37 Web Connection Chapter 12 4 Confirm the contents in the box Item Description Display the detailed information of the document Download the document Delete the documen...

Page 315: ...Web Connection Chapter 12...

Page 316: ...13 Appendix Chapter 13 Appendix...

Page 317: ...store about 9 000 Oc standard originals in an A4 size sheet with 700 words that are saved and received in each mode Copy Printer Scan Box and Fax at fine resolution Number of stored pages may differ d...

Page 318: ...how to use the keyboard that appears in the touch panel for typing in the names of registered accounts and custom paper sizes The keypad can also be used to type in numbers Any of the following keybo...

Page 319: ...13 Appendix 13 4 Network Fax Appendix Chapter 13 The following procedure describes how to type using E Mail address input screen...

Page 320: ...lso be typed in with the keypad The entered characters appear in the text box 2 Note To cancel the entered text touch Cancel To clear all entered text press the C clear key Detail To change a characte...

Page 321: ...use network or internet is transmitted or re ceived as a document attached to an E mail TIFF format between the Internet Faxes or computers M MDN Message Dis position Notifica tions A message to confi...

Page 322: ...ansmission condition of the documents such as the destination trans mission time memory transmit or resolution is same bps An abbreviation for bit per second It is the unit of data transmission and re...

Page 323: ...n This is one of the communication standards Frame Erase The function to erase dark bands reproduced when the original is a book or read with the ADF left open G G3 One of the fax communication modes...

Page 324: ...and the images on the first page are shown on communication results report However when a large number of pages are sent or when the images on the originals are fine memory capacity may be exceeded du...

Page 325: ...a large number of pages R Re TX The function to select documents that have failed to be sent The documents are stored in memory and you can send again either to the same destination or after changing...

Page 326: ...t at midnight or early in the morning during which telephone charg es are less Total page set The function to place the total number of pages on each page of the fax in quick mem ory transmission It i...

Page 327: ...is connected to the line via an extension exchange equipment Vertical scan ning The vertical direction when the original is scanned Z Z folded origi nal The function to determine the document siz es...

Page 328: ...ata 2 8 Density 3 18 Destination Indicator 2 11 Detail 1 11 Detail Search 3 27 3 30 Direct Input 2 10 3 24 3 32 DSN Message 11 14 E E Mail Setting 3 21 Entering Power Save Mode Fax 10 6 10 23 F Fax 2...

Page 329: ...12 Print Separate Fax Pages 4 11 4 12 Print Fax Output Settings 10 6 10 25 Program 2 10 3 26 3 29 9 13 Program List 11 22 R Receipt Mail Text 11 15 Redialing 3 39 Reminder 1 11 Report Settings 10 13 1...

Page 330: ...MEMO...

Page 331: ...MEMO...

Page 332: ...ting Environment IP Address Fax 2 4 2 4 Features and System Configuration of Internet Fax 2 5 2 5 Features and System Configuration of IP Address Fax 2 6 2 6 Control Panel 2 7 2 6 1 Control Panel 2 7...

Page 333: ...y One Mail Address Internet Fax 3 24 3 6 2 Specifying only destination IP Address Fax 3 29 3 6 3 Selecting Multiple Destinations 3 34 3 6 4 To Confirm Delete a Destination 3 36 3 7 Scanning 3 38 3 7 1...

Page 334: ...5 Call for Service 5 7 6 Specifications 6 1 Specifications Internet Fax 6 2 6 2 Specifications IP Address Fax 6 4 7 Transmission Applications 7 1 Opening the Scan Setting Screen 7 2 7 2 Application Fu...

Page 335: ...ic Screen Default Setting 10 5 10 2 2 User Setting Display Setting Fax Active Screen 10 5 10 2 3 User Setting Initial Setting 10 6 10 2 4 Administrator Setting System Setting Power Save Setting Enteri...

Page 336: ...g Security Setting Security Details Restrict Fax TX10 16 10 3 Fax Basic Screen Default Setting 10 17 10 4 Fax Active Screen 10 19 10 5 Initial Setting 10 21 10 6 Entering Power Save Mode Fax 10 23 10...

Page 337: ...essage 11 14 11 8 Receipt Mail Text 11 15 11 9 Address Book List 11 16 11 10 Group Address List 11 19 11 11 Program List 11 22 11 12 E Mail Subject Text List 11 25 11 13 Fax Setting List 11 28 12 Web...

Page 338: ...7 12 11 Memory RX User Box 12 36 13 Appendix 13 1 Number of Stored Pages to Memory 13 2 13 2 Entering Text 13 3 13 3 Internet Fax Terminology 13 6 13 4 FAX Terms 13 7 13 5 Index 13 13...

Page 339: ...8...

Page 340: ...l 1 11 Detail Search 3 27 3 30 Direct Input 2 10 3 24 3 32 DSN Message 11 14 E E Mail Setting 3 21 Entering Power Save Mode Fax 10 6 10 23 F Fax 2 7 Fax Active Screen 10 5 10 19 Fax Basic Screen Defau...

Page 341: ...Output Settings 10 6 10 25 Program 2 10 3 26 3 29 9 13 Program List 11 22 R Receipt Mail Text 11 15 Redialing 3 39 Reminder 1 11 Report Settings 10 13 10 61 10 63 Reset 2 8 7 4 Resolution 3 19 S Scan...

Page 342: ...3...

Page 343: ...4...

Page 344: ...5...

Page 345: ...6...

Page 346: ...Printing for Professionals Oc 100 Oakview Drive Trumbull CT 06611 Oc 2006...

Reviews: