SPLITMUX Quad Screen 4K 18GB Multiviewer
30
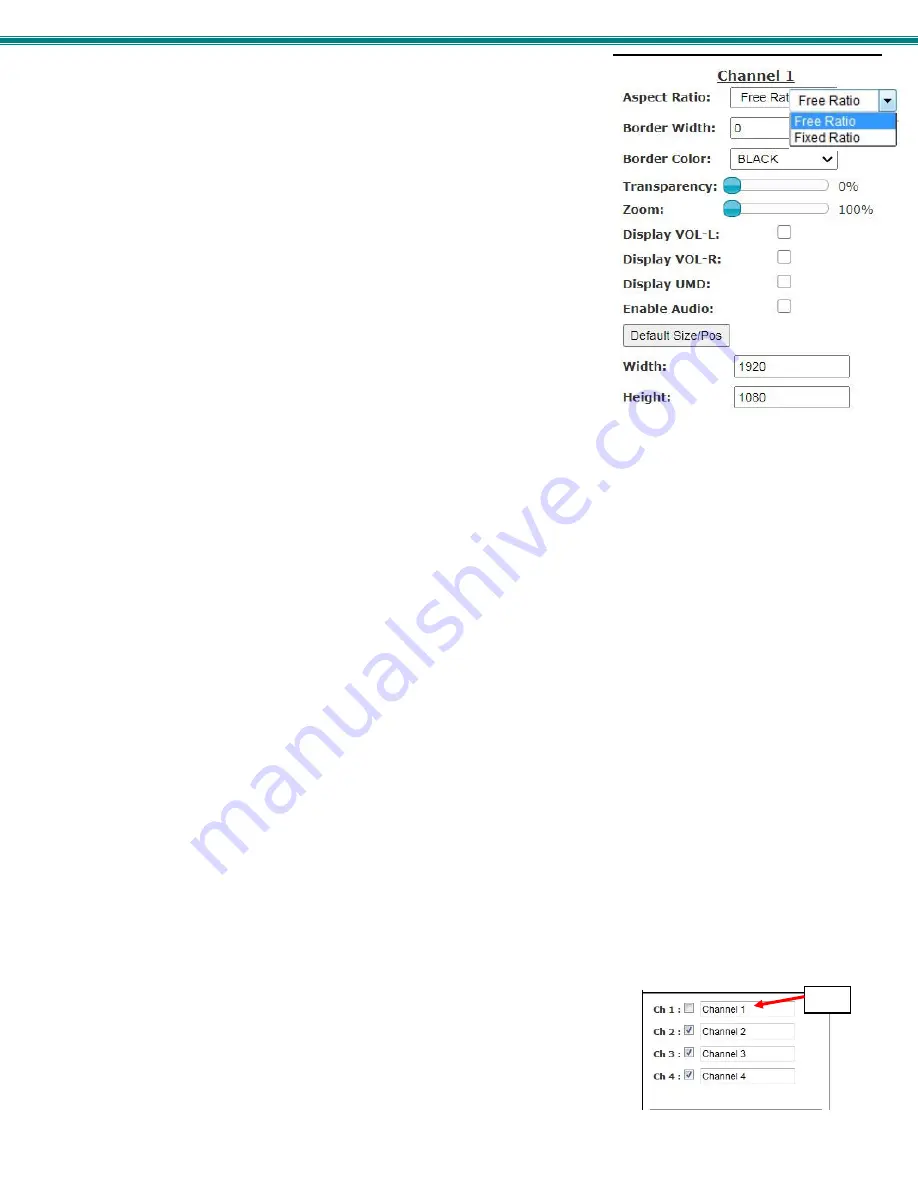
Individual Channel Settings
The settings applied here will impact only the individual channel being configured.
The Aspect Ratio can be configured to be a Fixed or Free Ratio.
When set to
Fixed Ratio
, no matter what size you drag the channel to be,
the viewed image will retain the ratio of the source.
When set to
Free Ratio
, the displayed video will adjust to whatever size or
shape you have dragged that channel to be.
To switch between aspect ratio settings, click on the drop-down arrow and select
the desired setting.
Note: When you switch from Free Ratio to Fixed Ratio after having resized
the image, the image on that channel will automatically crop to retain the
displayed size and shape while adjusting to the proper aspect ratio.
The border width can be set from 0-50 pixels (0 = no border).
The border color is selected from an array of options by clicking on the arrow.
Control the level of transparency for an input by sliding the “Transparency” button to the right.
Use the Zoom slider to zoom in on the image to enlarge your view of the source. Zoom range is from 100% (full size) to 500%.
With the image zoomed, you can also use the “Pan and Crop” feature (see
Alignment Tools- page 29
) to bring your preferred
area of focus into view.
Place a checkmark in “VOL-L” and/or “VOL-R” to display audio levels to the left and right of the video on the display for that
channel. (See Figure 18 on page 23).
Place a checkmark in “UMD” (
U
nder
M
onitor
D
isplay) to show the channel name beneath the video on the display.
Note: The audio level and UMD will only be viewable on the display when the SPLITMUX is in Custom Mode.
Place a checkmark in “Enable Audio” to hear the audio from that channel. Remove the checkmark to disable audio, but this will
only effect audio operation while in Custom Mode.
If your adjustments result in distortions in the channel and you want to start from scratch, click on “
Default Size/Pos
” button. The
channel resolution will either change to a full screen display at the native resolution for that channel, or to a combination of the
native resolution and the set output resolution of the SPLITMUX. If the output resolution is set smaller than the channel (source)
resolution, then the resulting display image will be limited by the size and aspect ratio of the output setting.
For a specific display dimension for the selected channel, enter the desired values under “Width” and “Height”.
Enable/Disable Channels
You can enable or disable each channel being displayed, and provide labels for the
channels. These labels are displayed in this interface as well as on the display
device when “UMD” (under monitor display) is selected for the channel.
Label


