background image

SPLITMUX Quad Screen 4K 18GB Multiviewer 

23 


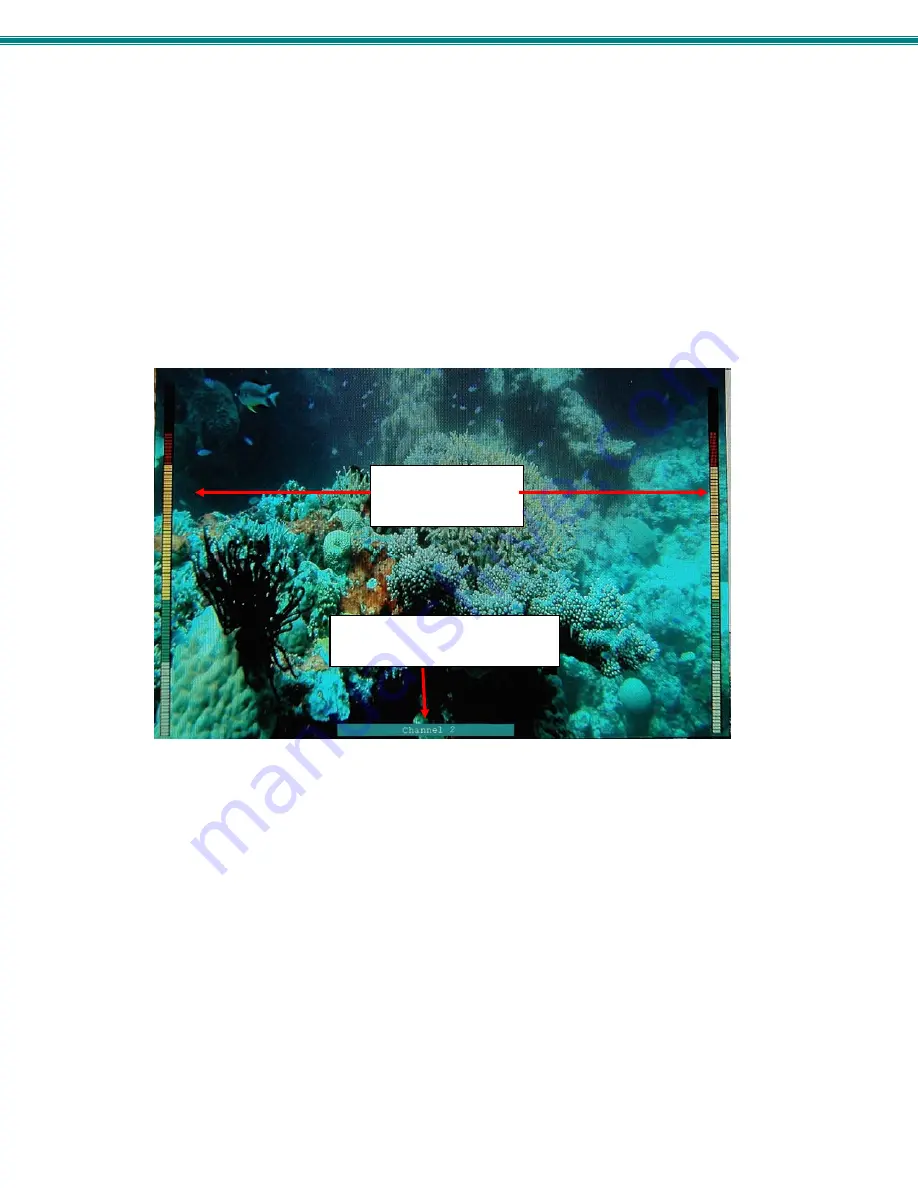
Audio Level and Gain 

The Audio level bar indicates the sound level output for the left and right speakers of that input channel.  The level “ -96dB” 
indicates minimum sound output and “0dB” indicates maximum sound output.    The audio level can also be viewed on the display 
(see Figure 18) when enabled through the web interface (see Figure 22).  


The Audio Gain provides control over the Audio level output by the SPLITMUX.    Drag the slide button to the left or right to adjust 
the audio level.   If the Audio level indicates -96dB for an input channel, it means there is no audio at that source. 


Note:  If sliding the Audio Gain button towards 0.00 dB results in the Audio level reaching 0 dB,  back it down towards 
the left enough to reduce the Audio level to at least -3dB (red arrow in Fig. 20.).   Levels higher than 0dB will likely result 
in significant audio static or noise.  


Note: The audio that is heard is determined by the Audio Mode Settings (below) and the Input Channel selected under 
Current Output Mode (page 17). 


                                               Figure 18- Display with sound level indications


Audio Mode Settings 

When Audio Mode is 

enabled

, the audio will come through any time the input signal is present (whether the video is enabled or 

not). 

When Audio Mode is 

disabled

, no audio will be heard from that input.  

When Audio Mode is 

automatic

, the audio will only be heard from that input if that input is the currently active input. To avoid 

confusion from multiple audio inputs when using Quad, TRIP or PIP modes, set each audio input to automatic.   


Sound level 
indications for left 
and right speaker 

Channel label 

(when UMD is enabled (Fig. 24)) 

Summary of Contents for SPLITMUX Series

Page 1: ...MAN399 Rev Date 6 29 22 SPLITMUX 4K18GB 4 SPLITMUX USB4K18GB 4 4K 18Gbps Quad Screen Splitter Multiviewer Installation and Operation Manual SPLITMUX Series SPLITMUX 4K18GB 4...

Page 2: ...without the prior written consent of Network Technologies Inc 1275 Danner Drive Aurora Ohio 44202 CHANGES The material in this guide is for information only and is subject to change without notice Net...

Page 3: ...ssword 16 Administration System 18 Administration Network 20 Administration Input Settings 21 Administration Output Settings 22 Audio Level and Gain 23 Audio Mode Settings 23 Administration Mode Setti...

Page 4: ...us 58 Navigating OSD menus via Keyboard 59 System Configuration 60 Network Configuration 61 Input Configuration 63 Output Configuration 64 Mode Configuration 65 Load Save Layout 69 System Information...

Page 5: ...cade Settings 32 Figure 25 User Configuration 34 Figure 26 Firmware Update 35 Figure 27 System Information page 36 Figure 28 Text Menu Login screen 41 Figure 29 Text Menu Main Menu 42 Figure 30 Text M...

Page 6: ...en and Quad Screen Settings 66 Figure 64 PIP Screen Mode settings 67 Figure 65 OSD Custom Screen Mode Settings 68 Figure 66 OSD Load Save Layout functions 69 Figure 67 Save or Load a Custom Layout 69...

Page 7: ...bit xvYCC sRGB and YCbCr o Four channel mixing stereo with 16 20 or 24 bit uncompressed PCM audio o Video bandwidth up to 594Mhz 5 94Gbps Any DVI source or display can be connected by using the DVI HD...

Page 8: ...r 2 MP4828 Connector Plate 24 HW5133 6 32x1 4 Flat head Screws 4 HW7097 4 40x3 16 Pan head Screws Additional materials may need to be ordered CAT5 5e 6 unshielded twisted pair cable s terminated with...

Page 9: ...powered ON Green or in Standby Red 5 PWR STBY Rocker switch For switching the SPLITMUX between ON I and Standby O 6 12VDC Power Jack For connection of power supply 7 HDMI IN 1 4 HDMI female connector...

Page 10: ...6 12VDC Power Jack For connection of power supply 7 HDMI IN 1 4 HDMI female connector For connection of HDMI video sources 8 HDMI OUT HDMI female connector For connection of cable to HDMI Monitor 9 RS...

Page 11: ...igure 1 Attach ear brackets to front corners Figure 2 Assembled unit ready to mount in rack 2 Install 4 cage nuts provided to the rack in locations that line up with the holes in the mounting ears on...

Page 12: ...le management tray will not be used Assemble the ear brackets to the holes vacated by the screws securing the cable tray Figure 3 Remove cable tray if applicable 4 Install 4 cage nuts provided to the...

Page 13: ...minate red standby 4 Press the switch on the front to power the SPLITMUX ON Within 20 more seconds the LED will change from red to green ON and the SPLITMUX will be ready to use 5 For keyboard and or...

Page 14: ...x port corresponding with the HDMI IN x port the video from the CPU is connected to 7 Connect any desired USB devices to the ports labeled With the connections made in steps 6 and 7 the keyboard conne...

Page 15: ...to USB type A male adapter and connect the adapter to a USB port on a computer running a terminal program Figure 6 RS232 Terminal Connection Ethernet Connection for Remote User Control To make a remot...

Page 16: ...er 20 more seconds the LED will change from red standby to green ON The SPLITMUX is now powered up and ready to use When powering the SPLITMUX OFF always press the power switch to OFF switch towards O...

Page 17: ...deo signals in When FULL is pressed the input selected using buttons 1 through 4 or active image will be the only image on the display The audio from the selected input will also be heard provided the...

Page 18: ...e active source being displayed in its entirety on the full screen and the remaining selected images at a reduced resolution for simultaneous viewing The position of the reduced images can be configur...

Page 19: ...tput clockwise or counter clockwise user selectable depending upon how the monitor is rotated to be viewed properly OSD Mode In OSD Mode the buttons are used to navigate and control the SPLITMUX using...

Page 20: ...the SPLITMUX using the keyboard press Ctrl accent tilde key on the keyboard press at the same time to enter Command Mode While in Command Mode all 3 status lights on the keyboard will illuminate to in...

Page 21: ...Figure 10 Device Discovery Tool Click on the Detect NTI Devices button to start the discovery process After a short time the tool will display all NTI devices on your network along with their network...

Page 22: ...the unit is powered up If the SPLITMUX does not find a DHCP server the address entered into the static IP address field page 20 default address shown below will be used If a DHCP server on the network...

Page 23: ...ode is Quad PIP TRIP or Custom the Input Channel selected indicates which input will pass audio through to the output provided the audio mode for each input is set to Automatic page 23 Function Descri...

Page 24: ...MUX when improved software becomes available System Information Provides firmware version MAC address network settings and input connection status Administration System The System Configuration page p...

Page 25: ...d log in again Note The IP address will be set to the IP address in the file and may be different Note Before overwriting the existing configuration consider whether the existing configuration should...

Page 26: ...or Static Mode Primary DNS Address Enter preferred name server for Static Mode Alternate DNS Address Enter alternate name server for Static Mode Server Settings Description Enable Telnet Place a check...

Page 27: ...ter a port name to associate with the video source on Input 1 Enable Choose to Enable or Disable the video input for this channel Each Input channel can be configured with these settings Note Make sur...

Page 28: ...the output resolution to send to the display or select Auto to have it choose from the EDID table Note When the Output resolution is set to Auto your SPLITMUX will automatically sense the native reso...

Page 29: ...dB back it down towards the left enough to reduce the Audio level to at least 3dB red arrow in Fig 20 Levels higher than 0dB will likely result in significant audio static or noise Note The audio that...

Page 30: ...seconds each channel will appear at full screen range is 0 999 Scan input 1 Enable or disable to include input 1 in the scanning sequence Scan input 2 Enable or disable to include input 2 in the scan...

Page 31: ...inputs should be in the middle Bottom Screen Select which of the 4 inputs should be on bottom Enable Border Place a border around each input displayed Border Color Choose the color of the border arou...

Page 32: ...sition PIP Horz Position Position of PIP images from the right side of the screen range is 0 90 of screen width PIP Vert Position Position of uppermost PIP from the top of the screen range is 0 60 of...

Page 33: ...s including the Active Channel and take turns displaying each channel in the PIP window as well as changing the Active Channel image at full screen Double PIP Mode When in Double PIP Mode the PIP Vert...

Page 34: ...d to save layout Restore saved layout Configure the size position appearance of each input channel Alignment Tools Show audio levels for the channel on the display Enter checkmark to show channel labe...

Page 35: ...grid points for easy alignment of the displayed images The distance between grid points is adjusted by changing the numbers of Rows and Columns default is 10 Click the radio button Move Scale the defa...

Page 36: ...referred area of focus into view Place a checkmark in VOL L and or VOL R to display audio levels to the left and right of the video on the display for that channel See Figure 18 on page 23 Place a che...

Page 37: ...ayout to update with your custom layout and click on Update Note If you don t want to overwrite an existing preset save that layout to a file on your PC before updating the preset layout with your cus...

Page 38: ...ration To cascade SPLITMUXs simply connect the output port of any downstream SPLITMUXs to the input port of an upstream SPLITMUX Any input sources will be viewable from the monitor connected at the mo...

Page 39: ...ave will determine what video is viewed and audio is heard at the master level regardless of what the custom mode layout is set at The configuration menu for each slave is accessible from the web inte...

Page 40: ...enable or disable this users access to the SPLITMUX Note a user that is not enabled will not be able to log in to the SPLITMUX Password enter a password for this user to login with Confirm re enter t...

Page 41: ...hinc com download d hdmi multiviewer html to a location on your PC 2 Click on the Browse button and locate and select the firmware file for the SPLITMUX splitmux hd 4rt vx x bin for example 3 Click on...

Page 42: ...server assigned settings regardless of the network setting applied on the Network Configuration page page 20 which only apply when the IP mode is set to Static Figure 28 System Information page Note T...

Page 43: ...this The Downloads link will take you to the Firmware Downloads page for the SPLITMUX on the NTI website All versions of firmware for the SPLITMUX will be found there available for immediate download...

Page 44: ...ION 1 No connection 2 No connection 3 RX Receive data TXD at host 4 GND Ground 5 No connection 6 TX Transmit data RXD at host 7 No connection 8 No connection A 5 foot patch cable and adapter RJ45 to D...

Page 45: ...ustom layout 01 10 RU SA CR IP OP CR Read Unit Size RS SA CR Reset unit If the first field is not a known command as listed above or SW field is different from the serial address programmed in the swi...

Page 46: ...rompted for the root password to connect to the SPLITMUX The factory default password is nti all lowercase letters With a proper password sent the SPLITMUX will respond with Password Successful Connec...

Page 47: ...uration page press Enter Be sure to Tab to Save and press Enter when configuration changes are made To return from Save back to a field on the configuration page press Tab From a terminal connection t...

Page 48: ...appear on the display Mode Configuration Configure how each mode will behave Load Save Layout Choose to save custom layout up to 10 different layouts or load one of saved custom layouts System Inform...

Page 49: ...2 provides 3 categories of settings to configure and provides an option to restore the SPLITMUX configuration to default settings Figure 32 Text Menu System Configuration The Unit Settings page provi...

Page 50: ...d 115200 bps and the assigned serial address 1 15 Figure 34 Text Menu Serial Port Settings The OSD Screen Settings page provides values for the placement of the OSD menu on your screen Values of the H...

Page 51: ...default values or not Be careful here but the default answer is No for your protection Figure 36 Text Menu Restore Default Settings Network Configuration The Network Configuration screen Main Menu 3...

Page 52: ...sk for Static Mode Default Gateway Enter valid default gateway for Static Mode Primary DNS Address Enter preferred name server for Static Mode Alternate DNS Address Enter alternate name server for Sta...

Page 53: ...s The default is disabled HTTP Port Port to be used for standard HTTP requests default is 80 HTTPS Port Port to be used for HTTPS secure requests default is 443 Web Timeout Number of minutes after whi...

Page 54: ...the user will use to login Password enter a password for this user to login with Confirm re enter the password this user will login with Enabled Yes or No to enable this user to access the SPLITMUX Ad...

Page 55: ...ain Menu 5 Select which input to configure and choose the settings to be applied Figure 43 Text Menu Input Configuration Input Settings Input Channel x Port Name Enter a port name to associate with th...

Page 56: ...Name Enter a port name to associate with the display Output resolution Select the output resolution to send to the display see table below for resolutions to choose from or select Auto to have it cho...

Page 57: ...between enabled disabled automatic Input 4 Audio Mode Select the audio mode for the Input between enabled disabled automatic When Audio Mode is enabled the audio will come through any time the input s...

Page 58: ...by the SPLITMUX will be presented Mode characteristics will determine how the images will look on the display Figure 46 Text Menu Mode Settings Menu Figure 47 Text Menu Default Mode Configuration Powe...

Page 59: ...mount of time in seconds each channel will appear at full screen range is 0 999 Scan input 1 4 Select Yes or No to include input 1 2 3 or 4 in the scanning sequence Figure 49 Text Menu Quad Mode Setti...

Page 60: ...nput channel will be in PIP lower right position PIP Horizontal Position Position of PIP images from the right side of the screen range is 0 90 of screen width PIP Vertical Position Position of upperm...

Page 61: ...ect which input should be displayed on the bottom Enable Border Yes or No to add a border for each input Border color Choose the color of the border around each input Border width Choose the width of...

Page 62: ...d Screen 4K 18GB Multiviewer 56 Load Save Layout Select Load Save Layout from the main menu Main Menu 8 to save or recall a display configuration of video sources being viewed Figure 53 Text Menu Load...

Page 63: ...ssible saved layouts or load one of up to 10 previously viewed and saved layouts System Information Select System Information from the main menu Main Menu 9 to view the port status network configurati...

Page 64: ...a choice like pressing the Enter key on the keyboard The TAB button is used to move from one field to another in the menus The button is used to advance the field to another option or increase a numer...

Page 65: ...guration Configure how each mode will behave Load Save Layout Load or Save Custom Layout configurations System Information Display firmware version MAC address network settings and port status Navigat...

Page 66: ...tegories of settings to configure Access to the OSD menus is controlled under Unit Settings serial communication baud rate and address under Serial Settings and the position of the OSD menu on the dis...

Page 67: ...lect a value between 1200 and 115200 bps Serial Address Serial Address for RS232 commands and for the IR Remote select value from 1 15 OSD Screen Settings Horiz Offset Position OSD Horizontal Offset f...

Page 68: ...r preferred name server for Static Mode Alternate DNS Address Enter alternate name server for Static Mode Note If you select DHCP for the mode make sure a DHCP server is running on the network the SPL...

Page 69: ...figuration screen Select which input to configure and choose the settings to be applied Figure 61 OSD Input Configuration Figure 62 OSD Input Settings Input Settings Input Channel x Port Name Enter a...

Page 70: ...Settings Input 1 Audio Mode Select the audio mode for the Input between enabled disabled automatic Input 2 Audio Mode Select the audio mode for the Input between enabled disabled automatic Input 3 Aud...

Page 71: ...iviewer 65 Mode Configuration Mode Configuration will determine how each display mode provided by the SPLITMUX will be presented Mode characteristics will determine how the images will look on the dis...

Page 72: ...nel to automatically switch from one channel to another Scan time Set the dwell time while scanning the amount of time in seconds each channel will appear at full screen range is 0 999 Scan input 1 4...

Page 73: ...ut channel will be in PIP lower right position PIP Horizontal Position Position of PIP images from the right side of the screen range is 0 90 of screen width PIP Vertical Position Position of uppermos...

Page 74: ...ct which input should be displayed on the bottom Enable Border Disable or Enable a border for each input Border color Choose the color of the border around each input Border width Choose the width of...

Page 75: ...en layout configured in such a way that you want to save that layout for future viewing select Load Save Layout to open the Save Layout menu Figure 69 OSD Load Save Layout functions Figure 70 Save or...

Page 76: ...the main menu to view the current network settings MAC address and port status This is particularly helpful when the SPLITMUX is in DHCP mode with a server assigned IP address The IP address shown be...

Page 77: ...ons are used for the SPLITMUX and have the following functions Numerical Values 1 4 Selects port numbers for IN Select mode to switch to IN Pressed to indicate an input port selection OUT Pressed to i...

Page 78: ...All NTI SPLITMUX 4K18GB 4 will work with the same IRT UNV IR Remote control As a result a user with multiple NTI SPLITMUXs may find that if the units are installed too close together both units may re...

Page 79: ...tems Max 15 Pushbutton Control 29 keys Power supply 2x AAA Battery Chassis material Plastic Approvals RoHS Troubleshooting the IRT UNV PROBLEM SOLUTION IRT UNV is not selecting inputs or changing mode...

Page 80: ...ave units connected In order to make edits to the configuration of slave units either change the IP address in the URL bar or double click on the channel where slave units are indicated In Cascade Set...

Page 81: ...cted through channel 2 Input 2 These are of course IP 192 168 3 125 and IP 192 168 3 183 Any edits made using the web interface configuration menu at this level will directly and only impact the SPLIT...

Page 82: ...nfiguration of the master or upper level slave click on the appropriate tab Figure 75 View of custom configuration of Slave at IP 192 168 3 183 In Figure 75 we see that there are no slaves connected t...

Page 83: ...5mm power jack 2 USB Keyboard Mouse Additional Ports SPLITMUX USB4K18GB 4 only 2 USB 2 0 High Speed Transparent Protocols supported HTTP HTTPS TCP IP DHCP UDP ARP IPV4 Operating temperature 32 to 122...

Page 84: ...plug cable at the SPLITMUX and at the display Cannot log in to SPLITMUX via Ethernet Incorrect IP address has been entered in the browser User is on a different subnet Check the System Information pag...

Page 85: ...you will likely see lines between the channels To remove the lines and perfect the images using Custom Mode increase the dimensions of the channels by a few pixels to make them overlap other channels...

Page 86: ...ion the line s will disappear Once the displayed channels look as intended that configuration will remain in place until you change it If you decide you want to save it for re use later you can save t...

Page 87: ...ads 35 Ethernet 9 firmware update web 33 IRT UNV 67 Java Runtime Environment 14 load layout 29 53 65 log in 15 network settings 19 OSD menus 55 OSD via Keyboard 56 output settings 21 Password 15 RS232...

Reviews: