


Copyright © 2019 Nortek Security & Control LLC
49
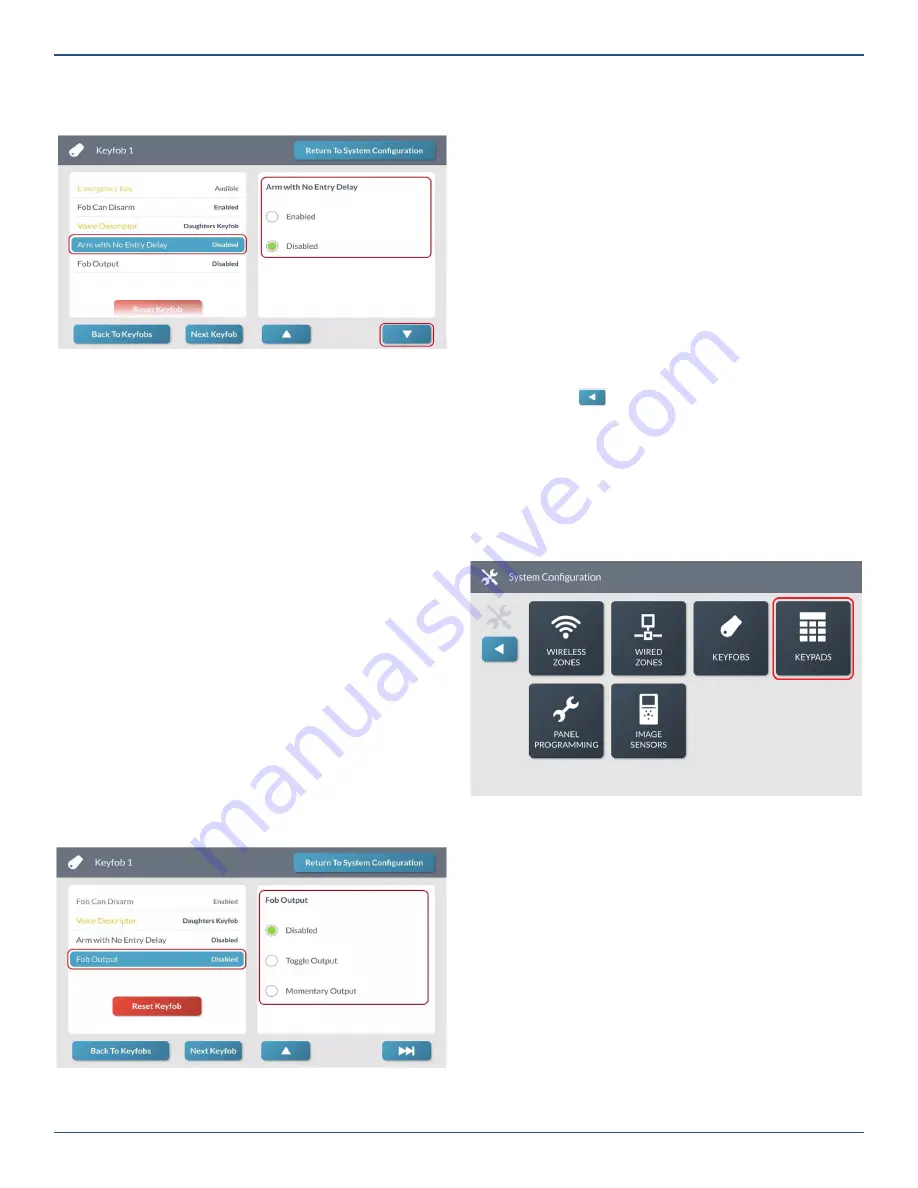
2. Under
Arm with No Entry Delay
, choose
Enabled
or
Disabled
.
Keyfob Programming—Arm with No Entry Delay
3. Tap
▼
.
Step 11: Enable or Disable Fob Output
Finally, select whether the auxiliary (*) button on the keyfob
can be used to trigger the GC3 Panel’s Open Collector #1
output.
1. At the
Keyfob <###>
screen, highlight
Fob
Output
.
2. Under
Fob Output
, choose one of these options:
»
Disabled
: This deactivates the option.
»
Toggle Output
: Choose this option for toggle
output. This lets users press the Auxiliary (*) button
on the fob to control the device that is connected
to the system’s Open Collector Output #1. For
example, to use the keyfob to open and close a
garage door, you would typically choose Toggle
Output.
»
Momentary Output: Choose this option for
momentary output. This lets users press the
Auxiliary (*) button on the fob to control the device
that is connected to the system’s Open Collector
Output #1. For example, to use the keyfob to turn
system-controlled lights ON or OFF, you would
typically choose Momentary Output.
Keyfob <###> Screen—Fob Output
Next Steps
You have
fi
nished programming a keyfob. You can now
choose one of these options:
»
To program another keyfob, tap
Next Keyfob
and
repeat the programming steps for another keyfob.
The system keeps track of all your programming
changes and prompts you to permanently save all
your changes as a group when you exit the
System
Con
fi
guration
menu.
»
To program the next keyfob, tap uu|. This
button becomes visible and available only when
programming the last setting for a keyfob.
»
To erase all of the settings you just programmed for
the keyfob, tap
Reset Keyfob
.
»
To permanently save the settings you just
programmed, tap
Return to System Con
fi
guration
.
Then tap
. At the
Con
fi
rm Changes
screen, tap
Save
.
Program a Keypad
The GC3 Panel lets you program a maximum of eight (8)
keypads. To begin keypad programming, navigate to the
Installer Toolbox
. See “Navigate to the Installer Toolbox.”
Then tap
System Con
fi
guration
>
Keypads
.
System Confi guration Menu
This reveals the
Keypads
screen shown in the step that
follows.
Step 1: Select a Keypad
First, select the keypad to edit:
1. On the left side of the Keypads screen, swipe up to
move through the list of keypads.
2. Tap one of the available keypads to select it.
Note:
A keypad is available for programming when
it appears in gray text. A keypad that has already
been programmed appears in black text.


