background image


RDP Client Settings

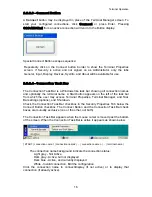
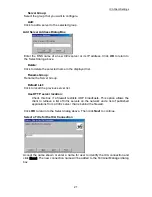
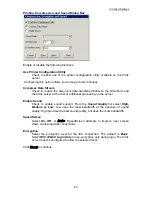
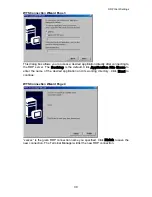
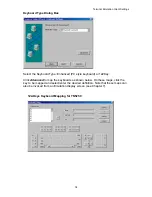
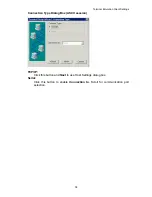
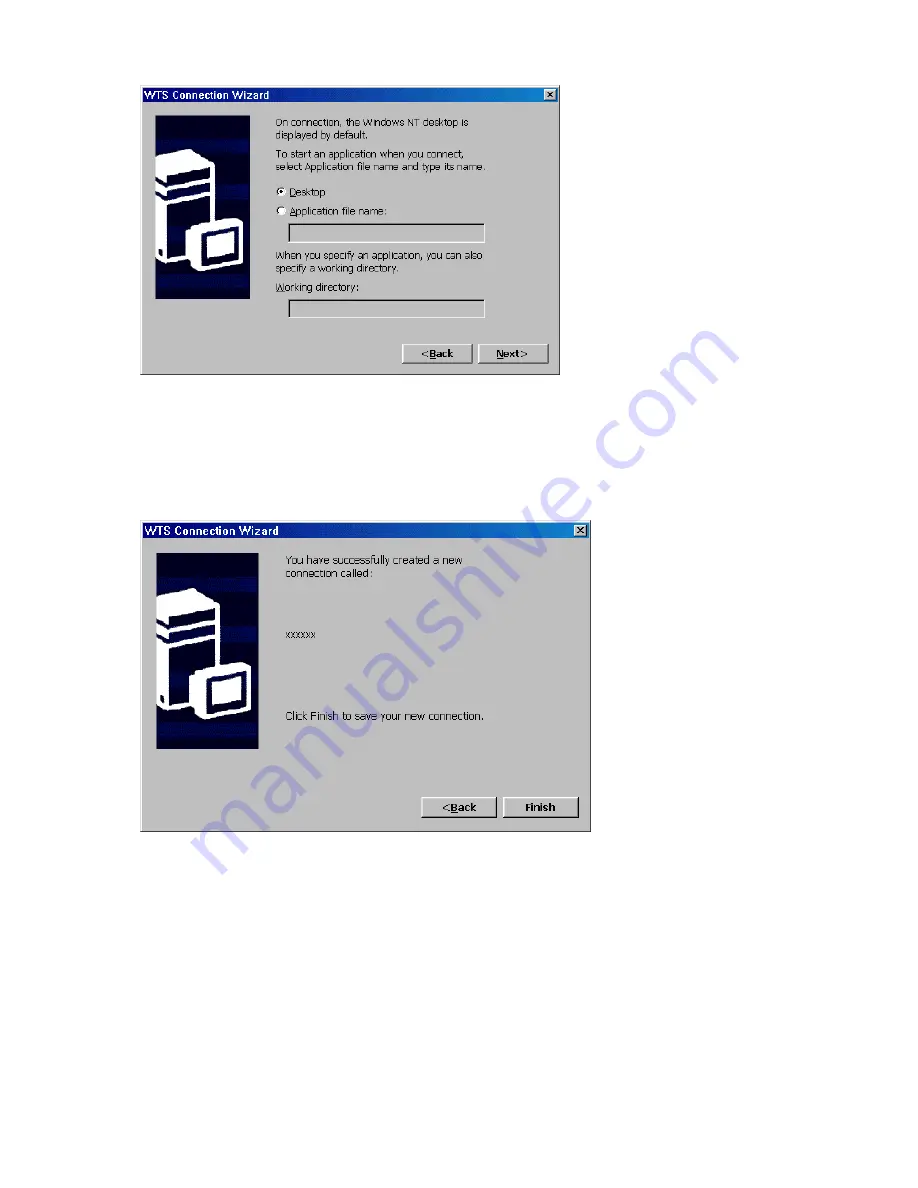
WTS Connection Wizard Page 3 


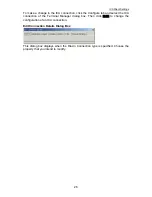
This dialog box allows you to access a desired application directly after connecting to 
the RDP server. The 

Desktop


is the default. Click 

Application File Name


to 

enter the name of the desired application and its working directory. Click

 Next


to 

continue. 


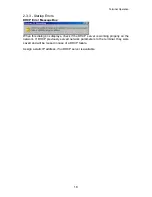
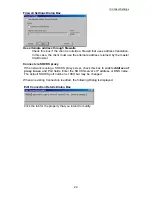
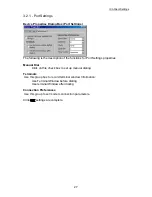
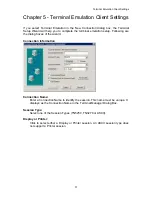
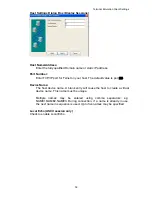
WTS Connection Wizard Page 4 


“xxxxxx” is the given RDP connection name you specified. Click 

Finish


to save the 

new connection. The Terminal Manager will list the new RDP connection. 
 

30 

Summary of Contents for OmniTerm WBT

Page 1: ...OmniTerm WBT Windows based Terminal User s Guide Version 2 1 0e...

Page 2: ...ab 48 6 3 Display Tab 49 6 4 Network Tab 50 6 5 Upgrade Tab 58 6 6 Devices Tab 59 6 7 Security Tab 78 6 8 SysInfo Tab 83 6 9 About Tab 84 Chapter 7 Terminal Emulation Sessions 85 7 1 Display Session 8...

Page 3: ...etup 119 Appendix B AutoUpdate AutoConfiguration 120 Appendix C Advanced Terminal Customization 122 C 1 Emulation Font Upload 122 C 2 Boot up Splash Screen Upload 125 C 3 Remote Serial Number Update 1...

Page 4: ...nd complete installation instructions Stand Assembly Re Assembly 1 Identify the front and rear orientation of the stand 2 Attached the stand to the OmniTerm using the 4 screws provided 3 The stand wil...

Page 5: ...s reset to initial conditions Welcome Dialog Box This dialog box provides product information A 15 second countdown displays at the top Click Next to continue or wait for the countdown to end Press Es...

Page 6: ...supply the IP Address The default is No I will enter static IP information If you select Yes use the IP information supplied by DHCP the next figure Specify an IP Address Dialog Box will be skipped Sp...

Page 7: ...ired information By default the check boxes are unselected If DHCP is used the DNS server is commonly specified and would not need to be entered here Desktop Area and Refresh Frequency Dialog Box Sele...

Page 8: ...a local printer to be used with an RDP session Click Next and the Finish dialog box will display Local Printer Configuration Dialog Box Click Open to setup a local printer Click Delete to delete the...

Page 9: ...ect the port you want your printer to use Most users select LPT1 port for a local printer Select the Printer Model Message Box Select the manufacturer of your printer from the Manufacturers list Then...

Page 10: ...log Box Specify the name of your printer The printer name can be entered as no more than 31 characters Set Default Printer Dialog Box This dialog box allows you to set the local printer as the default...

Page 11: ...NO Click Next to finish Finish Dialog Box Click Finish to apply your specified setting and quit the Setup Wizard Terminal Settings Change The terminal must be restarted for changes to take effect Clic...

Page 12: ...the initial terminal setup the Terminal Manager dialog box will display Unless Security is in effect this will be the first dialog box after you power on the terminal If a browser is supported the nam...

Page 13: ...ank if connection is not active You can select from this list and click Connect to activate that connection or just double click the connection name to be activated For a selected active session you c...

Page 14: ...startup Once the desired connections are configured security can be set to inhibit display of the Configure Dialog Box Terminal Manager Dialog Box Configure Connection Types RDP Microsoft Terminal Se...

Page 15: ...3 Microsoft Remote Desktop Client Chapter 4 Terminal Emulation Chapter 5 Click Edit to edit or review the selected item in the connection list Click Delete to delete the selected item in the connectio...

Page 16: ...required The status in the Startup column will show Default Automatically start the selected connection at startup T c A T A a he startup screen will automatically display the selected connection No...

Page 17: ...ght Alt key is reserved for special emulation functions e g Alt right E generates the Euro symbol Note On the 122key keyboard 122Key certain special key sequences are supported F2 Press F2 from Termin...

Page 18: ...s Esc to allow login as the Administrator or a different user different connections If Auto Login is not enabled with Security or if Esc was pressed at the Auto Login box The following dialog box is u...

Page 19: ...on the left of the task bar from which the user may access Terminal Properties Terminal Manager and Task Bar settings options and Shutdown Check the Connection Task Bar checkbox in the Security Proper...

Page 20: ...he screen To change this setting first close all Connections Slide Bar Task Bar scrolls up when in autohide versus instantly appearing Show Terminal Name Display Terminal Name on the right of the Task...

Page 21: ...this dialog box displays check if the DHCP server is working properly on the network If DHCP previously served network parameters to the terminal they were saved and will be reused in case of a DHCP f...

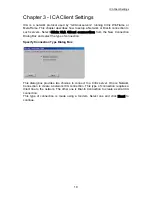
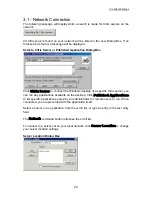
Page 22: ...ion from the New Connection Dialog Box and select the type of connection Specify Connection Type Dialog Box This dialog box provides two choices to connect to a Citrix server One is Network Connection...

Page 23: ...he Windows desktop of a specific Citrix server you can run any applications available on the desktop Click Published Applications to list specific applications setup by an administrator for remote use...

Page 24: ...ault List lick to recall the previous server list Use HTTP server location Check this box if a firewall restricts UDP broadcasts This option allows the client to retrieve a list of Citrix servers on t...

Page 25: ...lication you intend to use Click Next Specify Logon Information Dialog Box If necessary enter a user name a password and a domain name for connecting to an application Click Next Select Window Options...

Page 26: ...additional processing on the server Enable Sound Check to enable sound support From the Sound Quality list select High Medium or Low Low uses the least bandwidth at the expense of sound quality High p...

Page 27: ...y the master ICA Browser Connect via SOCKS proxy I p T E f the network is using a SOCKS proxy server check this box to enable Address of roxy to use and Port fields Enter the SOCKS server s IP address...

Page 28: ...x The Device Properties dialog box contains two options Port Settings Call Options These options are discussed in Port Settings 3 2 1 and Call Options 3 2 2 sections of this manual Click Next to conti...

Page 29: ...nd select the ICA connection of the Terminal Manager dialog box Then click Edit to change the configuration of an ICA connection Edit Connection Details Dialog Box This dialog box displays when the Di...

Page 30: ...or Port Settings properties Manual Dial Click on this check box to set up manual dialing Terminals U U se this group box to record terminal window Information Use Terminal Window before dialing Use te...

Page 31: ...cel the call if Not connected within Enter in this field the number of seconds to wait before a call is canceled The default is 120 with the function enabled Wait for Dial Tone Before Dialing The defa...

Page 32: ...n the Terminal Manager dialog box WTS Connection Wizard Page 1 Type a name in Name field so a user can identify this RDP connection Enter the name IP address of the server in Server field Check Low Sp...

Page 33: ...RDP server The Desktop is the default Click Application File Name to enter the name of the desired application and its working directory Click Next to continue WTS Connection Wizard Page 4 xxxxxx is...

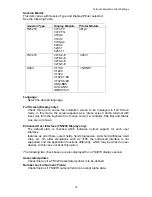
Page 34: ...Following are the dialog boxes of the wizard Connection Information Connection Name Enter a Connection Name to identify the session This name must be unique It displays as the Connection Name in the...

Page 35: ...en dumb terminal with input only from the keyboard no mouse cursor A windows Title Bar and Status Line are not shown Enhanced User Interface TN5250 Display only The default state is checked which indi...

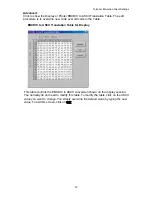
Page 36: ...r old code in the Table EBCDIC to ASCII Translation Table for Display T Y CII v v his table controls the EBCDIC to ASCII conversion shown on the display session ou normally do not need to modify this...

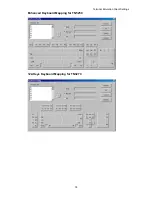
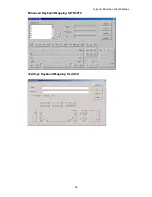
Page 37: ...ed PC style keyboard or 122Key Click Advanced to map the keyboards as shown below On these maps click the key to be mapped and select enter the desired definition Note that these maps can also be invo...

Page 38: ...Terminal Emulation Client Settings Enhanced Keyboard Mapping for TN5250 122 Keys Keyboard Mapping for TN3270 35...

Page 39: ...Terminal Emulation Client Settings Enhanced Keyboard Mapping forTN3270 122 Keys Keyboard Mapping for ASCII 36...

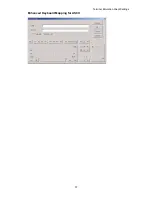
Page 40: ...Terminal Emulation Client Settings Enhanced Keyboard Mapping for ASCII 37...

Page 41: ...n Client Settings Connection Type Dialog Box ASCII session TCP IP Click this button and Next to use Host Settings dialog box Serial Click this button to enable Connection to Scroll for communication p...

Page 42: ...st The default value is port 23 Device Name The host device name A blank entry will cause the host to create a virtual device name This name must be unique Multiple names may be entered using comma se...

Page 43: ...ust be unique Message Queue The default value is QSYSOPR Activated only in TN5250 Printer mode Library The default value is LIBL Activated only in TN5250 Printer mode Font The default value is 011 Act...

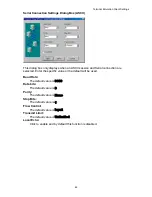
Page 44: ...low Paper Source 1 Select paper type in paper source 1 The default setting is MFRTYPMDL Paper Source 2 Select paper type in paper source 2 The default setting is MFRTYPMDL Envelope Hopper Select Envel...

Page 45: ...e selected Enter the specific value or the default will be used Baud Rate The default value is 9600 Data bits The default value is 8 Parity The default value is None Stop Bits The default value is 1 F...

Page 46: ...ad and end codes are 00 this feature will be disabled Below is an example illustrating the transparent mode feature are the lead codes and is the end code Given the character string 1B410C Hex 6A 5F F...

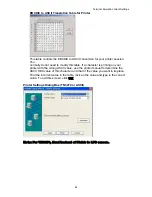
Page 47: ...If a character is printing on your printer with the wrong ASCII value use the printer manual to determine the ASCII HEX value of this character and that of the value you want in its place Find the inc...

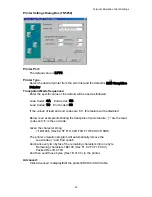
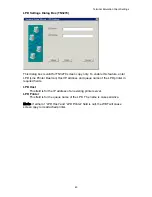
Page 48: ...e Printer Daemon Host IP address and queue name of the LPD printer in required fields LPD Host This field is for the IP address of an existing printer server LPD Printer This field is for the queue na...

Page 49: ...d may vary with the OmniTerm model or with the Security selected Click the desired Tab to display it The property tabs are described in the following sections After clicking OK in the Terminal Propert...

Page 50: ...rminal Setup sequence will be invoked see Chapter 2 A Serial Number may be displayed below the Bootlloader display Serial No is displayed when that value was manually entered or loaded at the factory...

Page 51: ...ble keyboard Num Lock on system startup Repeat delay Use this slider control to determine how quickly a key will start to repeat when held down Repeat Rate Use this slider control to determine how qui...

Page 52: ...is displayed for 5 seconds using the setting selected Enable Screen Saver C a lick on the Screen Saver check box to make the three functions in the group box ctivated Screen Saver Click this button to...

Page 53: ...y an IP address Enter a static IP address in IP Address field Enter the subnet mask and gateway of the IP address in Subnet Mask and Gateway fields Terminal Name Name used by RDP connections and or SN...

Page 54: ...ble DNS Use this group box to set domain primary and secondary IP addresses for DNS Enable WINS Use this group box to set the primary and secondary IP addresses of a WINS server Advanced DHCP See Appe...

Page 55: ...Terminal Properties SNMP Network Enter custom fields that can be viewed with SNMPadm v2 0b1 81 or higher Typically used for ID processes 52...

Page 56: ...y hides and displays the client window title bar Use the title bar to drag the client window to different positions on the local desktop Remove the title bar to maximize your workspace CTRL ALT DEL Di...

Page 57: ...6 or Thousands colors When using a PPP connection 16 colors mode may provide better performance If the window options specified exceed the capabilities of the client hardware the maximum size and colo...

Page 58: ...rowser or SSL TLS HTTPS Browser Server Group Select the group that you want to configure Add Click to add a server to the selected group Add Server Address Dialog Box Enter the name of a new Citrix se...

Page 59: ...Select Proxy type from the list Use alternate address through firewall If the ICA client is outside a firewall that uses address translation you must configure the client to use the alternate address...

Page 60: ...blished applications The names of such applications are added to the Terminal Manager Connection name list Enable PNLite Check this box to enable the PNLite mode Server Enter the address and port numb...

Page 61: ...er Enter FTP server IP address and the path to the file containing the new firmware files If the FTP server requires a User ID and Password enter it Click Upgrade Now to start the update SNMP Manager...

Page 62: ...rinter Ping Ping Host by name or IP address MAGTEK MSR Setup Magtek Magnetic Strip Reader with keyboard MicroTouch Panel Setup a MicroTouch touch screen panel NetCOM Setup attached serial device for a...

Page 63: ...address of the WBT see SysInfo and the Queue Name devices on the network can print to your attached printer To create an LPD printer check Enable LPD and enter a printer queue name Port 515 is standar...

Page 64: ...d DHCP option number This option is of type string The values are listed in the Time Zone list e g GMT 08 00 Pacific Time US Canada NetClock Get time from SNTP servers You can add a new SNTP server or...

Page 65: ...data only 01390 Track 1 and 2 data 01385 Track 1 and 3 data 01391 Track 2 and 3 data 01394 Track 1 2 and 3 data 01395 default Input the command then click OK to close the driver screen and execute the...

Page 66: ...tion The serial cable should be connected to the DB9 male COM port on the back of the OmniTerm terminal To configure from the terminal manager screen press F2 click on the Devices Tab then Double clic...

Page 67: ...shairs in the lower left that you will touch for calibration then touch the crosshairs in the upper right After you are finished touch the Done button that appears in the Calibrate Complete screen Tou...

Page 68: ...istance between your fingertip and the pointer tip Select Vertical and or Horizontal Edge Adjust then press Set The following graphic allows you to select Vertical Offset Top None Bottom Maximum and H...

Page 69: ...IP address to ping Click Start to ping the Host A series of Pings will be sent to the Host Click Stop button to end the process Remote Display Check Enable Remote Display to allow a SNMPadm administr...

Page 70: ...ed when Enter is pressed e g SET CRLF SerialD commands OPEN WRITE READ and CLOSE are described below OPEN comport baudrate parity databits stopbits handshake Comport COM1 COM2 Baudrate 2400 4800 9600...

Page 71: ...eturn value if value 0 successful If value 0 an error occurred Error number list Open 1 open port failed 2 server busy 3 parameter error 0 OK Close 4 port not open 0 OK Write 4 port not open 6 timeout...

Page 72: ...tion click that icon to highlight and click the Delete button To setup a new local printer double click the Add Printer icon or click Open Add Printer Select printer port LPT1 COM1 or Network Click Ne...

Page 73: ...Terminal Properties Enter a friendly name for the printer 70...

Page 74: ...ired Clear Cache memory and or Clear History saved entered addresses You can also change Cache Size Connection If your internet connection uses a proxy server set its address name or IP and the port n...

Page 75: ...lt in Ethernet network settings double click the icon labled PCI xxxxxxx To start other connections double click the appropriate icon When multiple connections exist you can use the Advanced Settings...

Page 76: ...al Properties Make New Connection Properties Sheet Name and select connection type Dial Up Connection Establish Dial Up connection to RAS Remote Access Server using PPP Point to Point protocol Configu...

Page 77: ...Terminal Properties TCP IP Settings Security Settings 74...

Page 78: ...t Enter a phone number Click Finish to create the connection Double click the created icon to enter sign on data and start the connection Direct Connection See Dial Up Connection for Configure TCP IP...

Page 79: ...Terminal Properties Virtual Private Network Enter name or IP address of the VPN server for the network to which you want to connect TCP IP Settings Security Settings 76...

Page 80: ...Terminal Properties PPP over Ethernet PPPoE Security Settings 77...

Page 81: ...tton only A Connect Button see chapter 2 3 is displayed after terminal power on instead of the Terminal Manager screen The user will not have direct access to the Terminal Manager or Properties screen...

Page 82: ...of the user to be Administrator User or Guest Available Connections The currently available connections of WBT will automatically display in this Available Connections item for Administrator s assign...

Page 83: ...Properties General V V Disable Reset V Disable Reset Input V V V Display V V V Network V Printers V V Upgrade V Devices V V V Security V SysInfo V V V About V V V User Properties User Dialog Box When...

Page 84: ...will display See Table above for the available functions with Guest privilege Reset HotKey Enable Click to enable the Ctrl Tab Delete F12 key sequence at the Terminal Manager or Connect Button screen...

Page 85: ...is in alphabetic order by connection name Already active connections are skipped When FailOver is started because of a connection failure the message Please Wait While Failover Works will display Mul...

Page 86: ...or not Primary DNS IP Address Secondary DNS IP Address WINS enable or not Primary WINS IP Address Secondary WINS IP Address DHCP Settings There will show information about DHCP Enabled or Disabled If...

Page 87: ...erties 6 9 About Tab The About properties sheet contains copyright information about the terminal as well as the WBT version ID e g E5404B1 This properties sheet is informational No user interaction i...

Page 88: ...splay session consists of two sections Menu bar has six options File Edit View Macro Setting and Help The menu options are described in sections 8 1 1 8 1 5 Tool bar has Icons for left to right Ruler...

Page 89: ...Macro Menu for its use Help This will display the basic information about terminal First status bar The right area identifies the cursor position row R and column C in the f a s ormat R C The left ar...

Page 90: ...wo cursors Emulation cursor Caret and the Windows mouse cursor By default the right mouse button can be used to click on various Hot Spots to select and execute menu number options execute system func...

Page 91: ...Remapping See Chapter 5 for the Keyboard Remapping screens Keyboard procedure ALT F K Key Pad Key Pad Dialog Box The Key PAD allows you to access frequently used keyboard functions or macros from a c...

Page 92: ...of the area to be copied and drag the mouse cursor to highlight the area To select the area to be copied using the keyboard use ALT SHIFT Arrow keys Keyboard procedure ALT E C Paste This option can p...

Page 93: ...the status of the current session in the bottom line of the screen In Full Screen mode a double click left from the mouse will toggle back to Normal Screen mode Keyboard procedure ALT V S Full Screen...

Page 94: ...second time delay While recording a macro select Pause to allow non recorded user input The name Pause changes to Continue Select Continue to resume recording the macro Keyboard procedure ALT M U or...

Page 95: ...their description This option allows you to open a pre recorded macro for use when you hit the Play button Note that the default is to run the macro after you open the file so be sure that you are rea...

Page 96: ...back the pre recorded key sequences in the macro file previously selected Keyboard procedure ALT M P or PLAY 122key keyboard Fn or ALT F5 Enhanced keyboard Fn Quit This option is used to terminate a m...

Page 97: ...o selections are Line and Under Line Ruler If you select Ruler you can select one of three ruler lines Cross Vertical and Horizontal Note To toggle ruler on off key Rule 122key keyboard or ALT PageDow...

Page 98: ...in the left color list Click New color button to select desired color in the Color Panel shown below If you need different color from the basic colors click Define to create a new color using the Def...

Page 99: ...ent pop up Key Pad Select the KeyPad Size in terms of the number of Columns x Rows Values range from 1x1 to 9x4 Click on a cell in the matrix displayed The Name if any will display in the KeyPad field...

Page 100: ...d in the above dialog Clicking this button will display the Com Port Setting dialog as shown below Hot Spot ALT S H By default the right mouse button can be used to click on various Hot Spots to selec...

Page 101: ...Courier New is the default Other fonts may be loaded as described in Appendix C Connection ALT S C This option allows you to auto reconnection when the host disconnected Select desired time When choo...

Page 102: ...Terminal Emulation Sessions 8 1 6 Help Menu Click Help then About to display basic information about the terminal Keyboard Procedure ALT H A 99...

Page 103: ...ready status to connect to the host Online When the printer session is active the Online button will become yellow PA1 PA2 Form Feed TN3270 only Click the button to send the named code to the server U...

Page 104: ...T DELETE or ALT F D Select Disconnect to disable the printer session from the host The connection remains active and Connect replaces Disconnect Control TN3270 only ALT F C CPI Characters Per Inch The...

Page 105: ...d only for DSC LU3 with WCC s 00 in 2nd and 3rd bit NL is placed at MPP 1 Selecting this item will cause NL on MPP 1 the Auto Line Feed will not be performed This function is valid only for DSC LU3 wi...

Page 106: ...Terminal Emulation Sessions 7 2 2 Help Menu Click Help then About to display basic information about the terminal Keyboard Procedure ALT H A 103...

Page 107: ...The single file is a compressed file which must be expanded then placed in a known location on your FTP server An FTP server is provided with Microsoft Internet Information Server If you have IIS run...

Page 108: ...LI WBT SNMP Administrator see 9 3 Manual Upgrade The default is Manually upgrade Enter the update information in the four fields required FTP Server FTP server IP address Pathname Enter the directory...

Page 109: ...terminal or reset to defaults again required when going from CE2 0 to CE3 0 Auto Upgrade Configuration initiated via custom DHCP tags See Appendix B The OmniTerm may be automatically updated configur...

Page 110: ...Manager Procedure The OmniTerm firmware can be updated from a centrally located PC Server running the NLynx WBT SNMP Manager Please see the SNMPadmin manual for complete operating functions details f...

Page 111: ...een is shown below Operation is essentially the same as running an IE browser on a Windows PC Refer to Chapter 6 for configuration details The Menus are similar but some are significantly different Th...

Page 112: ...Web Browser 9 1 File Menu Port LPT1 COM1 57600 COM1 9600 IRDA Network Net Path If Port Network specify the network printer path For example YOURSERVER YOURPRINTER 9 2 Edit Menu 109...

Page 113: ...Web Browser 9 3 View Menu 110...

Page 114: ...Web Browser See section 7 9 for configuration details The Internet Options menu option will not be displayed if Security is enabled and the user is not the Administrator 9 4 Go Menu 111...

Page 115: ...Web Browser 9 5 Favorites Menu The list of favorites is shown The Name shown may be edited 9 6 Window Menu 112...

Page 116: ...supports up to 11Mbit data rate which provides performance equal to most wired mplementations IMPORTANT NOTE Wired and wireless Ethernet connections should NEVER be connected simultaneously Do not co...

Page 117: ...twork there is nothing to configure The terminal will auto detect the network and does not require configuration To configure you wireless settings start at the Terminal Manager screen then press F2 t...

Page 118: ...11 miniport Settings IP Address tab you can manually set the IP address the wireless card will use or use DHCP IP Address tab From within the Name Servers tab you can manually specify your DNS and Win...

Page 119: ...the type of wireless network in your environment Businesses normally only use Access Point based networks The default setting Any available network access point preferred is sufficient for most appli...

Page 120: ...ey button The WEP Enabled setting on this panel is set automatically based on the WEP setting detected on your Access Point If WEP is enabled on your access point the WEP Enabled option is checked and...

Page 121: ...ere is no access point within radio range If the settings are know to be correct and access points are functioning normally accept the option to restart the terminal and allow the terminal to attempt...

Page 122: ...st of BIN files FILE_XXX BIN xxx file sequence number for flash image firmware CAUTION All files are controlled as a group When you are updating or changing the files in the directory OmniTerm in the...

Page 123: ...tions Options 206 through 209 are defined as FTP AutoUpdate Config options The OmniTerm firmware files are can be retrieved from the WEB or accessed via E mail The Configuration files are generated us...

Page 124: ...1 3 RDP rdp1 rdp2 192 168 1 1 ICA ica1 ica2 192 168 1 3 RDP session rdp1 rdp2 connect to 192 168 1 1 ICA session ica1 ica2 connect to 192 168 1 3 4 RDP ICA 192 168 1 3 192 168 1 1 all RDP session conn...

Page 125: ...Please check the NLynx technical support web site www nlynx co uk as more fonts become available and tested Important Note THE ONLY FONTS SUPPORTED are fonts with Monospace and Truetype attributes Yo...

Page 126: ...the IP address s of the terminal Select the menu item Messages Enter the following string into the message box The font file andalemo ttf will be used for this example INSTALL FONT andalemo ttf Import...

Page 127: ...Advanced Terminal Customization 124 Related Messages UNINSTALL FONTS fontname Reboot by user is required LIST INSTALL FONTS The SNMPadm Message History lists the installed fonts...

Page 128: ...ns 206 208 are served start at step 2 1 Set upgrade server and path on the OmniTerm Press F2 at the Terminal Manger panel At the Terminal Properties panel Click the Upgrade tab Select the check box Ma...

Page 129: ...e the serial number loaded it can be entered manually on the terminal see section 7 1 or via a special command Use SNMPadm 1 83 10 or above to send a command to update the serial number discover the t...

Page 130: ...on To disable the address bar the registry must be modified A dword value Disable AddressBar must be added as follows HKEY_CURRENT_USER Software Microsoft Internet Explorer Main Disable AddressBar 0 d...

Page 131: ...ore Autostart begins which resolves this issue The Autostart Delay feature must be enabled via a registry change The dword value is HKEY_LOCAL_MACHINE Software Microsoft WBT Shell AutoStartDelay The v...

Reviews: