background image


www.nitronic.ch

                                                               - 

43 - 

Nitronic  AG 

Mattenstrasse 11 


CH – 2555 Bruegg 

Tel.   

+41 32 373 7070 

Switzerland 


Fax 

+41 32 373 70 

75


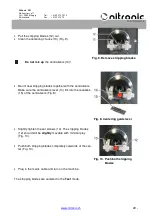
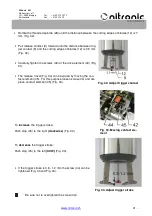
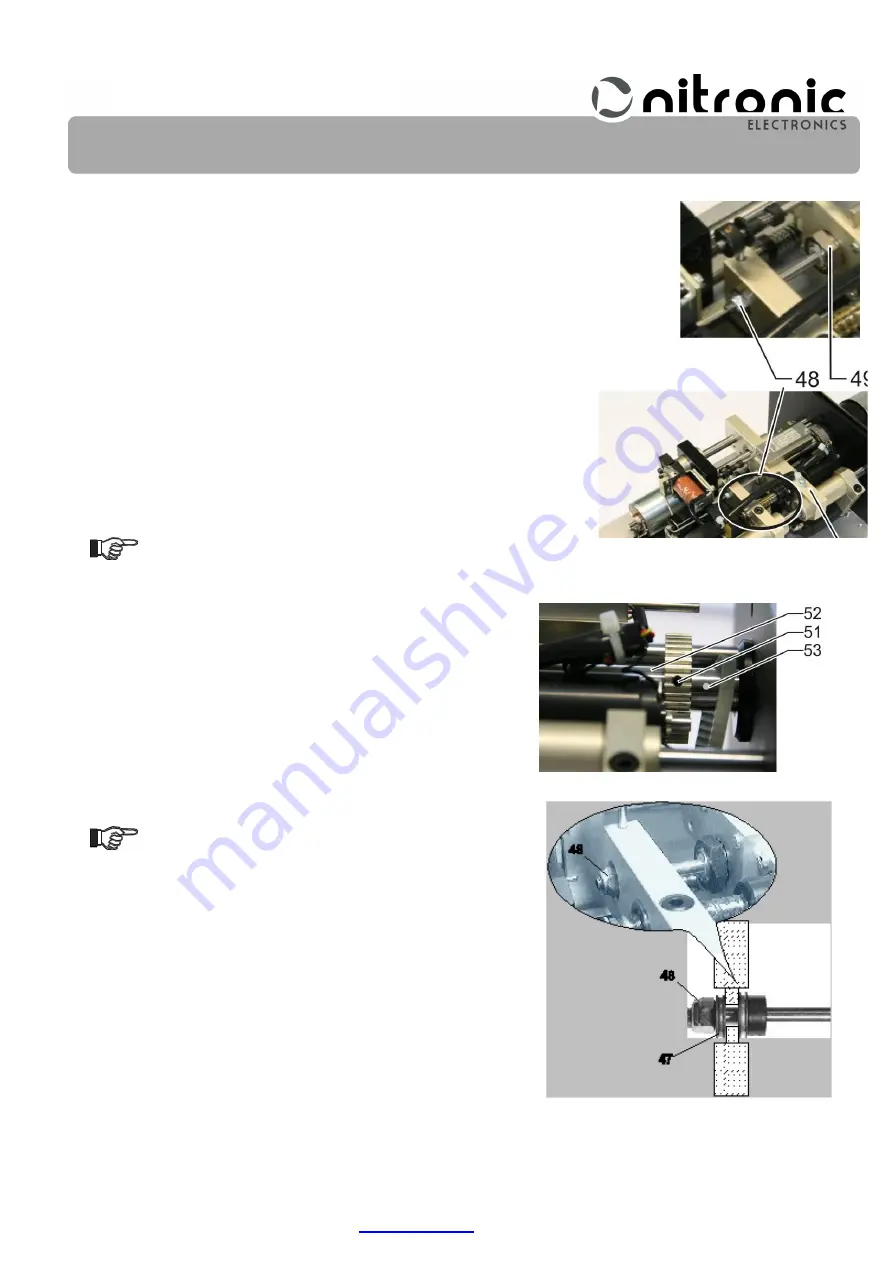
  Unscrew and remove locknut (48) (Fig. 37). 


  Unscrew nut (49) of the stripping shaft (Fig. 37). 


  If an 

L

 is punched into the motor carrier (50) the nut (49) has a left-hand thread 

(Fig. 37). 


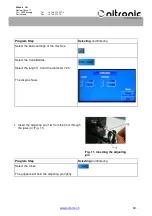
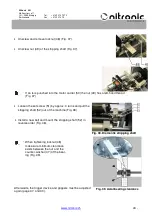
  Loosen the set screw (51) by approx. 4 turns and pull the 

stripping shaft (52) out of the machine (Fig. 38). 


  Install a new belt and mount the stripping shaft (52) in 

reverse order (Fig. 38). 


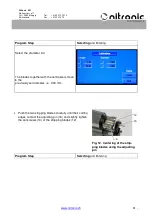
  When tightening locknut (48) 

make sure minimum clearance 
exists between the nut and the 
counter-washer (47) of the bear-
ing (Fig. 39). 
 

Afterwards, the trigger device and grippers must be adjusted 
again (page 37, and 40). 


Fig. 38. Dismantle stripping shaft 


Fig. 39. Axial bearing clearance 

Summary of Contents for ST730T

Page 1: ... 7070 Switzerland Fax 41 32 373 70 75 Coax Stripping Machine ST730T Operating manual Stand V1 1 preliminary Subject to change without notice Publisher Nitronic AG Mattenstrasse 11 CH 2555 Brügg Phone 41 32 373 7070 Fax 41 32 373 7075 Web www nitronic ch Email info nitronic ch ...

Page 2: ... 2 Remove protective foam 11 Fig 3 Remove safety cover place machine in position 11 Fig 4 Toggle main switch A to I 11 Setting the Mains Voltage 12 Fig 5 Fuse holder 12 Exchanging the Mains Fuses 12 Operation 13 Testing of Functionality 13 Fig 6 Stripping of sample cable 13 Programming 14 Processing Steps 14 Programming of Step in graphic mode 15 1 Turn the unit ON 15 2 Allocate a program memory p...

Page 3: ...s Copy Cable 23 10 Copying of Steps Copy Step 24 Basic settings 25 1 Toggle units Millimeter Inch 25 To toggle the units on the Nitronic ST730T from mm to inch proceed as listed below 25 2 Micro Coax Mode 25 3 Autobaud OFF 25 4 RS232 26 5 Direction of rotation Rotary Dir 26 6 Touchscreen calibration Calib Touch 26 7 Deleting of memory contents Del Memory 27 8 Calibration of the blades Calib Blades...

Page 4: ...8 Fig 27 Adjust distance between grippers 39 Fig 28 Gripper holder screws 39 Fig 29 Final check 39 Adjusting of the trigger contact 40 Fig 30 Loosen drive element 40 Fig 31 Shift drive element 40 Fig 32 Adjust trigger contact 41 Fig 33 Moving contact element 41 Fig 34 Adjust trigger stroke 41 Adjusting the clamping force 42 Fig 35 Adjusting the clamping force 42 Replacing the toothed belt 42 Fig 3...

Page 5: ...www nitronic ch 5 Nitronic AG Mattenstrasse 11 CH 2555 Bruegg Tel 41 32 373 7070 Switzerland Fax 41 32 373 70 75 Spare parts list 52 Wear parts 52 Options 52 Block diagram 53 Index 54 ...

Page 6: ... can be processed without any mechanical settings Stripping and corrective values can be directly set and stored Any stored stripping parameters can be selected and will remain in memory even in the event of blade changes or power failures The stripping diameters can be precisely adjusted with an accuracy of up to 1 1000 mm The ST730T is easy to operate and enables the user to be familiar with the...

Page 7: ...rammed cable Step Select individual processing steps Length Programming of the current strip length ParStrip Activating and setting of the partial strip Diameter Programming of the respective diameters Waybck Activating and setting of the wayback function Feed Programming the blade feed rate RTime Programming the rotating time Rot Activating the rotation during pull off Scrolling in step ...

Page 8: ...ns function key F Code Activating and setting the password entry F DelCounter Reset the counter for produced cables F Swap Step Exchanging Step with another Step F Sequence To connect several programs F Copy Step Copying of freely selectable Step F Copy Cable Copying of freely selectable memory segments Programming in graphic mode ...

Page 9: ... length until 0 01mm 0 00004inches Resolution of diameter until 0 001mm 0 000004inches Autobaud Automatically adapting the baud rate when transmission the data RS232 Activation of the interface Rotary Dir Setting the direction of rotation Calib Touch Calibrate the touchscreen Del Memory All programmed cable data is deleted Calib Blades For calibration by the blade changing Sensor 4 8V Service info...

Page 10: ...sumption 100 VA Fuses 100 VAC 115 VAC 2 x 0 630 A T 230 VAC 2 x 0 315 A T To set the mains voltage and to change the fuses see page 12 Remote Control RS 232 C Port to connect the ST730T with a PC Switch Connection for a foot switch Electromagnetic Immunity EMI Only specially designed cables must be used to make sure that the EMI require ments are fulfilled and thus ensuring the reduction of interf...

Page 11: ...ety cover 2 by removing screws 3 Fig 2 Remove the foam 1 between the jaws 4 and the stripping head 5 Replace the safety cover 2 and fasten screws 3 Fig 2 Place the ST730T on a bench so that its front edge is flush with the edge of the bench This way the stripping debris can fall into a waste basket Plug in the power cord Turn on the ST730T with the main switch A Fig 4 Fig 2 Remove protective foam ...

Page 12: ...he selected voltage can now be seen in the small win dow of the fuse holder 8 Note the selected voltage on the nameplate Exchange the fuses according to the selected voltage Insert the fuse holder 8 in the ST730T Connect the power cord Exchanging the Mains Fuses Turn OFF the ST730T with the main switch A and disconnect the power cord Use a screwdriver to pull out the fuse holder 8 Exchange both fu...

Page 13: ...cker cable The stripping quality of the ST730T can be tested as follows Program Step Selecting and Entering Select cable No 1 Cable 1 Enter Place the thinner sample cable with the non stripped end through the jaws 4 until it touches the trigger plate 9 As soon as the cable touches the plate the stripping process is initiated based on the data set at the factory The thin sample cable can be strippe...

Page 14: ...e Special process cycle Ad van tages of the special process cycle The blade lifetime increases because the shielding is being cut only once Clean cut because the short shield is supported by the dielectric and insulation Clean cut edge of the dielectric because stripping is done as the last step also partial strip can be programmed to protect the conductor Disadvantage of the special process Cycle...

Page 15: ...speedy 3 step processing cycle is to be programmed as follows 1 Turn the unit ON Toggle the main switch to I 2 Allocate a program memory position Program Step Selecting and Entering Select an empty memory position e g Cable No 10 Cable 10 Enter 3 Select graphic mode Program Step Anwahl Select the graphic mode 4 Select 3 steps Program Step Selecting Select Step three times ...

Page 16: ... example the diameter in Step 3 is the largest one stored in the memory This avoids the blades do not close with a high feed rate through the different lay ers Rule The diameter in Step 0 can never be smaller than the largest diameter determined in the current program 4 Step 1 Program Step Selecting and Entering Choose the preset diameter 1 00 and enter the cable diameter e g 0 90mm Choose the pre...

Page 17: ... the Program The entered processing cycle can now be activated as desired by selecting program 10 8 Maintaining a List of Programs To ensure the processing reproducibility the stored parameters should be written down on paper using the List of Programs proposed layout is shown on page 18 This list also provides info about the values stored in memory In total are 999 storage locations available for...

Page 18: ... 18 Nitronic AG Mattenstrasse 11 CH 2555 Bruegg Tel 41 32 373 7070 Switzerland Fax 41 32 373 70 75 Wire Program mm Inch Program Lock yes no Step Length ParStrip Diameter Waybck Feed RTime Rot 0 1 2 3 4 5 6 7 8 9 Notes ...

Page 19: ... Switzerland Fax 41 32 373 70 75 List of Programs Example Date 27 Mai 2014 Wire Sample wire RG59 Program C04 mm inch Program lock yes no Step Length ParStrip Diameter Waybck Feed RTime Rot 0 0 0 6 50 6 0 1 6 0 0 90 5 0 2 16 0 3 65 0 20 6 9 3 22 0 4 65 0 20 6 0 4 5 6 7 8 9 Notes X X ...

Page 20: ...ammed for each step Program Step Selecting and Entering Select the wayback in the desired step e g Step 2 and enter the blade opening value e g 0 20 mm 0 2 Enter The wayback can be deleted at anytime Select the Wayback 0 20 in Step 2 and delete the selected wayback value 0 20 Del 2 Partial Strip Par Strip To protect the exposed center conductor or shielding the auxiliary function Partial Strip can...

Page 21: ...otating time RTime The rotating time is the duration during which the stripping head continues to rotate after the blades have reached the programmed diameter The programmed rotating time can be easily se lected according to the following table When cutting into shielding on a soft dielectric or when cutting through soft dielectric material on the respective conductors it is particularly recommend...

Page 22: ... At the top of the display is shown the Code Symbol By entering this code e g 1 2 3 access to the Memory is again enabled F Code 1 2 3 Enter F Code 1 2 3 Enter After the code has been entered the following activities can be selected only Select Cable Select Step Select Quantity In case of forgotten or misplaced code the memory can only be accessed with a classified code This code can be obtained b...

Page 23: ...s program and with key 1 the following program can be selected The quantity increases only after the entire sequence has been processed Afterwards the lowest program number is selected again automatically 8 Exchange of an Steps with an other Step Swap Step To change the ordering of the Steps proceed as follow For example they are exchange Step1 with Step2 Program Step Selecting and Entering Select...

Page 24: ...ompleted F Copy Cable 30 Enter 10 Copying of Steps Copy Step If identical cables of different lengths have to be processed the possibility of copying stored steps exists For example the data of step 1 can be copied in the step 2 Already programmed values in step 2 are automatically overwritten Program Step Selecting and Entering Select the Copy Step The display shows Enter the Step number e g 1 to...

Page 25: ...d Entering Select the basic settings of the machine Select the desired unit Inch Rechtslauf 2 Micro Coax Mode Using the Micro Coax Mode for stripping small coaxial cables The gripper jaw closing and the stripping processes will be adjusted To toggle the Nitronic ST730T on the Micro Coax Mode proceed as listed below Program Step Selecting and Entering Select the basic settings of the machine Select...

Page 26: ...cables can be pro cessed with this standard setting Changing the rotational direction to clockwise right is suitable when processing wires with twisted strands In this case special centralizers must be installed The centering of the cable can only be ensured when using the centralizers dedicated for the direction of rotation To change the rotational directions follow the instructions below Program...

Page 27: ...99 programs Program Step Selecting and Entering Select the basic settings of the machine Press Del Memory and then DELETE 8 Calibration of the blades Calib Blades This function is required for replacing the stripping blades see Page 30 Program Step Selecting and Entering Select the basic settings of the machine Press Calib Baldes button The display shows You can travelled the length and diameter v...

Page 28: ... only be warranted when using intact and genuine stripping blades The ST730 is designed that any stored values are not altered when the stripping blades are being changed Therefore program resetting after changing blades are not needed Centering of the stripping blades as described hereunder can only be realized when the jaws are centered correctly Turn off the machine and disconnect the mains cab...

Page 29: ...izers Make sure the centralizers lever 14 fits into the recesses 15 of the centralizers Fig 8 Slightly tighten the set screws 10 The stripping blades 12 should still be slightly movable with minimal play Fig 10 Push both stripping blades completely outwards of the cen ter Fig 10 Plug in the mains cable and turn on the machine The stripping blades are centered in the Test mode Fig 8 Centering guide...

Page 30: ... Entering Select the basic settings of the machine Select the Calib Baldes Select the lenght 1 0 and the diameter 7 20 The displa shows Insert the adjusting pin 16 from the front through the jaws 4 Fig 11 Program Step Selecting and Entering Select the Close The grippers will hold the adjusting pin tightly Fig 11 Inserting the adjusting pin ...

Page 31: ...iameter 3 0 The blades together with the centralizers move to the previously set diameter i e 3 00 mm Push the two stripping blades carefully until their cutting edges contact the adjusting pin 16 and slightly tighten the set screws 10 of the stripping blades 12 Program Step Selecting and Entering Fig 12 Centering of the strip ping blades using the adjusting pin ...

Page 32: ...hten the set screws 10 of the stripping blades Fig 12 Do not over tighten the set screws 10 Fig 12 as this may damage the dovetail guides of the blade holders Install the safety cover 2 Fig 2 page 11 Turn the machine on Select a program and carry out the respective stripping test Check the stripping result In case the stripping results do not coincide with those previously obtained the blades have...

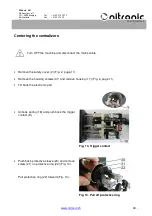
Page 33: ... the mains cable Remove the safety cover 2 Fig 2 page 11 Remove the housing screws 31 and remove housing 17 Fig 2 page 11 Tilt back the electronic part Unhook spring 18 and push back the trigger contact 9 Push back protective sleeve 20 and remove screw 21 on protective ring 22 Fig 14 Pull protective ring 22 forward Fig 14 Fig 13 Trigger contact Fig 14 Pull off protective ring ...

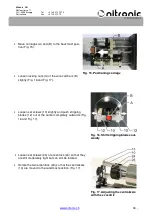
Page 34: ...7 Loosen set screws 10 slightly and push stripping blades 12 out of the center completely outwards Fig 16 and Fig 17 Loosen set screws 23 of eccentrics 24 so that they are still moderately tight but can still be rotated Rotate the two eccentrics 24 so that the centralizers 13 are moved to the outermost position Fig 17 Fig 15 Positioning carriage Fig 16 Shift stripping blades out wardly Fig 17 Adju...

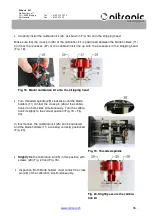
Page 35: ...indle 28 clockwise until the blade holders 11 contact the cross pin 26 of the calibra tion kit on both sides simultaneously Turn the calibra tion kit slightly to the correct position Fig 19 Fig 20 In this manner the calibration kit 25 can be centered and the blade holders 11 are being correctly positioned Fig 20 Slightly fix the calibration kit 25 in this position with screws 29 Fig 20 and Fig 18 ...

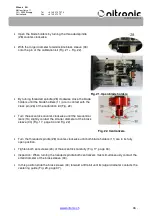
Page 36: ...ig 22 Turn the eccentrics counter clockwise until the two central izers 13 slightly contact the smaller diameter of the brass sleeve 30 Fig 17 page 34 and Fig 22 Turn the threaded spindle 28 counter clockwise until both blade holders 11 are in its fully open position Tighten both set screws 23 of the eccentrics carefully Fig 17 page 34 Inspection When turning the treaded spindle both centralizers ...

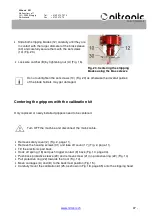
Page 37: ...with the calibration kit Only replaced or newly installed grippers need to be centered Turn OFF the machine and disconnect the mains cable Remove safety cover 2 Fig 2 page 11 Remove the housing screws 31 and take off cover 17 Fig 2 page 11 Tilt the electronic part back Hook off spring 18 and push trigger contact 9 back Fig 13 page 33 Push back protective sleeve 20 and remove screw 21 on protective...

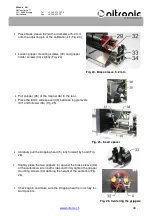
Page 38: ...e magnet 36 to the rear Place the 8 mm wide spacer 39 between toggle levers 37 and follower 38 Fig 25 Carefully pull the stripping head 5 fully forward by hand Fig 26 Slightly press the two grippers 4 against the brass sleeve 32 of the calibration kit on both sides and firmly tighten the gripper mounting screws 33 defining the height of the centering Fig 26 Check again and make sure the stripping ...

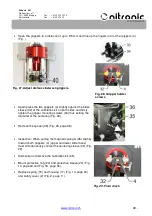
Page 39: ...crews 34 thus setting the diameter of the centering Fig 28 Remove the spacer 39 Fig 25 page 38 Inspection When pulling the magnetic plunger 35 slightly forward both grippers 4 upper and lower slide faces must simultaneously contact the centering sleeve 32 Fig 29 Dismantle and remove the calibration kit 25 Mount protective ring 22 and protective sleeve 20 Fig 14 page 33 and Fig 18 page 35 Replace s...

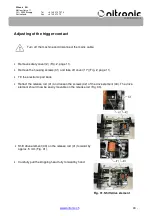
Page 40: ...11 Remove the housing screws 31 and take off cover 17 Fig 2 page 11 Tilt the electronic part back Retract the release rod 41 and loosen the screws 42 of the drive element 43 The drive element should now be easily movable on the release rod Fig 30 Shift drive element 43 on the release rod 41 forward by approx 5 mm Fig 31 Carefully pull the stripping head fully forward by hand Fig 30 Loosen drive el...

Page 41: ...y tighten the screws 42 of the drive element 43 Fig 31 The release travel Fig 34 can be varied by moving the con tact element 45 For this purpose loosen screw 44 and dis place contact element 45 Fig 33 To increase the trigger stroke Push stop 45 to the right clockwise Fig 33 To decrease the trigger stroke Push stop 45 to the left CCW Fig 33 If the trigger stroke is 0 8 1 2 mm the screw 44 can be t...

Page 42: ...rection A To increase the clamping force Move in direction B Tighten mounting screws 46 Fig 35 Replacing the toothed belt Turn OFF the machine and disconnect the mains cable Remove the safety cover 2 Fig 2 page 11 Remove the housing screws 31 and take off cover 17 Fig 2 page 11 Tilt the electronic part back Hook off spring 18 and push trigger contact 9 back Fig 13 page 33 Remove the screws 42 of t...

Page 43: ...and thread Fig 37 Loosen the set screw 51 by approx 4 turns and pull the stripping shaft 52 out of the machine Fig 38 Install a new belt and mount the stripping shaft 52 in reverse order Fig 38 When tightening locknut 48 make sure minimum clearance exists between the nut and the counter washer 47 of the bear ing Fig 39 Afterwards the trigger device and grippers must be adjusted again page 37 and 4...

Page 44: ...ig 2 page 11 Using a cleaning brush remove any stripping debris from the processing space Repeat this procedure DAILY or as needed Cleaning the stripping blades and centralizers Move tension blade holders 11 inwards and move the cen tralizers 13 to the outside Fig 40 Remove dirt using the cleaning brush supplied Inspection The centralizers 13 must move freely If their movement play is impeded by d...

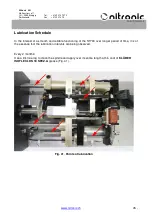
Page 45: ...n the interest of a smooth and reliable functioning of the ST730 over longer period of time it is of the essence that the lubrication intervals are being observed Every 2 months Use a lint free rag to clean the spindle and apply over its entire length a thin coat of KLÜBER ISOFLEX LDS 18 SPEZ A grease Fig 41 Fig 41 Points of lubrication ...

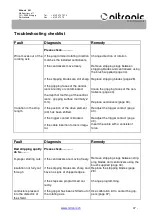
Page 46: ...e of debris The centralizers move freely The stripping blades are in good condition In case the stripping quality is unsatisfactory please check the following settings Stripping blades refer to centering of the stripping blades page 28 Centralizers refer to centering of the centralizers page 33 Grippers refer to centering of the grippers using the calibration kit page 37 Trigger contact refer to a...

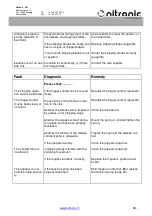
Page 47: ...ripping slugs between stripping blades and centralizers using the brush supplied page 44 Replace stripping blades page 28 Clean the gripping faces of the cen tralizers page 44 Replace centralizers page 33 Readjust the trigger contact page 40 Readjust the trigger contact page 40 Insert the cable with a consistent force Fault Diagnosis Remedy Bad stripping quality do to improper starting cuts insula...

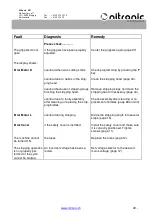
Page 48: ...t at all The contact force is insufficient The grippers do not hold the cable secure ly Please check if the trigger contact can be moved freely the centricity of the module in rela tion to the axis whether the release rod is impaired by grease oil or stripping slugs whether the release contact spring is in place and has been properly tensioned whether the tension of the release contact spring is a...

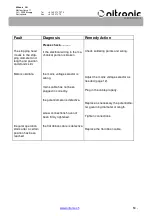
Page 49: ...slugs blocking the stripping head overload due to faulty assembly after cleaning or replacing the strip ping blades overload during stripping if the safety cover is installed the fuses An incorrect voltage has been se lected Center the grippers again page 37 Check programming by pressing the F key Clean the stripping head page 44 Remove stripping slugs and clean the stripping head if necessary pag...

Page 50: ...en reached Please check if the electrical wiring in the me chanical portion is broken the mains voltage selector is wrong mains cable has not been plugged in correctly the potentiometer is defective screw connections have not been firmly tightened the flat ribbon cable is defective Check soldering points and wiring Adjust the mains voltage selector as needed page 12 Plug in the cable properly Repl...

Page 51: ...Machine cycle 3 steps 5 7 seconds depends on auxiliary functions Noise level appr 62 dB A Stripping blades Carbide steel Settings Length 0 1 mm steps Diameter 0 001 mm steps Stripping steps Max 9 steps in one stripping cycle Program capacity 999 different wires with 9 stripping steps each Input voltage Selectable 100V 115V 230V 10 50 60 Hz Power consumption appr 80 VA Net weight 9 5 kg Dimensions ...

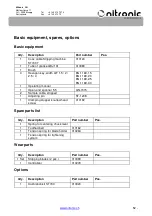
Page 52: ...169 2 0 BN 1169 2 5 BN 1169 3 0 1 Operating manual 1 Open end spanner 5 5 GN 7415 2 Sample cable stripped 1 Adjusting pin ST 1208 1 Clamping stopper knurled head screw 010192 Spare parts list Qty Description Part number Pos 1 Spring for centering chuck lever 1 Toothed belt 010162 1 Tension spring for blade holder 010263 1 Tension spring for tightening system Wear parts Qty Description Part number ...

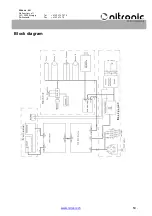
Page 53: ...www nitronic ch 53 Nitronic AG Mattenstrasse 11 CH 2555 Bruegg Tel 41 32 373 7070 Switzerland Fax 41 32 373 70 75 Block diagram ...

Page 54: ...hrichtung 27 28 Functional Testing 13 Interference Immunity EMC 10 Joining of Several Programs 24 List of Spares 58 Lubrication Schedule 49 Machine Description 5 Mains Connection 10 Maintenance 29 Memory Lock 23 Messervorschub 21 mm inch 26 Open Blades Prior to Strip Pull 20 Operation 13 Options 58 Partitial Strip 20 Programming 14 Programming of Steps 15 Programmverzeichnis 18 Programmverzeichnis...

Reviews: