


Locating an Access Point, Client, or Interferer
70
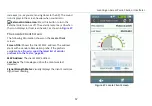
sound that increases in frequency as the signal level
increases (i.e., as you are moving closer to the device).
External Antenna Icon:
Press this button
to turn the
External Antenna on or off. The external antenna is On when
the icon displays in the screen header, as shown in
.
Using the External Directional Antenna
In large, open areas, the external directional antenna can
show you the direction of a signal source more precisely than
the omni-directional antennas inside the Tester.
NOTES:
When the external antenna is connected, it is only
functional in the
Locate
screens.
While on one of the
Locate
screens, the AirCheck G2
Tester does not transmit.
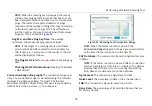
How to: Use the external antenna to locate
1
Connect the antenna to the SMA connector on the Tester
See “AirCheck G2 Physical Features," page 6
The screen shows the antenna icon (
) when you
connect the antenna. The Tester uses the external
antenna if the antenna is connected. To switch between
the external and internal antennas, touch the antenna
icon at the bottom right of the screen.
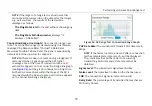
2
Divide the area into four sections, as shown in
.
Go to the center of the area.
3
Press
Locate
.
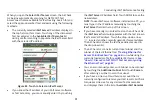
4
Point the antenna to each corner of the area. Figure 51
shows how to point the antenna.
5
Go to the middle of the section that has the strongest
signal.
6
Repeat steps 2, 5, and 6 until you find the device.
NOTE:
If you do not find the device, look on the floor
above or below you.
Use these guidelines when you use the external antenna
(See
Hold the antenna at a constant height. You can get more
stable measurements if you hold the antenna above
cubicle walls.
When you point the antenna in different directions, do
not move your arm. Hold the Tester and antenna in one
position while you turn your body.


