NetApp SGF6024 Hardware Installation And Maintenance Manual Download Page 81

c.  If the IP address is correct, check appliance cabling, SFP transceivers, and the network setup.

If that does not resolve the issue, contact technical support.

d.  If the ping was successful, open a web browser.

e.  Enter the URL for the StorageGRID Appliance Installer:

https://SG6000-CN_Controller_IP:8443

The Home page appears.

Expansion shelves do not appear in Appliance Installer

If you have installed expansion shelves for the SG6060 and they do not appear in the StorageGRID
Appliance Installer, you should verify that the shelves have been completely installed and powered
on.

About this task

You can verify that the expansion shelves are connected to the appliance by viewing the following
information in the StorageGRID Appliance Installer:

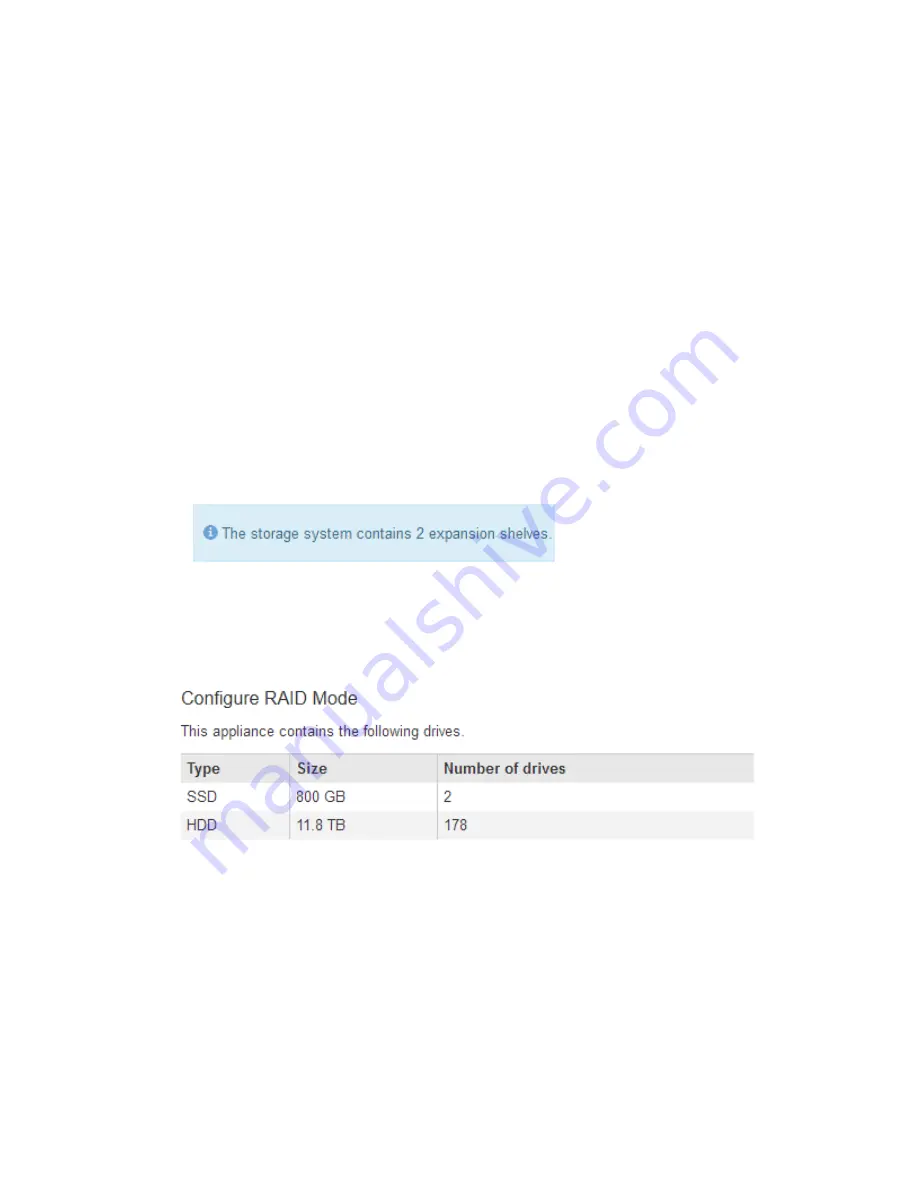
The Home page contains a message about expansion shelves.


The Advanced > RAID Mode page indicates by number of drives whether or not the appliance
includes expansion shelves. For example, in the following screen shot, two SSDs and 178 HDDs
are shown. An SG6060 with two expansion shelves contains 180 total drives.


If the StorageGRID Appliance Installer pages do not indicate that expansion shelves are present,
follow this procedure.

Steps

1.  Verify that all required cables have been firmly connected.

2.  Verify that you have powered on the expansion shelves.

3.  If you need help resolving an issue, contact technical support.

Related tasks

SG6060: Cabling the optional expansion shelves

 on page 40

Connecting power cords and applying power

 on page 42

Troubleshooting the hardware installation | 81

Summary of Contents for SGF6024

Page 1: ...StorageGRID 11 3 Hardware Installation and Maintenance Guide For StorageGRID SG6000 Series Appliances May 2020 215 14204_2020 05_en us doccomments netapp com...

Page 2: ......

Page 3: ...xpansion shelves 40 Connecting power cords and applying power 42 Viewing status indicators and buttons on the SG6000 CN controller 43 Viewing boot up status codes for the storage controllers 44 Config...

Page 4: ...Rebooting the SG6000 CN controller while the StorageGRID Appliance Installer is running 82 Maintaining the SG6000 appliance 83 Upgrading SANtricity OS Software on the storage controllers 83 Replacing...

Page 5: ...ontroller BMC for monitoring and diagnosing the hardware in the compute controller Support up to four 10 GbE or 25 GbE connections to the StorageGRID Grid Network and Client Network Support Federal In...

Page 6: ...ansion shelves must be installed during initial deployment They cannot be added later E Series DE460C enclosure a 4U shelf that includes Two input output modules IOMs Five drawers each holding 12 NL S...

Page 7: ...shelf looks identical 3 SG6000 CN compute controller with front bezel removed 4 E2860 controller shelf with front bezel removed optional expansion shelf looks identical This figure shows the back of t...

Page 8: ...2 for E2860 controller shelf This figure shows the back of the optional expansion shelf for the SG6060 including the input output modules IOMs fans and power supplies As an option each SG6060 can be i...

Page 9: ...interconnect Baseboard management controller BMC that simplifies hardware management Redundant power supplies Flash array controller shelf E Series EF570 flash array also known as a controller shelf a...

Page 10: ...This figure shows the back of the SGF6024 including the compute and storage controllers fans and power supplies 1 Power supply 1 of 2 for SG6000 CN compute controller 2 Connectors for SG6000 CN compu...

Page 11: ...he Admin Network and the Client Network Connects to the E Series storage controllers and operates as the initiator This figure shows the connectors on the back of the SG6000 CN Port Type Use 1 Interco...

Page 12: ...Include SANtricity System Manager for monitoring storage hardware and for managing alerts the AutoSupport feature and the Drive Security feature Connect to the SG6000 CN controller and provide access...

Page 13: ...r monitoring storage hardware and for managing alerts the AutoSupport feature and the Drive Security feature Connect to the SG6000 CN controller and provide access to the flash storage This figure sho...

Page 14: ...SG6060 Input output modules for optional expansion shelves The expansion shelf contains two input output modules IOMs that connect to the storage controllers or to other expansion shelves Port Type U...

Page 15: ...ation site Unpacking the boxes and checking the contents Obtaining additional equipment and tools Gathering IP addresses and network information 2 Installing the hardware Registering the hardware Inst...

Page 16: ...nding a StorageGRID system Deploying an appliance Storage Node as part of a Storage Node recovery operation Instructions for recovery and maintenance Related tasks Preparing for installation on page 1...

Page 17: ...g power and grounding See the NetApp Hardware Universe for more information 2 Confirm that your location provides 240 volt AC power for the SG6060 or 120 volt AC power for the SGF6024 3 Obtain a 19 in...

Page 18: ...u supply are long enough for the planned layout Related information NetApp Hardware Universe NetApp Interoperability Matrix Tool Unpacking the boxes Before installing the StorageGRID appliance unpack...

Page 19: ...ack installation SG6060 expansion shelf Expansion shelf with no drives installed Front bezel 60 NL SAS drives One rail kit with instructions Four handles Back brackets and cage nuts for square hole ra...

Page 20: ...ludes the following cables and connectors Four power cords for your country Your cabinet might have special power cords that you use instead of the power cords that ship with the appliance Four optica...

Page 21: ...blade screwdriver ESD wrist strap You need one of the following options One to four TwinAx cables or optical cables for the 10 25 GbE ports you plan to use on the SG6000 CN controller One to four SFP...

Page 22: ...orageGRID system you can connect it to the following networks Grid Network for StorageGRID The Grid Network is used for all internal StorageGRID traffic It provides connectivity between all nodes in t...

Page 23: ...Gathering installation information on page 25 Cabling the appliance on page 38 Related information Grid primer Port bond modes for the SG6000 CN controller When configuring network links for the SG600...

Page 24: ...tional failover paths Callout Which ports are bonded 1 All connected ports are grouped in a single LACP bond allowing all ports to be used for Grid Network and Client Network traffic If you plan to us...

Page 25: ...on the right and access the appliance using IP address 169 254 0 1 Callout Network bond mode A Both management ports are bonded into one logical management port connected to the Admin Network I The p...

Page 26: ...s Subnet mask Gateway For IPv6 IPv6 address Routable IP address storage controller router IP address For IPv4 IPv4 address Subnet mask Gateway For IPv6 IPv6 address Routable IP address storage control...

Page 27: ...example if the MAC address on the label ends in 09 the MAC address for the Admin Port would end in 0B If the MAC address on the label ends in y FF the MAC address for the Admin Port would end in y 1 0...

Page 28: ...e Switch port for port 4 Grid Network for Fixed mode Table 4 Information needed to connect the SG6000 CN controller to the Grid Network The Grid Network for StorageGRID is a required network used for...

Page 29: ...mode Choose one Active Backup default LACP 802 3ad VLAN tagging enabled Choose one No default Yes VLAN tag If VLAN tagging is enabled Enter a value between 0 and 4095 DHCP assigned IP address for the...

Page 30: ...IP address you plan to use for the BMC management port IPv4 address CIDR Gateway Related concepts Port bond modes for the SG6000 CN controller on page 23 Related tasks Cabling the appliance on page 38...

Page 31: ...plying power on page 42 9 Viewing status indicators and buttons on the SG6000 CN controller on page 43 10 Viewing boot up status codes for the storage controllers on page 44 Registering the hardware R...

Page 32: ...hardware never move the shelf if drives are installed You must remove all drives before moving the shelf Caution When installing the E2860 controller shelf or optional expansion shelves install hardw...

Page 33: ...es pull back on the release latch push down then pull away from the shelf 6 Secure the shelf to the front of the cabinet Insert screws into the first and third holes from the top of the shelf on both...

Page 34: ...from their packaging 3 Release the levers on the top drive drawer and slide the drawer out using the levers 4 Locate the two SSD drives Note Expansion shelves do not use SSD drives 5 Raise each drive...

Page 35: ...e the outer packing box for the appliance Then fold down the flaps on the inner box 3 Place the back of the shelf the end with the connectors on the rails Caution A fully loaded shelf weighs approxima...

Page 36: ...t of rails for the SG6000 CN controller in your cabinet or rack and then slide the controller onto the rails Before you begin You have reviewed the Safety Notices document included in the box and unde...

Page 37: ...rts of the rails until you hear a click 3 Insert the SG6000 CN controller into the rails 4 Slide the controller into the cabinet or rack When you cannot move the controller any further pull the blue l...

Page 38: ...ided with the appliance One to four TwinAx cables for connecting the four network ports One to four SFP or SFP28 transceivers if you plan to use optical cables for the ports Caution Risk of exposure t...

Page 39: ...0 or 100 megabit speeds Connects the SG6000 CN controller to the Admin Network for StorageGRID Rightmost RJ 45 port on the SG6000 CN controller 1 GbE RJ 45 Attention This port operates only at 1000 ba...

Page 40: ...twork ports to one or more switches You should connect at least two of the four ports to avoid having a single point of failure If you use more than one switch for a single LACP bond the switches must...

Page 41: ...wo expansion shelves If you have only one connect IOM A to controller A and connect IOM B to controller B 1 SG6000 CN 2 E2860 controller shelf 3 Controller A 4 Controller B 5 Expansion shelf 1 Install...

Page 42: ...cabinet or rack 5 Connect a power cord to each of the two power supply units in the storage controller shelf 6 If you have expansion shelves connect a power cord to each of the two power supply units...

Page 43: ...r button Blue The controller is powered on Off The controller is powered off 2 Reset button Not applicable Use this button to perform a hard reset of the controller 3 Identify button Blinking blue Ide...

Page 44: ...n segment display for each storage controller The seven segment display on each storage controller shows the repeating sequence OS Sd blank to indicate that the controller is performing start of day p...

Page 45: ...networking by browsing to the StorageGRID Appliance Installer which is pre installed on the SG6000 CN controller the compute controller Steps 1 Accessing the StorageGRID Appliance Installer on page 45...

Page 46: ...n 0B If the MAC address on the label ends in y FF the MAC address for the Admin Port would end in y 1 01 You can easily make this calculation by opening Calculator in Windows setting it to Programmer...

Page 47: ...nnection a Connect a service laptop directly to the rightmost RJ 45 port on the SG6000 CN controller using an Ethernet cable b Open a web browser on the service laptop c Enter this URL for the Storage...

Page 48: ...to use You have connected the network ports to switches that can support these features You understand how to configure the switches to use this higher speed If you plan to use Aggregate port bond mo...

Page 49: ...d for the Grid Network Ports 1 and 3 use an active backup bond for the Client Network VLAN tags can be specified for both networks for the convenience of the network administrator LACP 802 3ad Ports 2...

Page 50: ...Configure Networking Link Configuration The Network Link Configuration page appears The first time you access this page Link Speed is set to 10GbE Port bond mode is set to Fixed Network bond mode is...

Page 51: ...must also support and be configured for this speed You must use SFP28 TwinAx cables or optical cables and SFP28 transceivers 3 Enable or disable the StorageGRID networks you plan to use The Grid Netwo...

Page 52: ...wn 4 Refer to the table and configure the port bond mode and the network bond mode This example shows Aggregate and LACP selected for the Grid and the Client networks You must specify a unique VLAN ta...

Page 53: ...figure the IP addresses and routing information used for the appliance Storage Node on the StorageGRID Grid Admin and Client Networks About this task You must either assign a static IP for the applian...

Page 54: ...All grid subnets specified must be reachable through this gateway These Grid Network subnets must also be defined in the Grid Network Subnet List on the primary Admin Node when you start StorageGRID...

Page 55: ...he Admin Network gateway To add a subnet click the insert icon to the right of the last entry To remove an unused subnet click the delete icon f Click Save 4 Configure the Client Network This section...

Page 56: ...ID Appliance Installer click Configure Networking Ping Test The Ping Test page appears 2 From the Network drop down box select the network you want to test Grid Admin or Client 3 Enter the IPv4 addres...

Page 57: ...est nmap The Port Connectivity Test page appears 2 From the Network drop down box select the network you want to test Grid Admin or Client 3 Specify a range of IPv4 addresses for the hosts on that net...

Page 58: ...r connects the appliance to the management network for SANtricity System Manager You must set a static IP address for each storage controller to ensure that you do not lose your management connection...

Page 59: ...might take a few minutes for the DHCP values to appear 5 Optionally set a static IP address for the storage controller management port Note You should either assign a static IP for the management port...

Page 60: ...URL for SANtricity System Manager https Storage_Controller_IP The login page for SANtricity System Manager appears 2 Set or enter the administrator password Note SANtricity System Manager uses a sing...

Page 61: ...task You use SANtricity System Manager to configure the following settings Email alerts SNMP alerts or syslog alerts for the components in the storage controller shelf AutoSupport settings for the com...

Page 62: ...e Security c Follow the How To instructions to create and manage the security key 7 Optionally change the administrator password a Select Help to access the online help for SANtricity System Manager b...

Page 63: ...of Optimal a Click the Hardware tab b Click Show back of shelf From the back of the shelf you can view both storage controllers the battery in each storage controller the two power canisters the two...

Page 64: ...ows you to configure SNMP settings and other options for the SG6000 CN controller Steps 1 Changing the root password for the BMC interface on page 64 2 Setting the IP address for the BMC management po...

Page 65: ...twork you plan to use About this task Attention For support purposes the BMC management port allows low level hardware access You should only connect this port to a secure trusted internal management...

Page 66: ...alues to appear 4 Optionally set a static IP address for the BMC management port Note You should either assign a static IP for the BMC management port or assign a permanent lease for the address on th...

Page 67: ...ment network you plan to use The management client is using a supported web browser Steps 1 Enter the URL for the BMC interface https BMC_Port_IP For BMC_Port_IP use the DHCP or static IP address for...

Page 68: ...MP Settings 2 On the SNMP Settings page select the Enable SNMP V1 V2 checkbox and provide a Read Only Community String and a Read Write Community String The Read Only Community String is like a user I...

Page 69: ...performance reduced rebuild times after drive failures ease of management and comparable storage efficiency To use DDP16 mode your configuration must contain at least 20 drives DDP16 does not provide...

Page 70: ...the menu bar of the StorageGRID Appliance Installer click Configure Networking Remap Ports The Remap Port page appears 2 From the Network drop down box select the network for the port you want to rema...

Page 71: ...work the Admin Network and the Client Network To deploy an appliance Storage Node in a StorageGRID system you access the StorageGRID Appliance Installer and perform the following steps You specify or...

Page 72: ...s IP address automatically assuming the primary Admin Node or at least one other grid node with ADMIN_IP configured is present on the same subnet 3 If this IP address is not shown or you need to chang...

Page 73: ...Admin Node admin_ip and that the Start Installation button is enabled If the Start Installation button is not enabled you might need to change the network configuration or port settings For instructi...

Page 74: ...e following processes occurs depending on the appliance type For an appliance Storage Node the installer connects to the storage controller clears any existing configuration communicates with SANtrici...

Page 75: ...for more than 10 minutes refresh the web page manually 4 Go to the Grid Manager approve all pending grid nodes and complete the StorageGRID installation process When you click Install from the Grid Ma...

Page 76: ...he BMC dashboard If you want to use a kernel based virtual machine KVM you have experience deploying and using KVM applications If you want to use serial over LAN SOL you have experience using IPMI SO...

Page 77: ...e if the network interface card NIC firmware needs to be updated RB The system is rebooting after applying firmware updates FP The hardware subsystem firmware update checks have been completed Inter c...

Page 78: ...y speed 0x51 Memory initialization error SPD reading has failed 0x52 Memory initialization error Invalid memory size or memory modules do not match 0x53 Memory initialization error No usable memory de...

Page 79: ...0xF3 MRC ERR_INVALID_REG_ACCESS 0xF4 MRC ERR_SET_MC_FREQ 0xF5 MRC ERR_READ_MC_FREQ 0x70 MRC ERR_DIMM_CHANNEL 0x74 MRC ERR_BIST_CHECK 0xF6 MRC ERR_SMBUS 0xF7 MRC ERR_PCU 0xF8 MRC ERR_NGN 0xF9 MRC ERR_I...

Page 80: ...connect to SANtricity System Manager a Try to ping the appliance using the IP address for either storage controller on the management network for SANtricity System Manager ping Storage_Controller_IP b...

Page 81: ...by viewing the following information in the StorageGRID Appliance Installer The Home page contains a message about expansion shelves The Advanced RAID Mode page indicates by number of drives whether...

Page 82: ...CN controller is running the StorageGRID Appliance Installer Once the installation is completed this step no longer works because the StorageGRID Appliance Installer is no longer available Steps 1 Fr...

Page 83: ...upport Without the guidance of technical support your StorageGRID appliance could become inoperable Technical support will help you consult the NetApp Interoperability Matrix Tool IMT to determine whi...

Page 84: ...ation dialog box appears e Enter the provisioning passphrase and click OK A progress bar and a series of messages including Request Sent Stopping StorageGRID and Rebooting indicate that the appliance...

Page 85: ...layed Note If possible use the URL containing the IP address of the appliance s Admin Network port Note Accessing https 169 254 0 1 8443 requires a direct connection to the local management port g Con...

Page 86: ...mware and NVSRAM Note Activate the upgrade files immediately Do not defer activation 5 Once the upgrade operation has completed return the appliance to normal operating mode a From the StorageGRID App...

Page 87: ...d or you have taken other antistatic precautions You have a 1 Phillips screwdriver You have the E Series instructions for replacing a controller in duplex configuration Attention Refer to the E Series...

Page 88: ...the failed controller 2 Locate the MAC address and FRU part number labels on the back of the replacement controller This figure shows the E2800 controller The procedure for replacing the EF570 contro...

Page 89: ...on To prevent degraded performance do not twist fold pinch or step on the cables c Release the controller from the appliance by squeezing the latch on the cam handle until it releases and then open th...

Page 90: ...h down and away from the controller Item Description 1 Battery release latch 2 Battery d Lift up on the battery and slide it out of the controller e Remove the cover from the replacement controller f...

Page 91: ...he battery is not installed correctly as shown in the second figure the metal flange might contact the controller board causing damage Correct The battery s metal flange is completely inserted in the...

Page 92: ...eed to replace a component in the storage controller shelf Before you begin You have the E Series hardware replacement procedure About this task To replace the battery in the storage controller see th...

Page 93: ...is not functioning optimally or if it has failed Before you begin You have a replacement controller with the same part number as the controller you are replacing You have labels to identify each cabl...

Page 94: ...ller and determine the MAC address for the Admin Network port Note The MAC address label lists the MAC address for the BMC management port To determine the MAC address for the Admin Network port you m...

Page 95: ...rack on page 36 Viewing boot up codes for the SG6000 CN controller on page 76 Related references Viewing status indicators and buttons on the SG6000 CN controller on page 43 Replacing a power supply...

Page 96: ...the chassis Ensure that the blue latch is on the right side when you slide the unit in 5 Push the cam handle down to secure the power supply 6 Attach the power cord to the power supply and ensure tha...

Page 97: ...t bond mode from Fixed to Aggregate or from Aggregate to Fixed Changing Network bond mode from Active Backup to LACP or from LACP to Active Backup Enabling or disabling VLAN tagging or changing the va...

Page 98: ...ng StorageGRID and Rebooting indicate that the appliance is completing the steps for entering maintenance mode When the appliance is in maintenance mode a confirmation message lists the URLs you can u...

Page 99: ...ires a direct connection to the local management port g Confirm that the appliance is in maintenance mode by noting the maintenance mode message on the StorageGRID Appliance Installer home page 2 From...

Page 100: ...t have been affected by the link configuration changes you made in step 3 In addition to any other tests you choose to perform confirm that you can ping the Grid Network IP address of the primary Admi...

Page 101: ...de returns to the expected status by viewing the icon to the left of the node name When the reboot is complete the Tasks tab looks like the following screenshot Related tasks Configuring network links...

Page 102: ...WAY OUT OF THE USE OF THIS SOFTWARE EVEN IF ADVISED OF THE POSSIBILITY OF SUCH DAMAGE NetApp reserves the right to change any products described herein at any time and without notice NetApp assumes no...

Page 103: ...NETAPP logo and the marks listed on the NetApp Trademarks page are trademarks of NetApp Inc Other company and product names may be trademarks of their respective owners http www netapp com us legal n...

Page 104: ...ng this document send us your comments by email doccomments netapp com To help us direct your comments to the correct division include in the subject line the product name version and operating system...

Reviews: