background image

HotShot SC User Manual 

Rev 1.2.5 –March 2012 

© NAC Image Technology Inc 

Jimmy Robinson 

41 

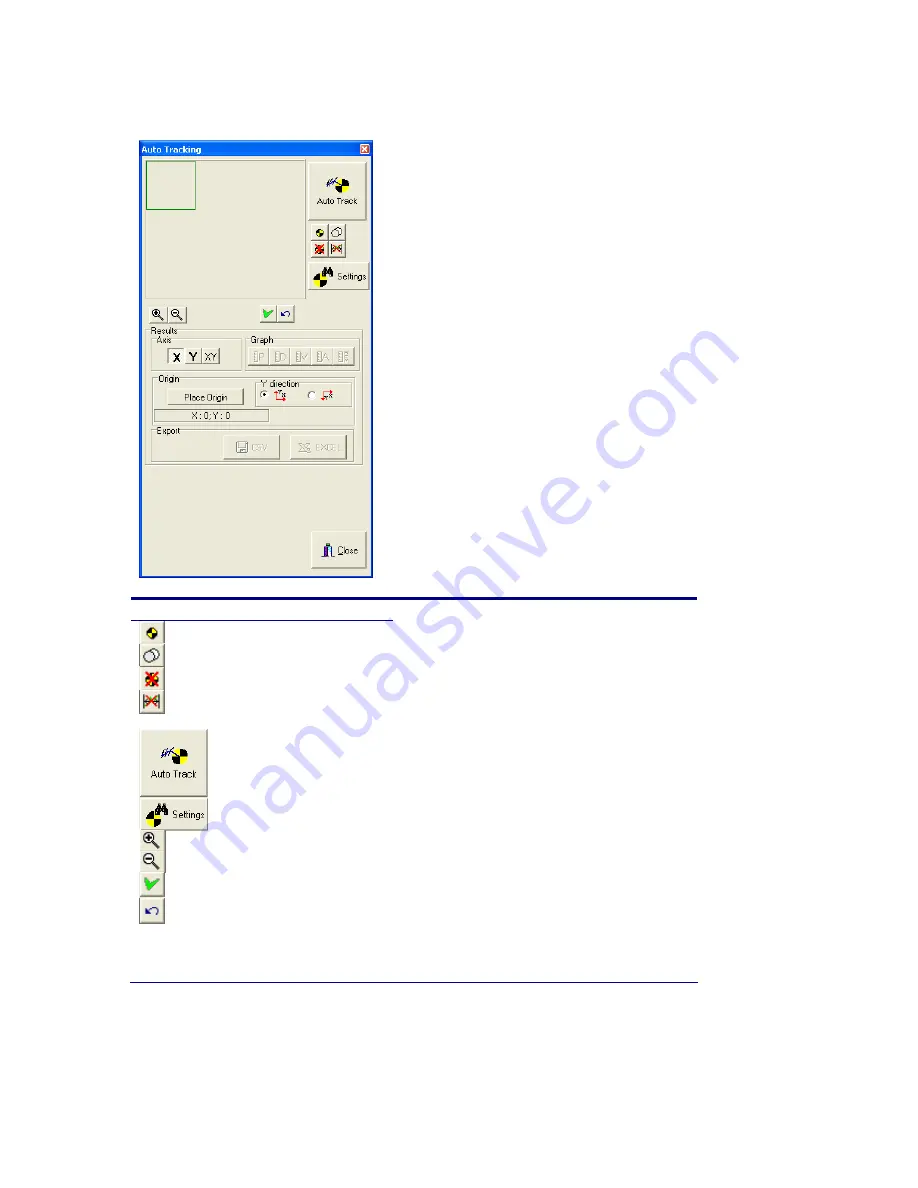
You will see the following window appear. 


Use this … 

To do this… 


Quadrant Target 

Define a target as a Quadrant Type 


Correlation Target 

Define a target as a Correlation Type 


Delete Target 

Delete the current Target 


Delete Tracked Data

Delete the tracked data for the current 
target 


Begin Tracking 

Start Automatic Tracking 


Target Settings 

View / Edit the Target Settings 


Zoom In 

Zoom in on the target Window 


Zoom Out 

Zoom Out of the target Window 


Confirm Point 

Confirm a point (if requested) 


Undo Move Point 

Undo a manual Move of a point 


6.14.4.1


Getting Started with Auto Tracking 


Summary of Contents for Hot Shot SC

Page 1: ...NAC Image Technology Inc Hot Shot SC Hot Shot e64 Hot Shot CC User Manual V 1 2 6 June 2012...

Page 2: ...0 2 1 Grant of License 10 2 2 Copying 10 2 3 Term 10 2 4 NAC s Rights 10 2 5 Limited Warranty 10 2 6 Liability 11 2 7 Termination of the Agreement 11 2 8 Governing Law 11 2 9 Entire Agreement 11 3 Cop...

Page 3: ...Resolution Live Image in ARM Mode 32 6 8 3 Loop Playback 32 6 8 4 Play Back Speed 32 6 8 5 The Scroll Bar 32 6 9 Synchronization Modes 33 6 9 1 Sync In 33 6 9 2 Sync Out 34 6 10 Trigger Setting 34 6 1...

Page 4: ...ogram 56 6 17 10 Settings Reticule 57 6 17 11 Settings Firmware Upgrade 57 6 17 12 Settings Adjust DACs 57 6 17 13 About 57 7 Multi Channel Wave Inserter 59 7 1 MCWI Settings 60 7 2 MCWI Viewing the D...

Page 5: ...the HotShot Link software are compatible with the following cameras NAC HotShot 512 SC NAC HotShot Mega SC MIC NAC HotShot e64 MIC NAC HotShot CC series Any other cameras not listed are not supported...

Page 6: ...hould be solid Green DATA LED Indicates when Data is being transferred between the camera and the control PC Lights Blue during Data Transfer ERROR LED This LED will indicate a temperature fault of ot...

Page 7: ...USB Connects to the control PC USB2 socket via USB cable POWER Provides power to the camera from the supplied power supply Input requirement is 12 28V DC BATTERY Connector for Batter Power TBD EVF Ele...

Page 8: ...of the HotShot E64 camera One is the RJ45 ethernet connector The other is for power and I O signals A break out cable for the PWR IO connector is provided This is for Power Trigger in Sync in and Syn...

Page 9: ...ectors There are four connectors on the side of the CC camera 1 VGA Use this to connect a VGA monitor if required 2 PWR Power connector Use the supplied power supply 3 GigE Gigabit Ethernet Connect to...

Page 10: ...purposes 2 3 Term This Agreement is effective from the day you first install the Software onto any system and continues until you return the original media to NAC 2 4 NAC s Rights You acknowledge tha...

Page 11: ...Termination of the Agreement If any of the terms and conditions of this Agreement are broken NAC has the right to terminate the Agreement and demand that you return the Software to NAC 2 8 Governing...

Page 12: ...ware FIRST You MUST do this WITHOUT a connection to a camera 4 1 Un installing Software If you have previous version of HotShot SC Link installed you first un install this You can do this via the Wind...

Page 13: ...Time connection to the camera the Firmware version will be checked and will AUTOMATICALLY be upgraded If you have Multiple Cameras you MUST connect only one at a time in the first instance in order f...

Page 14: ...lly in the range IP Address 172 21 10 xxx Subnet Mask 255 255 0 0 OR IP Address 192 254 127 xxx Subnet Mask 255 255 255 0 Before you can communicate with the camera you need to configure your Network...

Page 15: ...55 the IP address values have to match the camera For cameras with 172 21 10 x IP Address Usually an IP address of 172 21 10 1 is OK for the NIC With a subnet mask of 255 255 0 0 For cameras with 192...

Page 16: ...dress of the camera You should get a reply from the camera if it can be seen on the network as shown below If there is no reply please check again the IP address of the NIC and also that the camera is...

Page 17: ...shortcut is also placed on the Windows Desktop It is important that when you run the software for the first time that you Check Include CC Camera under settings This will enable the software to searc...

Page 18: ...r light on the camera will show green 1 Click the CONNECT button 2 WAIT for connection You will see camera info appear in the image area when completed and the camera STATUS will show READY in the Ite...

Page 19: ...the IMAGE QUALITY if required 14 Select the required frame range for download see section 6 7 5 Push the DOWNLOAD Button to Download the RAW data The Raw Data File will Open in the Main Window 15 Rev...

Page 20: ...er Manual Rev 1 2 5 March 2012 NAC Image Technology Inc Jimmy Robinson 20 6 1 The Main Window When the software starts it will look similar to the screen shot below The Screen is divided up into a num...

Page 21: ...ist MultiView TOGGLE Display All Open Files Connected Cameras as Thumbnail Windows Download Download the images from the Current Camera The images will be stored in a RAW format hsf Format Convert Con...

Page 22: ...le This will allow you to brows for a file to open Currently you may open the following file formats Extension Type hsf HotShot RAW data File AVI Windows AVI File tif Tiff File jpg Jpeg File bmp Windo...

Page 23: ...he camera then a raw hsf file is NOT created The Convert DIRECTLY from the camera will take LONGER to perform than a RAW data Download It is recommended that RAW data is downloaded and then converted...

Page 24: ...dify the parameter of the output files as follows Conversion Start Conversion End Format Filename Save Folder To modify the parameter for an individual item click the parameter in the table To modify...

Page 25: ...et the Auto Exposure Control 6 3 1 Recording FPS The available recording Frames pictures per second are given on the Selection Combo To change the recording FPS select the required value from the Comb...

Page 26: ...g the value for width and height Special Considerations Limitations The AOI must conform to the following restrictions 1 Width W must be a multiple of 8 2 Height H must be a multiple of 8 3 Total area...

Page 27: ...cation either as a percentage of memory OR as a number of frames NOTE For XLRT Operation of E64 Camera ONLY a Start Trigger is available This is a 0 start trigger rather than the standard 5 START Trig...

Page 28: ...it significance of the 8 bits can be specified Adjusting the Digital Shift is another method of adjusting the light sensitivity separate from the GAIN function above 6 3 8 Auto Exposure Control NOT av...

Page 29: ...The nature of the FPN changes as the camera temperature changes and also as you set different record parameters The Black Balance is ONLY VALID at the Frame Rate Shutter Speed exposure AOI and GAIN se...

Page 30: ...the White Balance Button is Depressed click it again When Using AUTO mode the camera will calculate the AUTO White Balance Level on the Current Frame or the FIRST Frame if a live image VIEW MODE If th...

Page 31: ...wards Loop Playback Forwards push button 2x Step Forwards Step ONE Frame Forwards Fast Forward Go to the End frame OR the Mark Out Frame VIEW ARM Go To VIEW Mode if READY Go to ARM Mode if VIEW TRIGGE...

Page 32: ...RM Mode it is recording into camera memory In order not to have a detrimental effect on this process the LIVE image received from the camera during ARM and RECORD mode transmitted via the GigE link is...

Page 33: ...t Sync Modes as defined in the Software Preferences See 6 16 1 6 8 1 Sync In The Sync In mode of the camera determines how the signal input to the Sync In BNC Connector see 1 2 3 is interpreted The Sy...

Page 34: ...e Sync OUT BNC Connector see 1 2 3 is interpreted There are THREE possible States for the Sync OUT HIGH During Exposure LOW During Exposure ARM STATUS To change the Sync OUT Mode of a specific camera...

Page 35: ...ure If Double Exposure is ON then a TICK will be displayed net to the menu item In Double Exposure mode the first image is exposed with for the time specified by the exposure setting The second image...

Page 36: ...d equally between the selected number of memory segments The default setting for each of these segments will be the current settings This includes FPS Exposure Shutter Gain Digital Shift It does not c...

Page 37: ...oom in to the image by 10 each Click Zoom Out Zoom out of the image by 10 each Click Reset Zoom Reset the Zoom to 100 No Zoom Fit to Screen Zoom the image to fit the screen Histogram Show the Image Hi...

Page 38: ...mage in order to get a pixels per unit value Click the calibrate button You should then click on two known points in the image in turn After the second point has been specified you will be presented w...

Page 39: ...icule The Manual Tracking tool will allow you to manually track up to ten 10 points in the image The results are stored in an CSV file that can easily be opened in a spreadsheet application To begin m...

Page 40: ...Hide Tracking Window Hide the Reticule window and stop manual tracking 6 14 3 1 Quick Guide to Manual Tracking 1 Click the Manual Tracking button to open the manual tracking tool window 2 Set the Auto...

Page 41: ...rget as a Correlation Type Delete Target Delete the current Target Delete Tracked Data Delete the tracked data for the current target Begin Tracking Start Automatic Tracking Target Settings View Edit...

Page 42: ...the end of the sequence or until stopped by the user If the target is lost or the software is unsure of it s location then it will stop and ask for user confirmation You can confirm the suggested loca...

Page 43: ...which the software looks for during the target search process can be updated The default is that it updates every frame This means tat in each frame the software will search for the target as it appea...

Page 44: ...a will allow the software to automatically decrease the search area size if it is useful to do so 6 14 4 2 5 Threshold Limit The Threshold Limit is the measure of Pattern Match Accuracy If during sear...

Page 45: ...ment allowed for the Centre of the target similar to the search area If the centre moved more than the value in Max Centre Movement then the software will stop for user confirmation 6 14 4 3 Tracking...

Page 46: ...the Y axis direction Export to CSV Export the tracking data to a Coma Separated Data File Export To Excel Start Microsoft Excel and post the data into a worksheet MS Excel must me installed on the PC...

Page 47: ...m the camera which will be monitored by the software If this portion of the image changes above a defined threshold level it will cause the camera to automatically TRIGGER a recording NOTE There will...

Page 48: ...te The Auto Trigger Function Live Monitor Show Live results of the Auto Trigger Threshold Sensitivity Show the Threshold at which the Trigger Will be Applied Threshold Change the Trigger Threshold Lev...

Page 49: ...eshold sensitivity for the Auto Trigger is set to 15 If the image changes slightly more then the camera will trigger 6 15 1 3 Enable Auto Trigger This must be checked for the auto trigger to be active...

Page 50: ...or Camera Exit Quit the Application Preferences Define Software Camera Preferences Auto Run Specify Auto Run Settings Camera Info View Connected Camera Information Show Histogram Show the live Image...

Page 51: ...s 6 16 2 General Settings 6 16 2 1 Auto Connect on Startup If this is selected then when the software starts it will immediately connect to any available cameras 6 16 2 2 Include Cameras in Bulk Conve...

Page 52: ...s the folder which is first opened when a File Open is requested 6 16 2 6 Default Save Location Specifies the folder which is first opened when a File Save is requested 6 16 3 HotShot SC specific Sett...

Page 53: ...n the camera is put into LOW LIGHT MODE See 6 3 5 NOTE If the setting is less than 500 then the LIVE VIDEO OUT will be disabled in Low Light Mode only SC camera 6 16 3 4 Live Video Out Sets the Live V...

Page 54: ...ption XLRT Mode Option These options will only be shown if the system is delivered with XLRT options Here you can set the XLRT options 6 16 6 Debug Settings The settings should not be modified unless...

Page 55: ...ecify the End Frame to Save To Save Filename Specify the Save File name All Segments Specify that ALL segments should be downloaded Activate Switch ON OFF Auto Run Process see also 6 15 2 6 16 7 1 Aut...

Page 56: ...Noise in the image Black Frame calibration is performed before the camera leave the factory but it is worth re calibrating every 12 Month or so or if FPN noise becomes more visible in the images To c...

Page 57: ...ion of the camera DAC s Under normal operation any modifications are performed automatically You will not normally need to use this function This function is Password Protected and you will be talked...

Page 58: ...HotShot SC User Manual Rev 1 2 5 March 2012 NAC Image Technology Inc Jimmy Robinson 58...

Page 59: ...the camera and can be as many as 40 samples PER frame Period You may choose to use 1 2 or 4 of the analog inputs Using more inputs will decrease the sampling rate The sampled data is stored in the ca...

Page 60: ...e this To do this WIMode Set the Wave Inserter Channel Count Analog Range Set the voltage range used on the Analog Inputs Digital State Specify the Default State of the Digital Inputs Apply Changes to...

Page 61: ...oost option if you have a Colour Camera See section 6 7 1 A sample Live Monitor output is show to the left The LIVE MONITOR button toggles the Live Monitor Display Update ON and OFF The Buttons specif...

Page 62: ...from which it originated Y Axis You can change the colour of the plot by using the customisation dialog see Modifying the graph display settings The value of the plot at the cursor position is displa...

Page 63: ...on point with master time In list view the data table will scroll 7 2 4 Graph Menus Use this To do this Graph Rename Rename the Graph Graph Copy Copy the graph image to the clipboard Graph Print Print...

Page 64: ...To manually set the graph axis you must double click the axis to set Where there are multiple Y axis be sure to click the correct one This will display an axis dialog where you can enter the bounds t...

Page 65: ...ent Undo Zoom Undo any zoom of the graph Maximize Create a full screen copy of the Graph Customization Dialog Display a Dialog to allow full customisation of the display properties of the graph Export...

Page 66: ...s at this stage then the camera may not function correctly In most cases unless instructed otherwise by a NAC engineer you should press OK The Software will now check which firmware requires and updat...

Page 67: ...fore you press OK When the ARM and REC LED have stopped flashing you should only see the POWER LED illuminated GREEN WARNING IF THE LED S are ANY OTHER STATE then you should keep power to the camera a...

Page 68: ...message Below Click OK Cycle the power on the camera Unplug Reconnect NOTE For Software Version after 1 0 0 4 the camera will RE Boot Automatically 8 1 EEPROM Update When you connect to the camera ag...

Page 69: ...al Rev 1 2 5 March 2012 NAC Image Technology Inc Jimmy Robinson 69 You should Select YES unless otherwise instructed by a NAC Technical Engineer The Firmware Upgrade is now COMPLETE and you can contin...

Page 70: ...Inc Jimmy Robinson 70 9 Disclaimer We reserve the right to modify the function of the software without notice to allow for continuous improvement to our software and Hardware systems Due to this this...

Page 71: ...17 18 Close 2 12 13 24 Connect 2 12 13 23 Digital Shift 2 15 17 Download 2 8 10 12 13 14 19 24 Electronic ViewFinder 2 5 Enhance 2 17 18 Format Convert 2 12 14 FPS 2 9 15 Gain 2 15 16 Gamma 2 17 18 LE...

Reviews: