T: +1-613-545-0466 F: +1-613-542-8029 www.mrel.com
33
BROC mode: A specified number of frames will be recorded with each trigger, then the recording will pause. The buttons and
position indicators will be the same as for ROC mode. If the camera is triggered before the specified number of frames
have been recorded, the additional frames are appended to whatever number have frames have already been recorded.
4. Press the Arm button. A message will appear giving you the options of exiting to Review and Save, or to continue recording.
Note:
Appending to ROC and BROC recordings upon returning from Playback or a Power cycle will cause a number of black frames
(up to 128) to be inserted in the recording timeline.
It is possible to alternate FasCorder ROC and BROC recordings in any combination as they are compatible formats. Long Record basic
recordings, however, are not compatible with FasCorder and cannot coexist on the SSD.
5.12 Reviewing Captured Imagery: Playback
Once the recording is complete, if Autosave is not enabled, the
Blaster’s Ranger II™ Lt
will open the recording in Review Mode. There are
several things to do in Review:
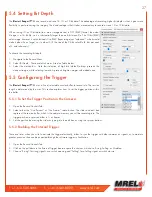
• Play the video--play it forward, backward, frame by frame, adjust the cut-in and cut-out points (find the interesting portion of the clip),
etc.
• Adjust the image brightness, contrast, gamma, bit depth, color, etc.
• Save video to a mass storage device.
• Load a CAP file from SSD to memory for Review.
5.12.1 Searching for Interesting Parts:
Very often the first thing you will wish to do when reviewing a clip is to “scrub” through it using the playback slider looking for the most
interesting moments.
1. Click on the Pause Play button. (Only necessary if you have already clicked on another of the playback buttons.) This will enable all of
the playback buttons (they become black). (If any of the buttons become gray (inactive) you will not be able to scrub through the clip.
2. Move the Start Clip bumper all the way to the left (beginning of segment) and the End Clip bumper all the way to the end. (This is the
default position when you enter Review.)
3. Click and hold the Playback Bug and move it along the progress bar. This will allow you to move to any point in the video that might
be of interest.
5.12.2 Using the Slider
When selected the Playback Bug will turn blue. There are several mouse and keyboard stokes available when the bug is selected:
• Click on the slider bar to the left of the Playback bug to move 10 frames backward
• Click on the slider bar to the right of the Playback bug to move 10 frames forward
• Click on the left or down arrow on the keyboard to move 1 frame backward
• Click on the right or up arrow on the keyboard to move 1 frame forward
• Click on Page down to move 10 frames backward
• Click on Page up to move 10 frames forward
Summary of Contents for Blaster's Ranger II Lt
Page 7: ...T 1 613 545 0466 F 1 613 542 8029 www mrel com 1 Chapter 1 Introduction ...
Page 10: ...4 Blaster s Ranger II Lt Operations Manual Edition 1 1 Lt ...
Page 11: ...T 1 613 545 0466 F 1 613 542 8029 www mrel com 5 Chapter 2 Hardware ...
Page 15: ...T 1 613 545 0466 F 1 613 542 8029 www mrel com 9 Chapter 3 Getting Started ...
Page 19: ...T 1 613 545 0466 F 1 613 542 8029 www mrel com 13 Chapter 4 FasMotion ...
Page 29: ...T 1 613 545 0466 F 1 613 542 8029 www mrel com 23 Chapter 5 Recording ...
Page 47: ...T 1 613 545 0466 F 1 613 542 8029 www mrel com 41 Chapter 6 Using the Web App ...
Page 55: ...T 1 613 545 0466 F 1 613 542 8029 www mrel com 49 Chapter 7 Field Operations ...
Page 57: ...T 1 613 545 0466 F 1 613 542 8029 www mrel com 51 ...
Page 74: ...68 Blaster s Ranger II Lt Operations Manual Edition 1 1 Lt ...
Page 77: ...T 1 613 545 0466 F 1 613 542 8029 www mrel com 71 ...


