background image

GTR 8000 Base Radio

Procedure Steps

1

Connect to the base radio in CSS through an Ethernet connection. See

4.4.4 Connecting Through an Ethernet

Port Link, page 4-11

.

2

Select

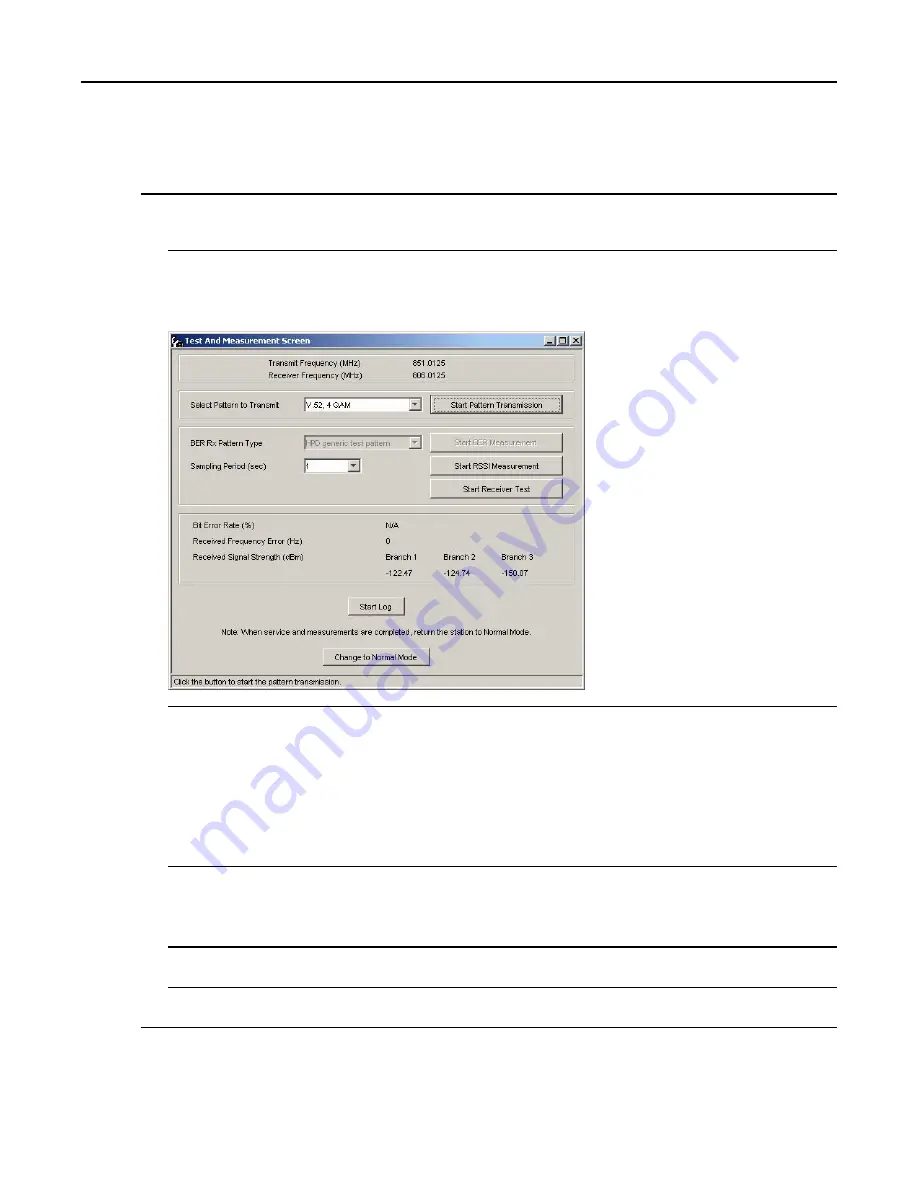
Service → Test and Measurement Screen

from the menu.

Figure 5-31

CSS Test and Measurement Screen

3

Reset the base radio:

a. If the base radio is not already is service mode, click

Change to Service Mode

.

Step result:

A confirmation dialog box appears.

b. Click

OK

.

Step result:

The base radio begins a reset sequence to change modes, which takes a few minutes.

c. After the base radio resets, re-open the Test and Measurement Screen as described in

step 2

.

4

Select

Start Receiver Test

.

Step result:

A confirmation dialog box appears indicating tests progress. After a few seconds, the test

concludes with a pass or fail message.

5

Click

OK

.

6

If no further testing is needed, click

Change to Normal Mode

to return the base radio to normal operation.

5-58

6871022P86-A - November 2012

Summary of Contents for GTR 8000

Page 1: ...System Release 7 13 ASTRO 25 INTEGRATED VOICE AND DATA GTR 8000 BASE RADIO November 2012 6871022P86 6871022P86 A 2012 Motorola Solutions Inc All rights reserved ...

Page 2: ......

Page 3: ...e of a product Disclaimer Please note that certain features facilities and capabilities described in this document may not be applicable to or licensed for use on a particular system or may be dependent upon the characteristics of a particular mobile subscriber unit or configuration of certain parameters Please refer to your Motorola contact for further information Trademarks MOTOROLA MOTO MOTOROL...

Page 4: ......

Page 5: ...Document History Version Description Date 6871022P86 A First release of the GTR 8000 Base Radio manual November 2012 iii ...

Page 6: ......

Page 7: ...435 MHz 1 17 1 9 2 1 Industry Canada 1 20 1 9 3 GTR 8000 Base Radio GPW 8000 Receiver Specifications for Integrated Voice and Data UHF R2 435 524 MHz 1 21 1 9 3 1 Industry Canada 1 25 1 9 4 GTR 8000 Base GPW 8000 Receiver Radio Specifications for Integrated Voice and Data VHF 136 174 MHz 1 25 1 9 4 1 Industry Canada 1 29 1 9 5 GTR 8000 Base Radio Specifications for High Performance Data 700 and 80...

Page 8: ...n Overview 3 7 3 3 2 General Equipment Inspection and Inventory Recommendations 3 8 3 3 3 General Placement and Spacing Recommendations 3 9 3 3 4 General Cabinet Bracing Recommendations 3 9 3 3 5 General Floor Mounting Procedure for Cabinets or Racks 3 9 3 3 6 General Bonding and Grounding Requirements 3 10 3 3 7 General Cabling Requirements 3 10 3 3 8 General Power Guidelines and Requirements 3 1...

Page 9: ...ecting Through a Serial Port Link 4 4 4 4 3 Serial Connection Configurations 4 6 4 4 3 1 Setting the Device IP Address and Pairing Number Using CSS 4 7 4 4 3 2 Pairing To a Comparator 4 8 4 4 3 3 Serial Security Services Using CSS 4 9 4 4 3 3 1 Setting the Serial Security Services Using CSS 4 9 4 4 3 4 Resetting SNMPv3 User Credentials to Factory Defaults Using CSS 4 10 4 4 4 Connecting Through an...

Page 10: ...1 Field Tuning Overview 5 12 5 9 2 Required Test Equipment 5 13 5 9 3 Tuning a 700 800 MHz Duplexer 5 13 5 9 4 Tuning a VHF Duplexer 5 13 5 9 4 1 Setting Up for Tuning a VHF Duplexer 5 14 5 9 4 1 1 How To Set Up Tuning The VHF Duplexer 5 15 5 9 4 2 Tuning VHF Duplexer Low Pass Resonators 5 15 5 9 4 2 1 How To Tune VHF Duplexer Low Pass Resonators 5 16 5 9 4 3 Tuning VHF Duplexer High Pass Resonato...

Page 11: ...y Reference Oscillator 6 1 7 GTR 8000 Base Radio Operation 7 1 7 1 Base Radio Operational States for Trunked Simulcast 7 1 7 2 Base Radio Operational States for Trunked Repeater and HPD 7 1 7 3 Base Radio Operational States for Conventional 7 2 7 3 1 Packet Data interactions with Multiple NAC s 7 2 7 3 2 Supplementary Signaling interactions with Multiple NAC s 7 2 7 4 Illegal Carrier Determination...

Page 12: ... 1 1 1 Transceiver Status and Alarm LEDs 10 1 10 1 1 2 Transceiver Ethernet Link Status LEDs 10 2 10 1 1 3 Transceiver Application Controlled LEDs 10 2 10 1 1 4 Transceiver Services Controlled LEDs 10 3 10 1 2 Transceiver Option Card Intercom LED 10 4 10 1 3 Power Amplifier LEDs 10 4 10 1 4 Fan Module LED 10 5 10 1 5 Power Supply LEDs 10 6 10 2 RFDS Equipment Specifications 10 7 10 2 1 Transmit Fi...

Page 13: ...nce for T1 2R with Talk Around A 19 A 2 3 Installing the T1 2R with Talk Around Option Kit A 19 A 2 4 Configuring the T1 2R with Talk Around Option Kit A 20 A 3 T2 2R with Duplexer and Triple Relay Option Kit A 23 A 3 1 T2 2R with Duplexer and Triple Relay Option Kit Parts List A 26 A 3 2 Expected Site Performance for T2 2R with Duplexer and Triple Relay A 27 A 3 3 Installing the T2 2R with Duplex...

Page 14: ......

Page 15: ...ay Module Connections 2 19 Figure 2 22 Base Radio Backplane Mounting Location 2 20 Figure 2 23 Antenna Relay Module Mounted on Backplane Cover 2 21 Figure 2 24 Antenna Relay Module Mounted on Peripheral Tray 2 22 Figure 2 25 Functional Block and Interconnect Diagram for Antenna Relay Module Bracket Mounting 2 23 Figure 2 26 Functional Block and Interconnect Diagram for Antenna Relay Module Periphe...

Page 16: ...r Isolation Connecting Duplexer Cable Assembly 5 32 Figure 5 21 Metering Screen Window 5 35 Figure 5 22 Configuration for Modulation Fidelity Measurement Aeroflex 2975 Series Service Monitor 5 43 Figure 5 23 Configuration for Modulation Fidelity Measurement Aeroflex 2975 Series Service Monitor 5 45 Figure 5 24 HPD Service Monitor Test Screen Aeroflex 3900 Series Service Monitor 5 46 Figure 5 25 HP...

Page 17: ... Kit Wiring Diagram A 7 Figure A 6 Tn nR Receiver Mute Option Kit Wiring Diagram A 10 Figure A 7 CSS WildCard Tables Example A 14 Figure A 8 T1 2R Talk Around Option Kit Wiring Diagram A 17 Figure A 9 T2 2R with Duplexer and Triple Relay Configuration A 23 Figure A 10 Triple Antenna Relay Tray A 24 Figure A 11 T2 2R with Duplexer and Triple Relay Option Kit Wiring Diagram A 25 Figure B 1 Analog Si...

Page 18: ......

Page 19: ...itter Specifications for IV D VHF 136 174 MHz 1 26 Table 1 20 GTR 8000 Base Radio GPW 8000 Receiver Specifications for IV D VHF 136 174 MHz 1 27 Table 1 21 GTR 8000 Base Radio GPW 8000 Receiver FCC Identification for IV D VHF 136 174 MHz 1 28 Table 1 22 GTR 8000 Base GPW 8000 Receiver Radio Industry Canada for IV D VHF 136 174 MHz 1 29 Table 1 23 General Specifications for GTR 8000 Base Radio for ...

Page 20: ...ns UHF 10 8 Table 10 10 Preselector Filter Specifications VHF 10 9 Table 10 11 Duplexer Specifications 700 800 MHz 10 9 Table 10 12 Duplexer Specifications UHF 10 10 Table 10 13 Duplexer Specifications VHF 10 10 Table 10 14 External Dual Circulator Specifications 700 800 MHz 10 11 Table 10 15 External Dual Circulator Specifications UHF 10 11 Table 10 16 External Dual Circulator Specifications VHF ...

Page 21: ... 4 6 CSS Configuration Parameters for the GTR 8000 Base Radio Trunked Simulcast 4 26 4 4 7 CSS Configuration Parameters for the GTR 8000 Base Radio Trunked Repeater 4 27 4 4 8 CSS Configuration Parameters for the GTR 8000 Base Radio HPD 4 28 4 4 9 CSS Configuration Parameters for the GTR 8000 Base Radio Conventional 4 30 4 5 Using VoyenceControl to Configure Centralized Authentication on Devices 4...

Page 22: ......

Page 23: ...4 4 5 2 Setting the Date and Time Using CSS 4 15 4 4 5 3 Changing SNMPv3 Configuration and User Credentials Using CSS 4 15 4 4 5 3 1 Adding or Modifying an SNMPv3 User Using CSS 4 18 4 4 5 3 2 Performing an SNMPv3 Connection Verification Using CSS 4 19 4 4 5 4 1 How to Configure DNS Using CSS 4 21 4 4 5 5 Customizing the Login Banner Using CSS 4 22 4 4 5 6 Setting the SWDL Transfer Mode Using CSS ...

Page 24: ...hecks 5 33 5 10 2 Monitoring the Power Supply Module 5 35 5 10 3 Verifying Receiver Performance Digital Operation 5 35 5 10 4 Verifying Receiver Performance Analog Operation 5 38 5 10 5 Checking Receiver Sensitivity Self test Method IV and D 5 39 5 10 6 Monitoring the Transmitter Metering Points 5 40 5 10 7 Verifying Transmitter Performance Digital Operation 5 41 5 10 8 Verifying Transmitter Perfo...

Page 25: ...g the T2 2R T3 3R and T4 4R Receiver Mute Option Kits A 11 A 1 7 Configuring the T2 2R T3 3R and T4 4R Receiver Mute Option Kits A 13 A 2 3 Installing the T1 2R with Talk Around Option Kit A 19 A 2 4 Configuring the T1 2R with Talk Around Option Kit A 20 A 3 3 Installing the T2 2R with Duplexer and Triple Relay Option Kit A 27 A 3 4 Configuring the T2 2R with Duplexer and Triple Relay Option Kit A...

Page 26: ......

Page 27: ...eration details tasks that you will perform once the GTR 8000 Base Radio is installed and operational on your system Chapter 8 GTR 8000 Base Radio Troubleshooting provides fault management and troubleshooting information relating to the GTR 8000 Base Radio Chapter 9 GTR 8000 Base Radio FRU Procedures lists the Field Replaceable Units FRUs and Field Replaceable Entities FREs and includes replacemen...

Page 28: ...entation descriptions ASTRO 25 system diagrams ASTRO 25 system glossary For an additional overview of the system review the architecture and descriptive information in the manuals that apply to your system configuration Dynamic System Resilience Provides all the information required to understand operate maintain and troubleshoot the Dynamic System Resilience feature Conventional Operations Quick ...

Page 29: ... transceiver module includes the functionality for the exciter receiver and station control with an optional transceiver option card The base radio software configuration and network management as well as inbound outbound traffic handling are performed through the transceiver module On board serial and Ethernet service ports are located on this module for local servicing through CSS The power ampl...

Page 30: ...ing additional receive only stations in areas where it would otherwise be difficult to receive a signal from low power subscriber units The receiver also operates as a monitor receiver in a non voting environment with connection to a console 1 2 GTR 8000 Base Radio GPW 8000 Receiver Components Table 1 1 Base Radio Receiver Modules and Function GTR 8000 Base Radio Description Power Supply Operates ...

Page 31: ...n the GPW 8000 Receiver 1 3 Supported System Configurations The GTR 8000 Base Radio is available in the following system architectures High Performance Data HPD Trunked IP Simulcast Subsystems IV D Trunked Single Site Repeater Configuration IV D Centralized Conventional Architectures Distributed Conventional Subsystem Architecture ASTRO 3 1 Conventional System Analog Only Conventional System 1 3 1...

Page 32: ...eplacement of PSC 9600 Site Controllers or base radios other than the GTR 8000 Base Radios The base radios may be colocated with the site controllers or be separated non colocated from the site controllers This configuration can only be used in non voting configurations Support is provided only for FDMA when the base radios are physically separated from and not colocated with the site controllers ...

Page 33: ...ated base radios The stated distance limit for a shielded twisted pair Ethernet cable CAT5 is 328 ft 100 m before the signal degrades too much to be used See Figure 1 3 Figure 1 3 Single Site Repeater Configuration 2 Once the site controller link is extended the control plane could be open to access from elements other than the base radios Each Ethernet LAN switch must be manually configured to pr...

Page 34: ... an example 1 5 1 How To Configure The HP2610 Ethernet LAN Switch Procedure Steps 1 Enter the following commands at the prompt ProCurve Switch 2610 24 2 ProCurve Switch 2610 24 erase startup config This removes any existing switch configuration 3 ProCurve Switch 2610 24 config This puts the switch into configuration mode 4 ProCurve Switch 2610 24 config int X Using Port X as an example 5 ProCurve ...

Page 35: ...wer amplifier modules it can also provide auxiliary power to a connected site controller or receive multicoupler low noise amplifier RMC LNA The HPD base radio provides a full duplex RF interface to HPD Mobile Subscriber Units MSUs The HPD base radios are available for 25 kHz HPD operation in the 700 or 800 MHz bands Up to five HPD base radios may be installed at the site Each base radio has an Et...

Page 36: ... conventional base radio receiver uses either a 2 or 4 wire TRC or 4 wire EM interface in an analog infrastructure a V 24 interface for digital voice and data traffic to either a Channel Bank Digital Interface Unit CCGW MLC 8000 or ASTRO TAC 3000 Comparator and an optional 4 wire link for analog voice in a mixed mode configuration an IP interface for digital voice and data traffic to a CCGW or GCM...

Page 37: ...l Architectures Zone Core with Colocated Conventional Channels Trunked IP Simulcast Remote Site with Conventional Channels Dispatch Console Site with Colocated Conventional Channels Conventional Only Remote Site HPD Site with Conventional Channels Distributed Conventional Subsystem Architectures Conventional Base Radio Sites Conventional Hub Sites 1 7 2 Analog Conventional Base Radio Receiver Anal...

Page 38: ...unctions see the Conventional Operations manual An analog conventional base radio receiver can be used in the following architectures ASTRO 3 1 Conventional Systems Centralized Conventional Architectures Zone Core with Colocated Conventional Channels Trunked IP Simulcast Remote Site Conventional Channels Dispatch Console Site with Colocated Conventional Channels Conventional Only Remote Site Distr...

Page 39: ...e fan module See 9 3 Replacing the Fan Assembly page 9 10 in the FRU Procedures chapter for instructions on how to disable the fan To validate the 35 W standby power consumption specification wait for the main fans to turn off after the transmitter dekeys The turn off delay of the main fans is controlled by the fan holdover configuration in the CSS Single fan operation requires the Tx Power Out in...

Page 40: ...ions for Integrated Voice and Data VHF 136 174 MHz page 1 25 1 9 5 GTR 8000 Base Radio Specifications for High Performance Data 700 and 800 MHz page 1 29 Specifications are subject to change without notice 1 9 1 GTR 8000 Base Radio GPW 8000 Receiver Specifications for Integrated Voice and Data 700 and 800 MHz Table 1 3 GTR 8000 Base Radio GPW 8000 Receiver General Specifications IV D 700 and 800 M...

Page 41: ...5000 meters 16900 feet Power Requirements AC 90 264 VAC 47 63 Hz DC 43 2 60 VDC Power Consumption GTR 8000 Base Radio Transmitting AC C4FM FM 470 W max H DQPSK LSM 530 W max DC C4FM FM 430 W max H DQPSK LSM 490 W max Power Consumption GPW 8000 Receiver AC 85 W max DC 50 W max Power Consumption GTR 8000 Base Radio Standby AC 110 W max DC 75 W max Channel Spacing 12 5 25 kHz Power Supply Type Switch...

Page 42: ...tortion Less than 2 at 1000 Hz Emission Designators 8K70D1W 8K10F1E 8K70D7W 8K10F7W 8K10F1D 16K0F3E 9K80D7W 11K0F3E Adjacent Channel Power Ratio 12 5 kHz offset 6 kHz BW 67 dB Tx Noise in Rx Band 145 dBc Hz Intermodulation Attenuation 80 dB Full transmitter output power is available during battery revert The output power reference plane is the output connector of the power amplifier The loss of th...

Page 43: ...ent Channel Rejection 60 dB Analog Adjacent Channel Rejection EIA603 Analog 12 5 kHz 75 dB Analog Adjacent Channel Rejection TIA603D Analog 12 5 kHz 50 or 60 dB adjustable Analog 25 kHz 80 dB Spurious and Image Response Rejection 85 dB 100 dB with preselector Analog Audio Response 1 3 dB from 6 dB per octave de emphasis 300 3000 Hz referenced to 1000 Hz at line output Analog Audio Distortion 3 or ...

Page 44: ...ase Radio GPW 8000 Receiver Industry Canada for IVD 700 and 800 MHz IC Approval Number Frequency Range Type Power Output IC Model Number 109AB T7039 Tx 851 869 MHz Rx 806 824 MHz LSM Variable 2 100 Watts average T7039 800 109AB T7039 Tx 851 869 MHz Rx 806 824 MHz C4FM FM Variable 2 100 Watts T7039 800 109AB T7039 Tx 764 770 MHz Rx 794 800 MHz LSM Variable 2 100 Watts average T7039 700 109AB T7039 ...

Page 45: ...7mm 5 25 x 19 x 18 Weight 21 kg 46 lbs base radio 16 kg 36 lbs receiver Temperature Range Operating 30 to 60 C 22 to 140 F Storage 40 to 85 C 40 to 185 F Operating Altitude Up to 1800 meters 5900 feet above mean sea level Above 1800 meters 5900 feet the derating is 1 5 C km 0 8 F 1000 feet Maximum operational altitude is 5000 meters 16900 feet Power Requirements AC 90 264 VAC 47 63 Hz DC 43 2 60 V...

Page 46: ...nternal Reference OCXO transceiver option card Aging 30 ppb yr 100 ppb 5yr Temperature 40 ppb Frequency Stability Internal Reference TCXO transceiver option card Aging 1000 ppb yr Temperature 500 ppb Frequency Stability External Reference TRAK Frequency Generation Synthesized Table 1 9 GTR 8000 Base Radio Transmitter Specifications for IV D UHF R1 380 435 MHz Transmitter Specifications Frequency R...

Page 47: ... to back of base radio is 3 at 450 MHz However the base radio software allows the transmitter output power to be set at 10 above rated value Table 1 10 GTR 8000 Base Radio GPW 8000 Receiver Specifications for IV D UHF R1 380 435 MHz Receiver Specifications Frequency Range 380 435 MHz Modulation GTR 8000 Base Radio C4FM H CPM FM Modulation GPW 8000 Receiver C4FM FM Analog Sensitivity 12 dB SINAD 12...

Page 48: ...ted Spurious 57 dBm Bit Error Rate Floor 0 01 Table 1 11 GTR 8000 Base Radio GPW 8000 Receiver FCC Identification for IV D UHF R1 380 435 MHz FCC Identification Frequency Range Type Power Output Type Acceptance Number 406 1 435 MHz Transmitter 2 110 W C4FM FM 2 100 W LSM H DQPSK ABZ89FC4821 380 435 MHz Receiver N A ABZ89FR4822 1 9 2 1 Industry Canada Table 1 12 GTR 8000 Base Radio GPW 8000 Receive...

Page 49: ...7mm 5 25 x 19 x 18 Weight 21 kg 46 lbs base radio 16 kg 36 lbs receiver Temperature Range Operating 30 to 60 C 22 to 140 F Storage 40 to 85 C 40 to 185 F Operating Altitude Up to 1800 meters 5900 feet above mean sea level Above 1800 meters 5900 feet the derating is 1 5 C km 0 8 F 1000 feet Maximum operational altitude is 5000 meters 16900 feet Power Requirements AC 90 264 VAC 47 63 Hz DC 43 2 60 V...

Page 50: ...nternal Reference OCXO transceiver option card Aging 30 ppb yr 100 ppb 5yr Temperature 40 ppb Frequency Stability Internal Reference TCXO transceiver option card Aging 1000 ppb yr Temperature 500 ppb Frequency Stability External Reference TRAK Frequency Generation Synthesized Table 1 14 GTR 8000 Base Radio Transmitter Specifications for IV D UHF R2 435 524 MHz Transmitter Specifications Frequency ...

Page 51: ...ower amplifier The loss of the transmitter output cable PA output to back of base radio 3 at 450 MHz However the base radio software allows the transmitter output power to be set at 10 above rated value Table 1 15 GTR 8000 Base Radio GPW 8000 Receiver Specifications for IV D UHF R2 435 524 MHz Receiver Specifications Frequency Range 435 524 MHz Modulation GTR 8000 Base Radio C4FM H CPM FM Modulati...

Page 52: ... 25 kHz 50 dB Spurious and Image Response Rejection 85 dB 100 dB with preselector Signal Displacement Bandwidth 1 kHz Intermediate Frequencies 1st 73 35 MHz 2nd 2 16 MHz Electronic Bandwidth Full Bandwidth Blocking Immunity 100 dB Conducted Spurious 57 dBm Bit Error Rate Floor 0 01 Table 1 16 GTR 8000 Base Radio GPW 8000 Receiver FCC Identification for IV D UHF R2 435 524 MHz FCC Identification Fr...

Page 53: ... Receiver General Specifications for IV D VHF 136 174 MHz General Specifications Model Number T7039A GTR 8000 Base Radio T7540A GPW 8000 Receiver Number of Channels trunked 1 Number of Channels conventional 16 Size H x W x D 133mm x 483mm x 457mm 5 25 x 19 x 18 Weight 21 kg 46 lbs base radio 16 kg 36 lbs receiver Temperature Range Operating 30 to 60 C 22 to 140 F Storage 40 to 85 C 40 to 185 F Ope...

Page 54: ...or Types Tx N female Rx BNC female without preselector N female with preselector Frequency Stability Internal Reference transceiver option card Aging 30 ppb yr 100 ppb 5yr Temperature 40 ppb Frequency Stability External Reference TRAK Frequency Generation Synthesized Table 1 19 GTR 8000 Base Radio Transmitter Specifications for IV D VHF 136 174 MHz Transmitter Specifications Frequency Range 136 17...

Page 55: ...amplifier The loss of the transmitter output cable PA output to back of base radio 1 at 150 MHz However the base radio software allows the transmitter output power to be set at 10 above rated value Table 1 20 GTR 8000 Base Radio GPW 8000 Receiver Specifications for IV D VHF 136 174 MHz Receiver Specifications Frequency Range 136 174 MHz Modulation GTR 8000 Base Radio C4FM H CPM FM Modulation GPW 8...

Page 56: ...le Analog FM Hum and Noise 12 5 kHz 45 dB 25 kHz 50 dB Signal Displacement Bandwidth 1 kHz Intermediate Frequencies 1st 44 85 MHz 2nd 2 16 MHz RF Input Connector with Optional Preselector N female Electronic Bandwidth Full Bandwidth Blocking Immunity 100 dB Conducted Spurious 57 dBm Bit Error Rate Floor 0 01 Table 1 21 GTR 8000 Base Radio GPW 8000 Receiver FCC Identification for IV D VHF 136 174 M...

Page 57: ...ations for GTR 8000 Base Radio for HPD 700 and 800 MHz General Specifications Model Number T7039A Number of Channels 1 Size H x W x D 133mm x 483mm x 457mm 5 25 x 19 x 18 Weight 21 kg 46 lbs Temperature Range Operating 30 to 60 C 22 to 140 F Storage 40 to 85 C 40 to 185 F Operating Altitude Up to 1800 meters 6000 feet above mean sea level Power Requirements AC 90 264 VAC 47 63 Hz DC 43 2 60 VDC Po...

Page 58: ...ut power is available during battery revert The output power reference plane is the output connector of the power amplifier The loss of the transmitter output cable PA output to back of base radio is 4 at 800 MHz However the base radio software allows the transmitter output power to be set at 10 above rated value Table 1 25 Receiver Specifications for GTR 8000 Base Radio 700 and 800 MHz HPD Receiv...

Page 59: ...Error Rate Floor 0 01 Co Channel Rejection QPSK 11 dB Reference signal is QPSK Table 1 26 FCC Identification for GTR 8000 Base Radio for HPD 700 and 800 MHz FCC Identification Frequency Range Type Power Output Type Acceptance Number 762 776 MHz Transmitter 2 50 W ABZ89FC5812 851 870 MHz Transmitter 2 50 W ABZ89FC5810 792 825 MHz Receiver N A ABZ89FR5811 1 9 5 1 Industry Canada Table 1 27 Industry ...

Page 60: ......

Page 61: ...ceiver module provides the control exciter receiver and optional transceiver option card for the base radio receiver Figure 2 1 Transceiver Module Front View The transceiver generates the station reference which typically needs to be locked on to one of many possible external sources The external source can be either the site controller TDM clocks or the external reference operating at 5 or 10 MHz...

Page 62: ... with the TCXO is traded for lower power consumption The TCXO mandates shorter maintenance intervals The TCXO transceiver option card is available in UHF R1 R2 frequency bands The TXCO is only available for non simulcast conventional systems 2 1 1 1 Transceiver Control Board The main operating software for the base radio is loaded in the XCVRs control section As the main manager for the base radio...

Page 63: ...ctor is electronically tuned to the desired receive frequency anywhere between 792 825 MHz UHF R1 380 435 MHz UHF R2 435 524 MHz or VHF 136 174 MHz 2 1 1 3 Transceiver External Interfaces The transceiver external interfaces include seven external ports a switch and LEDs If a transceiver option card is part of the transceiver there are four additional external ports See 3 4 7 Connections Front page...

Page 64: ...interface and peripheral interface The digital connection receives alarm data and the site controllers TDM signals which are used to pass reference and control data to the base radio Figure 2 5 Transceiver Module Backplane Connections Single Receiver Input An RJ 45 Ethernet port on the base radio backplane is cabled to a site LAN switch for this channel The backplane also provides an RF connection...

Page 65: ...es and Battery Type page 4 31 The power amplifier also performs functions related to the fan module including reporting of the fan module status and supplying power to the fan power bus Figure 2 6 Power Amplifier Module The power amplifier is comprised of six internal modules Core Board Converter Board Driver Amplifier Board Final Amplifier Board Distribution Board Output Circuitry 2 1 2 1 Power A...

Page 66: ...e fan speed for either fan falls below 30 of the rated speed If the fan module is used for the Power Efficiency Package the following must be configured in the CSS in order to take full advantage of the Power Efficiency Package Optional fan holdover time length of time the base radio receiver fan stays ON after transmission Disabling one of the fans within the fan module See 9 3 1 How To Replace t...

Page 67: ...2 1 4 Function of the Power Supply Figure 2 8 Fan Module 2 1 4 Function of the Power Supply Figure 2 9 Power Supply 6871022P86 A November 2012 2 7 ...

Page 68: ...s of 29 V with reference to output ground when operating from a DC source 43 2 VDC to 60VDC maximum positive or negative ground This voltage limit includes consideration of the battery charging float voltage associated with the intended supply system regardless of the marked power rating of the equipment The battery charger is not usable when operating from a DC input power source The power supply...

Page 69: ...as a redundant power input to other site components such as the site controller 2 1 4 2 Power Supply Battery Charger The power supply includes an integrated battery charger The battery charger is controlled entirely through software residing on the associated device module Software contains the information on supported battery types and obtains user specific information pertaining to the particula...

Page 70: ...ded is a 40 foot battery temperature sensor cable which attaches to a battery pack supplied by your organization and to the backplane of the device This three wire cable carries a voltage signal to the power supply from the sensor element which needs to be mounted in close proximity to the storage battery Voltage is proportional to the battery temperature and is used by diagnostic circuitry in the...

Page 71: ...the power supply when operating from a DC source Connects the charger output to the standby battery when operating from an AC input with a standby DC battery 29 VDC Provides the Main and Aux DC outputs of the power supply for use by the power amplifier transceiver and site controller Other signals handled by this connector include control interface and battery temperature interface Figure 2 11 Pow...

Page 72: ...00 800 MHz The preselector provides a first level of band pass filtering for inbound RF signals RF input and output connectors are cabled to the GTR 8000 Base Radios RF Output RxA This filter must be included to fulfill TIA102 CAAB Class A spurious response rejection 90 dB The filter is usually not required when using a receiver multicoupler system This filter can NOT be retuned in the field 2 3 2...

Page 73: ...ponse rejection 90 dB The filter is usually not required when using a receiver multicoupler system This filter can be retuned in the field Figure 2 14 Preselector VHF 2 3 4 RFDS Transmit Filter 700 800 MHz The transmit filter removes any noise in the receive sub band The Tx Output from the GTR 8000 Base Radio connects to the Transmit Filters Tx In The Transmit Filters Tx Out connects the Tx Output...

Page 74: ...e a single antenna for both transmitter and receiver Only one transmitter and receiver can be combined Figure 2 16 Duplexer 700 800 MHz 2 3 6 RFDS Duplexer UHF This optional filter provides the capability to use a single antenna for both transmitter and receiver Only one transmitter and receiver can be combined 2 14 6871022P86 A November 2012 ...

Page 75: ...gure 2 17 Duplexer UHF 2 3 7 RFDS Duplexer VHF This optional filter provides the capability to use a single antenna for both transmit and receiver Only one transmitter and receiver can be combined 6871022P86 A November 2012 2 15 ...

Page 76: ... an External Dual Circulator module which isolates the base radio from the antenna thus preventing the transmitter from generating intermodulation The circulator load dissipates reflected power It includes a cable that connects to the RF Peripherals port on the base radio backplane to provide temperature monitoring 2 16 6871022P86 A November 2012 ...

Page 77: ...n for the GTR 8000 Base Radio is an External Dual Circulator module which isolates the base radio from the antenna thus preventing the transmitter from generating intermodulation The circulator load dissipates reflected power It includes a cable that connects to the RF Peripherals port on the base radio backplane to provide temperature monitoring 6871022P86 A November 2012 2 17 ...

Page 78: ... to provide temperature monitoring 2 3 11 Antenna Relay Module The antenna relay module allows a single antenna to be used for both transmit and receive functions on a conventional GTR 8000 Base Radio The antenna relay module is controlled by a signal from the base radio transceiver module and is typically mounted on the backplane cover on the rear of the base radio or on the peripheral tray if th...

Page 79: ...and monitored through the exciter module The exciter failure should be ignored until after the antenna relay failure is corrected The failures are reported in the Status Report and UEM Figure 2 21 Antenna Relay Module Connections 2 3 11 1 Mounting Locations The antenna relay module may be installed in either of two locations On base radios not equipped with the peripheral tray the antenna relay is...

Page 80: ...GTR 8000 Base Radio Figure 2 22 Base Radio Backplane Mounting Location 2 20 6871022P86 A November 2012 ...

Page 81: ...Mounting Locations Figure 2 23 Antenna Relay Module Mounted on Backplane Cover On base radios equipped with the peripheral tray the antenna relay is mounted on the peripheral tray 6871022P86 A November 2012 2 21 ...

Page 82: ...ally closed contacts The relay coil is controlled by a signal from the transceiver module that connect to Receiver input port Rx A or the PA deck to a single transmit receive antenna Note that with the relay de energized the antenna is connected to Receiver input port Rx A To connect the antenna to the PA deck the transceiver module must energize the relay 2 22 6871022P86 A November 2012 ...

Page 83: ...2 3 11 2 Functional Operation Figure 2 25 Functional Block and Interconnect Diagram for Antenna Relay Module Bracket Mounting 6871022P86 A November 2012 2 23 ...

Page 84: ...GTR 8000 Base Radio Figure 2 26 Functional Block and Interconnect Diagram for Antenna Relay Module Peripheral Tray Mounting 2 24 6871022P86 A November 2012 ...

Page 85: ... and Guidelines page 3 7 3 A variety of tools are needed to install and service the equipment If information is needed regarding where to obtain any of the equipment and tools listed contact the Motorola System Support Center SSC See 3 3 12 General Installation Troubleshooting Tools page 3 14 for a list of general recommended tools for installing and servicing the hardware 4 Install all equipment ...

Page 86: ...ings and cautions necessary for the safe operation of all equipment Refer to the appropriate section of the product service manual for additional pertinent safety information Because of the danger of introducing additional hazards do not install substitute parts or perform any unauthorized modifications of equipment The installation process requires preparation and knowledge of the site before ins...

Page 87: ...ical energy increases the risk of a fire safety hazard Equipment shall be installed in site meeting the requirements of a restricted access location per UL60950 1 which is defined as follows Access can only be gained by service persons or by user who has been warned about the possible burn hazard on equipment metal housing Access to the equipment is through the use of a tool or lock and key or oth...

Page 88: ...is connected This equipment must be located in the same immediate area such as adjacent cabinets as any other equipment that has a connection between the earthed conductor of the same DC supply circuit and the earthing conductor and also the point of earthing of the DC system The DC system must not be earthed elsewhere The DC supply source is to be located within the same premises as the equipment...

Page 89: ...ing apparatus for moving and lifting the equipment racks In addition to these points refer to and comply with any local regulations that govern the use of lifting equipment Crush hazard could result in death personal injury or equipment damage Equipment racks can weigh up to 360 kg 800 lb Follow the instructions below for proper lifting procedures 3 2 3 1 Lifting Equipment Racks Horizontally In so...

Page 90: ...g angles using the eyenuts Figure 3 2 Lengths and Angles for Lifting Using the Eyenuts If eyenuts are removed or become loose install them properly before lifting the equipment rack Tighten the eyenuts and bolt assembly by hand Correct eyenut tightness and alignment are crucial to ensure the eyenut assembly performs to its intended lifting capacity The eyenuts must be aligned to point towards the ...

Page 91: ...uidelines for Communication Sites manual for more details including Equipment installation Antenna installation You should also review installation information specifically for GTR 8000 Base Radios and subsystems in 3 4 GTR 8000 Base Radio Hardware Installation page 3 16 3 3 1 General Site Preparation Overview Perform the activities listed in this table to ensure proper site preparation The table ...

Page 92: ...t Checklist in Appendix F as well as the Power and Grounding Checklist in Appendix D Chapter 6 External Grounding Chapter 7 Internal Ground Chapter 8 Power Sources Chapter 9 Transient Voltage Surge Suppression Schedule installation of site power Covers grounding power sources and surge protection Chapters 6 External Grounding Chapter 7 Internal Ground Chapter 8 Power Sources Chapter 9 Transient Vo...

Page 93: ...nstallation Locate the system in an area that is free of dust smoke and electrostatic discharge ESD See the Motorola Standards and Guidelines for Communication Sites manual for details on these space requirements 3 3 4 General Cabinet Bracing Recommendations Use all supplied bracing hardware when installing a rack or cabinet and secure all equipment within a rack or cabinet If additional equipment...

Page 94: ...7 Secure the cabinet or rack to the site floor with the locally procured mounting hardware If the cabinet or rack is to be secured to a concrete floor 1 2 inch grade 8 bolts with anchors are recommended 3 3 6 General Bonding and Grounding Requirements Cabinets and racks include a rack grounding bar RGB with the capacity to terminate numerous ground wires Equipment added to the cabinet or rack shou...

Page 95: ...and connectors may result in unpredictable system performance or catastrophic failure 3 3 8 General Power Guidelines and Requirements Follow the guidelines in the Motorola Standards and Guidelines for Communication Sites manual for information on providing electrical service power budgeting selecting batteries and other topics for supplying power at the site Electrical installation work shall be c...

Page 96: ...ss of multiple transmit channels each base radio power supply should have its own supply breaker The breaker recommendations for AC and DC supply breakers are as follows For a 120 VAC 60 Hz application the AC supply breaker should be rated for a continuous current of 20A For a 220VAC 50 Hz application the AC supply breaker should be rated for a continuous current of 10A minimum not to exceed 20A I...

Page 97: ...tation licensee shall be responsible for the proper operation of the station at all times and is expected to provide observations servicing and maintenance as often as may be necessary to ensure proper operation The transmitter ERP shall not exceed the maximum power specified on the current station authorization The frequency of the transmitter must be checked during initial installation of the tr...

Page 98: ...Software DB 9 Straight through serial cable RS 232 Cables with Connectors Punch Block Impact Tool MODAPT RJ 45 Breakout Box Remote RJ 11 RJ 45 Cable Tester 1200 ft length maximum PC Cable Tester RG 58 59 62 BNC RJ 45 RJ 11 DB 9 DB 15 DB 25 Centronics 36 pin connectors ESD field service kit Amprobe Instruments GP 1 Earth Tester AEMC 3730 Clamp on Ground Resistance Tester 3 3 12 2 Rack Tools The fol...

Page 99: ...et Cable Antenna tester 50 Ohm Terminated Load Rohde Schwarz NRT Z14 Directional Power Sensor 25 1000 GHz 0 1 120W Recommended for all uses when a service monitor is not available 3 3 13 Technical Support for Installation Technical support is available from the site specific documents provided by the Field Engineer or Motorola Field Representative for the system one of the Motorola System Support ...

Page 100: ...configuration and layout for the system 3 4 GTR 8000 Base Radio Hardware Installation The following is information specific to GTR 8000 Base Radios 3 4 1 Placement and Spacing Cabinet and racks allow equipment to be added to a site Always consider room for expansion when setting up a site Cabinets or racks my be installed adjacent to each other or to other equipment However all cabinets and racks ...

Page 101: ...s been secured to the floor For open racks two brackets are required to distribute the weight Without brackets the center of gravity of the system shifts to the back potentially causing structural issues with the rack The brackets come with the required number of screws Figure 3 4 Base Radio Receiver Mounted in Rack It is suggested that two people perform this installation so that one person can h...

Page 102: ...rack use hardware appropriate for the rack d Attach the brackets to both sides of the rack through the upper back openings on the brackets e Attach the brackets to the rack on both sides through the lower back openings 5 In the front attach the chassis to the brackets a Screw two M6x1x10 thread forming screws black finish through the front holes on one side of the chassis and into the bracket b Sc...

Page 103: ...000 Base Radio GPW 8000 Receiver Specifications page 1 12 To determine the maximum length of wire for wire other than 2 AWG the following relationship can be used Length meter feet V I R where V voltage drop in one leg of the loop max 0 5V I current drawn by the base radio during DC operation R resistance of the wire being considered in Ohms per foot For common wire sizes the maximum distances sho...

Page 104: ... where V voltage drop in one leg of the loop max 0 5V I current drawn by the base radio during DC operation 9 5A R resistance of the wire being considered in Ohms per foot For common wire sizes the maximum distances shown in Table 3 4 apply Table 3 4 Power Connection Wire Gauge Maximum Distances for HPD AWG Resistance ohm 1000 ft Maximum Distance 2 0 1563 102m 335 ft 3 0 1970 81m 265 ft 4 0 2485 6...

Page 105: ...ing charged There are two examples of mounting Example 1 Use cable ties to attach the sensing cable to the positive or negative power cable A minimum of two cable ties should be used spaced 6 inches apart with one of the cable ties not more than 2 inches from the sensing element The sensing element itself should be not more than 2 inches from the battery post where the power cable connects See Fig...

Page 106: ...battery system either positive or negative at the battery The DC input battery charger output of the power supply is floating with respect to earth ground The power supply can therefore be used in either positive ground or negative ground DC systems The appropriate terminal or of the DC system should be connected to protective earth at the battery These instructions assume that all telephone lines...

Page 107: ...rounding bar on the other The rack grounding bar is connected to the master ground bus bar To use the grounding lugs you need a length of 6 AWG wire with UL listed ring lugs on both ends This wire is shipped with the base radio Figure 3 7 Rack Grounding 3 4 4 1 How to Ground Base Radio Receiver Procedure Steps 1 Take the ground wire already attached to the two grounding lugs at the rear of the bas...

Page 108: ...eive line A BNC RF coax to receive path for antenna A Rx B BNC Receive line B BNC RF coax to receive path for antenna B This port is used for dual diversity for TDMA Rx C Not in use Transmit port N type Transmit line N type RF coax to transmit antenna Aux Pwr Output Comparator Aux Pwr Input Connection to a conventional comparator for a conventional base radio Bat Temp 6 pin Battery temperature sen...

Page 109: ... power source Input from 120 240 VAC nominal power source EXT FREQ REF TRAK 9100 BNC 1 In an Analog or ASTRO 25 simulcast configuration this input is connected to an external reference signal source to drive an internal oscillator for precise frequency stability The source can be 5 MHz or 10 MHz 2 In an ASTRO 25 simulcast configuration it is used as an input connected to an external reference whic...

Page 110: ...4 6 Connections Rear HPD The base radio connects with each of the site controllers and to the transmit and receive paths Figure 3 9 Base Radio HPD Backplane Table 3 6 Base Radio Backplane Connections for HPD Port Type Device it connects to Port Type Description SC A port RJ 45 Site Controller module A Base radio port RJ 45 Connects to site controller A base radio port for this channel The length o...

Page 111: ... Batt DC Input from and output to a 48 VDC power supply or backup battery Input from and output to a 48 VDC power supply or backup battery When AC power is not available the device switches to operate from a DC source if the optional DC power 8AWG length 9 ft CA01400AA is ordered and installed One end connects into the Batt DC port and the other end connects into the DC source The contacts are 39 ...

Page 112: ...interfaces and wild card I Os Table 3 7 Transceiver Connections Front XCVR Port Type Connects to This Device Port Description Ethernet service port RJ 45 Service PC LAN port Ethernet service port for local access using Configuration Service Software CSS Also may be used for localized software downloads Supports only 10 Mb half duplex operation Serial service port DB 9 Service PC RS 232 port Serial...

Page 113: ...U01 Landline equipment RJ 45 port Connection between telephone lines and the analog conventional base radio The wireline processes and routes all wireline audio signals between the base radio and landline equipment such as consoles or modems Wireline port RJ 45 MLC 8000 RJ 45 port E M interface for 4 wire connections for analog operation System Connector mini SCSI 50 pin Telco Connector Connection...

Page 114: ...hat the base radio receiver can be IP managed while using the 2 or 4 wire V 24 interface for channel traffic 3 4 7 1 System Connector Ports Conventional The system connector is a 50 pin Mini SCSI connector It is used for the Wildcard inputs outputs and the analog audio paths not routed to their own connector Table 3 8 50 Pin System Connector Pin Outs Conventional Pin Signal Type Function Note 1 Au...

Page 115: ...x Out Relay 10 Com Output Form Relay A Closed When Active 18 Aux Out 11 Output Low Impedance to Ground When Active 19 External_Reset Input Reset Buffered Input Pull To Ground To Activate 20 TSTAT Output For future use 0 Volts When Inactive 5 Volts when Active 21 AUX RX Output Aux Rx Analog Signal Unbalanced 22 TX DATA Input For future use Analog Signal 600 Ohm Balanced 23 AUX TX Input Out put Aux ...

Page 116: ...ive Form Relay A Closed When Active 40 Aux Out Relay 8 N O Output Main Standby Antenna Relay Form Relay A Closed When Active 41 Aux Out Relay 9 N O Output Form Relay A Closed When Active 42 Aux Out Relay 10 N O Output Form Relay A Closed When Active 43 GND GND 44 GND GND 45 RSTAT Output For future use 0 Volts When Inactive 5 Volts when Active 46 GND GND 47 TX DATA Input For future use Analog Signa...

Page 117: ...and can accommodate up to 8 pins Table 3 9 Wireline Port Pin Outs Signal Name Pin 2 Wire Connection 4 Wire Connection Auxiliary 4 Wire Connection Line2_ 1 Input Output Output Line2_ 2 Input Output Output Line3_ 3 Input Line1_ 4 Input Line1_ 5 Input Line3_ 6 Input Line4_ 7 Output Line4_ 8 Output Figure 3 12 Wireline Port Pin Outs 6871022P86 A November 2012 3 33 ...

Page 118: ... 2 MIC_PTT 3 MIC_AUDIO 4 GND 5 Reserved 6 Reserved 7 Reserved 8 Figure 3 13 Microphone Port Pin Outs 3 4 7 4 Speaker Port Pin Outs The Speaker port in an RJ 9 connector that provides the interface to an external speaker To prevent damage to the base radio use HSN1006A speaker with 0185180U01 cable Table 3 11 Speaker Port Pin Outs Signal Name Pin GND 1 12 V 2 GND 3 Speaker Out 4 3 34 6871022P86 A N...

Page 119: ...Part 68 Information This section applies when the base radio receiver is equipped with the optional wireline interface circuitry contained on the OCXO Transceiver Option Card Option CA01506AA or TCXO Transceiver Option Card Option CA01953 The TCXO Transceiver Option Card is used in base radios for the Power Efficiency Package option This equipment complies with Part 68 of the FCC rules and the req...

Page 120: ...ompany may request that your organization disconnect the equipment until the problem is resolved None of the circuit boards in this equipment are field repairable For assistance in sending the boards back for repair see 8 5 Using Motorola System Support Center SSC page 8 8 This equipment cannot be used on public coin phone service provided by the telephone company Connection to party line service ...

Page 121: ...n Prerequisites When and where to use This process provides a list of items you need to have access to before you can complete the device software installation and begin the configuration procedures in the Configuration chapter Process Steps 1 Transfer and install new software to a comparator using Software Download Manager See 3 7 Using Software Download page 3 39 2 Make sure that the ASTRO 25 sy...

Page 122: ...kup SYSLOG Service Name Fully Qualified Domain Name FQDN RADIUS FQDN parameter value RADIUS Row Status parameter value RADIUS Service Time Out sec parameter value RADIUS Service Retransmits Attempts parameter value RADIUS Service Dead Timer min parameter value RADIUS Specific Key parameter value RADIUS Service Global Key parameter value 5 Ensure that you have the default credentials local accounts...

Page 123: ...onfigurator manual Securing Protocols with SSH manual 3 7 Using Software Download The Software Download SWDL is an application that can transfer only install only or transfer and install new software to devices The new software can be installed either locally at a site or on the Network Management subsystem Individual devices not connected to the system can be downloaded using single device mode D...

Page 124: ...e while the other bank is inactive The transfer of the software using SWDL is a background process that loads the software into the inactive bank The site controller or RDM executes the software in one bank while software is simultaneously downloaded to the inactive bank This is done in the background without interruption of services at the site An install causes the site controller to reset and a...

Page 125: ...UNC See the Unified Network Configurator manual to perform single device software downloads ruthless download to the devices 3 8 Device Installation Using the UNC When and where to use The Unified Network Configurator UNC is the Network Manager used to discover a device and load Operating System images This process lists the basic steps involved using the UNC on the base radio UNC is not applicabl...

Page 126: ...ified Network Configurator UNC Once the device is installed configured through the CSS and security parameters are enabled follow this procedure to discover the device The configuration information can then be updated using this configuration management application The UNC network management solution consists of two applications Both the UNC Wizard and the VoyenceControl applications are used in t...

Page 127: ... to the UNC from the NM client by entering http ucs unc0 Y ucs where Y is the number of the UNC server 01 for primary core UNC server and 02 for backup core UNC server Step result The UNC client launches and a login dialog box appears 9 Type the administrative username and password Click OK Step result VoyenceControl launches The names EMC Ionix Network Configuration Manager and VoyenceControl are...

Page 128: ...Motorola device OS Image CDs Locate the Transport OS Image media that is packaged with the Network Management DVDs When and where to use This procedure loads the Operating System OS images for the devices for distribution through the Unified Network Configurator UNC Once OS images are distributed to the UNC you can update the device s CSS configuration files to the UNC 3 44 6871022P86 A November 2...

Page 129: ... stops blinking press ENTER Step result The OS images load on the UNC 6 Select View OS Images from the menu Press ENTER Step result The device software image appears 7 Select Eject CD from the menu Press ENTER Step result The media ejects from the drive on server 8 Remove the OS Image CD from the CD DVD ROM drive of the server 9 To log out of the server Press ENTER Step result The User Configurati...

Page 130: ...Select Unix Administration from the menu Press ENTER Step result The Unix Administration menu appears 3 Select FTP Services from the menu Press ENTER Step result The FTP Services menu appears 4 Select Enable FTP service from the menu Press ENTER Step result The FTP Services are enabled and available for software transfer and install operations 3 8 3 2 Transferring and Installing the OS Image When ...

Page 131: ... where Y is the number of the UNC server 01 for primary core UNC server and 02 for backup core UNC server Step result Internet Explorer opens to the URL of the application server and a VoyenceControl client session launches with the welcome page Figure 3 15 VoyenceControl Welcome Page The names EMC Ionic Network Configuration Manager and VoyenceControl are used interchangeably for this product 687...

Page 132: ...window Figure 3 16 VoyenceControl Login Window 3 Enter the User ID and Password Click OK Step result The VoyenceControl Dashboard appears Figure 3 17 VoyenceControl Dashboard 4 In the left navigation pane expand Networks ASTRO 25 Radio Network then Views Step result The list of options expands 3 48 6871022P86 A November 2012 ...

Page 133: ...vigation pane select one or more devices from the same device class right click the selections then choose Update OS Image from the menu Step result The Select OS Image window appears 9 Select Software Image Click Next Step result The Update OS Image window appears 10 Select each device that appears in the Selected Devices section Step result This associates a version to a device instance In most ...

Page 134: ...software is transferred and then installed There are up to two resets of the device during installation 15 Click Schedule Step result The Schedule Push Job window appears 16 Configure the schedule information Click Approve and Submit Step result This approves the job and you can view it in the Schedule Manager window If you choose Submit you are asked to approve the job later 17 Verify the job sta...

Page 135: ...rectly within the Device view 3 Choose the Configuration tab then the Hardware tab 4 Double click the Chassis object from the Physical Hardware properties Step result The Chassis property tree expands 5 View the following properties and their values Bnk1 device Transferred software in bank 1 Bnk2 device Transferred software in bank 2 device Installed and Running Software The Table format can be us...

Page 136: ...ion menu appears 3 Select FTP Services from the menu Press ENTER Step result The FTP Services menu appears 4 Select Disable FTP service from the menu Press ENTER Step result The FTP Services are disabled and unavailable for software transfer and install operations 5 Back out of the menus by pressing q three times 6 At the prompt enter exit to return to the previous menu 7 Enter exit again Step res...

Page 137: ...ogs of the equipment at the site See the CSS Online Help for configuration details UNC Wizard is a component of UNC and is used to configure the parameters of a site subsite and channel See the UNC Wizard Online Help for configuration details VoyenceControl is a component of UNC and can be used to pull and push configurations and configure the parameters of the device See the Unified Network Confi...

Page 138: ...K when the pop up window appears For configuration details see the Information Assurance Features Overview Software Download and SNMPv3 manuals See Figure 4 1 Figure 4 1 SNMPv3 Security Level Option Prompt A pop up window appears displaying the File Transfer Access Services for Configuration Service Software CSS This logon is used when communicating to a device through CSS using either an Ethernet...

Page 139: ... Set IP Address from the CSS menu 4 4 1 Initial Configuration of a Device Using CSS Process Steps 1 Perform the following configuration steps that require a serial connection See 4 4 2 Connecting Through a Serial Port Link page 4 4 a Set the IP address and paring number of the device See 4 4 3 1 Setting the Device IP Address and Pairing Number Using CSS page 4 7 b Set the serial security services ...

Page 140: ...e Centralized Authentication using the CSS See Chapter 7 Enabling Disabling Centralized Authentication Using CSS in the Authentication Services manual k Set the Local Cache Size for Centralized Authentication using the CSS See Chapter 7 Setting the Local Cache Size for Central Authentication Using CSS in the Authentication Services manual l Customize the login banner text using CSS optional See 4 ...

Page 141: ...creen dialog box appears 4 Select Serial on the Connection Type field Step result The Serial Settings on the dialog box become enabled 5 Select the communication port in the Serial Port field that matches the one selected on the PC 6 In the Baud Rate field select the baud rate with which you want to communicate with the device Baud Rate 19200 7 Click Connect A login password prompt screen opens Pr...

Page 142: ...Elevated Privileges Password field is active Type the Elevated Privileges Password that was set up for this device See 4 4 3 3 1 Setting the Serial Security Services Using CSS page 4 9 to configure Authentication Services on the device 8 Click OK to close the dialog box Step result The blank CSS main window appears The Service menu is not available until you read the configuration file from the de...

Page 143: ...leges password to configure the site devices before proceeding The user credentials information includes both the current and new credentials Without the current credentials you cannot access the device and cannot change the user credentials See 8 2 4 2 Resetting Passwords and SNMPv3 Passphrases page 8 6 Setting or changing the device s IP Address causes the SNMPv3 configuration and user credentia...

Page 144: ...ng in a voting multicast or IP simulcast configuration base radios and receivers must be paired to comparators using the BR_CM Pairing Number The BR_CM Pairing Number for both the base radio receiver and comparator is used to create an IP multicast group that allows the base radio receiver and comparator to talk to each other The base radio receiver listens for messages that the comparator sends i...

Page 145: ... is verified against the stored password for these accounts Built in logins and passwords RF site devices support built in login password combinations for login by services such as Software Downloads SWDL Only certain SWDL login names are authenticated in this way Centralized Authentication For authentication through centralized accounts instead of Local Service Elevated Privileges and built in us...

Page 146: ...ce Account or Elevated Privilege from the drop down list and click Update password Step result A Change Account Password dialog box opens 7 Enter the old password then enter a new password and confirm the new password before clicking Change Password 8 Click OK to save the new password Step result The Change Account Password dialog box closes 4 4 3 4 Resetting SNMPv3 User Credentials to Factory Def...

Page 147: ...ites This procedure assumes CSS is loaded on the computer See the Private Network Management Client manual if necessary or see the instructions in the CSS CD ROM jewel box for instructions on loading the CSS on the laptop or computer When and where to use Use the Ethernet port link to configure All CSS parameters for the device Procedure Steps 1 Connect a computer either laptop or desktop to a dev...

Page 148: ...2 Continue with step 6 Trunked Device Do not know the IP address but know the system identification of the device the zone site subsite and device ID of the device 1 Click Fetch DNS Entry to open the DNS IP Address Calculation Screen dialog box 2 Select the desired device type from the Device list box 3 Enter the proper values in the Zone Site Subsite and Device ID fields Some fields such as Subsi...

Page 149: ...ed directly to the Ethernet service port of the device click Front Panel Ethernet 7 Click Connect to make the connection Step result If this is an SNMPv3 capable device a Passphrase Prompt screen opens Skip to step 9 Figure 4 4 SNMPv3 Security Level Option Prompt For Windows XP computers If after clicking Connect a comm Error is encountered when connecting to the front panel Ethernet port on a bas...

Page 150: ...nt cache that are cleared c Reconnect the Ethernet cable to the front panel Ethernet port if not connected 9 In the SNMPv3 Security Level Option Prompt enter the User Information and Passphrase Information Click OK If Authentication Services are not enabled on a device click OK when the window appears See 4 4 5 3 Changing SNMPv3 Configuration and User Credentials Using CSS page 4 15 to configure o...

Page 151: ...n Service Software CSS through an Ethernet port link See 4 4 4 Connecting Through an Ethernet Port Link page 4 11 2 Select Tools Set Device Date and Time from the menu 3 Enter the current date and time Click OK Step result The date and time is set 4 4 5 3 Changing SNMPv3 Configuration and User Credentials Using CSS Prerequisites Ensure that you have the required SNMPv3 credentials information Auth...

Page 152: ...ng the device for the first time if the default passphrases do not work the passphrases may have been set to default values by a different system release of software See the Reset SNMPv3 Configuration Serial screen in the CSS Online Help to reset the passphrases to the current software release defaults 4 If connecting remotely through the network to a different device enter the Device IP Address f...

Page 153: ...hange or update the SNMPv3 security level for the selected user select the security level from the Security Level list in the User Information form of the Configure SNMPv3 Users dialog box The security level options are NoAuthNoPriv Neither the Authentication Passphrase nor Encryption Passphrase is needed for communicating with the device AuthNoPriv Authentication Passphrase is needed but no Encry...

Page 154: ... Configure SNMPv3 Users dialog box If you do not know the passphrase click the I do not remember old passphrase check box 12 Type the new passphrase into the New Passphrase field then type the same new passphrase into the Confirm New Passphrase field 13 To change the Authoritative Engine Identifier applicable to MotoInformA and MotorInformB users only select the desired current engine ID from the ...

Page 155: ...ears and processes the request A green square indicates OK and a red square indicates failure 4 After reviewing the processing status click OK If you encounter any errors go back to the appropriate step and correct the information entered 5 Repeat these steps for any SNMPv3 users you wish to create update or delete 6 Click Cancel to exit the Configure SNMPv3 Users dialog box Step result The Config...

Page 156: ...he Fully Qualified Domain Name FQDN for server s on the Network Security Configuration window in CSS Using Table 4 1 enter the IP addresses for the primary secondary and tertiary DNS servers for this device Table 4 2 is used only when configuring a conventional device Table 4 1 DNS Nameservers for Devices in Dynamic System Resilience and Non Dynamic System Resilience Sites To configure on a device...

Page 157: ...S Troubleshooting chapter in the Authentication Services manual 4 4 5 4 1 How to Configure DNS Using CSS Procedure Steps 1 Verify that you have IP addresses for a Primary Secondary and or Tertiary DNS Server IP Contact your system administrator for this information if you do not have it before continuing to step 2 2 Connect to the device using Configuration Service Software CSS through an Ethernet...

Page 158: ... in completing the Requested DNS Domain Name click DNS Service Wizard 8 In the Requested DNS Host Name field enter up to 63 alphanumeric characters for the network in which this device resides A Requested DNS Domain Name must be entered for this field to be active This field is available only when configuring a conventional device AND a Requested DNS Domain Name has been entered For assistance in ...

Page 159: ...er 5 Click one of the following Refresh To re read the original Login Banner text Apply To save your changes and keep the screen open OK To save your changes and close the screen Cancel To close the screen without saving your changes 4 4 5 6 Setting the SWDL Transfer Mode Using CSS Sets the SWDL transfer mode prior to performing a Software Download on the device When and where to use Follow this p...

Page 160: ...e Sftp 4 4 5 7 Setting the NTP Server Settings Network Time Protocol NTP provides a clock synchronization mechanism for various Network devices and computers To allow the NTP server to provide date and time synchronization for a particular device the NTP server s IP address must be entered on the Manager NTP Definition Screen For security purposes the base radio can restrict NTP messages to only t...

Page 161: ...ick the Password Configuration element Step result The Password Configuration window appears Figure 4 7 Password Configuration Window 3 Complete the following fields Minimum Password Length This field allows you to enter a value as the minimum length for the Password The minimum can be between 8 and 255 characters with a default of 10 characters Number of Required Special Characters This field all...

Page 162: ...cal password can be changed The default value is 1 4 4 6 CSS Configuration Parameters for the GTR 8000 Base Radio Trunked Simulcast Prerequisites Before proceeding with this process complete the initial configuration of the device in 4 4 1 Initial Configuration of a Device Using CSS page 4 3 For configuration parameters on each field for a trunked simulcast GTR 8000 Base Radio see Multi Site or Si...

Page 163: ...on changes to a local or network drive so that if the base radios transceiver module fails you can load your settings to a replacement base radio transceiver If the configuration file is not saved to a local or network drive you will need to repeat the setup steps after replacing a transceiver module 10 Write the configuration data to the base radio as follows Select File Write Configuration to De...

Page 164: ... complexity and controls see Password Configuration in CSS Online Help 8 Select File Save As from the menu to save the configuration data to a new archive file or select File Save from the menu to overwrite the existing archive file Be sure to save any configuration changes to a local or network drive so that if the base radios transceiver module fails you can load your settings to a replacement b...

Page 165: ...ervices manual For configuration details for SYSLOG Services see the Centralized Event Logging manual 7 Click Password Configuration in the System tree and complete the fields Password Configuration is only required if you have passwords entered for local accounts This sets the password complexity and controls For details on password complexity and controls see Password Configuration in CSS Online...

Page 166: ...radio See 4 4 4 Connecting Through an Ethernet Port Link page 4 11 2 Click Site in the System tree and complete the fields 3 Click Hardware Configuration in the System tree and complete the fields on the two tabs As part of RMC configuration you will need to set the DIP switches on the RMC LNA modules See 4 4 11 Setting RMC System Gain page 4 32 4 Click Options in the System tree and complete the ...

Page 167: ...from the menu to save the configuration data to a new archive file or select File Save from the menu to overwrite the existing archive file Be sure to save any configuration changes to a local or network drive so that if the base radio fails you can load your settings to a replacement base radio If the configuration file is not saved to a local or network drive you will need to repeat the setup st...

Page 168: ...kup Watts 7 Select the Battery Type manufacturer and model or select the generic listing for the class of battery 8 Select File Save or File Save As from the menu to save the configuration to an archive on your local or network drive 9 Select File Write Configuration to Device from the menu to write the configuration to the device 4 4 11 Setting RMC System Gain When and where to use The RMC system...

Page 169: ...ield 8 Save your RMC configuration to an archive on your local or network drive by selecting File Save or File Save As from the menu 9 Write the configuration data to the base radio by selecting File Write Configuration to Device from the menu Step result The resulting system gain is automatically used by the RMCs In addition an appropriate transceiver attenuation is automatically calculated and s...

Page 170: ...Control in the Authentication Services manual 4 Set the Local Cache Size for Centralized Authentication for the device See Chapter 7 Setting the Local Cache Size for Central Authentication on RF Site and VPM Devices Using VoyenceControl in the Authentication Services manual 5 Enable Disable Centralized Authentication for the device See Chapter 7 Enabling Disabling Centralized Authentication on RF ...

Page 171: ...to make this alignment should be accurate to within 1 ppb This accuracy typically requires test equipment with a double oven or a Rubidium reference oscillator The base radio or receiver must be turned on for at least one week before the internal frequency reference oscillator is aligned The internal frequency reference oscillator for an OCXO transceiver option card must be aligned Upon installati...

Page 172: ... 5 3 Vpp 100 kohms AC coupled 25 modulation 1pps arrives on 75 duty cycle 1 PPS 1 PPS Pulse 2 6 5 3 Vpp 100 kohms DC coupled Front Panel Ext Freq Ref 5 MHz Sine 2 5 Vpp 10 18 dBm 50 ohms AC coupled Front Panel Ext Freq Ref 5 MHz Square 45 55 duty cycle 50 ohms AC coupled Front Panel Ext Freq Ref 10 MHz Sine 2 5 Vpp 10 18 dBm 50 ohms AC coupled Front Panel Ext Freq Ref 10 MHz Square 45 55 duty cycl...

Page 173: ...ified ASTRO 25 simulcast transmit offset delay value applies only to ASTRO 25 simulcast subsystems and is considered optional The default offset value is 0 zero causing no adjustment to the launch time specified by the arriving timestamp value For Analog Simulcast the Transmit Offset Delay merely delays the Analog Simulcast Audio to provide the adjustment in the overlap coverage areas See Base Rad...

Page 174: ...equipped with tuning slugs to adjust the passband corresponding to the operating frequency s of the base radio The preselector assembly must be field tuned if replaced in the field or if the base radio operating frequency s are modified Tuning for best SINAD or BER response DOES NOT result in optimum tuning of the preselector assembly You must use this field tuning procedure to obtain optimum pres...

Page 175: ...btract 250 kHz Otherwise note the actual frequency Step example If the base radio receive frequency is 138 575 MHz subtract 250 kHz because the frequency is less than 148 MHz 138 575 MHz 250 kHz 138 325 MHz 3 If the preselector is Range 1 136 154 MHz determine the alignment frequency as follows If frequency from Step 2 is 152 MHz then alignment frequency 152 MHz Otherwise use actual frequency from...

Page 176: ...gle Receive Frequency page 5 5 or 5 8 1 1 2 Calculating The VHF Alignment Frequency for Multi Receive Frequencies page 5 5 is greater than 148 MHz Range 1 or 156 MHz Range 2 turn the five tuning screws clockwise until 1 8 protrudes past each of the tension nuts b If the alignment frequency is less than or equal to 148 MHz Range 1 or 156 MHz Range 2 turn the five tuning screws counterclockwise unti...

Page 177: ...5 8 1 3 VHF Tuning Procedure Figure 5 1 Preselector Tuning VHF 6871022P86 A November 2012 5 7 ...

Page 178: ...ust tuning screw 4 for a DIP 7 Insert tuning probe into cavity H4 Decrease output from signal generator to 5 dBm 8 Adjust tuning screw 5 for a DIP Then turn tuning screw 5 an additional 1 4 turn counterclockwise Note that DIP will not be as sharp for screw 5 as it was for screws 2 through 4 5 8 2 UHF Tuning Procedures 5 8 2 1 Calculating Proper UHF Alignment Frequency Use either 5 8 2 1 1 Calculat...

Page 179: ...equency as follows If the frequency from Step 1 is 468 MHz then alignment frequency 468 MHz If frequency from Step 1 is 440 MHz then alignment frequency 440 MHz Otherwise use actual frequency from Step 1 4 If the base radio receiver is 470 524 MHz determine the alignment frequency as follows If the frequency from Step 1 is 518 MHz then alignment frequency 518 MHz If frequency from Step 1 is 472 MH...

Page 180: ...unctional station cage equipped with a power supply module 2 Using the torque driver and deep well socket loosen the three tension nuts on the adjustment screws 3 Detune the preselector by turning tuning screws 3 and 4 clockwise until they bottom out Be careful not to apply more than 3 in lbs of torque to prevent warping preselector cover and housing 4 See Figure 5 2 5 8 2 3 UHF Tuning Procedure S...

Page 181: ...5 8 2 3 UHF Tuning Procedure Figure 5 2 Preselect Tuning UHF 6871022P86 A November 2012 5 11 ...

Page 182: ...rew 4 for a DIP 9 Tighten tension nut on tuning screw 4 to at least 12 in lb and fine tune tuning screw 4 for a DIP 5 9 Tuning a Duplexer Duplexer modules shipped with base radios are tuned at the factory If a duplexer must be replaced in the field the unit must be installed and tuned specifically to the transmit and receive frequency pair for the particular base radio 5 9 1 Field Tuning Overview ...

Page 183: ...er Boonton 92E or equivalent 50 Ohm N type terminator Tuning tool 5 32 x 4 screwdriver UHF Male to Females N Type T connector UG 107B U or equivalent VHF Slotted screwdriver VHF 3 32 Allen wrench VHF Tuning tool thin blade VHF N to N bullet connector UG29A U or equivalent 7 16 Nutdriver UHF 7 16 Open End Wrench UHF N to BNC Adapter UG349A U N to N Connector UG57B U 5 9 3 Tuning a 700 800 MHz Duple...

Page 184: ...ng Up for Tuning a VHF Duplexer Perform the tasks in 5 9 4 1 1 How To Set Up Tuning The VHF Duplexer page 5 15 prior to tuning the VHF duplexer module See Figure 5 3 Figure 5 3 VHF Duplexer Tuning Setup 5 14 6871022P86 A November 2012 ...

Page 185: ...the 6 N type connectors from each cavity 2 For each cavity unscrew and remove trimmer screw dust covers 9 3 Use an Allen wrench and loosen the tuning rod locking screws 6 5 9 4 2 Tuning VHF Duplexer Low Pass Resonators Figure 5 4 Test Equipment Set Up for Tuning VHF Duplexer Low Pass Resonator 6871022P86 A November 2012 5 15 ...

Page 186: ...4 2 Push or pull tuning rod for cavity 1 to obtain a PEAK reading on the millivoltmeter 3 Use the Allen wrench and tighten locking screw 4 Repeat steps 2 and 3 for cavities 2 and 3 5 9 4 3 Tuning VHF Duplexer High Pass Resonators Figure 5 5 Test Equipment Set Up for Tuning VHF Duplexer High Pass Resonator 5 16 6871022P86 A November 2012 ...

Page 187: ...in Figure 5 5 2 Push or pull tuning rod for cavity 4 to obtain a PEAK reading on the millivoltmeter 3 Use the Allen wrench and tighten locking screw 4 Repeat steps 2 and 3 for cavities 5 and 6 5 9 4 4 Tuning VHF Duplexer High Notch Loop Assemblies Figure 5 6 Test Equipment Set Up for Tuning VHF Duplexer High Notch Loop Assemblies 6871022P86 A November 2012 5 17 ...

Page 188: ... cavity 1 to obtain minimum reading on millivoltmeter Adjust trimmer screws equally to obtain minimum Reduce the range on the millivoltmeter as necessary to reach true minimum reading 3 Repeat steps 1 and 2 for cavities 2 and 3 5 9 4 5 Tuning VHF Duplexer Low Notch Loop Assemblies Figure 5 7 Test Equipment Set Up for Tuning VHF Duplexer Low Notch Loop Assemblies 5 18 6871022P86 A November 2012 ...

Page 189: ...tool to adjust trimmer screws for cavity 4 to obtain minimum reading on millivoltmeter Adjust trimmer screw to obtain minimum Reduce the range on the millivoltmeter as necessary to reach true minimum reading 3 Repeat steps 1 and 2 for cavities 5 and 6 5 9 4 6 Verifying VHF Duplexer Insertion Loss Figure 5 8 Verifying VHF Duplexer Insertion Loss Connecting Test Equipment 6871022P86 A November 2012 ...

Page 190: ...GTR 8000 Base Radio Figure 5 9 Verifying VHF Duplexer Insertion Loss Connecting Duplexer Cable Assembly 5 20 6871022P86 A November 2012 ...

Page 191: ...n the millivoltmeter 5 Subtract the absolute number noted in step 2 from the number noted in step 4 The difference should be less than 1 3 dB to meet specification for Insertion Loss 6 Repeat steps 1 through 5 for Low Pass High Notch cavities with the following exceptions a Set the service monitor to Rx or Tx frequency whichever is LOWER b Connect service monitor to Low Pass duplexer input cavity ...

Page 192: ...GTR 8000 Base Radio Figure 5 11 Verifying VHF Duplexer Isolation Connecting Duplexer Cable Assembly 5 22 6871022P86 A November 2012 ...

Page 193: ...High Notch cavities with the following exceptions a Set service monitor tor Rx or Tx frequency whichever is HIGHER b Connect service monitor to Low Pass duplexer input cavity 1 c Connect terminator to cavity 6 5 9 4 8 VHF Duplexer Post Tuning Checks Procedure Steps 1 Make sure all locking screws are tight Re install dust covers on all trimmer capacitors 2 Make sure all tuning rod locking screws 6 ...

Page 194: ...GTR 8000 Base Radio 5 9 5 1 Setting Up for Tuning a UHF Duplexer Figure 5 12 UHF Duplexer Tuning Setup 5 24 6871022P86 A November 2012 ...

Page 195: ...1 Disconnect N type connectors 12 and remove cables 6 from cavities See Figure 5 12 2 For each cavity 6 use open end wrench and loosen locknuts 2 per cavity 5 9 5 2 Tuning UHF Duplexer Low Pass Resonators Figure 5 13 Test Equipment Set Up for Tuning UHF Duplexer Low Pass Resonator 6871022P86 A November 2012 5 25 ...

Page 196: ... screw for cavity 1 to obtain a PEAK reading on the millivoltmeter 3 Use an open end wrench and tighten lock nut carefully making sure pass adjustment screw does not shift position 4 Repeat steps 2 and 3 for cavities 2 and 3 5 9 5 3 Tuning UHF Duplexer High Pass Resonators Figure 5 14 Test Equipment Set Up for Tuning UHF Duplexer High Pass Resonator 5 26 6871022P86 A November 2012 ...

Page 197: ...s adjustment screw for cavity 4 to obtain a PEAK reading on the millivoltmeter 3 Use an open end wrench and tighten lock nut carefully making sure pass adjustment screw does not shift position 4 Repeat steps 2 and 3 for cavities 5 and 6 5 9 5 4 Tuning UHF Duplexer High Notch Loop Assemblies Figure 5 15 Test Equipment Set Up for Tuning UHF Duplexer High Notch Loop Assemblies 6871022P86 A November 2...

Page 198: ...ing on the millivoltmeter Reduce the range on the millivoltmeter as necessary to reach true minimum reading 3 Use an open end wrench and tighten lock nut carefully making sure notch adjustment screw does not shift position 4 Repeat steps 2 and 3 for cavities 2 and 3 5 9 5 5 Tuning UHF Duplexer Low Notch Loop Assemblies Figure 5 16 Test Equipment Set Up for Tuning UHF Duplexer Low Notch Loop Assemb...

Page 199: ...y 4 to obtain a minimum reading on the millivortmeter Reduce the range on the millivoltmeter as necessary to reach true minimum reading 3 Use an open end wrench and tighten lock nut carefully making sure notch adjustment screw does not shift position 4 Repeat steps 2 and 3 for cavities 5 and 6 5 9 5 6 Verifying UHF Duplexer Insertion Loss Figure 5 17 Verifying UHF Duplexer Insertion Loss Connectin...

Page 200: ...GTR 8000 Base Radio Figure 5 18 Verify UHF Duplexer Insertion Loss Connecting Duplexer Cable Assembly 5 30 6871022P86 A November 2012 ...

Page 201: ...wn on the millivoltmeter 5 Subtract the absolute number noted in step 2 from the number noted in step 4 The difference should be less than 1 3 dB to meet specification for Insertion Loss 6 Repeat steps 1 through 5 for Low Pass High Notch cavities with the following exceptions a Set service monitor to Rx or Tx frequency whichever is LOWER b Connect millivoltmeter to Low Pass duplexer input cavity 1...

Page 202: ...GTR 8000 Base Radio Figure 5 20 Verifying UHF Duplexer Isolation Connecting Duplexer Cable Assembly 5 32 6871022P86 A November 2012 ...

Page 203: ...itor to Low Pass duplexer input cavity 1 c Connect terminator to cavity 6 5 9 5 8 UHF Duplexer Post Tuning Checks Procedure Steps 1 Make sure all notch adjustment lock nuts 6 are tight 2 Make sure all pass adjustment lock nuts 6 are tight 5 10 Testing the GTR 8000 Base Radio GPW 8000 Receiver Performance with a Service Monitor for Integrated Voice and Data The service monitor is a tool used to tes...

Page 204: ...nly 5 the allowable spread in the measured deviation should only be 5 and not 10 Table 5 2 Deviation Standards for ASTRO 25 System Test Patterns Signal Minimum Deviation Nominal Deviation Maximum Deviation low signal deviation 0 84 kHz 0 93 kHz 1 02 kHz sow signal wide pulse deviation undetermined 1 00 kHz undetermined standard deviation 2 55 kHz 2 83 kHz 3 11 kHz standard wide pulse deviation und...

Page 205: ...ab Figure 5 21 Metering Screen Window 3 Select the Power Supply tab 5 10 3 Verifying Receiver Performance Digital Operation When and where to use Use this procedure to verify receiver performance by measuring the Bit Error Rate BER and RSSI for digital operation Procedure Steps 1 Connect to the transceiver module in CSS through an Ethernet connection See 4 4 4 Connecting Through an Ethernet Port L...

Page 206: ...y c Set the RF level an initial value of 50 dBm 6 Set up the test in CSS a If the base radio is not already in service mode click Change to Service Mode Step result A confirmation dialog box appears b Click OK Step result The base radio begins a reset sequence to change modes which takes a few minutes c After the base radio resets re open the Test and Measurement Screen as described in step 2 d Se...

Page 207: ...ange the RF level and read the BER and RSSI again at the level appropriate for the base radio The value should be less than 5 See 1 9 GTR 8000 Base Radio GPW 8000 Receiver Specifications page 1 12 for the appropriate value d Key the transmitter in the base radio and readjust the generator output level until 5 BER is indicated on the service monitor Record this level Step result Less than 1 dB of d...

Page 208: ...ice mode click Change to Service Mode Step result A confirmation dialog box appears b Click OK Step result The base radio begins a reset sequence to change modes which takes a few minutes c After the base radio resets re open the Alignment Screen as described in step 2 4 Select the Carrier Squelch Alignment tab 5 Make the following connections to the base radio a Disconnect the BNC antenna cable o...

Page 209: ... 9 GTR 8000 Base Radio GPW 8000 Receiver Specifications page 1 12 for the appropriate value a Key the transmitter in the base radio and readjust the generator output level until 12 dB SINAD is indicated on the service monitor Record this level Step result Less than 1 dB of degradation should occur due to the transmitters being keyed b Dekey the transmitter 12 Click Stop SINAD measurement to stop t...

Page 210: ...icating tests progress After a few seconds the test concludes with a pass or fail message 5 Click OK 6 If no further testing is needed click Change to Normal Mode to return the base radio to normal operation 5 10 6 Monitoring the Transmitter Metering Points Procedure Steps 1 Connect to the base radio in CSS through an Ethernet connection See 4 4 4 Connecting Through an Ethernet Port Link page 4 11...

Page 211: ...Digital Operation When and where to use Use this procedure to test the transmitter signaling patterns and verify the base radio transmitter meets the ASTRO 25 system standards by forcing the base radio to transmit a V 52 standard test pattern Procedure Steps 1 Connect to the base radios transceiver module in CSS through an Ethernet connection See 4 4 4 Connecting Through an Ethernet Port Link page...

Page 212: ...to 20 dB Click DEMOD and set to P25 Click IF BW and set to 12 5 kHz Click RF GEN to turn OFF the Signal Generator Output d Click Options Enable and make the following selections in the Spectrum Analyzer EVM Data Power Meter and Modulation Plot as follows Expand the Power Meter and set to AR Autorange If necessary change to 0 Press Return Verify that Cable Loss is 0 If cable loss is anticipated exp...

Page 213: ...TGID and SID readings from the P25 Uplink Data in the Options menu for use in digital Receiver Testing 10 Click Stop Pattern Transmission to turn off the test tone 11 Disconnect the service monitor and reconnect the transmit antenna 12 If no further testing is needed click Change to Normal Mode to return the base radio to normal operation 5 10 8 Verifying Transmitter Performance Analog Operation W...

Page 214: ...io a Remove the N Type connector from the Transmitter Antenna Port b Connect an N to N cable from the Transmitter Antenna Port to the T R port of the service monitor c Make the following settings on the service analyzer Configure the service monitor for Analog Duplex Enter the frequency to match that of the base radio TX channel selected Click INPUT PORT and set to T R Click ATTEN and set to 20 dB...

Page 215: ...rvice Monitor 7 Click Stop Pattern Transmission to turn off the test tone 8 Disconnect the service monitor and reconnect the transmit antenna 9 If no further testing is needed click Change to Normal Mode to return the base radio to normal operation 5 11 Testing the GTR 8000 Base Radio Performance with a Service Monitor for HPD The HPD Service Monitor is a diagnostic tool that may be used with an H...

Page 216: ...thod HPD page 5 57 For additional information about using the service monitor see the HPD Service Monitor manual or online help accessed through the Help button on the front of the service monitor 5 11 1 Setting Up the HPD Service Monitor for Testing the Base Radio Procedure Steps 1 Plug a power cable into the AC port at the rear of the service monitor 2 Connect a USB mouse to one of the two USB p...

Page 217: ... Step result A confirmation dialog box appears 7 Click OK Step result The base radio goes through a reset sequence to change modes This takes a few seconds 8 After the station resets re open the Test and Measurement Screen as described in step 5 9 If measuring the base radios transmit signal connect the Tx connector at the rear of the base radio to the T R Transmit Receive port on the front of the...

Page 218: ... monitor twice Wait for approximately 1 second or more before pressing the UTILS button the second time Step result The Utility Menu screen appears 2 Select User Calibration from the drop down menu Step result The User Calibration screen appears 3 Click the Run User Calibration button located at the upper right corner of the User Calibration screen The default user calibration setting is 1 0 dB Th...

Page 219: ...nitor for Testing the Base Radio page 5 46 2 Configure the service monitor T R port to receive transmissions from the base radio as follows Click the T R soft key under RF In on the right side of the screen 3 Maximize the RF Control Settings window by clicking the upper left corner of the window Figure 5 25 HPD Service Monitor RF Control Settings Window Aeroflex 3900 Series Service Monitor 6871022...

Page 220: ...lot Sync Code PSC in the upper right quadrant of the RF Control Settings window 6 Make the following selections in the Receive Expected quadrant of the RF Control Settings window a Select Manual from the drop down list for Receive Mode b Select Outbound from the drop down list for Burst Type c Select 16 QAM from the drop down list for Modulation d Select Free Run from the drop down list for Sync M...

Page 221: ...screen as follows A panel of soft keys displays on the right side of the screen including two Reset keys a Click the Rx Meter subscreen Step result A panel of soft keys displays on the right side of the screen including two Reset keys b Click the Reset Acquire soft key on the right side of the screen This re synchronizes the test set with the incoming signal c Click the Reset Meters soft key on th...

Page 222: ...0 above rated value 12 Note the value that displays in the Freq Error field Tolerance should be 50 Hz 13 Note the value that displays in the EVM avg field The value should be less than or equal to 10 14 If no further testing is needed click Change to Normal Mode to return the base radio to normal operation 5 11 4 Measuring HPD BR Rx Sensitivity and Rx BER When and where to use Follow this procedur...

Page 223: ...lows a Click the ON soft key under RF Gen b Click the GEN soft key under RF Out c Click the ENABLE soft key under Transmit 3 Maximize the RF Control Settings window by clicking the upper left corner of the window Step result All of the RF Control Settings fields display Figure 5 28 HPD Service Monitor RF Control Settings Window Aeroflex 3900 Series Service Monitor 6871022P86 A November 2012 5 53 ...

Page 224: ...e entered should be within the Frequency Range specification for the HPD base radio configuration being tested See 1 9 GTR 8000 Base Radio GPW 8000 Receiver Specifications page 1 12 b Click the RF Gen Level field and enter a dBm value depending on the length of cable between the service monitor and the base radio The value entered should match the Receive Sensitivity 1 BER specifications for your ...

Page 225: ... and Measurement screen to display received BER through Configuration Service Software CSS as follows a Click Change to Service Mode This keys up the base radio in service mode b Re open the Test and Measurement Screen c Select a pattern that matches the Modulation Type selection for the RF Control Settings in the service monitor To match the QPSK Modulation Type on the service monitor screen sele...

Page 226: ...er lower values in the RF Gen Level field until 1 BER is displayed on the CSS Test and Measurement screen Compare the value in the RF Gen Level field to the Receive Sensitivity 1 BER specifications for your HPD base radio configuration See 1 9 GTR 8000 Base Radio GPW 8000 Receiver Specifications page 1 12 Be sure to take cable and splitter loss into account 13 Enter 70 dBm in the RF Gen Level fiel...

Page 227: ...Method HPD When and where to use Use this procedure to check the receiver sensitivity for the station without any test equipment The receiver uses a factory calibrated low level noise source at the receiver input to check performance This procedure can be performed remotely 6871022P86 A November 2012 5 57 ...

Page 228: ...Mode Step result A confirmation dialog box appears b Click OK Step result The base radio begins a reset sequence to change modes which takes a few minutes c After the base radio resets re open the Test and Measurement Screen as described in step 2 4 Select Start Receiver Test Step result A confirmation dialog box appears indicating tests progress After a few seconds the test concludes with a pass ...

Page 229: ...rnal filtering devices periodically If dust has accumulated on the fan grills cleaning of the fan grills is recommended When cleaning care should be taken to prevent dust from being pulled into the modules It is recommended that a damp cloth be used to wipe the front of the fan grills When removing the power supply make sure that the unit is turned off before proceeding 6 2 Aligning the Internal F...

Page 230: ......

Page 231: ... This isolated mode is reported in the Unified Event Manager If the base radio becomes operational again and receives the status packets from the comparator it again replies with a channel status message The base radio returns to the idle state and is ready for an assignment from the comparator Extended Control Channel For IP simulcast subsystems with 16 to 32 subsite capacity the Transport Networ...

Page 232: ... During initialization the base radio powers up into the standby receiving state and is enabled for service The base radio listens for any received transmissions After the base radio has received a transmission it can then key up and transmit The GPW 8000 Receiver does not transmit 7 3 1 Packet Data interactions with Multiple NAC s If a base radio supports multiple NAC s such as when using the com...

Page 233: ... Carrier message to UEM Invalid Network Access Code NAC OR Carrier activity without NAC If the RF Threshold Value level is exceeded the Malfunction Timer Value is activated After the timer expires the base radio enters the Illegal Carrier state and the base radio generates an Illegal Carrier message to UEM If the illegal carrier disappears or drops below the RF Threshold Value for 12 5 but not les...

Page 234: ......

Page 235: ... and UEM See the Troubleshooting chapter in the Authentication Services manual 5 Verify that the physical cabling is firmly connected and in good condition Check for any sharp bends or kinks in cabling Test suspected cabling for noise continuity attenuation and crosstalk Replace the cabling if necessary 6 Run ping traceroute pathping and other network administration commands to identify any link o...

Page 236: ... local event log which is retrievable through the configuration interface 2 If connected to centralized fault management equipment optional then the base radio transmits an alarm indication to the fault manager to alert the system administrator of the failure 3 A local visual indication is active due to this failure Recovery of the link failure results in a similar set of actions to indicate that ...

Page 237: ...ch is retrievable through the configuration interface 2 If connected to centralized fault management equipment optional then the base radio transmits an alarm indication of warning severity to the fault manager to alert the system administrator of the failure The alarm will be associated with the base radios control module 3 The base radio provides a local visual indication associated with the fai...

Page 238: ...se Radio Support page 3 36 for testing system performance 8 2 1 Using Unified Event Manager to Monitor Links and Components Use Unified Event Manager UEM to monitor critical links and components in the system Monitoring may take place remotely from a central operations center Two types of monitoring include Real time monitoring of UEM Topology Maps which alert you of faults as they occur Evaluatio...

Page 239: ...ase radio is offline Enabled Requests that the base radio enter the enabled mode and handle traffic 8 2 2 MOSCAD Network Fault Management If MOSCAD Network Fault Management NFM equipment is supported at the site additional status and alarm information for a device can be viewed through the MOSCAD NFM Figure 8 1 MOSCAD Network Fault Management When an alarm condition occurs the alarm box for one of...

Page 240: ...ooting information that can be escalated to Motorola for evaluation 8 2 4 1 Alarm Log from Internal Diagnostic Tests The base radio has been designed with internal diagnostic tests that occur on power up and reset Diagnostic tests are available for the control module and power supply If a problem occurs during operation it is reported as an alarm All alarms are stored in the Alarm Log accessible w...

Page 241: ...ilable the MSUs attempt to register at another site For HPD operation the base radio receives external frequency reference and network time synchronization from the active site controller over the Ethernet link In the event of loss of the external time and frequency reference source the base radio continues to maintain its own time and frequency stability to continue operations for a specified amo...

Page 242: ...stem ID number Location of the system Date the system was put into service Software and firmware versions Symptom or observation of the problem such as When did it first appear Can it be reproduced Are there any other circumstances contributing to the problem for example loss of power Maintenance action preceding the problem such as Upgrade of software or equipment Changes to hardware or software ...

Page 243: ...Motorola System Service Subcontractor Assessment program ensures that service people contracted by Motorola meet strict minimum requirements before they can work on any system For more information on this program contact the Motorola representative 6871022P86 A November 2012 8 9 ...

Page 244: ......

Page 245: ...te the part number on the cable itself before contacting Motorola Support See 8 5 Using Motorola System Support Center SSC page 8 8 To guard against personal injury and or damage to equipment switch a trunked base radio to Service Mode when performing service The GTR 8000 Base Radio periodically keys up to pseudo train its linear transmitter autonomously when it is not assigned by the zone control...

Page 246: ...ncy Fan Module DLN6804A 9 3 Replacing the Fan Assembly page 9 10 AC 48V DC Power Supply DLN6568B 0182516W12 or DLN6781A 0182516W14 Power Efficiency AC 48V DC Power Supply DLN6793A 9 4 Replacing a Power Supply page 9 13 Power Supply Fan Module 5985167Y02 9 5 Replacing a Power Supply Fan page 9 15 Mid Power Power Amplifier Module 700 800 MHz DLN6567A Mid Power Power Amplifier Module UHF R1 380435 MH...

Page 247: ... Post Filter 700 MHz 9184680Y01 Transmit Post Filter 800 MHz 9184680Y02 9 9 Replacing Transmit Filters 700 800 MHz page 9 28 External Dual Circulator Tray DLN1317A External Dual Circulator Tray UHF 380 435 CLE6203A 9 10 Replacing the Dual Circulator Isolator Modules page 9 30 Duplexer 700 MHz 9184718Y01 Duplexer 800 MHz 9184718Y02 9 11 Replacing a Duplexer 700 800 MHz page 9 35 Duplexer UHF 380403...

Page 248: ...Dual Circulator Isolator Modules page 9 30 Table 9 4 GTR 8000 Base Radio Cables Component Type Part Number System Connector Cable SCSI2 Base Radio to Champ 30009301004 Antenna Relay Control Cable 3084848Y01 Antenna Relay Mini UHF Cable 3085664Y04 Antenna Relay QMA Cable 3085664Y05 Antenna Relay BNC Cable 3013943J08 Antenna Relay 75 CM Cable 3013942M23 Antenna Relay 32 CM Cable 3013942M11 Antenna R...

Page 249: ...rm a Pull All procedure see the Unified Network Configurator manual This step may not be possible if communication is severed between the transceiver and the UNC or if the transceiver is within a K1 K2 or non networked site If this scenario exists perform any one of the following Use the last known good configuration files from the UNC Extract the configuration files from the transceiver directly ...

Page 250: ...m does not attribute the loss of channel to a failure Disable the base radio as follows It is not necessary to turn off the power supply for the transceiver module being replaced as the modules are designed to be swapped out with the power on If you choose to turn off the power set the rocker switch on the front of the associated power supply to the Off 0 position a Select Service Test Measurement...

Page 251: ...t of the associated power supply to the On 1 position 16 Connect to the devices DB 9 serial service port using Configuration Service Software CSS See 4 4 2 Connecting Through a Serial Port Link page 4 4 17 Set the IP Address and BR_CM Pairing Number for the device See 4 4 3 1 Setting the Device IP Address and Pairing Number Using CSS page 4 7 18 Set the Serial Security Services Using CSS See 4 4 3...

Page 252: ...Component Operations Import Fileset from the menu Step result The Import a Fileset Into the Software Depot dialog box appears c Click Browse and search for the swdlv3 cfg file on the CD Click Open d Click Generate to add the file to the Components In the Software Depot list Click OK e Exit the Software Depot File Manager f From Software Download select the appropriate ASTRO 25 system Site Type and...

Page 253: ...iguration To Device from the menu Click OK Step result The configuration from the file you selected is loaded into the base radio Communication with the base radio is not available until the reset is complete 30 For a trunked base radio enable the base radio as follows a Select Service Test Measurement Screen from the menu b Click Change to Normal Mode Step result The base radio is enabled 31 Disc...

Page 254: ...See the Unified Event Manager manual 38 Verify the transceiver module is operating properly The Status LED on the front of the transceiver is green Proper operation is confirmed using software tools such as UEM and the Transmitter Metering Screen in Configuration Service Software CSS 9 3 Replacing the Fan Assembly To prevent overheating this fan must be in place at all times except during servicin...

Page 255: ...a verified good ground This strap must be worn throughout this procedure to prevent ESD damage to any components 2 Using a T20 bit loosen the three captive screws on the front of the fan assembly so they disengage from the chassis 3 Using the handle on one end and the edge on the other side gently pull the fan assembly straight out to disengage the connector 6871022P86 A November 2012 9 11 ...

Page 256: ...ace each connector end into the individual pockets of the rubber retainer The DLN6804A fan module can also be used in a non power efficiency package configuration However the fan module must be configured for dual fan operation 5 Using the guide pins and the connector on the back of the new fan assembly push the fan assembly into place until it feels secure 6 Tighten the three captive screws Torqu...

Page 257: ...ply is inserted and turned ON It is recommended that you disable the channel before replacing the module so that the system does not attribute the loss of channel to a failure You can disable a channel using Unified Event Manager or the Configuration Service Software CSS The Power Supply module contains dangerous voltages which can cause electrical shock to people or damage to equipment 9 4 1 How ...

Page 258: ...pply so that they disengage from the chassis It is recommend to let the power supply module cool before performing the following step which exposes surfaces of the module that can be extremely hot 5 Pull on the metal handle to disengage the power supply from the backplane and remove it completely from the chassis 6 Slide the replacement power supply into place pushing gently until it seats 7 Tight...

Page 259: ...ss of the associated transmit channel until the replacement power supply is inserted and turned ON It is recommended that you disable the channel before replacing the module so that the system does not attribute the loss of channel to a failure You can disable a channel using both the Unified Event Manager or the Configuration Service Software CSS The Power Supply module contains dangerous voltage...

Page 260: ...it loosen the two captive screws on the front of the power supply module so that they disengage from the chassis It is recommended that you let the power supply module cool before performing the following step which exposes surfaces of the module that can be extremely hot 5 Pull on the metal handle to disengage the power supply from the backplane and remove it completely from the chassis 6 Remove ...

Page 261: ...ply is operating properly The power supply Status LED is green The power supply Alarm LED is off The power supply Fan LED is off and the fan is operating Proper operation is confirmed using software tools such as Unified Event Manager and the Power Supply Metering Screen in Configuration Service Software CSS 16 Enable the base radio as follows a Select Service Test Measurement Screen from the menu...

Page 262: ...Power Amplifier Procedure Steps 1 Wear an electrostatic discharge ESD wrist strap and connect its cable to a verified good ground This strap must be worn throughout this procedure to prevent ESD damage to any components 2 If the base radio is not operational skip to step 5 9 18 6871022P86 A November 2012 ...

Page 263: ...er on If you choose to turn off the power set the rocker switch on the front of the associated power supply to the Off 0 position 5 Remove the fan assembly to gain access to the power amplifier module See 9 3 Replacing the Fan Assembly page 9 10 for instructions on removing the fan assembly The power amplifier module is designed to be swapped out without shutting the power off However you should m...

Page 264: ... along the guiding rails until the RF cable connector can reach the RF connection on the front of the module b Push the RF cables connector on to the module s connector until it snaps securely into place 10 Slide in the replacement power amplifier module until it engages with the backplane A slight push may be needed to engage the module If the power amplifier module stops well before it is engage...

Page 265: ... is the circuit board at the rear of the card cage which connects the power supply transceiver and power amplifier Figure 9 9 shows the metal cover that must be removed to access the backplane See 3 4 5 Connections Rear Integrated Voice and Data page 3 23 and 3 4 6 Connections Rear HPD page 3 26 for the ports and cables that must be disconnected in order to remove the cover Figure 9 9 GTR 8000 Bas...

Page 266: ...plifier which connects through a metal bulkhead to the left of the backplane This does not need to be disconnected However to access the backplane screw behind the metal bulkhead remove the two screws securing the bulkhead to the inner chassis at the left of the backplane using a T20 bit 6 Label then disconnect all cables from the front ports on the transceiver 7 Remove the power supply module fro...

Page 267: ...h the backplane still secured to the chassis as follows a Follow the fan cable with your hand from its connector at the front of the chassis to its connection to the backplane through the card cage section from where the power supply module was removed b Remove the fan cables multi pin connector from the backplane SUGGESTION Squeeze the top and bottom of the connector and pull the connector straig...

Page 268: ... from the front of the chassis with the backplane secured to the chassis as follows a Locate the port in the new backplane for the fan cables multi pin connector b Follow the fan cable with your hand from its connector at the front of the chassis to the connector at the other end of the cable c Push the fan cables multi pin connector with the tab up into the correct location in the backplane Figur...

Page 269: ...le Figure 9 11 EMI Spring Panel Guide Rail Alignment 20 Reinstall the screw into the EMI spring panel tab 21 Slide the transceiver and power amplifier modules into the new backplane A slight push may be needed to engage the modules 22 Reconnect all cables to the front ports on the transceiver if applicable 23 Secure the transceiver and power amplifier modules to the chassis with the two captive sc...

Page 270: ...e power supply rocker switch to On 1 29 Verify that the LEDs indicate the modules you removed and reinstalled are operational The Status LEDs are green The Alarm LEDs are off The power supply Fan LED is off 30 In CSS enable the base radio as follows a Select Service Test Measurement Screen from the menu b Click Change to Normal Mode Step result The channel is enabled 31 Re configure the Security S...

Page 271: ...placing a Preselector Filter 9 8 Replacing a Preselector Filter Figure 9 12 Preselector Filter 700 800 MHz Figure 9 13 Preselector Filter UHF Figure 9 14 Preselector Filter VHF 6871022P86 A November 2012 9 27 ...

Page 272: ...0 bit b Label and disconnect the left and right QMA cables from the front of the preselector 3 Install the preselector to the base radio as follows a Secure the slide rail to the base radio flange using the two screws which were previously removed b Reconnect the left and right QMA cables to the preselector c Tune the preselector See 5 8 Tuning a Preselector page 5 4 4 Verify that the system is op...

Page 273: ... Radio contains dangerous voltages which can cause severe electrical shock or damage to equipment Set the rocker switches on the front of the associated power supplies to the off position before servicing this component in the base radio 9 9 1 How To Replace Transmit Filters 700 800 MHz Procedure Steps 1 Wear an electrostatic discharge ESD wrist strap and connect its cable to a verified good groun...

Page 274: ...you previously removed 7 Re install the transmit filter tray in the rack as follows a Slide the tray in the front of the rack b Using a T30 bit secure the tray to the rack with the two screws you previously removed c Reconnect the Tx input Antenna output and ground cables to the transmit filter 8 Set the rocker switches on the front of the power supplies to the ON 1 position 9 Enable each base rad...

Page 275: ...9 10 Replacing the Dual Circulator Isolator Modules Figure 9 16 External Dual Circulator Isolator Tray 700 800 MHz 6871022P86 A November 2012 9 31 ...

Page 276: ...power supply switches for the affected equipment to the Off 0 position when servicing this component in the system Powering down the base radio causes any affiliated subscribers to relocate to another channel at the site or another channel at an adjacent site It is recommended that you disable the base radios before powering down so that the system does not attribute the loss of channel to a failu...

Page 277: ...r Load temperature cable at the inline connector which disconnects it from the cable leading to the RF Peripherals port on the base radio backplane c Using a T30 bit remove the two screws which secure the tray to the rack d Slide the tray out the front of the rack 5 If Then You are replacing an individual External Dual Circulator Isolator module 1 Label and disconnect the RF input and RF output ca...

Page 278: ...ic Filter module 2 Pull up firmly to release the Low Pass Filter module from the two semi circular clips holding it in place 3 Insert the new Low Pass Filter module into the semi circular clips using the same orientation as the module you are replacing 4 Connect the RF input and RF output cables to the new Low Pass Harmonic Filter module 5 Proceed to Step 6 using the existing tray You are replacin...

Page 279: ...exer Module 700 800 MHz Shock hazard The GTR 8000 Base Radio contains dangerous voltages which can cause electrical shock or damage to equipment Set the power supply switches for the affected equipment to the Off 0 position when servicing this component in the base radio Powering down the base radio causes any affiliated subscribers to relocate to another channel at the site or another channel at ...

Page 280: ...d ground cables from the duplexer b Using a T30 bit remove the two screws which secure the tray to the rack c Slide the tray out the front of the rack 5 Remove the duplexer from the tray by removing the T20 screws that attach it to the tray 6 Install the new duplexer in the tray as follows a Place the new duplexer in the tray in the same location and orientation as the module that you removed b Se...

Page 281: ...ribers to relocate to another channel at the site or another channel at an adjacent site It is recommended to disable the base radio before powering down so that the system does not attribute the loss of a channel to a failure You can disable a base radio using Unified Event Manager or the Configuration Service Software CSS 9 12 1 How To Replace a Duplexer UHF Procedure Steps 1 Wear an electrostat...

Page 282: ...se radio as follows a Label and disconnect the Rx output Tx input antenna output and ground cables from the duplexer b Remove the four screws which secure the duplexer to the rack using T20 bit 5 Install the duplexer to the rack as follows a Secure the duplexer to the rack using the four screws which were previously removed b Reconnect the Rx output Tx input antenna output and ground cables from t...

Page 283: ...t to the Off 0 position when servicing this component in the base radio Powering down the base radio causes any affiliated subscribers to relocate to another channel at the site or another channel at an adjacent site It is recommended to disable the base radio before powering down so the system does not attribute the loss of channel to a failure You can disable a base radio using Unified Event Man...

Page 284: ... a Label and disconnect the Rx output Tx input antenna output and ground cables from the duplexer b Remove the four screws which secure the duplexer to the rack using T20 bit 5 Install the duplexer to the rack as follows a Secure the duplexer to the rack using the four screws which were previously removed b Reconnect the Rx output Tx input antenna output and ground cables from the duplexer 6 Set t...

Page 285: ...rough an Ethernet Port Link page 4 11 b Select Service Test Measurement Screen from the menu c Click Change to Service Mode Step result The base radio is disabled 3 Set the rocker switch on the front of the power supply to the OFF 0 position 4 Remove the antenna relay from the base radio as follows a Mark all cables and remove RX NC position TX NO position Antenna C connection position and power c...

Page 286: ......

Page 287: ...ement If something other than a hardware fault is causing the state Impaired is noted Impaired The device is not fully operational due to internal or external causes Some corrective action must be taken to get back to 100 operation Booting Up The device is not in service due to running of diagnostics or initializing Online Indicates that the device is fully operational The LEDs for the transceiver...

Page 288: ...detected and auto negotiation completed Green ENET SC A external connection to SITE CTRL A on the rear of the chassis Ethernet link active Actively transmitting or receiving data Amber blinking Ethernet link inactive Remote PHY MAC not detected Off Ethernet link established Remote PHY MAC detected and auto negotiation completed Green ENET SC B external connection to SITE CTRL B on the rear of the ...

Page 289: ...ransmitter Inhibited Amber blinking Infrastructure Link Connected V 24 IP and 4 wire V 24 Green Partial Infrastructure Link Established V 24 link established 4 wire link not established Amber Infrastructure Link Disconnected V 24 IP and 4 wire V 24 Green blinking During a normal boot up sequence LEDs 1 through 4 blink from left to right and from right to left continuously for several seconds 10 1 ...

Page 290: ...er blinking Major Hardware Failure Red blinking Critical Hardware Failure Red VSWR Fault Red 10 1 2 Transceiver Option Card Intercom LED The Transceiver Option Card has a single Intercom LED that indicates the intercom function between the ON amber and OFF states Figure 10 2 Transceiver Option Card Intercom LED viewable behind the fan module 10 1 3 Power Amplifier LEDs Figure 10 3 Power Amplifier ...

Page 291: ...ested Output Power Green Green Off Transmitting at Less Than Requested Power Amber Green Red PA Failure Red Off Red Receive Only Off Off Off Transmitter Inhibited Off Green Red blinking 10 1 4 Fan Module LED Figure 10 4 Fan Module Alarm LED lower right corner The fan module has one Fan Alarm LED visible on the lower right corner of its front panel The Alarm is red during Lamp Test for a second or ...

Page 292: ...e front panel In order to interpret its condition observe the color of all the power supply s LEDs For example If the Alarm and Fan LEDs are red and the Status LED is green the condition is Lamp Test If the Alarm LED is red and the Fan and Status LEDs are not lit the condition is Power Supply Failure Table 10 6 Power Supply LEDs Condition Fan Status Alarm Power Off Off Off Off Lamp Test Red Green ...

Page 293: ...nsmit Filter Specifications 700 800 MHz Table 10 7 Transmit Filter Specifications 700 800 MHz Tx Filter Spec Limit 700 800 MHz 800 MHz Typical Notes 762 776 MHz Frequency range 851 870 MHz Insertion loss 0 7 dB 0 3 dB VSWR max 1 5 1 1 12 1 Rx selectivity 35 dB 40 dB Peak instantaneous power 32000 W Passive Intermodulation 135 dBc 2 x 43 dBm Input Connector 7 16 Output Connector 7 16 Power monitor ...

Page 294: ...B 0 7 dB VSWR max 1 5 1 1 3 1 Tx selectivity 15 dB 18 dB Input Connector QMA Output Connector QMA 10 2 3 Preselector Filter Specifications UHF Table 10 9 Preselector Filter Specifications UHF Preselector Spec Limit UHF Typical 380 433MHz 435 470 MHz Tuning range 470 524 MHz Bandwidth 4 MHz Insertion loss 2 dB 1 3 dB VSWR max 1 9 1 1 5 1 Input Connector Mini UHF Output Connector Mini UHF 10 8 68710...

Page 295: ...tput Connector Mini UHF 10 2 5 Duplexer Specifications 700 800 MHz Table 10 11 Duplexer Specifications 700 800 MHz Duplexer Spec Limit 700 800 MHz Typical Notes 762 776 MHz Tx Frequency range 851 870 MHz 792 806 MHz Rx Frequency range 806 825 MHz Insertion loss Tx 1 dB 0 5 dB Insertion loss Rx 1 dB 0 6 dB VSWR max 1 5 1 1 23 1 Rx isolation 80 dB 85 dB Tx isolation 80 dB 85 dB Passive Intermodulati...

Page 296: ...MHz 470 MHz 100 dB 100 dB R T 5 MHz R T 3 MHz Antenna Connector N female Rx Tx Output Connector N Female For 470 MHz R T can be as low as 3 MHz and for 470 MHz R T can be a low as 2 MHz however insertion loss or isolation specs may not be met 10 2 7 Duplexer Specifications VHF Table 10 13 Duplexer Specifications VHF Duplexer Spec Limit VHF Typical Notes 136 146 MHz 144 160 MHz Frequency range 158 ...

Page 297: ...r Specifications 700 800 MHz External Dual Circulator Spec Limit 700 800 MHz Typical Operating Frequency Range 762 870 MHz Insertion Loss 1 6 dB 1 2 dB Input Return Loss 18 dB Reverse Isolation 40 dB 42 dB Power continuous 200 W Harmonic Attenuation 60 dB Intermodulation 2 tone 100 W each 75 dBc Input Connector RF cable with N male Output Connector N female 10 2 9 External Dual Circulator Specific...

Page 298: ...rnal Dual Circulator Specifications VHF External Dual Circulator Spec Limit VHF Typical 136 146 MHz 144 160 MHz Operating Frequency Range 158 174 MHz Insertion Loss 1 6 dB 0 7 dB Input Return Loss 18 dB 25 dB Reverse Isolation 40 dB 50 dB Power continuous 200 W Harmonic Attenuation 10 GHz 50 dB Input Connector RF cable with N male Output Connector N female 10 2 11 Antenna Relay Specifications Tabl...

Page 299: ... 21 0 V min 2 0 V max 430 Ω 10 20 ºC Contact Specifications type actuation pull in time drop out time and remake NC contacts SPDT Failsafe break before make 20 ms max 20 ºC 20 ms max 20 ºC Insertion Loss 0 30 dB max Isolation 70 dB min VSWR Maximum 1 3 1 Temperature Range 30 ºC to 80 ºC Terminations Female N type Input and Output Impedance 50 Ohms 6871022P86 A November 2012 10 13 ...

Page 300: ......

Page 301: ... CSS page 4 15 b Set up the local Password Configuration using the CSS optional See 4 4 5 8 Setting Up the Local Password Configuration Using the CSS page 4 25 4 Complete the configuration of the Information Assurance features using CSS as follows a Change the SNMPv3 configuration and user credentials from CSS See 4 4 5 3 Changing SNMPv3 Configuration and User Credentials Using CSS page 4 15 b Cre...

Page 302: ...f the following procedures Trunked GTR 8000 Base Radios For GTR 8000 Base Radios with PSC 9600 Site Controller 11 2 Performing a Site Download With PSC 9600 Site Controllers page 11 3 For GTR 8000 Base Radios with GCP 8000 Site Controller 11 3 Performing a Site Download With GCP 8000 Site Controllers page 11 5 Conventional GTR 8000 Base Radios See Downloading Software in the Software Download manu...

Page 303: ...ch port may have been disabled due to an unexpected MAC address If so re enable the port on the HP switch 9 Replace the base radio in the UNC See Chapter 4 Replacing a Device in the Unified Network Configurator manual 10 Discover the base radio in the UEM See the Unified Event Manager manual 11 2 Performing a Site Download With PSC 9600 Site Controllers When and where to use The following procedur...

Page 304: ... from the menu Step result The parameters download from the device to the computer When the download is complete the CSS Main window opens 8 Open the Software Download application Make sure to load the correct version of the software There is a possibility of a mismatch in software versions when replacing the transceiver module with an on hand spare If a mismatch in software versions occurs this m...

Page 305: ...GCP 8000 Site Controllers Procedure Steps 1 Connect an Ethernet straight through cable between the Ethernet port on the computer and the Ethernet service port on the site controller The laptop IP address must be set to an address on the subnet of the local site which varies depending on the site and zone numbers See 4 4 4 Connecting Through an Ethernet Port Link page 4 11 If 802 1x services are en...

Page 306: ... only available when the Site ID is between 1 64 h Click Connect Step result The system connects to the specified zone and site i Select Transfer and Install for the Operations Type j Select the Application Type For an HPD site select both HPD Site Controller and HPD Base Radio For a Repeater site select both Repeater Site Controller and Site Repeater For a trunked Simulcast site select Multisite ...

Page 307: ...eceiver Mute option kits are available T2 2R Receiver Mute Option CA01958AA ADD 2 GPW 8000 Receiver Hardware Kit 4 Wire Analog T3 3R Receiver Mute Option CA01959AA ADD 3 GPW 8000 Receiver Hardware Kit 4 Wire Analog T4 4R Receiver Mute Option CA01960AA ADD 4 GPW 8000 Receiver Hardware Kit 4 Wire Analog Tn nR Receiver Mute Option CA01961AA ADD GPW 8000 Receiver Hardware No Splitter Kit 4 Wire Analog...

Page 308: ...d in Table A 1 T2 2R Receiver Mute Option Kit Parts List Figure A 1 T2 2R Receiver Mute Option Kit Wiring Diagram See 3 4 7 1 System Connector Ports Conventional page 3 30 for a detailed description of system connector pinouts See Figure A 3 T4 4R Receiver Mute Configuration for an example of a Receiver Mute configuration However the T2 2R Receiver Mute configuration only has one GPW 8000 Receiver...

Page 309: ... 4 07009370001 BRACKET CHASSIS SUPPORT 2 27009304001 CHASSIS PERIPHERAL 1 40009272002 RELAY COAXIAL 29V 1 5682347B20 BAG FOR SCREWS 1 64009317001 PANEL FRONT 1 0285504U05 CAGE NUT M6 FOR CABINET MTG 4 CLN8788A 0310909C91 SCREW M6 GROUND CABLE TO BUS BAR AND TRAY TO CABINET CAGE NUTS 5 CABLES T2 2R RECEIVER MUTE 1 30009380001 CABLE SAC 1 3013942M23 CBL N N M M 75 CM 1 3013942P19 CBL N N M F PNL 55 ...

Page 310: ...d in Table A 2 T3 3R Receiver Mute Option Kit Parts List Figure A 2 T3 3R Receiver Mute Option Kit Wiring Diagram See 3 4 7 1 System Connector Ports Conventional page 3 30 for a detailed description of system connector pinouts See Figure A 3 T4 4R Receiver Mute Configuration for an example of a Receiver Mute configuration However the T3 3R Receiver Mute configuration only has two GPW 8000 Receiver...

Page 311: ...KET CHASSIS SUPPORT 2 27009304001 CHASSIS PERIPHERAL 1 40009272002 RELAY COAXIAL 29V 1 5682347B20 BAG FOR SCREWS 1 64009317001 PANEL FRONT 1 0285504U05 CAGE NUT M6 FOR CABINET MTG 4 CLN8789A 0310909C91 SCREW M6 GROUND CABLE TO BUS BAR AND TRAY TO CABINET CAGE NUTS 5 CABLES T3 3R RECEIVER MUTE 1 30009380001 CABLE SAC 1 3013942M23 CBL N N M M 75 CM 1 3013942P19 CBL N N M F PNL 55 CM 1 3013943E20 CBL...

Page 312: ...used with a standalone GTR 8000 Base Radio and three GPW 8000 Receiver All option kit hardware and cables required are included in Table A 3 T4 4R Receiver Mute Option Kit Parts List Figure A 3 T4 4R Receiver Mute Configuration Figure A 4 T4 4R Splitter and Antenna Relay Tray A 6 6871022P86 A November 2012 ...

Page 313: ...ion kit outlines the connections for all cables and provides part numbers for each type Figure A 5 T4 4R Receiver Mute Option Kit Wiring Diagram See 3 4 7 1 System Connector Ports Conventional page 3 30 for a detailed description of system connector pinouts 6871022P86 A November 2012 A 7 ...

Page 314: ...PORT 2 27009304001 CHASSIS PERIPHERAL 1 40009272002 RELAY COAXIAL 29V 1 5682347B20 BAG FOR SCREWS 1 64009317001 PANEL FRONT 1 0285504U05 CAGE NUT M6 FOR CABINET MTG 4 CLN8790A 0310909C91 SCREW M6 GROUND CABLE TO BUS BAR AND TRAY TO CABINET CAGE NUTS 5 CABLES T4 4R RECEIVER MUTE 1 30009380001 CABLE SAC 1 3013942M23 CBL N N M M 75 CM 1 3013942P19 CBL N N M F PNL 55 CM 1 3013943E20 CBL N BNC M M 60 C...

Page 315: ... VHF Transmit Tx 0 3 dB typical 0 4 dB maximum 0 3 dB typical 0 4 dB maximum 0 3 dB typical 0 4 dB maximum UHF Rx 4 2 dB typical 4 4 dB maximum 6 3 dB typical 6 5 dB maximum 7 5 dB typical 7 8 dB maximum UHF Rx Port to Port Isolation 28 dB typical 21 dB typical 25 dB typical UHF Tx 0 5 dB typical 0 6 dB maximum 0 5 dB typical 0 6 dB maximum 0 5 dB typical 0 6 dB maximum 800 MHz Rx 5 1 dB typical 5...

Page 316: ...7 1 System Connector Ports Conventional page 3 30 for a detailed description of system connector pinouts The antenna relay is mounted on the backplane of the GTR 8000 Base Radio See 2 3 11 Antenna Relay Module page 2 18 for details The only cable used with the Tn nR Receiver Mute option kit is the control cable All other required option kit hardware is included in Table A 5 Tn nR Receiver Mute Opt...

Page 317: ...rding to the processes and procedures in Chapter 3 GTR 8000 Base Radio Installation See Figure A 3 T4 4R Receiver Mute Configuration for an example of the GTR 8000 Base Radio and GPW 8000 Receivers installed in a rack It is recommended that no spaces be left between the devices in a rack or cabinet installation Leave enough space above the splitter and antenna relay tray to allow room for connecti...

Page 318: ...2R Receiver Mute Option Kit Wiring Diagram for details For a T3 3R Receiver Mute configuration See Figure A 2 T3 3R Receiver Mute Option Kit Wiring Diagram for details For a T4 4R Receiver Mute configuration See Figure A 5 T4 4R Receiver Mute Option Kit Wiring Diagram for details For a Tn nR Receiver Mute configuration See Figure A 6 Tn nR Receiver Mute Option Kit Wiring Diagram for details See Fi...

Page 319: ...configuration for the base radio and receiver s See 4 4 1 Initial Configuration of a Device Using CSS page 4 3 for details 2 Connect to the Ethernet port on the device See 4 4 4 Connecting Through an Ethernet Port Link page 4 11 for details 3 Select File Read Configuration From the Device from the menu 4 Select Hardware Configuration from the navigation pane and set Station Type R to Analog Only W...

Page 320: ...of States and Commands in each table States and Condition Actions Inactions WildCard Table Descrip tion State Value Command Value Command Value 1 In cabinet RPT Input 6 n a In cabinet Repeat ON n a In Cabinet Repeat OFF n a 2 Rx Inhibit Input 7 n a RX INHIBIT n a RX ENABLE n a 3 External PTT Input 5 n a Key from Wideband n a Dekey from Wideband n a 4 RD STAT RX ACT RX Qualifiers Met n a Set Output...

Page 321: ...receivers States and Condition Actions Inactions WildCard Table Descrip tion State Value Command Value Command Value Set Output 1 12 3 Clear Output 1 12 3 Set Output 1 12 4 Clear Output 1 12 4 11 Mute Ext RXs Analog Wireline PTT n a Set Output 1 12 5 Clear Output 1 12 5 9 For a T4 4R configuration click Add and populate the new WildCard table to control channel 4 as follows The description field i...

Page 322: ...tion Kit The CA01957AA T1 2R with Talk Around option kit adds the capability of listening to the output transmit Tx frequency of the base radio when the base radio is not transmitting This allows the console operator to listen to any talk around direct operation A GPW 8000 Receiver is used to monitor the output frequency A standalone T7039A GTR 8000 Base Radio is required One GPW 8000 Receiver mus...

Page 323: ...ing Diagram See 3 4 7 1 System Connector Ports Conventional page 3 30 for a detailed description of system connector pinouts The antenna relay is mounted on the backplane of the GTR 8000 Base Radio See 2 3 11 Antenna Relay Module page 2 18 for details 6871022P86 A November 2012 A 17 ...

Page 324: ...CREW 3 5X30MM ANT RELAY MTG 2 40009272002 RELAY COAXIAL 29V 1 CLN8792A 5682347B20 BAG FOR SCREWS 1 CABLES T1 2R W TALKAROUND 1 3084921Y09 CBL ASSY COAX 55CM N TO QN 1 4285026Y01 CLIP CABLE RETAINER 1 3013943E25 CBL N BNC M M 85CM 1 3084848Y01 CABLE RELAY W TEMP 1 4210217A04 STRAP TIE 184X7 31 NYL BLK 10 5682347B21 BAG PLASTIC 584 X 431 MM 1 DLN6799A CKN6945A SVCWARR12 12 MONTH STANDARD WARRANTY 1 ...

Page 325: ...1 9 dB maximum 800 MHz Tx 1 5 dB typical 1 7 dB maximum A 2 3 Installing the T1 2R with Talk Around Option Kit Procedure Steps 1 Install the standalone GTR 8000 Base Radio GPW 8000 Receiver according to the processes and procedures in Chapter 3 GTR 8000 Base Radio Installation Install a duplexer according to the procedures in Chapter 9 GTR 8000 Base Radio FRU Procedures To guard against personal i...

Page 326: ...ption Card TOC on the transceiver module See 9 3 Replacing the Fan Assembly page 9 10 for details 5 Connect cables to each device according to Figure A 8 T1 2R Talk Around Option Kit Wiring Diagram 6 Replace the fan modules for the base radio and receivers If you chose to turn off the power set the rocker switch on the front of the associated power supply to the On 1 position 7 If the base radio a...

Page 327: ...tellite Receiver 5 Set Antenna Relay R to Enabled Use the default value of 30 msec for the Antenna Relay Delay 6 Select WildCard Tables from the navigation pane and click Set to Default to add default WildCard tables 7 Click Yes to reset the WildCard Tables to their default structure The following default WildCard Tables are created WildCard Table numbers are arbitrary and shown for illustration p...

Page 328: ...ns are selected from the TABLE parameter See Figure A 7 CSS WildCard Tables Example for location of parameter fields 8 Select File Write Configuration To Device from the menu 9 Select Tools Disconnect from the menu to terminate the connection to the device 10 Repeat steps 1 7 for all GPW 8000 Receiver s Only the default WildCard tables are required for the GPW 8000 Receiver s 11 For GPW 8000 Recei...

Page 329: ... the second frequency A standalone T7039A GTR 8000 Base Radio is required for this option kit One GPW 8000 Receiver must be ordered without this option This option kit includes 3 RF transmit receive antenna relays control cables RF cables and mounting hardware The base radio must be ordered with the appropriate duplexer option All option kit hardware and cables required are included in Table A 8 T...

Page 330: ...igure A 10 Triple Antenna Relay Tray The wiring diagram for the T2 2R with Duplexer and Triple Relay option kit outlines the connections for all cables and provides part numbers for each type A 24 6871022P86 A November 2012 ...

Page 331: ...lay Option Kit Figure A 11 T2 2R with Duplexer and Triple Relay Option Kit Wiring Diagram See 3 4 7 1 System Connector Ports Conventional page 3 30 for a detailed description of the system connector pinouts 6871022P86 A November 2012 A 25 ...

Page 332: ...04001 CHASSIS PERIPHERAL 1 40009272002 RELAY COAXIAL 29V 3 5682347B20 BAG FOR SCREWS 1 64009317001 PANEL FRONT 1 0285504U05 CAGE NUT M6 FOR CABINET MTG 4 CLN8793A 0310909C91 SCREW M6 GROUND CABLE TO BUS BAR AND TRAY TO CABINET CAGE NUTS 5 CABLES T2 2R DUPLXR AND TRPL RELAY 1 30009379001 CABLE TRIPLE RELAY 1 3013942M11 CBL N N M M 32 5 CM 2 3013942M23 CBL N N M M 75 CM 1 3013942M29 CBL N N M M 110 ...

Page 333: ... 6 dB typical 2 9 dB maximum 800 MHz Tx 2 9 dB typical 3 3 dB maximum A 3 3 Installing the T2 2R with Duplexer and Triple Relay Option Kit Procedure Steps 1 Install the standalone GTR 8000 Base Radio GPW 8000 Receiver according to the processes and procedures in Chapter 3 GTR 8000 Base Radio Installation Install a duplexer according to the procedures in Chapter 9 GTR 8000 Base Radio FRU Procedures...

Page 334: ...ct cables to each device according to Figure A 11 T2 2R with Duplexer and Triple Relay Option Kit Wiring Diagram 5 Replace the fan modules for the base radio and receivers If you chose to turn off the power set the rocker switch on the front of the associated power supply to the On 1 position 6 If the base radio and receivers are in service mode switch each device to normal mode as follows a Conne...

Page 335: ...eter is not configurable for GPW 8000 Receivers 5 Set Antenna Relay R to Enabled 6 Set Antenna Relay Delay to 80 msec The 80 msec antenna rely delay is required to allow sufficient time for all antenna relays to propagate the transmission signal from the GTR 8000 Base Radio This step is not required for GPW 8000 Receivers 7 Select WildCard Tables from the navigation pane and click Set to Default t...

Page 336: ...unction 1 17 3 Key from Wireline n a n a n a Channel 1 16 3 NULL n a 10 T5 if CH3 Conf TRC Function 1 17 8 Key from Wireline n a n a n a Table configurations are selected from the TABLE parameter See Figure A 7 CSS WildCard Tables Example for location of parameter fields 9 Click Add and populate the new WildCard table as follows States and Condition Actions Inactions Wild Card Ta ble Descrip tion ...

Page 337: ...Value Condi tion State Com mand Value Com mand 13 Dekeyed on Ch Current Channel 1 16 1 AND NOT Station Keyed Clear Output 1 12 7 NULL 12 Select File Write Configuration To Device from the menu 13 Select Tools Disconnect from the menu to terminate the connection to the device 14 Repeat steps 1 8 for all GPW 8000 Receiver s Only the default WildCard tables are required for the GPW 8000 Receiver s 15...

Page 338: ......

Page 339: ...ble B 1 Analog Simulcast Cable Kit Parts List FRU Kit Item Part Number Description Quantity GTR ANALOG 4W E M W SIMULCAST KIT 1 PKG KIT ANLG SIMULCAST CBL ASSY 1 5675232H04 CARTON OUTER BOX 1 5682347B19 BAG PLASTIC 1 5682347B20 BAG PLASTIC 2 CBN6270A 5682347B21 BAG PLASTIC 584 X 431 MM 2 CABLE ANALOG SIMULCAST 1 A 30009398002 ANALOG SIMULCAST CABLE 1 B 07009381001 BRACKET SIMULCAST CABLE MOUNT 1 C...

Page 340: ...bly item A through the system connector opening in the panel item B The T57 Telco connector may be positioned with the d shape keying feature either up or down When using a right angle mating connector verify the orientation needed for proper cable routing before securing to the panel bracket 3 Position the strain relief item C over the T57 Telco connector 4 Using the 2 metric M3 screws item D fas...

Page 341: ...arts List page B 1 for the part numbers of the items called out in this procedure Figure B 2 Analog Simulcast Cable in an Open Rack Configuration 2 Secure each extender bracket item E to the tapped holes on the rack using two M6 item F screws using a Tx30 bit driver Torque to 55 in lbs The extender brackets should be mounted one rack unit above or below the GTR 8000 Base Radio Installation is depe...

Page 342: ... the Transceiver Option Card TOC on the transceiver module 9 3 Replacing the Fan Assembly page 9 10 for details 6 Route the Analog Simulcast Cable over the GTR 8000 Base Radio if the panel was mounted over the base radio Figure B 4 Connected Analog Simulcast Cable GTR 8000 Base Radio Front View 7 Connect the 50 pin connector to the system connector on the TOC 8 Connect the RJ45 wireline connector ...

Page 343: ...ng the Analog Simulcast Cable in a Cabinet Configuration Procedure Steps 1 Use this figure to identify the items used throughout this procedure See B 1 Analog Simulcast Cable Kit Parts List page B 1 for the part numbers of the items called out in this procedure Figure B 6 Analog Simulcast Cable in a Cabinet Configuration 6871022P86 A November 2012 B 5 ...

Page 344: ...embly page 9 10 for details 6 Route the Analog Simulcast Cable over the GTR 8000 Base Radio if the panel was mounted over the base radio See Figure B 4 Connected Analog Simulcast Cable GTR 8000 Base Radio Front View for an example 7 Connect the 50 pin connector to the system connector on the TOC 8 Connect the RJ45 wireline connector to the wireline port on the TOC 9 Replace the fan module on the b...

Page 345: ...4 n a GND I GND 9 25 n a Gen TX I Gen TX Data Analog Signal 600 Ohm Balanced 10 49 n a PL I PL In Analog Signal 600 Ohm Balanced 13 27 n a Aux In 3 I Tx Inhibit Pull To Ground To Activate 15 28 n a Aux In 5 I External PTT Pull To Ground To Activate 16 3 n a Aux In 6 I In Cabinet Repeat Pull To Ground To Activate 17 29 n a Aux In 7 I Rx Inhibit Pull To Ground To Activate 18 39 n a AUX Out Relay 7 N...

Page 346: ...l 600 Ohm Balanced 35 24 n a PL I PL In Analog Signal 600 Ohm Balanced 38 37 n a Aux Out 3 O Low Impedance to Ground When Active 40 38 n a Aux Out 5 O Low Impedance to Ground When Active 43 14 n a Aux Out Relay 7 Com O RD STAT Receiver Active Form Relay A Closed When Active 49 7 n a Aux In 11 I Opto Isolated In Current flow to Activate B 8 6871022P86 A November 2012 ...

Reviews: