background image

19- 

Tools


CALCULATOR

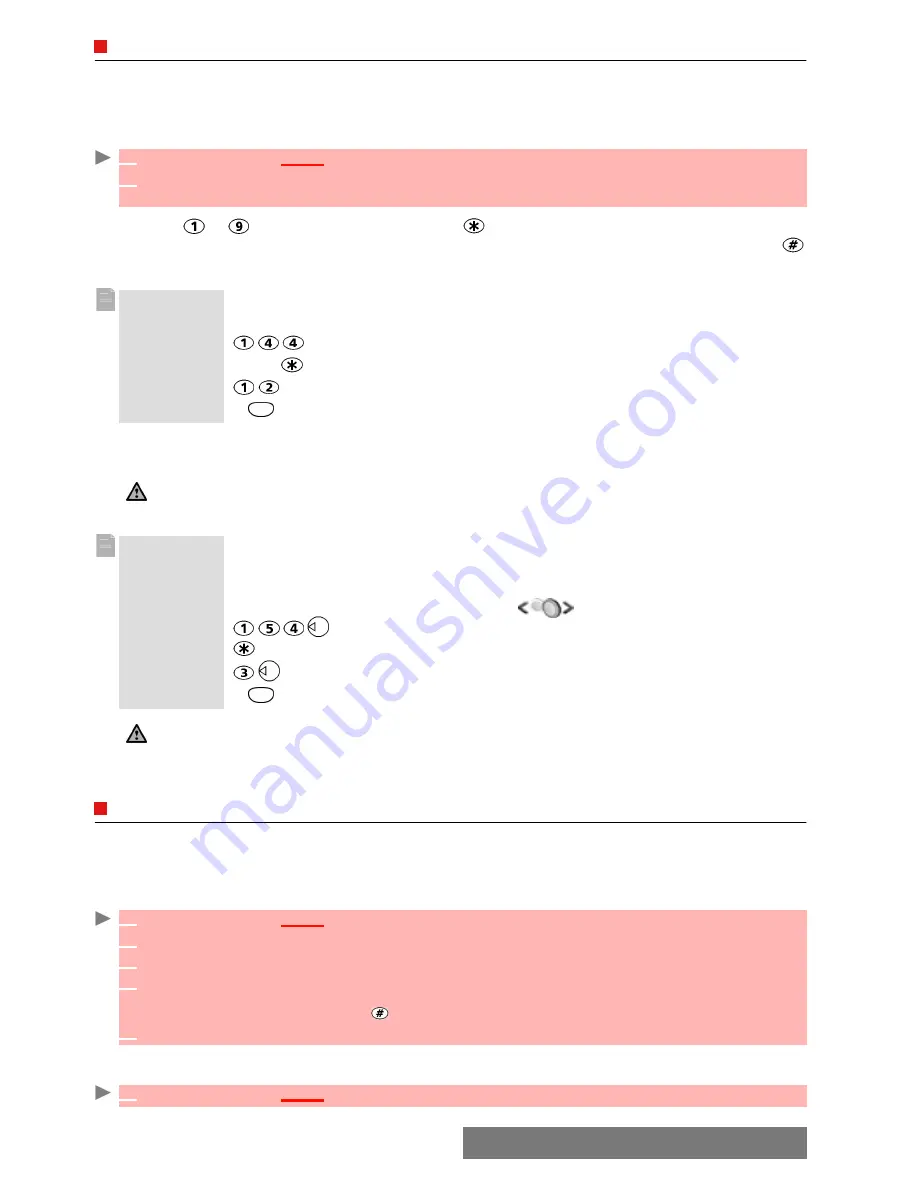
This feature allows simple calculations using + (plus), - (minus), * (multiplication), / (division)

and % (percentage) functions.

If the currency converter is initialised, numbers can be converted during calculations.

To use the calculator

,

Press keys 

 to  to type numbers. Press the  multitap (for further details on the multitap

text entry method please see


"entering text", page 24) to get 

+

-

*

 and 

/

 symbols. Use the 

multitap  to type decimal points or  

%

Press

 Clear

 during a calculation to correct an entry. Press 

=

  to get the operation result. 

Following the above example, pressing 

=

 again calculates 1728 x 12 = 20736

Pressing 

Clear

 deletes the result.

An integrated currency converter facility is also available. See Currency converter underneath.

CURRENCY


CONVERTER

This feature allows currency converting. The currencies and exchange rates have to be entered

befor

e

 use.


The conversion is calculated on the per unit exchange rate of the second se

lected

currency.

To select the currencies and the exchange rate:

To calculate the conversion between the chosen currencies:

  1

Press 

OK

.


Select 

Tools

.

  2

Select 

Calculator

 .

The phone is ready to perform simple calculations.

Example

144 x 12 = 1728

key sequence

display


144

Press


 3x  

*


12

1728

The % function can only be used (entered) as the last operator during a calculation. 

e.g.250 - 10% = 225

Example

using the currency converter 

£ - 

:

154 + 

3 = £ 97.1374

key sequence

display

Select 

Curr. 


95.2813


+


1.8561

=


97.1374

1. This example was made on the basis of the following exchange rate: 

1 = £0.61871

2. The Currency converter feature can be reached from the Calculator and from the Currency converter sub-

menus.

  1

Press 

OK

.


Select 

Tools

.

  2

Select 

Currency converter

.

  3

Select 

Settings

.

  4

Enter the first currency name (e.g. Yen). Press 

OK

.

Enter the second currency name (e.g. Dollar). Press 

OK

.

Enter the exchange rate using  to enter a decimal point.

  5

Press 

OK

 to validate the entry. Press 

Save 

 to confirm data storage.

  1

Press 

OK

.


Select 

Tools

.

Summary of Contents for M720

Page 1: ...rt has been made to ensure the accuracy of the instructions contained in this guide Melco Mobile Communications Europe S A reserves the right to make improvements and changes to the product de scribed in this guide and or to the guide itself without prior notice Melco Mobile Communications Europe S A is a Mitsubishi Group Company English ...

Page 2: ...K _______________________________ 20 INFRARED PORT ______________________________ 20 USING YOUR MOBILE AS A MODEM ________________ 21 PAGE 22 MESSAGES READING A RECEIVED SMS MESSAGE ______________ 22 READING STORED SMS MESSAGES ________________ 22 MOVING MESSAGES TO SIM ______________________ 22 FORWARDING MESSAGES _______________________ 23 ACTIVATING OR DEACTIVATING THE MESSAGE RECEPTION ALERT _...

Page 3: ...____________________ 51 STORING ERASING YOUR PICTURE _________________ 52 SELF TIMER _________________________________ 52 PAGE 53 FUN MEDIA BOX GAMES _____________________________________53 PICTURES ___________________________________53 MELODIES ___________________________________55 SPEECH NOTES _______________________________ 56 OTHERS ____________________________________ 57 STORAGE USED ________...

Page 4: ...ur M720 YOUR M720 CLOSED CLAMSHELL External screen Infrared port Side key Short press reject a call Long press start camera preview Power connector Camera lens Earpiece PC cable connector Headset connector ...

Page 5: ...t press quick ac cess to Wap Long press Functions list for the softkey Call Send key To dial displayed number or name and answer calls short press Voice recogni tion long press Alphanumeric keys To enter numbers and text Power connector Right softkey Short press quick ac cess to the Messages services Long press Functions list for the softkey NAVIGATION KEY QUICK ACCESS TO Alert mode setting short ...

Page 6: ...6 Your M720 PRELIMINARY OPERATIONS INSERTING AND EXTRACTING THE SIM CARD FITTING THE BATTERY COVER FITTING AND REMOVING THE BATTERY CHARGING THE BATTERY ...

Page 7: ...When receiving a phone call is displayed REJECTING A CALL When receiving a phone call 1 Open the clamshell 2 Press and hold the On Off key A tone sounds upon activation When switching on the mobile for the first time or if the phone was incorrectly switched off may be dis played 3 If your SIM card is PIN protected Enter PIN is displayed Enter the PIN code and select OK 4 If asked enter the date ti...

Page 8: ...ature and the message services by pressing on the softkeys shows your mobile is attached to a GPRS network THE EXTERNAL SCREEN When switched on the mobile searches for a connection with the network When the connection is established a tone sounds and the network and or service provider name or logo are displayed together with the time the signal strength and the bat tery charge level If the mobile...

Page 9: ...The power saver does not prevent any operation You can thus get a call an SMS etc while the power saver is on The symbol is displayed on power saver mode instead of the time when an event new message unanswered call information has occurred on your mobile This symbol is displayed until you read all the new events Pressing any key allows return to an active screen 1 Select Unlock and press or press...

Page 10: ...ey to validate the action above usually Exit Right arrow on cursor key Left arrow on cursor key Up arrow on cursor key Down arrow on cursor key Send and Call key End On and Off key The availability of the Calendar or Network services menu depends on your SIM card Press OK Press the key to select OK middle of the display Press OK select Settings From the standby display press the key to access the ...

Page 11: ...i e data can be received via the infrared port Short message service SMS Is displayed when one or many short messages have been received and not yet read flashes when the SMS message box is full and no new message can be stored SMS availability is network dependent Voice Mail Is displayed when a voice Mail message has been received and stored by the networks Voice Mail centre Voice Mail availabili...

Page 12: ...ndard operating positions with reference to CENELEC standard EN 50361 2000 with the phone transmitting at its highest certified power level in all tested frequency bands3 Although the SAR is determined at the highest certified power level the actual SAR level of the phone while operating can be well below the maximum value This is because the phone is designed to operate at multiple power levels s...

Page 13: ... to driving Do not use a hand held phone while driving If you do not have a hands free car kit stop and park your vehicle safely before using your phone Please ensure you are fully aware of the laws in your country in relation to the use of hand held mobile devices while driving If incorrectly installed in a vehicle the operation of mobile telephones can interfere with the operation of the vehicle...

Page 14: ...etic media The information contained on discs or cards may be affected by the phone Do not connect incompatible products The use of third party equipment or accessories not made or authorised by Mitsubishi Electric invalidates the warranty of your phone and can be a safety risk Do not remove the labels The numbers on it are important for aftersale service and other related purposes Do contact an a...

Page 15: ...e SIM Blocked is then displayed Enter PUK appears PUK AND PUK2 CODES 8 DIGITS Please ask your service provider for your PUK code Use it to unblock a disabled SIM card see page security features page 76 The PUK2 code is required to unblock the PIN2 code see above CALL BARRING PASSWORD 4 DIGITS This password is used to bar various types of calls made or received from the phone see call barring passw...

Page 16: ...ekly or a monthly basis Events can be sent via the Infrared port or by SMS TO ENTER AN EVENT An empty new event card is displayed with the following fields Title to type up to 10 characters Description to type up to 50 characters Starting date and time Ending date and time Alarm Location Repetition TO VIEW TODAY S ENTRIES In the Today view each event is displayed on one line as follows A graphic r...

Page 17: ...ns are available An Options list is available It allows the change of the current View to Create a New event Export the Events in a defined period All events or Delete all events ACTIONS PURPOSE To move down to the next event or loops back to the first one To move up to the previous event or loops to the last one To move to the previous day To move to the next day 1 Press OK Select Tools 2 Select ...

Page 18: ...after a snooze time until it is stopped or up to the beginning ending time and date of the event task STORAGE USED This feature displays the number of Diary registered events and tasks The following actions are available in the Options menu 1 Press OK Select Tools 2 Select Diary 3 Select Tasks list 4 Select New task and enter the required information 5 Enter or select the requested data Confirm ea...

Page 19: ...rsion is calculated on the per unit exchange rate of the second selected currency To select the currencies and the exchange rate To calculate the conversion between the chosen currencies 1 Press OK Select Tools 2 Select Calculator The phone is ready to perform simple calculations Example 144 x 12 1728 key sequence display 144 Press 3x 12 1728 The function can only be used entered as the last opera...

Page 20: ...ING THE INFRARED PORT Opening the infrared port allows to receive information via this port Once opened the infrared port can be used for any kind of transfer data fax file transfer The infrared port is automatically closed after a while To open close the infrared port 2 Select Currency converter 3 Select one of the first two options 4 Enter the amount to be converted Press to insert a decimal poi...

Page 21: ...infrared port 2 Open the other device infrared port 3 Select the card you wish to transfer as explained in section viewing and calling phonebook numbers page 45 4 Select Options Select Send by Infrared port The infrared port is opened and the transfer is then performed 1 Install the PC cable or open the Infrared port on your PC or PDA 2 Install the modem driver 3 Configure the PC according to the ...

Page 22: ...nnot store any other messages Delete messages to allow new messages to be delivered READING STORED SMS MESSAGES Unread messages are shown by the icon bold text Messages that were already read are shown by MOVING MESSAGES TO SIM It is possible to move a message from the Inbox or the Outbox to the SIM memory However according to the message size the message may be truncated the 160 first characters ...

Page 23: ...to 4 more addressees and press OK then Valid to come back to the previous screen 9 Select Options 10 Select Send Store send or Store 11 A warning information displays the number of SMS needed to send the message if it is more than one Select Go on if you want to send the message or select Cancel if you do not want to send it or if you want to amend your message 1 Press OK Select Messages 2 Select ...

Page 24: ...TAP MULTIPRESS METHOD A brief press on a key displays the first character associated with the key and shows the other available characters at the top of the display Here is the list of the available characters the available characters list is language dependent 1 Press OK Select Messages 2 Select SMS 3 Select Settings 4 Select Sending profiles and choose the profile you want to use Select Options ...

Page 25: ...y until is displayed Press briefly three times C is displayed Press until is displayed Press once a is displayed Press three times r is displayed Press once d is displayed The word Card is now displayed 1 Press the key bearing the required letter once only the requested character may not be displayed first 2 The active word changes as you type Type all the word characters up to the end of the word...

Page 26: ...To send SMS from the Menu Example To type card Press OK and select Messages Select Write new Fill in the To field see sending a new sms message page 26 In the Text field press the down arrow key until is displayed Press a appears Press ca appears Press car appears Press case appears If the displayed word is not the one you want press as many times as necessary to view card 1 Press OK Select Messag...

Page 27: ...if you do not want to send it or if you want to amend your message 1 If you have registered an automatic signature the number of characters used is automatically added to the message length 2 Once in the phone number editor Names allows to access the phonebook list to select a name 3 If a name is already stored in the To list pressing OK or one of the 0 to 9 keys again displays an Options list Mod...

Page 28: ...ust be network supported If the status is requested on a delivered message the date and time of delivery may be shown The network then answers by sending a status report SR back to the phone Press OK to acknowledge it 1 Press OK Select Messages 2 Select Parameters 3 Select Voice Mail 4 Select Number Enter the number type it directly or select it from the Names list 5 Press OK to validate 1 The Voi...

Page 29: ...IM card 1 Press OK Select Messages 2 Select SMS 3 Select Settings 4 Select Message config 5 Select Delivery report and select On 6 Select Save 1 Press OK Select Messages 2 Select SMS 3 Select Settings 4 Select Message config 5 Select Reply requested and select On 6 Select Save 1 Press Options Send again Clear Associated message or Delete message is displayed 2 Select the required action 1 Press OK...

Page 30: ...her messages Delete SMS or Multimedia messages to allow new messages to be delivered The notification and the retrieved message are automatically stored in the Inbox Unread messages are shown by and the text is bold Messages that have been already read are shown by Multimedia message notifications are shown by The appearance and the good reception of Multimedia message contents depend on the addre...

Page 31: ...g the message and press OK The Adjust config settings to require a delivery report a read reply report or to add a priority level to your message only apply to the edited message before they are sent The Message config parameters are the default settings see setting multimedia messages characteristics page 34 1 Selecting OK gives direct access to the phonebook 2 Choose one of the displayed names o...

Page 32: ... one of the available pictures from the list and press OK or press Options then Camera to take a new picture The selected image is partly displayed in the picture field 1 You can send any of the Pictures list images unless the file is copyright protected the File protected message is then displayed 2 The No picture item from the Pictures list allows to delete the current page image 3 Too many data...

Page 33: ...aximum Delete page To delete the current page Preview message To view the full message contents 1 The Too many data for message sending message is displayed on image melody speech note and text selection if the size of the selected file exceeds the message sending capacity 2 The validate option is not available when you only have one empty page in your Content field 3 The contents of this Options ...

Page 34: ...ge addresses or the http and https root address or type in the URL address Press OK 8 Select Connection profiles Enter the requested information the GSM connection and GPRS connection fields are linked to the Connection manager and thus allow to pick one from the displayed list see connection manager page 71 Select Save to store the data 9 Select Gateway settings and type in the IP address The sen...

Page 35: ...e message 1 Press OK Select Messages 2 Select Multimedia messages 3 Select Settings 4 Select Auto retrieval 5 Choose the required retrieval mode and press OK 1 The availability of this menu is operator dependent 2 Even if the Auto retrieval mode is On the message is not automatically retrieved if your mobile is on roaming mode or if it cannot attach the network 3 A message can be retrieved automat...

Page 36: ...2 Select e mail 1 Press OK Select Messages 2 Select e mail 3 Select Retrieve e mails to get your new messages 1 Press OK Select Messages 2 Select e mail 3 Select Inbox press Retrieve to get your new messages 1 Press OK Select Messages 2 Select e mail 3 Select Inbox to display the e mails list Select Options and select Retrieve e mails to get your new messages 1 Press OK Select Messages 2 Select e ...

Page 37: ...or Options View to read the message 1 Press OK Select Messages 2 Select e mail 3 Select Write new 4 Highlight the To field Press OK and select one of the available names from the displayed list or select More then type the required e mail address Press Valid 5 Highlight the Subject field Press OK and type in the e mail header text 40 characters maximum Press OK 6 Highlight the Text field Press OK ...

Page 38: ...s mailer login and mailer password Select Save to store the data 1 All the requested parameters can be obtained from your e mail service provider 2 The phone number or access point name the login and the password have to be stored in the Connection Manager see Table page 71 3 A profile name cannot be stored twice If an error message is displayed please also check the profile names in the Connectio...

Page 39: ...t Messages 2 Select e mail 3 Select Drafts and use up or down arrow key to scroll to the required message 4 Press Options to View Delete Delete all Send Modify e mail addresses to store the e mail address contained in the e mail header and Details 1 Once you have sent one of the Draft messages this message is automatically erased from the Drafts folder 2 You can use any of the Draft messages as a ...

Page 40: ... the required option and follow the displayed instructions CALL TIMERS The voice Modem and GPRS call information for Line 1 and Line 2 is stored in the Call timers menu The Details sub menu stores time information on calls made and received via the home network and while roaming national and international networks 1 Press OK Select Calls Times 2 Select Calls log 3 Select Last dial Unanswered calls...

Page 41: ...the call timers default lock code 0000 CALL COSTS MANAGEMENT Some service providers offer an Advice of Charge AoC subscription service which provides information on the last call cost the total calls cost and the remaining balance on your account after you have set a credit limit To display these you first have to set a currency value and to enter an average cost per unit only calls units are disp...

Page 42: ... credit limit 4 Select Edit Enter your PIN 2 code and press OK 5 Enter the credit limit use to type a decimal point for currencies Press OK to validate When a credit limit is set the selection from the Credit limit display is Edit or Set no limit 1 Press OK Select Calls Times 2 Select Call costs 3 Select Show 4 Use up and down arrow keys to display the Last Call and All Calls or show the Remaining...

Page 43: ...con leads to the Pictures list You can thus choose one of the registered images please see pictures page 53 and link it with your phone card Press left arrow to directly get to the phonebook from the standby display 1 Enter the number Select Store 2 Select Phone names 3 The Home number Mobile number Work number or FAX number list is displayed thus allowing to choose a number type 4 Enter the card ...

Page 44: ...g a number selecting Clear once deletes the last character Holding the Clear key deletes the whole number 2 The p pause and _ characters which are accessible by pressing and holding the key when registering a number can be stored as part of numbers 3 You can use _ wild card spaces to store numbers wild card spaces cannot be obtained when registering a number from the standby display When calling a...

Page 45: ...tern has to be attached if several numbers are stored on the card Select Home number Mobile number or Work number if you have registered several numbers on a phonebook card 1 Press the left arrow key to display the phonebook list 2 Scroll down to the card you want to reach 3 Press the call key or select Options then select Call 1 Press OK Select Phonebook 2 Select Read to display the phonebook lis...

Page 46: ...splayed Go over the whole voice registration procedure again 1 Press OK Select Phonebook 2 Select Voice dialling 3 Select List 4 Use the up and down arrow keys to view the requested entry 5 Press Options then select Play back to play the voice pattern To remove voice tag from the voice dialling list select Erase or to create a new voice pattern select Record 1 Press OK Select Phonebook 2 Select Vo...

Page 47: ...ect Save to store your settings 1 Go over the Phone names storage procedure see storing names and telephone numbers page 43 and fill in the Phone names card 2 Scroll down to Groups and select OK 3 Select one of the displayed groups from the list 4 Select Save to store your settings Groups can only be set for the Phone names cards not for the SIM names cards 1 Press OK Select Phonebook 2 Select My ...

Page 48: ...see others page 57 1 Press OK Select Phonebook 2 Select Fixed dialling Select Status 3 Select On or Off Enter the PIN2 number 4 Select OK to validate The Fixed dialling sub menu may not be available on your mobile Please contact your service provider for further details 1 Press OK Select Phonebook 2 Select Fixed Dialling 3 Select View to view the FDN list entries Pressing Options allows to view ca...

Page 49: ...d port page 20 match your phone cards see phone names card page 43 You can take 3 size pictures large VGA 640x480 pixels normal 160x120 pixels or portrait 60x80 pixels MOBILE POSITIONING The use of the camera and the sending forwarding and reproducing of the taken pictures are subject to property and privacy rights Do not take a picture unless authorised OPEN CLAMSHELL CLOSED CLAMSHELL 1 Please ch...

Page 50: ... implies a preview swap to new active screen OPTIONS DESCRIPTION Full view To see the picture on full screen Camera To go back to the preview screen Set as To set the picture as a Main Screen an External a Welcome or a Goodbye screen image Send by To send the picture via the Infrared port by e mail or by MMS Delete To delete the current picture Rename To change the name of the picture Details To g...

Page 51: ...t Options 4 Select Camera 1 From the standby display select Message right softkey or Press OK then select Messages select e mail 2 Select Write new Scroll down to the attached files and press OK 3 Select Picture 4 When in the pictures browser select Options 5 Select Camera If a call is active access to the camera is not allowed 1 Use the left or right arrow keys to select the Large VGA Normal or P...

Page 52: ...ntdown The Self timer function is then automatically set to Off Image resolution Large VGA 640x480 pixels Normal 160x120 pixels Portrait 60x80 pixels Image quality High Normal and Basic Shutter sound 1 2 3 volume level The Shutter sound is a Camera like sound that is played on picture capture 1 Selecting Clear then Yes to erase it 1 Press OK key and then Camera 2 Press Options 3 Select Self timer ...

Page 53: ... following sub menus Catalogue News Settings and Instructions in addition to the available game s name s PICTURES The Pictures sub menu views and pre set stores via the Camera and the Infrared port and downloads images as a Main screen an External a Welcome or a Goodbye screen in order to configure and personalise your mobile screen see display page 67 1 Press OK Select Fun Media box 2 Select Game...

Page 54: ...ntents Move To move the current image to Pictures Album 1 or Album 2 Details To show the name resolution size registering date and protection status of the current file My preferences To sort the stored images by date name size and select a view mode List or Thumbnails to change the Picture browser mode 1 Album 1 and Album 2 are sub folders of the Pictures menu 2 The Album 1 and Album 2 Options li...

Page 55: ...een To be set as an external screen the picture cannot be animated and must not exceed 100kB 1 Select Set as then select Main screen If the image is too big the crop screen is displayed 2 Use the cursor key to move the image up down left or right the availability of the four arrows depends on the image size 3 Select OK Stored is then displayed 1 Open the infrared port see infrared port page 20 and...

Page 56: ...d in the Melodies file If there is no space left you need to choose one or several melody ies to be replaced from the set of melodies melodies associated to a ring feature cannot be deleted Once stored a message is displayed The melody can be played and selected via the Fun Mediabox menu 1 Select Discard The melody is erased and is therefore lost for further installation 1 Press OK Select Fun Medi...

Page 57: ...date and file protection status information 1 The contents of this Options list may vary according to the file type 2 You cannot send any copyright protected file the File protected message is displayed on any attempt to send copyright protected files 1 Select Options left softkey on the information screen when you have received the file 2 Select View 3 The received file is displayed Select Store ...

Page 58: ...t Details to get storage information per file type 3 Use the up and down arrow keys to scroll to the required information type Pictures Melo dies Speech note Others The Fun Media box space is managed as a single folder The Pictures Melodies Others and Speech note files therefore share the same space in the mobile You may not be able to store more files You can for instance remove pictures to free ...

Page 59: ...ur SIM card and appear on the phone menu as they are reachable from the Network serv menu Please contact your service provider for further details Some operators may provide up to two services on the same SIM card The dis played sub menus in the Network serv menu may then be named Applications Services or Information Three kinds of services can be registered in this menu SIM APPLICATION TOOL KIT A...

Page 60: ...elect List to select one of the available home page addresses or the http and https root addresses or type in the url address 7 Select Connection profiles Enter the requested information the GSM connection and GPRS connection fields are linked to the Connection manager and thus allow to pick one from the displayed list see connection manager page 71 Select Save to store the data 8 Select Gateway s...

Page 61: ...oaded If the activated Wap profile is not correctly set or if your subscription does not allow you to reach the selected Wap site the Not available then Connection failure messages are displayed ITEM ACTION Back To go back to the previous page Reload To reload the current Wap page Save To access the Save page Save as bookmark Attachments sub menus Home page To go to and reload the home page Bookma...

Page 62: ...then proposed and may be used Use alternate connection mode is displayed My preferences To configure the browser and allow it to display the pages in full screen mode large medium or small fonts to allow or forbid pictures download and script execution in Wap pages to accept or forbid cookies Push preferences See receiving push messages page 63 The Preferred bearer sub menu may not be available on...

Page 63: ...play with a direct access to the inbox 1 Press the call key to display the options menu 2 Select Bookmarks 3 Select one of the bookmark names to access the required Wap site Selecting OK directly tries to reach the bookmarked page 1 Press OK Select Wap 2 Select Go to site 3 A list allows to freely enter or select Wap sites addresses OPTION ACTION Last page To connect to the latest page accessed wi...

Page 64: ... Accept provisioning see information above about Accept push info To allow forbid or filter messages bearing connection profiles to connect to Wap sites 1 Press OK Select Wap 2 Select Push inbox Summaries of all push messages are displayed according to their reception date and time 3 Press Options then select Read text to display the selected message text in full screen mode OPTIONS PURPOSE Read t...

Page 65: ...col to enable the download of large data Encoding version To display the possible encoding versions Select 1 1 1 2 1 3 or 1 4 Normal port To edit the port address for non secure connections Secure port To edit the port address for secure connections Use download fun To activate or deactivate the use of the OpenwaveTM solution to manage the download of large data Use range To activate or deactivate...

Page 66: ...Silent the icon is displayed on the standby screen 3 If the Alert mode is set to Vibrate Vibrate ring or Vibrate then ring the icon is displayed on the standby screen Main screen and External screen 4 When the phone is connected to either the Desk Top Charger HF kit CLA or AC adaptor the vibrator mode selection is temporarily inhibited and the phone rings instead of vibrating 1 Press OK Select Set...

Page 67: ...y picture or one of the five available background images 4 If My picture is selected select Pictures left softkey and choose one from the available images see pictures page 53 The image may be too large a Crop screen is then displayed see cropping page 55 5 Select Save to store your setting 1 The Urban theme changes twice a day a night screen sets at 7 p m a day screen sets at 7 a m 2 The Meridian...

Page 68: ...screen 4 Select Default or scroll down to My picture Select Pictures left soft key to choose one among the stored images 5 Select Save to store your setting You can also set the Welcome screen from the Pictures menu see setting an image as a main screen an external screen a welcome or a goodbye screen from the pictures folder page 55 1 Press OK Select Settings 2 Select Display 3 Select Goodbye scr...

Page 69: ...ed 1 From the standby screen press and hold to activate the keypad lock 2 Press and hold to de activate the keypad lock 1 Press OK Select Settings 2 Select Keypad 3 Select Any key answer and select On 1 Press OK Select Settings 2 Select Keypad 3 Select Softkeys functions and select left softkey or right softkey 4 The list of functions is displayed Scroll up or down to the required function and pre...

Page 70: ...vailable This feature is useful for the Diary To import or export calendar cards events and tasks timetables have to be set according to Time zones Both clocks are displayed on the same screen The date and time and the city name are displayed for both clocks CLOCK SETTING To set the clocks 2 Select Phone settings 3 Select Auto features 4 Select Auto answer and choose On 5 Select Save to store your...

Page 71: ...lect Settings 2 Select Phone settings 3 Select Time date 4 Select Swap An information message is displayed The secondary clock becomes the origin mobile clock and the origin clock becomes the secondary one 1 Press OK Select Settings 2 Select Phone settings 3 Select Default settings 4 Select Yes FEATURE DEFAULT SETTING Alert Modes Ring Volumes Ring Key Speech Alarm Mid values Backlight Contrast Mid...

Page 72: ...llows to divert incoming calls voice fax or data calls to another number To divert a call 1 Press OK Select Settings 2 Select Connection manager 3 Select Data counters 4 Select GSM counters or GPRS counters to view the connection details bytes or time during connection Then select Details to get the details per connection profile 1 Press OK Select Settings 2 Select Connection manager 3 Select Data...

Page 73: ...ect one of the phonebook entries or Number Enter the number the calls have to be diverted to and select OK A validation message bearing the selected number is displayed 1 If the On no reply option is selected please enter the time limit 5 15 or 30 seconds this also depends on your network after which the feature is valid 2 Call diverting has to be set for both Line 1 and Line 2 Only the selected l...

Page 74: ... and names of the networks in the preferred networks list can be edited and amended Your SIM card may contain a forbidden list of networks which cannot be used To view it or 1 Press OK Select Settings 2 Select GSM Services 3 Select Sending my ID 4 Select My settings 5 Select Preset The phone resets and gets back to its original network setting 1 Press OK Select Settings 2 Select GSM Services 3 Sel...

Page 75: ...ork for manual change if it is on the forbidden list even if it is still listed as a choice 2 You cannot delete a network from the forbidden list This list is automatically updated when the manual network selection is performed 3 If the Manual search was selected before turning the mobile off and if the manually selected network cannot be found when the mobile is next turned on you then have to ma...

Page 76: ...wrong PIN code is entered three times in succession your SIM card is blocked The 8 digit PUK code is then requested to unblock your phone Please contact your service provider to get this code To activate the PIN protection 1 Press OK Select Settings 2 Select GSM Services 3 Select Call barring 4 Scroll up or down to select the barring type to be deactivated Cancel or checked and follow the displaye...

Page 77: ...e trusted certificate is sent by the contacted WAP site to the phone It guarantees the WAP site is authentic and you have the right certificate in your phone If you do not have the right certificate the site identity cannot be checked certificates can then be downloaded from a WAP page To display a certificate 1 Press OK Select Settings 3 Select Security 4 Select PIN change and follow the displaye...

Page 78: ...erent signature codes These codes depend on the service you wish to use contact your service provider for more information on the signature codes Tickets A ticket is a document emitted on purchasing as a proof of the transaction receipt 5 tickets can be stored in the phone memory they are then deleted one after another To go over a transaction and use the security WIM system To view tickets 1 Pres...

Page 79: ...umbers of your operator IP Internet Protocol LCD Liquid Crystal Display MMI Man Machine Interface MMS Multimedia Messaging Service PIN PIN2 Personal Identification Number Supplied by your network service provider PPP Point to Point Protocol PUK PUK2 PIN Unblocking Key Used to unlock PIN and PIN2 Supplied by your network service provider QQVGA Quarter Quarter Video Graphics Array Roaming Rm The abi...

Page 80: ...lock and to turn the keypad lock off Impossible to make or receive a call Check at least one signal strength bar is displayed Try a stronger signal strength area If no network name is displayed check registration and area coverage with your service network provider and check the SIM is correctly inserted Call barring option is on Deactivate it see page 75 Call cost limit is reached see page 41 Sto...

Page 81: ...be impossible to fulfil Check your subscription You tried to activate a GSM service You are requested to check your subscription regarding the related service rights of use access Connection failed Connection with the server cannot be established for one of the following reasons The server is busy Try to connect later The server is down Try to connect later The network is not reachable Check the G...

Page 82: ...PIN code has been entered 3 times PIN2 blocked A wrong PIN2 code has been entered 3 times PUK2 blocked A wrong PUK2 code has been entered 10 times The SIM services protected by the PIN2 code have now been permanently disabled Reaching allowed credit The cost limit is about to be reached The connected call ends automatically when the limit is reached Registration required You have not registered to...

Page 83: ... non compliance with directions for use b installation or removal charges where the product is installed in a vehicle c defects or failures caused by accident misuse improper installation or improper repair by an un authorised repairer alteration or modification neglect failure to use for normal purpose Acts of God water ingress use in adverse environmental conditions humidity or temperature d cos...

Page 84: ...wnloaded melodies 56 Downloading Infrared port 55 E Editing a phonebook card 44 Editing a sim name card 44 Editing a text model 26 e mail Composing an e mail 37 e mail profiles 38 Inbox 36 Outbox 38 39 Preparing your phone 37 Reading 36 Ending a call 8 Entering text 24 Error messages 81 Export 48 External screen 8 53 External screen Main screen and Welcome screen animation 53 F Fixed dialling numb...

Page 85: ...70 Auto answer 70 Auto retry 70 Connection manager 71 Default settings 71 Keypad 68 Main screen 67 My picture 68 Phone settings 69 Security 76 77 Softkey functions 69 Speed dial 69 Time and date 70 71 Tones 66 67 Voice Mail 28 Wap 60 Welcome screen 68 settings 66 Show costs 42 Silent 66 SMS Forward 23 Move to SIM 22 Reading 22 Sending 26 Writing 24 Softkeys functions 69 Solutions 80 81 Speech note...

Page 86: ......

Page 87: ...MQ860C005A01 ...

Reviews: