SECTION 3 - M. FRAME, ADJ. RING, TRAMP REL. & CLRNG JACK ASSY
3-6
MP SERIES CONE CRUSHER TECHNICAL REFERENCE MANUAL
3.3.4 Seal Replacement
The U-shaped seal installed around the gear well
portion of the main frame is normally not subjected
to contact or wear. However, if the seal is damaged
in any way, it is important that it be replaced. The
seal prevents oil leakage and protects the precision
machined surfaces of the gear, pinion, and bearings
from harmful dust infiltration. Replace the seal as
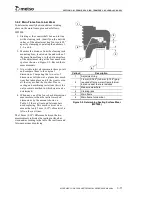
follows (refer to Figure 3-5):
1. Remove the damaged seal and completely
clean out any adhesive that remains in the
seal groove. Use a sharpened chisel or stiff
putty knife to cut through the seal and scrape
the old adhesive out of the groove.
2. Thoroughly clean the groove with an oil free
solvent and allow to dry. Use alcohol or
acetone.
3. The new seal is molded and comes in four
segments, thoroughly clean the bottom and
up each side surface 10 – 15 mm
(0.39 – 0.59") of the seal using coarse sand
paper to remove the surface shine before
cementing the seal in place.
These seals were coated with a mold release
agent which allows the seal to be removed
from their mold during manufacture. In
order for the seal to adhere properly to the
adhesive used to hold the seal in the groove
in the frame, this release agent must be
completely removed.
4. Before gluing the segments into the frame,
first place three of the segments in the
groove as the fourth segment will have to be
trimmed on one end to fit into the remaining
space. Make sure the end of the segment is
cut square to the end of the adjacent segment
to insure a strong bond when gluing the
segments into the frame.
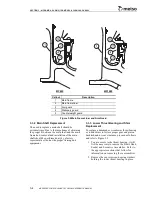
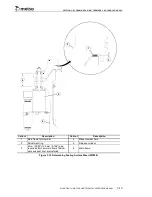
Figure 3-5 Installing Frame U-Seal
5. Apply
activator
in a very thin film to
bottom of seal
. If an excessive amount of
activator is applied, a partially cured bond
may result.
6. Sparingly apply
adhesive to bottom of
groove
. Apply only enough adhesive to
ensure minimal squeeze out.
7. Position the seal into the groove as soon as
possible after adhesive application. Maintain
enough force on the bottom of the seal so
that there is pressure contact between the
seal and the bottom of the groove. A
handling bond is attained in approximately
three minutes.
WARNING
Provide adequate ventilation when using
chemicals and glue when replacing the seal
to prevent inhalation of fumes.
NOTICE
If the mold release agent is not completely
removed, the seal could come loose during
operation.
Callout
Description
1
Apply activator to bottom and sides of
U-seal
2
U-seal
3
Apply adhesive to sides and bottom of
frame seal groove
4
Frame seal groove
5
Main frame
NOTICE
Make sure to also clean the ends of the
segments, then coat one end with activator
and the other end with adhesive.
1
3
5
4
2
Summary of Contents for MP1000
Page 1: ...Nordberg MP Series Cone Crusher ...
Page 2: ......
Page 4: ......
Page 6: ......
Page 8: ......
Page 64: ...SECTION 0 SAFETY 0 56 MP SERIES CONE CRUSHER TECHNICAL REFERENCE MANUAL ...
Page 66: ......
Page 74: ......
Page 154: ...Countershaft and Countershaft Box Callout Description 1 Countershaft 2 Countershaft box 1 2 ...


