background image

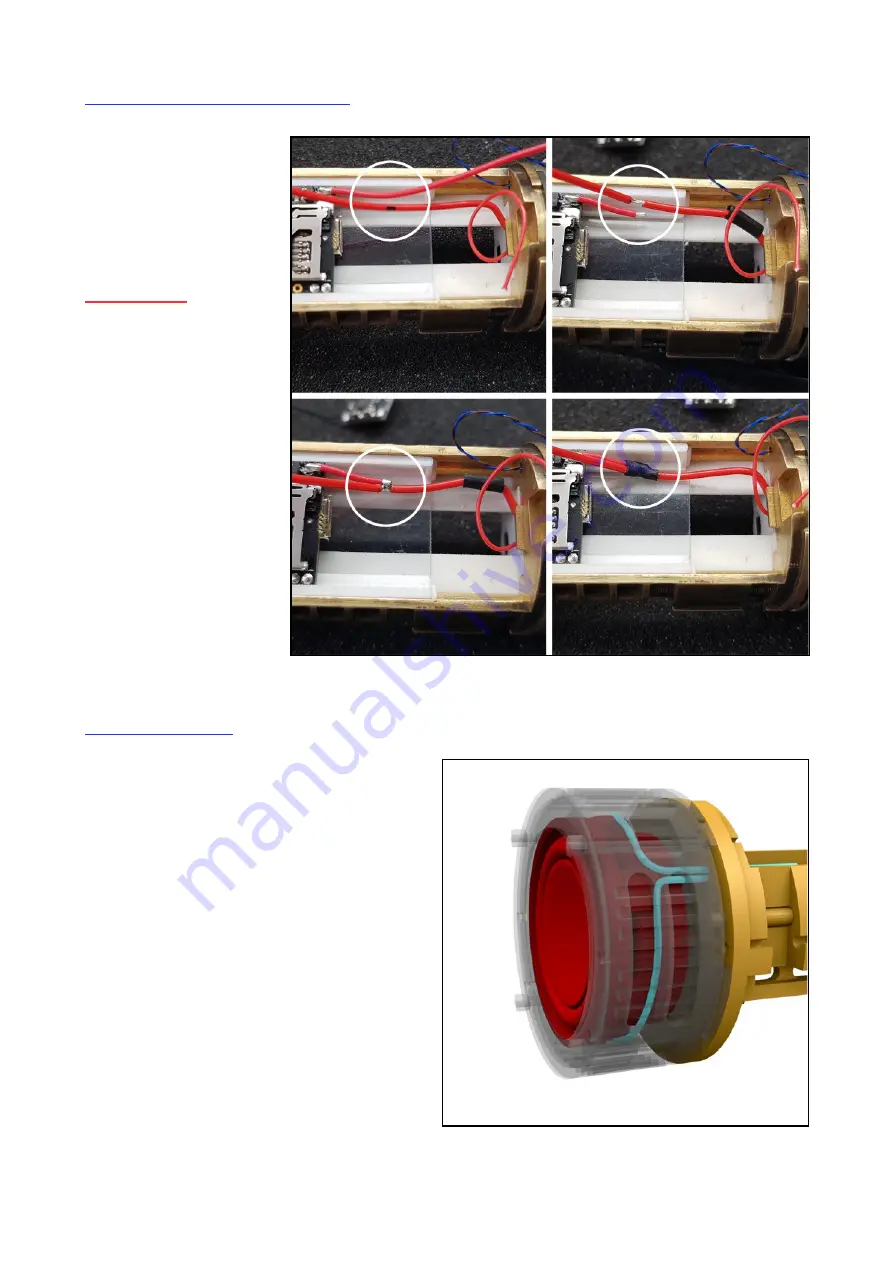
Soundboard - Blade power junction

The 

NeoPixel blade

 will be

powered directly from
battery 

+

.

So, the wire from battery
needs a junction as shown

in the pictures.

Other option:

Most Soundboards have

two Vin(

+

) solder pads.

One on each side.

Use one for Vin(

+

). And

the other one for the Pixel

Blade power wire.

Speaker installation

Solder 

AWG 26 wire

 to a 28mm speaker.

Rout the wires through the hole inside the

speaker chamber.

Push the speaker carefully into the chamber.

Make sure it's rotated correctly! 

Solder joints

pointing up and down

. As shown in the

picture.

Install the inner and outer speaker cover ring.

40

Summary of Contents for Chassis system 3.0

Page 1: ...the electronics and put together all chassis parts This manual does not show how to convert a Graflex Flashgun or setup a soundboard This manual contains the instructions for Metal Master chassis ver...

Page 2: ...paring the surface 15 7 Installation 18 7 1 Electronic wire 18 7 2 Speaker Chamber 19 7 3 Battery contact installation 23 7 4 Battery cover Part07 26 7 5 Charge PCB 27 7 6 Accent LED Pixel 31 7 7 Oled...

Page 3: ...basic chassis parts and add self designed parts and elements to it Especially the crystal chamber and the plasma gate can easily be modified For experienced hobbyists Editing and assembling the indivi...

Page 4: ...w mb sabers com shop 1x M1 2 brass rod https www mb sabers com shop 2x 40mm steel rods 1mm diameter https www mb sabers com shop 4x 95mm steel rods 1mm diameter https www mb sabers com shop 2x brass t...

Page 5: ...09 mm AWG 28 PTFE wire 0 14 mm AWG 26 PTFE wire 0 21 mm AWG 24 PTFE wire 0 32 mm AWG 22 PTFE wire 3mm accent LEDs SMD LEDs 0805 single pixel LED Soundboard https thesaberarmory com USB charging PCB h...

Page 6: ...ial printing Silver Brass Bronze These materials have the best accuracy and usability They can be drilled cut and tapped very easy However most metal parts are also available in steel or nylon plastic...

Page 7: ...ess LED Parts Parts Emitter glass eye adapter Emitter glass eye adapter Emitter add on A short Emitter add on A long Emitter add on B Emitter add on B Emitter add on C short Emitter add on C long Emit...

Page 8: ...art 01 SPG front cast metal Part 01 SPG front steel Part 01 plasma gate 2 0 B Part 01 SPG back cast metal Part 01 SPG back steel Part 01 Plasma Gate 2 0 C Part 01 SPG tube holder Part 01 SPG ring Part...

Page 9: ...er with 5 fins Crystal Chamber with 6 fins Parts Parts Part 02 A Part 02 A Part 02 B Part 02 B Part 02 C crystal holder Part 02 C crystal holder Part 02 D led holder Part 02 D led holder Part 03 Part...

Page 10: ...Metal Master 3 0 plate and spacer Metal Master 3 0 plate and spacer Metal Master 3 0 plate and spacer Metal Master 2 0 3 0 Insulation Metal Master 2 0 3 0 Insulation Metal Master 2 0 3 0 Insulation Me...

Page 11: ...Main Section USB USB B USB C Metal Master 06 Tech USB B Metal Master 06 Tech USB C 11...

Page 12: ...Speaker Section Part 08 Metal Master Speaker Chamber Metal Master 08 speaker cover 12...

Page 13: ...tact Shapeways and reclaim the part They will reprint the part for you Use this text I know the printing process I know it is possible to get a perfect print result with this model It looks like the p...

Page 14: ...ill be removed after the printing process Sometimes Shapeways damages the part Please contact Shapeways and reclaim the bad print Send them the picture of the issue They will reprint this part Use thi...

Page 15: ...Tools power tool and grinding heads diamond files small sandpaper 240 grit 600 grit belt sander 80 grit and 180 grit Precious Metal parts Brass Bronze Silver in general Precious metal material can be...

Page 16: ...ogether For the holes use small 2mm grinding heads with your Dremel and small round hand files Standard Steel material cannot be drilled Always use grinding heads sand paper or a diamond file Steel pa...

Page 17: ...holder fits This area has to be nice and smooth Other areas at the holders must be sanded to make the cover fit on the main part Metal Master 05 Check the fitting first Then decide where and how much...

Page 18: ...the pictures Electronic wire Use PTFE wire PTFE has the smallest profile function AWG mm speaker 26 0 14 single Pixel 30 0 05 Pixel data 30 0 05 battery to Soundboard 24 0 21 battery to Soundboard 22...

Page 19: ...be installed before the speaker chamber is screwed on Speaker Chamber mounting hole tapping Seven holes in the back of Part 05 need 1 2M threads Use a M1 2 tap set of three Drill the holes to 1mm and...

Page 20: ...pacer like shown on the picture Use the rod guides on the chamber to find the correct position Make sure 1mm rods fit and slide easy through the guides notches and holes Preparing the speaker chamber...

Page 21: ...gs The first one is smaller It is placed inside the Part08 It has to be adapted to the inner diameter of Part08 Sand the outside of the ring evenly till it fits into the cover Slide the Part08 over th...

Page 22: ...Install the main plate into Part05 NO glue needed 3 Add the power switch TS01CQE and the slider to the switch holder 4 Install the soundboard holder and the switch holder into Part05 5 Test the slider...

Page 23: ...b by sanding the two red marked faces till it fits into the cut out perfectly Battery contacts Do not remove the shrinking foil insulation from the Battery Everything must be insulated well Battery Th...

Page 24: ...ce and thin Preparing and wiring the battery contacts Both contacts are available at www mb sabers com 1 Flatten the hooks of the spring contact with pliers 2 Remove the T bar of the flat contact 3 So...

Page 25: ...ter the main plate The spring contact just has to be pushed into the slot No glue needed The flat contact must be inserted at an angle of 40 Then push it down to the final position No glue needed Elec...

Page 26: ...cover has a nice fit Steel material has 5 tolerance in any dimension The four spacers must be adjusted in length Battery cover add on installation Add two stripes of double sided adhesive foam tape as...

Page 27: ...the two indicator LEDs on a different position remove them External charging indicator LED position You can add charging indicator LEDs to the chassis cover Part06 There are two different positions po...

Page 28: ...be placed glue it into the Part 06 LED holder or not Wiring the indicator LED to the charge PCB Solder the four AWG 34 LED wires to the pads on the charge PCB as shown on the picture The wires should...

Page 29: ...the wire bridge should be at least 4cm long Add liquid rubber to the solder joints for protection Wiring the USB B port The AWG 34 wires should be twisted For the USB B port the wire bridge should be...

Page 30: ...N IN Wire length USB B red 4 5cm black 3 5cm USB C red 5 5cm black 4 5cm Install the USB port into Part06 TECH Make it fit first Maybe some sanding is needed Then place it into the slot Add some a nee...

Page 31: ...ture Din AWG 30 VCC AWG 28 AWG 30 GND AWG 28 AWG 30 capacitor 100uF resistor 330 Ohm Crystal chamber 5050 RGB Pixel installation Add the wired pixel to both crystal holder The picture shows the positi...

Page 32: ...through the through hole Top cover Part 06 accent LED installation Most Part06 LED holder are designed for 0805 SMD LEDs Glue the LEDs into the indentations and solder AWE 34 wires to the solder pads...

Page 33: ...EDs You can also combine them Oled accent LEDs The Part06 Oled has his own accent LED holder design It s designed for 0805 SMD LEDs It also has slots for 0603 smd resistors for each LED 1 Glue the smd...

Page 34: ...move the display carefully from the board It is held by an double sided adhesive film Remove this film and replace it with a thin double sided adhesive film Be careful with the flat flexible wire 2 Pl...

Page 35: ...e long sides of the Oled PCB 5 Push the Oled display into the frame This is how the attached Oled display and accent LEDs should look like Oled display cover Do not separate the two Oled cover Use one...

Page 36: ...not longer than 31mm This is the steel fin setup with the laser cut fins from mb sabers com It contains seven 0 5mm brass fins 6 threaded spacer and one 1mm steel fin replacing Shapeways Part 02 C Add...

Page 37: ...next pictures show advanced U rod designs Some 2mm diameter tubes were added These U rods can be combined with the fins from the mb sabers com shop Install the U rods together with the fins Add a M2...

Page 38: ...printed tubes add on loose over the tubes Don t glue it on 3 Install the crystal 4 Place Part02 with installed brass tubes over the three threaded main threaded rods 5 Install crystal chamber metal w...

Page 39: ...board position Attach the Soundboard The soundboard is clamped into the soundboard holder In addition a double sided adhesive tape should be attached under the soundboard Battery contact wire position...

Page 40: ...solder pads One on each side Use one for Vin And the other one for the Pixel Blade power wire Speaker installation Solder AWG 26 wire to a 28mm speaker Rout the wires through the hole inside the spea...

Page 41: ...st for Pixel blade sabers The switch has to be modified first As shown on the pictures Remove one pin Shorten the other two pins Shorten the slider Add 5cm AWG 22 PFTP wire to the two pins as shown in...

Page 42: ...PCB in position below the switch holder No glue needed 4 Install the switch holder Guide the wires as shown on the pictures 5 Solder the wires coming from the switch to the Soundboard negative pad and...

Page 43: ...picture on the right The cast metal version does not have supporting sprues After removing the sprues the deluxe details tube holder can be installed Glue them into position Also remove the sprues fro...

Page 44: ...tube with 10mm outer and 7mm inner diameter 3x 35mm steel tubes with 3mm outer diameter and thin wall Link to shop 3x 15mm brass tubes with 4mm outer and 2mm inner diameter Link to shop 3x 40mm steel...

Page 45: ...G is available as steel or cast precious metal version The steel version has two more 3D printed parts On the pictures below are all 3D printed parts listed for both variations I recommend testing and...

Page 46: ...have these design elements already integrated Threaded rod setup very important step Part01 front and Part01 back are connected by three threaded M2 steel rods Each rod gets a metal tube as spacer 4mm...

Page 47: ...y necessary The SPG works also without it All parts will be assembled without glue It is important to carefully sand off the grain on the printed Motor holder surface Check the fitting of the motor an...

Page 48: ...the SPG Assembling the motor section 1 Place the first bearing into the motor holder Important The motor guide in the middle of the motor holder must not protrude beyond the ball bearing Cut it a lit...

Page 49: ...PC tube through the tube holder down to the bearing1 Check the length of the tube and make adjustments if necessary The tube should touch the bearing without pressure Run the motor and make a test Wh...

Page 50: ...t easier to attach the spinning plasma gate when the Part02 and the crystal chamber is safe attached to the main chassis These three spacer are also holding the Part01 SPG spacer between Part01 SPG an...

Page 51: ...ly designed to illuminate the plasma tube with 6 Pixel It is very small 11 7mm diameter The Pixel ring holder is 3D printed Parts Pixel Ring shop LINK Pixel Ring holder shop LINK R1 0603 resistor pad...

Page 52: ...art and the plasma gate main part These holes can be used to install the metal wires There is no general way to add them The picture shows an example IMPORTANT First add the 3 Blade holder 4 40 UNC mo...

Page 53: ...can illuminate the five Emitter vents High brightness LED setup Mount the HB LED directly onto the thick backplate Lead the LED wires through the backplate hole IMPORTANT Only use the aluminum blade...

Page 54: ...ly 3 Install two 1 5mm brass rods into the AUX switch PCB mounting holes Adjust the height They should line up with the switch PCB surface 4 Place both PCBs into their position No glue needed 5 Mount...

Page 55: ...o position 3 Check the fit Maybe some adjustment is required 4 Temporarily replace Add On A with a 10mm x 10mm square wooden stick This is the best way to make sure the parts line up perfectly 5 Clean...

Page 56: ...6 countersunk screw Emitter Add On E Separate both Add On E parts Tip Insert two long 1mm rods into each piece first So that they don t get lost Glue two short 2cm 1mm Brass rods into the designated m...

Page 57: ...wires from the blade holder back plate High power LEDs or NeoPixel connector 2 Attach the back plate to the Emitter and connect the switch wires 3 Install 3x 4 40 UNC 3 4 cylinder head screws into th...

Page 58: ...lder the wires coming from the top cover to the soundboard 2 Place the tech details loose onto Part 05 3 Place the Metal Master Part 06 onto Part 05 Make sure the indicator LED is aligned 4 Install tw...

Page 59: ...would not work that way Then tilt the other end with the positive pole 2 When the battery is horizontal push it in to the final position Installing the Battery cover Part 07 Place the battery cover Pa...

Page 60: ...If you have any questions feel free to contact me info mb Sabers com 60...

Reviews: