


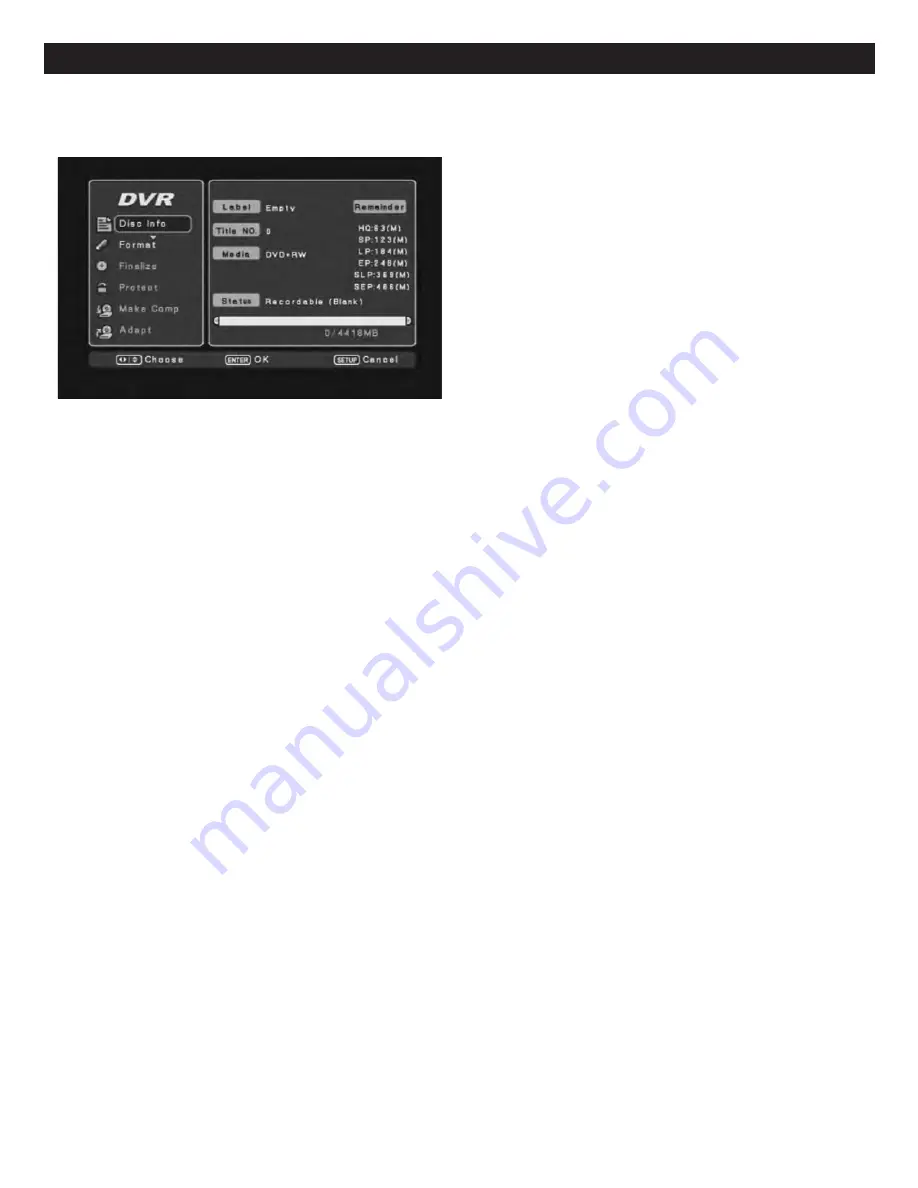
Disc Info:
Choose the Disc Info icon using the Navigation (
π
,
†
)
buttons; the Disc Info menu will appear (as shown left) showing
information regarding the disc.
Format:
Choose the Format icon using the Navigation (
π
,
†
)
buttons. Select OK (to format the disc) or CANCEL using the
Navigation (
√
,
®
) buttons then press the ENTER button. If you
select OK, after several seconds, the disc will be formatted.
Finalize (For DVD+/-R and DVD-RW discs only) or Unfinalize
(For DVD-RW discs only):
For the DVD+/-Rs, they must be
FINALIZED before being used in a standard DVD player. Unlike
DVD+/-RWs, DVD+/-Rs cannot be moved back and forth
between the recorder and standard DVD players. You must finish
all recordings on the disc and finalize the disc before it will be usable on any other player. However, for DVD-RWs, you also need to
finalize the disc before it will be usable on any other player; but, you can unfinalize the disc and edit/record/erase the disc again. To
unfinalize a disc, please see below.
To Finalize the Discs:
Choose the Finalize icon using the Navigation (
π
,
†
) buttons. Select OK (to finalize the disc) or CANCEL
(to NOT finalize the disc) using the Navigation (
√
,
®
) buttons then press the ENTER button. If you select OK, then the unit will
finalize the disc (this will take several seconds).
NOTE:
For DVD+/-Rs, once the disc is finalized, no further recordings/edits can be
made on the disc. For DVD-RWs, if the disc is finalized and you need to record/edit the disc, follow the Unfinalize procedure
described below:
Unfinalize (For DVD-RWs only):
With a finalized DVD-RW disc inserted, press the Disc Oper(ation) button, the Unfinalize option
will be available instead of the option "Finalize". Choose the Unfinalize icon using the Navigation (
π
,
†
) buttons. Select OK (to
unfinalize the disc) or CANCEL (to cancel unfinalizing the disc) using the Navigation (
√
,
®
) buttons then press the ENTER button.
If you select OK, then the unit will unfinalize the disc (this will take several seconds). After you unfinalize the DVD-RW, then the disc
will be editable/recordable again.
Protect/Unprotect Disc:
Choose the Protect Disc icon using the Navigation (
π
,
†
) buttons. Select OK (to confirm) or Cancel using
the Navigation (
√
,
®
) button then press the ENTER button. The unit will automatically protect the disc. Once the disc is protected,
you cannot edit the disc or record on the disc. For DVD+/-RW discs, you cannot erase the disc as well. If you want to edit, erase or
record the disc again, then you need to Unprotect the disc. With a protected disc loaded, enter the DVD Operation menu, choose the
Unprotect Disc icon using the Navigation (
π
,
†
) buttons. Select OK (to confirm) or Cancel using the Navigation (
√
,
®
) button then
press the ENTER button. The unit will automatically unprotect the disc. Once the disc is unprotected, you can edit, record or erase
the disc again.
Make Comp(atible) (for DVD+/-RW discs only):
This function makes your edits–such as hidden chapters–compatible with
standard DVD players. Use this option before distributing any recordings that you have edited to clients or friends. Before a RW
disc is made compatible, all edits will only be visible when the disc is used in this unit. You can use this option multiple times,
moving a RW disc back and forth between the DVD Recorder and a standard DVD player. Each time a disc is edited, it must be
made compatible again. Choose the Make Compatible icon using the Navigation (
√
,
®
,
π
,
†
) buttons. Select OK (to confirm) or
Cancel using the Navigation (
√
,
®
) button then press the ENTER button.
Adapt:
For a DVD-RW or DVD+RW disc, where the disc is recorded with some program by another brand DVD recorder, if the disc
isn't made compatible or finalized, then you can use the ADAPT function to adapt the disc so the disc can continuously record
programs with this unit. Also, you can edit the title and edit the disc. Further, this function will change the DVD+/-RW disc/titles
menu format to the format that this unit uses, so, you can edit the disc or continue to record scenes/titles on the disc.
NOTES:
•
If the DVD+/-RW disc has already been finalized or made compatible on the previous DVD recorder, then, you cannot ADAPT the
disc anymore and you won't be able to select this function inside the DISC OPERATION menu.
•
For this unit, the video recording format is DVD+VR. If the DVD+/-RWs that are recorded by another DVD recorder which is using
a non-DVD+VR video format, such as DVD-Video, DVD-VR, then the discs will not be able to be adapted.
To Adapt the DVD+/-RW, choose the ADAPT icon using the Navigation (
π
,
†
) buttons. Select OK (to adapt the disc) or CANCEL
using the Navigation (
√
,
®
) buttons then press the ENTER button. If you select OK, then the unit will adapt the disc (this will take
several seconds).
DISC OPERATION MENU:
While playing a recordable disc or while in the Stop mode, press the DISC OPER(ATION) button. The list of functions that can be performed
from the Disc Operation menu are shown below:
64
RECORDING (CONTINUED)


